
Likes
Comments
Share


Likes
3
Share


@Wiffz_CBD
Follow
.5tsp of Recharge added to self watering pots. Roughly.5tsp/1.5 gal
I put her in with her clones for the last 13 days.
Working on the time lapse from seed to now.

Likes
3
Share


@Hydroponicfarm7
Follow
Terminamos la 3ª semana de floración. Añadimos hesi pk 13-14 para que exploten los cogollos. Seguimos con la humedad por las nubes, no baja del 60. Seguimos firmes ☄️🔥


Likes
48
Share


@AsNoriu
Follow
Day 57. Statement :
Even with hard beginning - thats my best run ! Zamnesia is AMAZING !!!
With veg hiccups, they still bushout to really nice plants in less than 7 weeks. Now Blue Dream is targeting my roof, Kalini Asias are thick as f@ck. Runtz very dense plants, thought they would be a bit bigger ...
They drink every 36 hours, hard to keep up with work, but i do my best not to screw up with them ;)
This week : feed, water, water. Defoliation too !!!
Day 59. That game - "who will reach sealings" - I don't like !!!!
Moved lights two days ago ... Soon i will need axe for my roof !!! ;)) That Monster Blue Dream is insane !!!
Hope will do heavy defoliation in two days, maybe this will shock her ;))) other plants keep up with her and canopy is even without all three Blue Dreams. Huge plants.
Day 60. Video is showing how less space is left, but they just keep climbing !!! ;))
Day 61. Thinking to defoliate all girls tonight, but maybe i will do it after next watering. Had to reposition them, loads of branches need to be chopped, some didn't see light for last two weeks( Curly, looks like sh$t, will never reach light). Girls are too big for my setup and i really hope it will be enough light and HEIGHT for them...
And so Defoliation has started !!! Hope everything will go fine !!!
All done !!
With the thought " WHAT HAVE I DONE !!!!??????!!!!!" i go to try to fall asleep ;)))
Happy Growing !!!

Likes
11
Share


@Coughy
Follow
Trichs seem to be further along then last grows, I can only assume the extra light and/or higher heat has cause them to finish a bit faster. Right now we are sitting on a majority of 70% cloudy, literally only a couple ambers through out. Wanting to harvest a little earlier this grow, hopefully day 59 or 60. Sooooo, 10-11 more days till chop.
Day 51
Starting a flush, drained and filled with tap water, 2mL/L of flushing agent to help dissolve/bind salts. 3 hour cycle runtime with flushing agent. Drain/fill with high quality ROH2O, pH’d, H202 for disinfection.

Likes
7
Share


@ROY4L_GU4RD
Follow
Day 68 flower. I stopped using the Ripen on day 65. Since then I've been using Florakleen at 2tsp per gallon and RO water only for flush.
Pineapple express is flushing at a faster rate still. I had to brace several colas because of the size so I'm really watching closely for any molding issues. I'm planning to hang her up at day 71ish.
Rainbow cake is turning a little purple. It looks like its almost finished and I'm planning to pull around day 71 as well.
London mint cake is finishing up nicely. I think she's going to need a little more time flushing so she might get pulled a little later than the other 2.
Hope you like my pics and videos!


Likes
20
Share


Likes
3
Share

@HOMEGROWBOOK
Follow
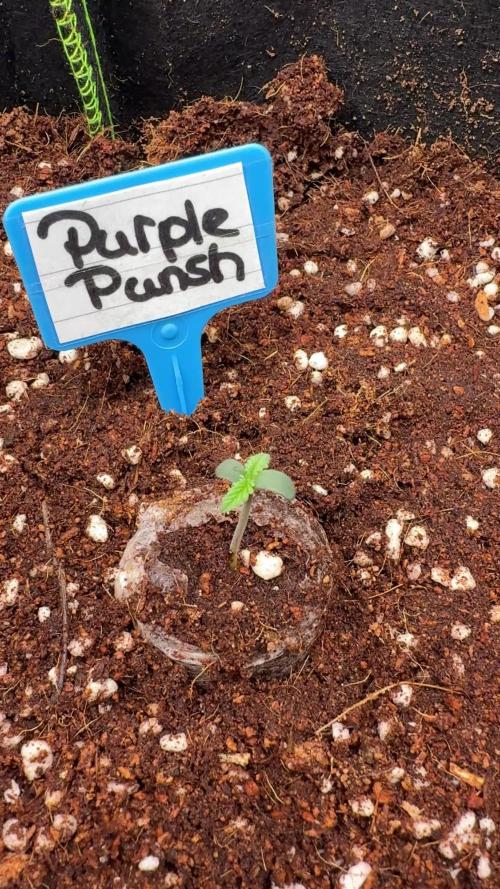
This week marks the very beginning of the Purple Punch run. The seeds successfully germinated and transitioned into their starter plugs, showing healthy early development.
⸻
🌱 Germination Progress
• Seeds sprouted quickly and evenly.
• The first cotyledons opened clean without deformities.
• Early stem structure looks stable, showing no stretching — lighting distance is well balanced.
Day breakdown:
• Day 2: Sprout breaking the surface.
• Day 3: Cotyledons fully open, first tiny true leaves forming.
• Day 4: Seedling transferred to its substrate, standing upright with good color.
⸻
💧 Watering
• Only minimal watering around the root zone.
• Humidity dome kept moisture high to avoid drying of the plugs.
• No nutrients added yet — seedlings rely fully on internal energy reserves.
⸻
🌡️ Environment
• Temperature: ~24–25°C
• Humidity: 70–80% for strong root initiation
• Gentle airflow to prevent damping-off while keeping the young stems stable.
Likes
59
Share


@Ferenc
Follow
Day 51, 4th of November 2020:
The 3rd day since the lamp switched to be 12/12...
I raised up the nutrition intake as it can be seen above only the BioBizz family 2ml/l and removed some LST because the plant remains in shape or just set a bit but nothing significant....
She looks really good and strech is on the way..... Lovely shape 😅
Nothing really to report there is crazy 2-3 weeks from now ;)
;)

Likes
54
Share


@MrJones
Follow
MrJones Cream Mandeiran Auto XL - ViparSpectra XS2000 240W Infrared Full Spectrum LED Grow Light
´🍪⊱╮🍪╰⊰🍪 WEEKLY GOALS 🍪╰⊰´🍪⊱╮🍪
🏡Indoor - 3"x4"x8" Custom Built Grow Closet
🌞Environment - 80F and 60%Humidity - using Humidfyer as needed.
🌾LST and Defoliation - this strain likes to stretch!
🗓️Week 6 Flower
⚱️5-Gallon 📊6.2 PH
💧 Feeding / Using Dr. Earth Dry Organic Amendments - Home Grown & Bud / Bloom Booster
🌞ViparSpectra XS2000 240W x2 Infrared Full Spectrum LED Grow Light
🕷️ IPM - Will be using Green Cleaner" 1 OZ per Gallon, and CannControl from Mammoth alternating between products each month for Integrated Pest Management.
´🍪⊱╮🍪╰⊰🍪 PLANT UPDATES 🍪╰⊰´🍪⊱╮🍪
📝 Notes - Started the week off with a Treatment of Mammoth CannaControl - Looks like the ladies are done with their stretch, time to focus on VPD and Bud Growth, with the ViparSpectra XS-2000's should no problem supplying the light needed, these girls have just blown up!
╰⊰🍪╰⊰´🍪⊱╮🍪╰⊰🍪╰⊰🍪╰⊰´🍪⊱╮🍪╰⊰🍪╰⊰🍪╰⊰🍪⊱╮
🔶Sunday 07.18.21/ Just watering with H20 PH-6.2
🔶Monday 07.19.21/ This run continues to be easy peasie! Just add water!
🔶Tuesday 07.20.21/ Using H20 PH 6.2 / 6.6
🔶Wednesday 07.21.21/ Buds are starting to fatten up starting to get SATINKT! Using H20 PH 6.2 / 6.6
🔶Thursday 07.22.21/ Dr. Earth and Water - Did not think it would come out so nice
🔶Friday 07.23.21/ Just using H20 PH to 5.8/6.2
🔶Saturday 07.24.21/ Just using H20 PH to 5.8/6.2
╰⊰🍪╰⊰´🍪⊱╮🍪╰⊰🍪╰⊰🍪╰⊰´🍪⊱╮🍪╰⊰🍪╰⊰🍪╰⊰🍪⊱╮
Cream Mandarine XL Auto®️ Information
Tall-stemmed auto-flowering strain. This high-yielding 4th generation auto-flowering strain is the resulting hybrid from the cross between selected specimens of our Cream Mandarine Auto®️ (SWS29)) and a Super Tai’98 elite clone.
The genetic coming from the Super Tai’98 elite clone contributes with interesting Sativa characteristics to this hybrid, such as bigger size, but also subtle aromatic and spicy tones with hints of wood and nuts. The so much appreciated Cream Mandarine Auto®️ genetic contributes with traits from the Indica side, such as high flower and resin production, but also sweet and fresh aromas with tones of citric fruits of the mandarin orange type.
DATA SHEET
Variety SWS55
Indica: 35% / Sativa: 63,4% / Ruderalis: 1,6%
THC: 18-23% · CBD: 0,6%
Indoor Yield: 450-650 g/m2
Outdoor Yield: 50-300 g/plant
Indoor/Outdoor Harvest: 9 weeks from germination
Height: 110-150 cm
Likes
Comments
Share


@Cannibalgardens
Follow
I have been doing some lst training and she loves it .. when the sun comes out last few days I bring her outdoors to get some fresh sun light that she stretches for.. This plant had grown very well since day 1 and I can't wait to see how she does into the next few weeks cheers

Processing
Likes
Comments
Share


@TexasJack0418
Follow
Week 5, Day 37 sprout, Day 7 bloom, Watered 1-1/2gal/ea. 5ml/gal Cal/Mag, 10ml/gal Seaweed/Fish extract. Removed some leaves. Day 38 LST. Day 40/10bloom I moved a MarsHydro Pro II Epistar 400W beside the TS-1000 and set both to 14" Installed 2 6" fans above plants to feed air and CO2. Day 41 made 3gal PH 6.3 Worm Tea; 2tbsp Molasses, 1-1/2cup Worm Castings, 1/2cup coffee chaff, 3-packs Green Tea, 4ml/gal Cal/Mag, 10ml/gal Seaweed/Fish extract, 0.5ml/gal Orca. Day41/11bloom watered 1-1/2gal/ea 1275PPM Worm Tea. Re-LST w/outrigger stakes keeping the canopy as close to the pot as possible.

Likes
12
Share


@MicroHidroGrow
Follow
Ya estamos en proceso de formación de la flor. Se ven algunas más grandes que otras. Pero a grandes rasgos estan muy parejas. Me preocupa un poco la cercanía a la luz, dado que estoy en 15cm y cualquier estirón extra, sería una complicación. Vamos a ir viendo como se dan las cosas, pero al momento, no me puedo quejar. Las plantas se ven bien y saludables.
Día 24. Se empieza a notar el engorde. Esperando a que aparezcan las hojas de azúcar, que ya se empiezan a visibilizar las primeras. Voy a ver si puedo conseguir overdrive de advanced para cuando se terminen de formar las flores. Entre tanto solamente tuve un inconveniente de pérdida de agua por una manguera que moví al atar las plantas, pero ya repuse la solución perdida y todo va encaminado. No sé si van a tardar las 6 semanas que dice el catálogo, pero cuanto mucho serán 8. Seguiré actualizando.
Día 26. Las flores empiezan a yomar su forma voluminosa. Estoy en duda sobre si agregar PK la semana próxima o la otra. Quizá empiece a usarlo en el próximo depósito. No quiero tampoco sobrepasarlas y agregar el producto antes porque tengo entendido que puede ser contraproducente. De todos modos me quedan dos días para el cambio de solución, así que voy a ver cuando termine la semana. Entre tanto, ya empiezan las emociones.
Día 28. Hice ina poda de hojas bien fuerte. Ya de esa forma dejo expuesto a la luz todo lo que tiene que terminar de engordar y de paso me esquivo posibles problemas de humedad. Al final voy a usar el PK de greenhouse que tengo, pero voy a subir la dosis. Mañana se viene el cambio de solución, para lo que sería la ante última semana en teoría. Vamos a ver como evoluciona, porque los cambios son muy abruptos de una semana a la otra. Y llegado el momento miraré los tricomas, como para ir haciéndome a la idea.


Likes
Comments
Share

@Martin82
Follow
yep, the heatwave is over, for now. As soon as the temperatures dropped the sweating buddha became a growing buddha. Keep growing, little buddha!


Likes
12
Share


@Kakui
Follow
Veg17, riego 1.3 EC y pH 6.1. Se hizo una muy pequeña defoliación y corte de algunos nodos para empezar a moldear la estructura.
Veg18, un par de horas después del LST ya están mostrando la estructura deseada.
Veg21, ajuste de LST.
Veg22, riego 6.1 pH y EC 1.5.


