
Likes
Comments
Share


@DrewbieDoobieNoobie
Follow
48 hrs. of dark are up and its time to chop. pots have dried from the last flush. These did not stretch as much as I would have liked I will have to adjust my light better next time and there was a lot of lower development near the media, hence not enough air flow. when I flushed the pots the water level went up to the lower growth on the Think different and the bottom was wet and rotted the bottom half. I did a mild lollypop on them I'm early flower it just was not enough, LESSON LEARNED. Chopped on 2/8/20 whole plant drying low and slow 54% RH 68F for 10-14 days then will trim and jar. 981 grams wet with the lumber. lets see how they dry. I got a rosin press coming today I will squeeze all the trim and larffy buds into dabs yummy! All in all I recommend these genetics I will try the think different again I'm sure I just got a recessive dwarf gene. I have seen other grows of this same strain same breeder that are huge and stacked. thanks again to Fast Buds 420 and Green Buzz Nutrients for suppling the goods for the grow. Stay tuned for the harvest pics and vids along with the rosin squish. Be cool to one another we could really use it these days.👏 please fell free to comment on the grow as this is my first true auto flower grow. If any one out there is experienced with rosin pressing and you have any tips for beginner's let me know I will incorporate them in the next videos. thanks


Likes
12
Share


@Jays_Not_Here_Man
Follow
The girls are starting to wrap up their cycle. I have been watching the trichomes closely, and we are getting very close

Likes
19
Share


@DrLaggis
Follow
HELLO GROWING FRIENDS - Please look at my Aftermovie Growvideo, which cost me about 4 hours to create. hope you like it!
Day 72: The Finale 🌿🌟
It’s finally time. My very first grow is coming to an end—at least the cultivation phase. The plant is now ready for harvest, and I can’t believe how incredible this journey has been. I never expected to enjoy the whole process so much—from nurturing the plants to watching them grow and evolve. I’m absolutely hooked and can’t wait to dive into the next steps: harvesting, drying, curing, and of course, starting a new grow soon with fresh ideas and experiments!
While it may not be the largest yield, the quality of the buds speaks for itself. The time, love, and care I’ve put into this grow is visible, and I’m pretty proud of the results. I’ll admit, I was a bit impatient at times (which I think every first-timer can relate to 😅), but the experience was priceless.
Here are a few interesting highlights from my trimming and harvest process:
1️⃣ Dark Phase Before Harvest
Two days before harvest, I put the plant in complete darkness to encourage resin production. I'm not sure if it really made a difference, but it was worth trying!
2️⃣ Wet Trim vs. Dry Trim
I decided to go for a wet trim because the buds were really dense, and I wanted to avoid any risk of mold. I’ve read that wet trimming can speed up drying and may slightly impact the quality, but this is part of the learning experience. Next time, I’ll try a dry trim for comparison!
3️⃣ Yield Update
Wet, the total came in at 209 grams from my plant. Trimming took around three hours, and it was actually a lot of fun, despite the time commitment.
4️⃣ Curing Plan
The buds are now hanging in the tent for about 8 days. Once dried, they’ll go into jars with Boveda Packs (62% humidity) for another 3 weeks of curing. I'll update the smoke report once they’re fully cured, but I’ve already had a sample of the same strain from a friend, and I can say it’s pretty amazing.
Final Thoughts on My Grow 🌱✨
As mentioned earlier, this grow has been an absolutely incredible experience, and it has definitely set me on a path to jump right into my next grow. There were ups and downs along the way, such as over-pruning, which I believe stressed the plants a bit. Additionally, I think they could have benefited from an extra week to mature. We also faced many temperature fluctuations this summer, which impacted the plants due to external weather conditions.
I’m really pleased with the quality of the buds. The quantity is okay—I can’t fully gauge it yet—but I’m sure there’s more potential to unlock. I’ve gained valuable experience in what worked well and what didn’t. Overall, the countless lessons learned during this grow far outweigh the few mistakes made. I’m incredibly proud of my first results!
As this long journey comes to an end, I want to thank everyone who followed along. I hope you enjoyed all the content. In that spirit, happy growing, and see you next time! 🌟
Likes
19
Share


@ledgrowers
Follow
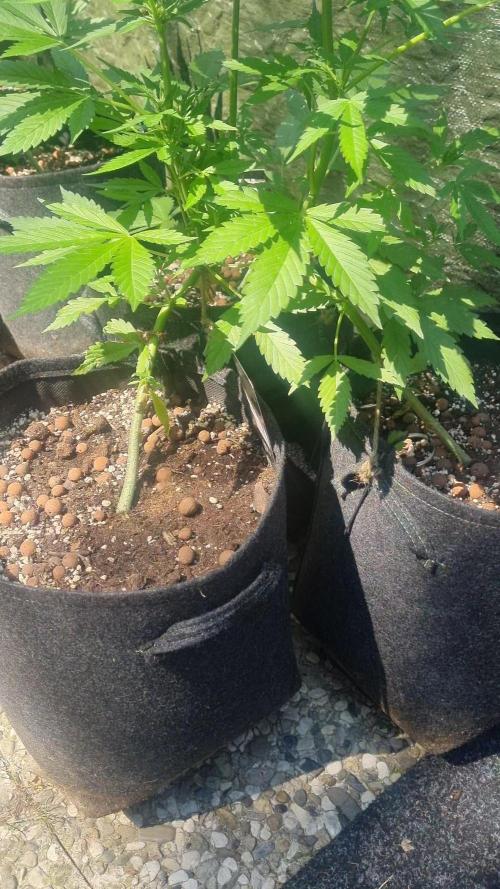
transplanted auto flower day 19 let me know if you guys like videos better

Likes
2
Share

@MrWeeedWorld
Follow
Meine drei Lemon Cherry Cookies entwickeln sich weiterhin hervorragend und haben die Blüte inzwischen vollständig eingeleitet. Überall erscheinen frische weiße Blütenstempel und an jedem Trieb bilden sich neue Budsites. Es ist schön zu beobachten, wie jede der drei Pflanzen ihren eigenen Charakter entwickelt.
Die größte Dame hat aktuell den stärksten Stretch hingelegt und ragt deutlich über ihre beiden Schwestern hinaus. Dennoch entwickeln sich auch die beiden kleineren Pflanzen ausgezeichnet und holen Woche für Woche weiter auf. Alle drei wirken gesund, kräftig und voller Energie.
Besonders zufrieden bin ich mit der gleichmäßigen Blattfarbe und der vitalen Entwicklung. Trotz der wechselhaften Wetterbedingungen der vergangenen Wochen zeigen die Pflanzen keinerlei Anzeichen von Stress oder Nährstoffmängeln. Das Plagron-Düngeschema liefert weiterhin alles, was sie für eine kräftige Blütenentwicklung benötigen.
Jetzt beginnt die spannendste Zeit des Grows. Der Stretch nähert sich langsam seinem Ende und schon bald wird die gesamte Energie in den Aufbau der Blüten fließen. Ich freue mich schon darauf, die Entwicklung der Colas in den kommenden Wochen zu verfolgen und bin gespannt, welches Aroma die drei Ladies am Ende entfalten werden.
Vielen Dank an Fast Buds für diese fantastische Genetik und an Plagron für die zuverlässige Versorgung während des gesamten Grows. Ich freue mich schon auf Blütewoche 3! 🍋🍒💚
--------------------------------------------------------------------------------------------------------------------------------------------------------------------
All three of my Lemon Cherry Cookies are progressing beautifully and have fully entered the flowering stage. Fresh white pistils are appearing everywhere, and every branch is producing new bud sites. It's exciting to see each plant developing its own unique growth pattern.
The tallest lady is currently showing the strongest stretch and has taken the lead in height. However, her two sisters are performing just as well and continue catching up week after week. All three plants look healthy, vigorous, and full of energy.
I'm especially happy with their rich green foliage and overall vitality. Despite the challenging weather conditions earlier in the grow, none of the plants show signs of nutrient deficiencies or stress. The Plagron feeding schedule continues to provide everything they need for strong flower development.
The most exciting stage is just beginning. The stretch is slowly coming to an end, and soon all of their energy will be focused on building dense, resinous flowers. I'm really looking forward to watching the colas develop over the coming weeks and discovering the unique aromas each of these three ladies will produce.
A huge thank you once again to Fast Buds for this outstanding genetic and to Plagron for providing the perfect nutrition throughout the entire grow. I can't wait for Flower Week 3! 🍋🍒💚
Likes
42
Share


@KrautFabrik
Follow
Day 56: nutrients like plan
Last feeding
Pictures are taken on day 56
---------------------------------------------
Super frosty buds but still a bit fluffy.❄️
Happy growing 🦍🌱

Likes
6
Share

@smoking_hills9
Follow
Last final defoliation done, now buds are fully exposed to the lights and the best part, harvest trim will be easier. Still it took me around 8 h altogether to defoliate all of them. Tones of buds and frost , amazing smells. Won't rush will give it a bit more to swell.

Likes
10
Share

@farah4weed
Follow
Hello guys
I did a genetic cross project and now I'm testing the results of the project and sharing them with you👽
Second week of flowering😍
Almost all the seeds have proven to be feminized😍🌷
Thank you for making me happy with your kind comments.
"farah4weed"


Likes
6
Share


@ToastFarmer
Follow
No deficiencies thus far adding some molasses each feeding 1 tbls per gal water

Likes
141
Share


@Anonymous_2022
Follow
Thanks for stopping by.. Please hit the like button if you like what you see and ill be sure to check you out too Growmies 🌱
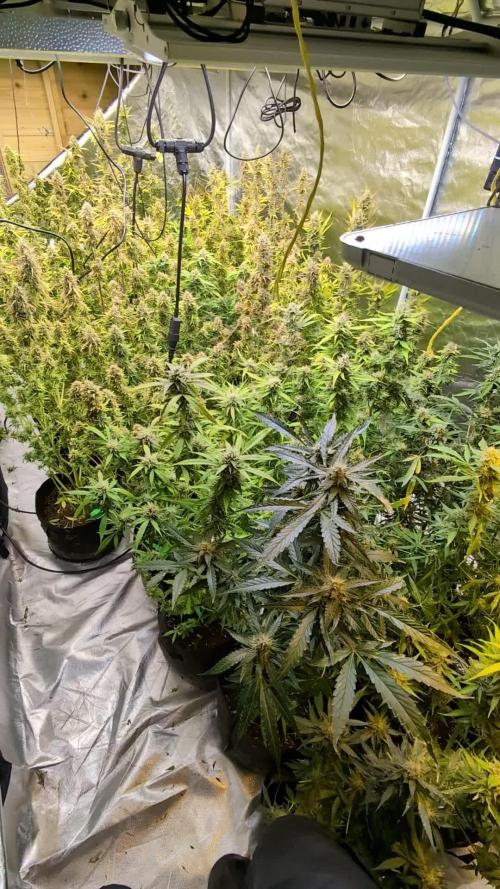
Week 8 of flower .. the smell is intense i just want to cut them down now ✂️
Leaves are looking a little bit more healthy now and being this close to the end of flower I’m not that concerned,
Trichomes are mainly cloudy so I’m guessing I will be flushing from next week 👍
Temps 21 - 27 ✅
Humidity 45 - 60 ✅
Thanks for checking in 💚


Likes
41
Share


@Reyden
Follow
Devo dire che queste FF mi hanno sorpreso, la Purple Lemonade di Fast Buds si è rivelata un ottima genetica con una crescita rapida ed una resistenza allo stress elevata, il super soil di Dogma Organics mi ha veramente aiutato questa volta e sono stato ricambiato con dei boccioli dal profumo eccezionale e che cercherò di curare nel migliore dei modi!!! Penso che pianterò ancora molto presto queste Fast Flowering e preleverò qualche altro clone!!!
Likes
13
Share


@HIAZ_urbanbudfarmer
Follow
Yes it's a very confusing diary, spent to long in Cloner, no where to put her , moved to veg tent in small pot & neglected, hand watered when I remembered.her & another clone brought back from the brink of death & put into DWC , around 9 weeks old but looked about 3 weeks. HST trained them for about 5 to 6 weeks in veg, moved to flowering tent, were 5 weeks into flower & both got root rot.The 2nd plant died saved this 1 by cutting away majority of roots. No point continuing to flower her as she would have greatly been affected, so put her back into veg, transplanted into recirculating hydro & been reveging for 7 weeks 46 days. Started getting new vegative growth over the last month.looking healthy & lush now, planned to put her back into flower with the new plants when they are ready to flower, hopefully she will be worth the effort & time when it comes to harvest, sh is around 24 weeks old!!!
Likes
21
Share


@MadeInGermany
Follow
Flowering day 12
since time change
to 12/12 h.
Hey everyone ☺️.
Once again a wonderful week goes by 😀.
It has developed so far and is now slowly starting to develop its flowers :-).
As soon as the first forms of buds can be seen (I think in 5-10 days) 2 g GHSC Powder Feeding Bio Bloom per liter of substrate are added.
In the third week, 1 g per liter of substrate is added so that it lasts through to the end :-).
This week it was poured 3 times with 1 liter each 👍.
The entire tent was also cleaned and the electronics checked for functionality.
The humidifier was refilled every day and fresh osmosis water was drained into the tank for the coming week ☺️.
The plants have all been checked for health and pests 👍.
Next week the bamboo sticks are inserted towards the end for support and the lowest shoots are removed so that at the end the energy is not wasted in the lower area 👍.
Otherwise there is nothing more to report this week :-).
I wish you a lot of fun with the update 😎.
Stay healthy and let it grow 🍀.
You can buy this Strain at
https://www.amsterdamgenetics.com/product/kosher-tangie-kush/
Type:
Kosher Tangie Kush
☝️🏼
Genetics:
Kosher Kush
X
Tangie
👍
Vega lamp:
2 x Todogrow Led
Quantum Board 100 W
💡
Bloom Lamp :
2 x Todogrow Led
Cxb 3590 COB 3500 K 205W
💡💡☝️🏼
Soil :
Canna Coco Professional +
☝️🏼
Fertilizer:
Green House Powder Feeding
☝️🏼🌱
Water:
Osmosis water mixed with normal water (24 hours stale that the chlorine evaporates) to 0.2 EC. Add Cal / Mag to 0.4 Ec Ph with Organic Ph - to 5.5 - 5.8 .

Likes
8
Share


@Kitties_and_Colas
Follow
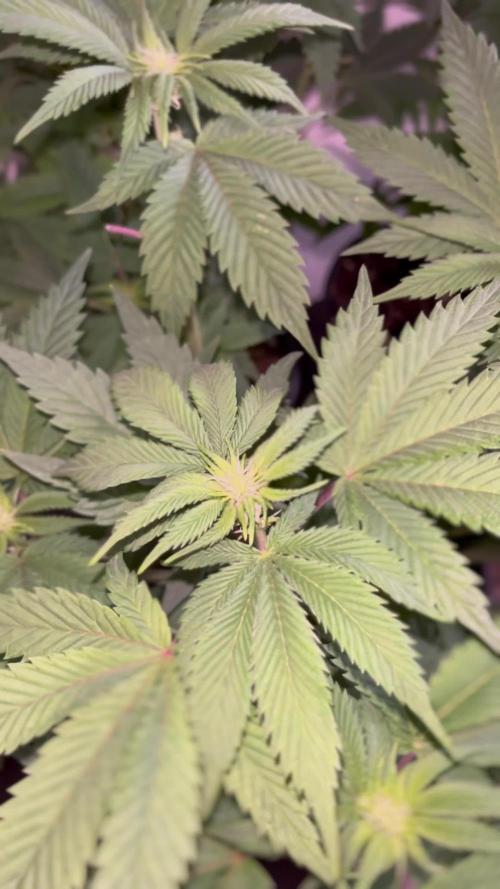
I believe last week's flush may have fixed my PH issue, the yellowing (mag deficiency)
seems to have stopped spreading..

Likes
5
Share


@WillWeedon
Follow
Watering 3 times a day (200ml/per plant)
Turned MarsHydro from 50% to 70% power
Still dont have a fan for plants😓
Want to try LST
Likes
Comments
Share

@Borberad
Follow
🔥🍪
Dieses Mal wird’s heiß, harzig und höllisch lecker in unserem Grow-Universum, denn wir haben uns eine echte Feuerkönigin ins Zelt geholt:
Red Hot Cookies von Sweet Seeds – eine Sorte so verführerisch wie ein frisch gebackener Cookie, der direkt aus einem Vulkan serviert wird.
Eine Pflanze, die nicht nur ordentlich Farbe ins Spiel bringt, sondern auch geschmacklich richtig aufdreht. Jung, wild, rot – und definitiv nicht zu unterschätzen.
---
🌿 Genetik & Charakter
Red Hot Cookies ist ein kraftvoller, moderner Hybrid, entstanden aus der Verbindung von Red Poison Auto x Tropicanna Cookies. Das Ergebnis ist eine Sorte, die Dessert-Süße mit würziger Schärfe verbindet – sowohl im Aroma als auch im Charakter.
Sie liefert eine aktive, kreative Wirkung, gepaart mit einer angenehmen körperlichen Entspannung. Perfekt für gute Laune, Musik, Gespräche oder kreative Eskapaden.
---
⏳ Blühdauer & Wuchs
Blütezeit: ca. 8–9 Wochen
Wuchshöhe Indoor: mittelgroß & kompakt
Outdoor: ebenfalls gut kontrollierbar
Ertrag: mittel bis hoch, dafür mit absolutem Show-Faktor
Wuchsform: kräftige Seitentriebe, buschiger Aufbau, perfekte Kandidatin für Training
---
🎨 Optik & Farben
Hier kommt der Name nicht von ungefähr:
Knallrote, violette & pinke Blütenfarben
Dichte Buds mit glänzender Harzschicht
Ein echter Blickfang – diese Pflanze sieht aus, als würde sie unter Schwarzlicht leben
Optisch ist sie weniger Pflanze, mehr neonfarbene Grow-Art.
---
🍪🔥 Terpenprofil & Aroma
Der Duft ist ein wilder Ritt durch die Cookie-Hölle:
Süße Kekse & Gebäck
Beeren & tropische Früchte
Dazu eine würzig-scharfe Chili-Note im Hintergrund
Beim Öffnen des Glases denkt man kurz, man steht gleichzeitig in einer Bäckerei und in einer heißen Küche.
🧠 Wirkung
Stimmungsaufhellend & aktivierend
Kreativ & kommunikativ
Später angenehm körperlich entspannend, ohne direkt abzuschalten
Eine Sorte für alle, die nicht sofort schlafen, sondern erst noch leben.
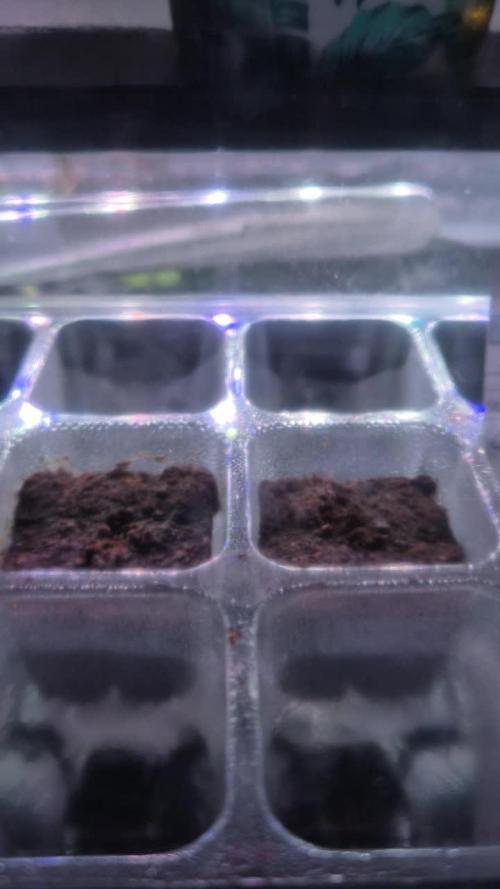
Woche 1: Die Keimungwoche
* Tag 0.1: Nach dem max. 10 Stündigen Einweichen in 1 % H₂O₂ wurde der Samen ins Substrat in seinen Easyplug gesetzt.
* Tag 0.2: Die erste Geduldsphase beginnt. Wir warten darauf, dass der Samen seine Schale aufbricht.
Tag 03/04 Warten.
* Tag 0.5: Die ersten Anzeichen des Lebens sind sichtbar. Das Samen bricht durch das Substrat, nachdem wir eine erste Wölbung der Substratoberfläche beobachtet hatten. Wir haben daraufhin das DLI von ca. 12 auf 16 erhöht, um dem Keimling genügend Licht zu geben.
Likes
53
Share


@DogDoctorOfficial
Follow
Greetings, fellow cultivators! Week 5 unfurls like a verdant tapestry, and my Blackberry Auto continues to astonish with her relentless growth and burgeoning beauty. Join me in this chapter of botanical marvels, where every leaf and bud tells a tale of meticulous care and burgeoning potential.
Unstoppable Growth and Insatiable Thirst: Blackberry Auto's growth knows no bounds as she reaches for the heavens, drinking voraciously from the AutoPot Aquavalve. The rhythm of her growth is like a symphony, each day bringing new heights and newfound vigor. It's a testament to her vitality and the nurturing environment she thrives in.
Enormous Leafs and Branch Bending Mastery: The foliage has evolved into a canopy of gigantic leaves, each a masterpiece of photosynthetic prowess. As I continue to bend branches, opening her arms to the light, the canopy becomes a labyrinth of greenery, optimizing light penetration and promoting lateral growth. It's a dance with nature, where every bend is a stroke of horticultural artistry.
Budding Beauty Unveiled: As the first week of flowering (or pre-flowering, depending on interpretation) dawns, Blackberry Auto reveals the promise of her floral bounty. The buds, adorned with an intricate structure, are a sight to behold – a precursor to the botanical masterpiece that awaits. It's a moment of anticipation, where each bud holds the potential for a harvest of unparalleled quality.
Rapid Evolution and Community Gratitude: With each passing day, Blackberry Auto evolves into a botanical marvel, a testament to the magic of cultivation. A heartfelt thank you to @fastbuds_official for bestowing upon us this exquisite strain, a true gem in the world of cannabis genetics. To Aptus Holland, my main sponsor, your support fuels this green journey and enables the flourishing of Blackberry Auto's potential. Kudos to Grow Diaries for providing the platform to document and share this journey, and a shoutout to the community for the camaraderie and shared passion that enriches our collective cultivation experience.
As the saga continues, I invite you to witness the unfolding chapters of Blackberry Auto's odyssey. Together, we cultivate not just plants, but a shared love for the botanical realm. Stay tuned for the forthcoming adventures in this GreenThumb Symphony!
Genetics Blackberry Auto @Fast_Buds
Food - @aptusholland @aptus_world
As always thank you all for stopping by, for the love and for it all , this journey of mine wold just not be the same without you guys, the love and support is very much appreciated and i fell honored and blessed with you all in my life
Likes
16
Share


@Bousmeister
Follow
Yo! It's week 2 of flower and the ladies are looking good! I can start smelling "green" in my grow room where my box is.
Caramelino is stretching nicely with many colas! She is starting to push out some pistils. Nice structure and took the training well!
Bruce Banner is living up to her name as she is growing big and strong. Took the FIM really well and she's got explosive growth. I love how she is growing. Stretching quite nicely aswell! Depending on the buds, I might just reveg and take some cuttings.
Northern Light Clone is stretching nicely! Looking better than her mother thus far, as her mother had heavy stress outdoor and my negligence as a cherry on top. Can't wait to see what she looks like indoor.
My clones are booming! Moved the 5 test batch outdoor as my space got quite restricted. Didn't expect my plants to go this crazy! Haha.
Anyway, keep y ou ur eyes peeled coz this is gonna be DANK!
Peace

Likes
3
Share


@BioGrowBayer
Follow
Keine Komplikationen, alle Pflanzen sehen gesund aus und entwickeln sich gut.
Der Lichtzyklus wurde über 6 Tage hinweg schrittweise reduziert, jeden Tag eine Stunde weniger Licht.
Heute ist der erste Tag mit 12/12 Licht-Dunkel-Zyklus und damit der offizielle Start der Blütephase.
Erste Anzeichen der Blüte sind sichtbar, Internodienabstand nimmt zu, das Wachstum verlagert sich in die Höhe.
Keine Mangelerscheinungen oder Stressanzeichen.
In den kommenden Tagen wird das Stretching genau beobachtet.
Ab nächster Woche beginnt das Monitoring der Vorblüten.