


Likes
Comments
Share


@Master_weeda
Follow
Bonjour à tous les padawans et maîtres jedis
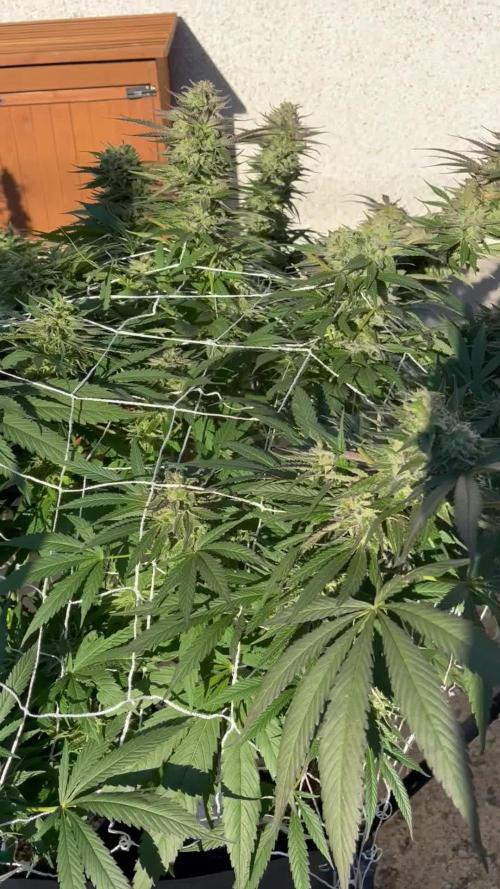
Jour84 arrosage avec 2 litres d'eau ph6.3
Jour86 arrosage avec 2. 5litres d'eau ph6.3
Jour89 arrosage avec 2 litres d'eau ph6.3
LE MEILLEUR MOMENT POUR RINCER SON CANNABIS
Le rinçage commence en général deux semaines avant la récolte. Si le plant a une période de floraison de huit semaines, le rinçage doit commencer six semaines après le début de la période de floraison. Il est préférable de regarder de près les trichomes sur le plant pour déterminer quand votre cannabis est prêt à être récolter. Si les petits trichomes commencent juste à passer d’une couleur transparente à une teinte laiteuse et blanche, c’est une bonne indication que les plants peuvent commencer à être rincés. Il faut s’arranger pour que la majorité des trichomes aient changé vers la couleur désirée pour la récolte après deux semaines – ça devient plus facile à faire avec l’expérience, alors accrochez-vous !
Le rinçage peut également être un bon moyen de remettre à zéro la terre quand un plant est toujours en phase de croissance végétative. Parfois, un cultivateur suralimente par accident son cannabis, ce qui provoque un changement de couleur et un flétrissement du bout des feuilles. Ceci est appelé une « brûlure par nutriments ». Rincer la terre peut éliminer les nutriments excédentaires, ce qui aide à résoudre le problème. Cependant, c’est une mesure drastique à ce stade de la culture, alors assurez-vous que le problème soit bien une brûlure par nutriments et non quelque chose d’autre.
Le rinçage ne concerne pas que le moment de la récolte. Cette technique peut aussi être mise en place durant la phase de croissance afin de débarrasser le sol des nutriments. Bien évidemment, les nutriments permettent à votre plante de rester en bonne santé et vous assurent des rendements maximaux, mais une trop grande quantité peut causer une accumulation et un état statique durant lequel la plante ne peut plus y accéder.
Le blocage des nutriments peut être causé par une accumulation saline ou des niveaux de pH incorrects. Ces deux causes peuvent être résolues par un rinçage de votre plante à l’eau claire. Les fluides viendront pousser les nutriments en dehors du substrat et le débarrasseront de l’accumulation, permettant ainsi aux racines de pouvoir accéder à nouveau aux nutriments.
EMPÊCHER LE BLOCAGE D'ABSORPTION DES NUTRIMENTS AVANT QU’IL NE POSE PROBLÈME
Au mieux, le blocage des nutriments peut être un problème, au pire, il peut être un vrai désastre. Comme le dit l’adage, il vaut mieux prévenir que guérir. Il vaut mieux prendre de l’avant pour empêcher le blocage des nutriments plutôt que de s’y atteler lorsque c’est trop tard.
Empêcher le blocage des nutriments peut se faire par le biais d’un rinçage de routine. En rinçant vos plantes une fois avant la floraison et une fois au milieu de cette dernière, vous minimiserez l’accumulation de nutriments.
LES ENZYMES À LA RESCOUSSE
Après le rinçage pour contrer l’accumulation ou le blocage des nutriments, vous remarquerez peut-être que vos plantes ont une apparence vert foncé, c’est le signe d’un excès de nutriments. Dans ce cas, certains cultivateurs choisissent d’ajouter une formule riche en enzymes à leur substrat.
Au cas où vous auriez oublié vos cours de biologie, les enzymes sont des protéines qui catalysent les réactions. Elles aident à rincer le substrat en décomposant l’amidon, les glucides et les nutriments. Il existe sur le marché toute une variété de produits qui contiennent des formules d’enzymes très efficaces.
Si l’eau ne suffit pas à vos plantes, ces petites protéines ne feront qu’une bouchée de l’accumulation de nutriments !
COMMENT BIEN RINCER SON CANNABIS
Rincer votre plant de cannabis est un processus simple. À chaque fois que vous apporteriez normalement des nutriments, vous rincez à la place. De l’eau du robinet non traitée est tout ce dont vous avez besoin pour rincer, assurez-vous juste que son pH est sans danger pour le cannabis. La plupart de l’eau de puits a un pH sain et ne nécessite pas de traitement, mais s’il est nécessaire de traiter l’eau de rinçage pour avoir un pH adapté, faites-le. Les ajustements du pH seront donc la seule chose à considérer.
Inonder la terre avec autant d’eau fraîche qu’elle puisse contenir. Laissez l’eau durant quelques minutes pour qu’elle puisse absorber les nutriments, puis inondez la terre encore pour rincer les nutriments loin du plant. Si vous cultivez en intérieur dans des pots, notez la couleur de l’eau qui s’échappe du fond des pots. Elle sera tâchée et aura une couleur sale. C’est à cette étape qu’un appareil de mesure des TDS (Total des Solides Dissous) est utile. Si vous récupérez et mesurez le TDS de l’eau « évacuée », elle devrait avoir un taux de 1300ppm, ce qui est assez élevé. Il est important de rincer le plant jusqu’à ce que total baisse à un niveau de 50ppm, ou du moins qu’il s’approche du TDS de l’eau fraîche que vous utilisez pour rincer le plant. La couleur de l’eau d’évacuation va s’éclaircir et apparaîtra plus propre. Vous devez tirer autant que possible de minéraux dissous du plant.
Comment et Quand Rincer les Plants de Cannabis
Rincer les plants de cannabis avant la récolte peut faire la différence entre les meilleurs têtes ou la plus rude pour la gorge. Cette petite tâche est simple et facile à faire. Ajoutez juste de l’eau ! Attention car le moment du rinçage joue un rôle critique.
Le b.a.-ba du rinçage de ses plants de cannabis.
Sommaire:
1. Qu’est-ce que le rinçage ?
2. Le meilleur moment pour rincer son cannabis
3. Empêcher le blocage d'absorption des nutriments avant qu’il ne pose problème
4. Les enzymes à la rescousse
5. Comment bien rincer son cannabis
6. Comment rincer ses plantes en hydroponie
7. Les résultats du rinçage de son cannabis
8. Quand éviter de rincer son cannabis
Vous avez enfin fini vos cultures et vous vous retrouvez avec un magnifique plant couvert de super têtes, maintenant sèches, vous avez fait le curing et vous êtes prêt à fumer – et pourtant quelque chose ne va pas. La weed semble ne pas vouloir se consumer et quand vous tirez une bouffée, c’est comme si on vous avait donné un coup de poing dans les poumons et vous toussez en craignant pour votre vie ! Le goût est rude et décevant. Si c’est une situation que vous avez vécue, il y a des chances pour que vos plants n’aient pas été rincés correctement avant la récolte.
Cette fumée bien loin d’être agréable est provoquée par la présence dans le plant des nutriments et minéraux utilisés lors de la culture, ce qui altère la façon dont le plant se consume. Rincer le plant élimine ces nutriments restants, ce qui améliore la qualité des sensations. Heureusement, le rinçage des plants de cannabis se fait facilement et sans effort, et cela vous permet de produire des têtes douces et délicieuses en un rien de temps.
ARTICLE LIÉ
Comment Utiliser les Nutriments pour Cannabis
QU’EST-CE QUE LE RINÇAGE ?
L’acte de rincer un plant implique d’utiliser de l’eau pour éliminer tout nutriment présent dans la terre. Une grande quantité d’eau est passée à travers la terre et drainée sur une base régulière. Tous les minéraux et nutriments présents dans la terre sont rincés avec le temps avec l’eau, ce qui laisse une terre propre.
Mais pourquoi vouloir éliminer tous les minéraux de la terre ? N’est-ce pas mauvais pour la récolte ? En fait, cela aide à la récolte de manière significative. Quand les nutriments sont éliminés de la terre, ceci force le plant de cannabis à utiliser tous les nutriments toujours présents dans le plant. C’est comme pour le corps humain. Quand on consomme beaucoup d’aliments, ce que nous n’utilisons pas est transformé en graisses. Dans les situations extrêmes où la nourriture est rare, le corps s’appuie sur cette graisse stockée pour tirer de l’énergie.
Comme rincer force le cannabis à utiliser tous les nutriments restants dans le plant, aucun ne devrait rester et altérer les têtes récoltées. Cependant, si vous le faites trop tôt, cela peut nuire à la santé du plant, le moment est donc clé.
LE MEILLEUR MOMENT POUR RINCER SON CANNABIS
Le rinçage commence en général deux semaines avant la récolte. Si le plant a une période de floraison de huit semaines, le rinçage doit commencer six semaines après le début de la période de floraison. Il est préférable de regarder de près les trichomes sur le plant pour déterminer quand votre cannabis est prêt à être récolter. Si les petits trichomes commencent juste à passer d’une couleur transparente à une teinte laiteuse et blanche, c’est une bonne indication que les plants peuvent commencer à être rincés. Il faut s’arranger pour que la majorité des trichomes aient changé vers la couleur désirée pour la récolte après deux semaines – ça devient plus facile à faire avec l’expérience, alors accrochez-vous !
Le rinçage peut également être un bon moyen de remettre à zéro la terre quand un plant est toujours en phase de croissance végétative. Parfois, un cultivateur suralimente par accident son cannabis, ce qui provoque un changement de couleur et un flétrissement du bout des feuilles. Ceci est appelé une « brûlure par nutriments ». Rincer la terre peut éliminer les nutriments excédentaires, ce qui aide à résoudre le problème. Cependant, c’est une mesure drastique à ce stade de la culture, alors assurez-vous que le problème soit bien une brûlure par nutriments et non quelque chose d’autre.
Flushing
Le rinçage ne concerne pas que le moment de la récolte. Cette technique peut aussi être mise en place durant la phase de croissance afin de débarrasser le sol des nutriments. Bien évidemment, les nutriments permettent à votre plante de rester en bonne santé et vous assurent des rendements maximaux, mais une trop grande quantité peut causer une accumulation et un état statique durant lequel la plante ne peut plus y accéder.
Le blocage des nutriments peut être causé par une accumulation saline ou des niveaux de pH incorrects. Ces deux causes peuvent être résolues par un rinçage de votre plante à l’eau claire. Les fluides viendront pousser les nutriments en dehors du substrat et le débarrasseront de l’accumulation, permettant ainsi aux racines de pouvoir accéder à nouveau aux nutriments.
EMPÊCHER LE BLOCAGE D'ABSORPTION DES NUTRIMENTS AVANT QU’IL NE POSE PROBLÈME
Au mieux, le blocage des nutriments peut être un problème, au pire, il peut être un vrai désastre. Comme le dit l’adage, il vaut mieux prévenir que guérir. Il vaut mieux prendre de l’avant pour empêcher le blocage des nutriments plutôt que de s’y atteler lorsque c’est trop tard.
Empêcher le blocage des nutriments peut se faire par le biais d’un rinçage de routine. En rinçant vos plantes une fois avant la floraison et une fois au milieu de cette dernière, vous minimiserez l’accumulation de nutriments.
LES ENZYMES À LA RESCOUSSE
Après le rinçage pour contrer l’accumulation ou le blocage des nutriments, vous remarquerez peut-être que vos plantes ont une apparence vert foncé, c’est le signe d’un excès de nutriments. Dans ce cas, certains cultivateurs choisissent d’ajouter une formule riche en enzymes à leur substrat.
Au cas où vous auriez oublié vos cours de biologie, les enzymes sont des protéines qui catalysent les réactions. Elles aident à rincer le substrat en décomposant l’amidon, les glucides et les nutriments. Il existe sur le marché toute une variété de produits qui contiennent des formules d’enzymes très efficaces.
Si l’eau ne suffit pas à vos plantes, ces petites protéines ne feront qu’une bouchée de l’accumulation de nutriments !
Comment et Quand Rincer les Plants de Cannabis
COMMENT BIEN RINCER SON CANNABIS
Rincer votre plant de cannabis est un processus simple. À chaque fois que vous apporteriez normalement des nutriments, vous rincez à la place. De l’eau du robinet non traitée est tout ce dont vous avez besoin pour rincer, assurez-vous juste que son pH est sans danger pour le cannabis. La plupart de l’eau de puits a un pH sain et ne nécessite pas de traitement, mais s’il est nécessaire de traiter l’eau de rinçage pour avoir un pH adapté, faites-le. Les ajustements du pH seront donc la seule chose à considérer.
Inonder la terre avec autant d’eau fraîche qu’elle puisse contenir. Laissez l’eau durant quelques minutes pour qu’elle puisse absorber les nutriments, puis inondez la terre encore pour rincer les nutriments loin du plant. Si vous cultivez en intérieur dans des pots, notez la couleur de l’eau qui s’échappe du fond des pots. Elle sera tâchée et aura une couleur sale. C’est à cette étape qu’un appareil de mesure des TDS (Total des Solides Dissous) est utile. Si vous récupérez et mesurez le TDS de l’eau « évacuée », elle devrait avoir un taux de 1300ppm, ce qui est assez élevé. Il est important de rincer le plant jusqu’à ce que total baisse à un niveau de 50ppm, ou du moins qu’il s’approche du TDS de l’eau fraîche que vous utilisez pour rincer le plant. La couleur de l’eau d’évacuation va s’éclaircir et apparaîtra plus propre. Vous devez tirer autant que possible de minéraux dissous du plant.
COMMENT RINCER SES PLANTES EN HYDROPONIE
Le rinçage des plantes en hydroponie est bien plus simple que de se débarrasser des nutriments en terre. Les cultivateurs en hydroponie pourront simplement drainer leur système et le remplacer par une eau au pH neutre.
Le rinçage des plantes en hydroponie est aussi un processus bien plus court. Une fois que la réserve d’eau aura été modifiée, les plantes en hydro n’auront pas accès aux nutriments externes. Pour cette raison, un rinçage de deux jours suffira.
LES RÉSULTATS DU RINÇAGE DE SON CANNABIS
Après la récolte des têtes, prenez du temps pour bien faire le curing pour atteindre le potentiel le plus élevé. Un affinage correct par curing permet de réduire encore plus le côté rude des têtes, en éliminant des choses comme un excès de chlorophylle. Vous serez étonné de voir la différence que ce petite effort peut avoir sur votre produit. Tout votre travail se sentira dans la première bouffée de cette weed douce comme de la soie, qui caresse la gorge comme du miel. Le plus doux de la nature. Vous pouvez donc améliorer la qualité de votre cannabis en ajoutant juste de l’eau !
QUAND ÉVITER DE RINCER SES PLANTES
Le seul moment où nous recommandons d’éviter le rinçage de son cannabis est lorsque l’on travaille avec une terre biologique amendée ou un super soil. Ces substrats ont été développés avec précaution afin d’héberger des micro-organismes bienfaisants tels que des bactéries ou des champignons. Cette délicate biodiversité pourrait être éliminée et endommagée par le rinçage.
Une fois de plus, l’absence de rinçage ne devrait pas poser de soucis, car aucun nutriment externe ou synthétique n’aura été ajouté au substrat. À la place, les plantes comptent sur les micro-organismes pour décomposer la matière organique et la livrer aux racines.
May the force be with you 💪

Likes
100
Share


@m0use
Follow
The time is finally here to post the harvest. I waited till it was all done and dry before updating the dairy so will add in the dry weights next on the 2nd half of the harvest entry.
I enjoyed this plant a lot, its grew well and loved how it was shorter and fatter. I wonder if it was at the dame distance from the plant if It could have done even more. Had some issues with the yellowing that was happening on the other plant in this tent. I should have treated this faster with a flush but was super reluctant and it may have hurt the yields a bit. The top best looking buds looked and smelled amazing even the lower buds where doing well not so larfy like the other plant.
There was crazy strong smells with this plant, sour berries and hints of lemon, it was a best smelling plant I have grown to date. This would be a great plant to grow for beginners, cant take a lot of stress and still produces quite well and even on lower wattage leds it was good. It was not the most crystally looking plant, not like the maltezerz but still had some finger hash buildup but a small amount. I feel this plant would be a winner for a rosin press.
I don't plan on growing this strain out again despite me liking a lot of qualities about it. I'm only trying to grow cbd dominate plants is the main reason. If my friends really like this I have some clones so can always give them some. Speaking of clones they are doing well outside, greened up a lot and showing signs of revegging.
Took some photos of the weed hang drying on day 1 in the tent and a week later to show how much they shrink.
Only some of the lower growth is larfy, will make good edibles or hash, that will be a fun project to do and may include that in my projects diary.
That's about all I can think of if you have any questions just ask.
m0use
Disclaimers:
1. I have divided the total watts of light in half, 300w(150w) for this diary. It will accurately reflect the g/w ratio as the two plants growing in this tent are listed in two separate diaries.
2. I include any shake/trim in my gross totals as I use them to make edibles.
3. I did not follow any proper ways of listing my nutrients. Some are ml/l of total solution watered, others ml/l of total medium and some are just the total amounts I added, not as a ratio.
If you have any questions let me know!
+++++++++++++++++++++++++++++++++++++++++++++++++++++++++++++
Cost + Time Analysis Of Growing Cannabis. m0use’s Breakdown
+++++++++++++++++++++++++++++++++++++++++++++++++++++++++++++
Light Schedule
===
Veg [Dec 18th 2021 - Mar 11th 2022]
18h on 6h off - 6am-12pm
Flower [Mar 12th 2022 - May 10th 2022]
12h on 12h off - 9am-9pm
This is extra tricky this harvest as I went through 2 different hydro rates in three different periods, plus a veg and bloom switch between them.
Mon-Fri are TOU rates, all weekends are off-peak pricing all day.
Off Peak = 7pm-7am + all weekend
Mid peak = 11am-5pm
On peak = 7am-11am + 5pm-7pm
TOU rates:
Dec 18th 2021-Jan 17th 2022
Cost of kwh with on-peak "17.0c", mid-peak "11.3c" and off-peak "8.2c".
Jan 18th 2022 - Feb 7th 2022
Cost of kwh with on-peak "8.2c", mid-peak "8.2c" and off-peak "8.2c".
Feb 8th 2022 - Current
Cost of kwh with on-peak "17.0c", mid-peak "11.3c" and off-peak "8.2c".
—
Dec 18th 2021-Jan 17th 2022
Weekdays “21 days”
6am - 7am -- 1hr @8.2c/kwh off-peak
7am - 11am -- 4hr @17.0c/kwh on-peak
11am - 5pm --6hr @11.3c/kwh mid-peak
5pm - 7pm -- 2hr @17.0c/kwh on-peak
7pm - 12am -- 5hr @8.2c/Kwh off-peak
Weekends “10 days”
6am - 12am – 18hr @8.2c/kwh off-peak
6h @17.0c/kwh
6h @11.3c/kwh
6h @8.2c/kwh + [email protected]/kwh weekdays/weekends
—
Jan 18th 2022 - Feb 7th 2022
Weekdays “15 days”
6am - 7am -- 1hr @8.2c/kwh off-peak
7am - 11am -- 4hr @8.2c/kwh on-peak
11am - 5pm --6hr @8.2c/kwh mid-peak
5pm - 7pm -- 2hr @8.2c/kwh on-peak
7pm - 12am -- 5hr @8.2c/Kwh off-peak
Weekends “6 days”
6am - 12am – 18hr @8.2c/kwh off-peak
18h @8.2c/kwh + [email protected]/kwh weekdays/weekends
—
Feb 8th 2022 - Harvest
Veg
Feb 8th - March 11th 2022
weekdays “24 days”
6am - 7am -- 1hr @8.2c/kwh off-peak
7am - 11am -- 4hr @17.0c/kwh on-peak
11am - 5pm --6hr @11.3c/kwh mid-peak
5pm - 7pm -- 2hr @17.0c/kwh on-peak
7pm - 12am -- 5hr @8.2c/Kwh off-peak
weekends “8 days”
6am - 12am – 18hr @8.2c/kwh off-peak
6h @17.0c/kwh
6h @11.3c/kwh
6h @8.2c/kwh + [email protected]/kwh weekdays/weekends
—
Flower
March 12 - May 10th 2022
weekdays “42 days”
9am - 11am -- 2hr @17.0c/kwh on-peak
11am - 5pm --6hr @11.3c/kwh mid-peak
5pm - 7pm -- 2hr @17.0c/kwh on-peak
7pm - 9am -- 2hr @8.2c/Kwh off-peak
weekends “18 days”
9am - 9pm – 18hr @8.2c/kwh off-peak
4h @17.0c/kwh
6h @811.3c/kwh
2h @8.2c/kwh + [email protected]/kwh weekdays/weekends
—
Total hours in each peak period
126+144+168 = 438h @17.0c/kwh
126+144+252 = 522h @11.3c/kwh
306+378+288+300 = 1,272h @8.2c/kwh
Lights
===
LED’s I use are 48w and 18w, per stick, they are arranged on an array totaling 300w.
6400k 18w*6 = 108w + 3000k 48w*4 = 192 108w+192w=300w | 300w/1000 = 0.3Kw
* note I am using 150w as stated in my disclaimers to account for the missing plant in a separate diary.*
Using the previous c/kwh numbers above I can find out the total cost of the lamps in the 3 peak periods. I converted the cents into dollar amounts beforehand to avoid dividing by 100. 8.2c/h = 0.082$/h
438h * 0.17c/kwh = $74.46kw * 0.15kw = $11.17 on peak
522h * 0.113c/kwh = $58.99kw *0.15kw = $8.85 mid peak
1,272h * 0.082c/kwh = $104.30kw *0.15kw = $15.65 off peak
The "h" hours and "kw" kilowatts cancel out and we are left with a value of $ dollars per peak period, add all the peak periods up and you get your total cost of running the lights in dollars.
$11.17 + $8.85 + $15.65 = $35.67 for the grow light only.
My light grew for 20 weeks and 4 days, or 144 days. almost 21 weeks total.
$35.67 / 144d = 0.2477$/d average of about 25c a day in electricity
337.2kw for the entire grow.
Using the regular calculation of grams harvested divided by watts used is not accurate to me, it does not account for all the time the lamps are on, the length of grow to the over all cost. The calculation that makes sense to me is this, harvested dry weight of usable cannabis buds/trim/keif/whatever in grams divided by total kw used. Could also combine it with grams per total single use costs “anything you used only for this grow and wont reuse in the next, or fractions of multi use items like fertilizers if they ½ full” and see how much you’re investing per gram.
"kw" ÷ "g" = kw/g
"$" ÷ "g" = $/g
I have harvested 4.57oz or 129.6g on 337.2kw.
337.2kw ÷ 129.6g = 2.60 kw/g of usable cannabis. This is not an ideal ratio for me and looks like a lot of energy waste happened from the extended veg period.
$35.67 ÷ 129.6g = 0.28c/g
It cost 28c/g when comparing total electricity cost to gross yield, almost identical to the comparison of total electrical cost to the number of days in the grow 25c/day.
Neat!
legend,
kwh = kilowatt per hour
kw = kilowatt
w = watt
h = hour
c = cents
$ = dollars
d = day
LED= Light Emitting Diode

Likes
2
Share

@Northern_Ent
Follow
Sep 19: Godfather OG by MSNL is looking great. Big thick and heavy buds are kinda making me drool in anticipation.
Sep 20: found another small bit of bud rot she likely caught from the Gorilla Cookies which had a bad outbreak last week. Ready soon but will try holding out as long as the weather.
That didn’t last long…found another bit of bud rot so I harvested the tops. First cut is 360 g wet Grade A and 350 g wet Grade B all fresh frozen for later processing. Another week or two would be best but these are ready and it lets the lower buds have direct sun to finish.

Likes
50
Share


@Mr_Motalovah
Follow
Hello growers and tokers! 👋 👩🌾 🧑🌾.🔥💨
Hope you had a great week because these ladies sure have! 😍
They're starting to get that sweet aroma this strain gives off, her aroma will be over powering my tent in full flower. Love it!
Pictures and info were taken on day 12 of flower.
I put 71cm tall because that's the average between the three girls.
CC 1: 78cm
CC 2: 68cm
CC 3: 68cm
CC 1 is killing it with the double main colas. 💪 💪 🤩
CC2 is my favorite. She's got a perfect shape, nice evenly distributed canopy. Took LST great.
For me that's the goal when I do LST.
CC3 doesn't fall behind in any way, she's looking great.
There's a bunch of new growth everywhere so after 21 days i'll be doing some pretty heavy selective defoliation.
Feeding 1,5L each, every other day. Will be increasing as they ask for more.
How do they ask for more?
When feeding if the soil is drier than normal I give a 150-200ml increment of water.
I do that until they stop feeding so much then i just maintain that amount.
I start reducing if it takes longer to dry.
That works good for me. The old finger in the dirt trick. 👍
Nothing like knowing exactly what your ladies need first hand.
They've got a lovely green lush color.
It's a delight growing this strain.
I'll have to get me some more seeds for next run because this is a strain that will always have a spot in my garden. 😍 😍
Hope you enjoyed this week's update and stay tuned for next week.
If you like what you see check out the other strains in the garden. 😁
Take care and stay safe!
One love!


Processing
Likes
9
Share


@CannabisRelated
Follow
One of the plants has a slight pie dough smell, but still very minimal smell when I open the tent. EDIT: the smell is actually making it passed my carbon filter, and I am not sure why
it is only 1 of the 2 plants giving off the heavy smell as well. The chunkier/darker colour one is the one that smells real heavy, smells really creamy/doughy.
UV/IR has been on for the past few weeks, and will stay on until the end.
The plants have gone through a bunch of issues so far, and are still going strong.
Gave a tablespoon of power bloom to each, on day 31.


Likes
7
Share


@OutdoorRebelGenetics
Follow
Had to highjack this old diary sick hope this all goes well done this 3 times now lol with a degree of success lol well I would like to thank greenhouse seed co and Andy for the chance of growing these new genetics and there very own feeding line more pics due ignore next 5 weeks until I'm there lol


Likes
11
Share


@Inceptionist
Follow
She seems starting to develop CalMag deficiency maybe.
Start to add some CalMag every other watering. Every 2 weeks also the Bio Enhancer from greenhouse feeding
Likes
Comments
Share


@xHide_BG
Follow
Good Strain ..
it's not the best of all.
but the experience is worth it.
😀I think it's a great plant to test
xxxxxxxxxxxxxxxxxxxxxxxxxxxxxxxxxxxxxxxxxxxxxxxxxxxxxx
xxxxxxxxxxxxxxxxxxxxxxxxxxxxxxxxxxxxxxxxxxxxxxxxxxxx
xxxxxxxxxxxxxxxxxxxxxxxxxxxxxxxxxxxxxxxxxxxxx
xxxxxxxxxxxxxxxxxxxxxxxxxxxxxxxxxxxxxx
xxxxxxxxxxxxxxxxxxxxxxxxxxxxxxx
xxxxxxxxxxxxxxxxxxxxxxxxxx
xxxxxxxxxxxxxxx
xxxxxx
x
it's not the best of all.
but the experience is worth it.

Processing
Likes
33
Share


@Ferenc
Follow
Day 50: Water intake is 150ml per plant, light schedule 18/6. Humidity is approx 50%. Fertilization continues the same way Monday, Wednesday, Friday Biobizz family, Tuesday, Thursday, Saturday bat guano and Epsom salt. Flowers are developing nicely and getting thicker. Plants love the new 600W Viperspectra:) All good so far! They are all approx 30-35 cm.
Day 53: Smell is getting stronger, really nice mix one.
Day 55: Nice smell comes out from this tent. Plants are nice buds are getting dense and the smell is getting stronger and stronger. All of them do well, some more some with less bud development but they all look happy.

Likes
8
Share


@Ananas_Comosus
Follow
Sunday, May 29, 2022
Plant #3 is stretching away by a foot over Plant #2. Both Plants looking well but displaying different leaf behaviour (particularly of the upper growth). When well watered, in full sun, Plant # 2 has perky, praying leaves that go down somewhat at night. In the same conditions, Plant #3 has droopy leaves that get even more tucked in at night. It was only from feeling the strong turgidity of the Plant #3 leaves when under good water and comparing them to Plant #2 that I accepted that it was ok and that's just how it wears its' clothes. The red and white pistils are filling out from top to bottom on all stems on Plant #2. Even though it's not as tall as its' neighbour, the six main stems on plant #2 seem proportional to, hopefully, support nice thick colas. Plant #3 is furring out much slower and though I am happy for the height, I am concerned the stems aren't thick enough to support much weight.
Likes
17
Share


@JonnyKush
Follow
hello growmies! day 51 finally the pre-flowers begin to appear. I apologize for the few photos but unfortunately they really filled the box and I find it difficult. overall I have to say they look in perfect shape! I will keep you updated thanks for passing by. like and comment! good day and beautiful growth to you 🌳🌱


Likes
7
Share


@stinkynuggsack
Follow
Co2 order never came in but better late then never I grabbed a bottle of tnb from my local grow shop and let it goto work.
This week went great
The purple buds are very rewarding 😁
Excited to see what next the week has for my babies
Likes
76
Share


@DogDoctorOfficial
Follow
🌸 Week 9 – Letting Go to Shine Brighter 🌸
Welcome to Week 9 of flower in the Eternity Grow Cup, a milestone moment where we shift gears and let the plants begin their final expression. This is the week we cut all nutrients — a bold move made with care and trust — leaving only System Clean to keep our lines pristine in the Autopot system. No harsh flushes, no dry backs, just gentle guidance toward the finish line.
We didn’t wait for the reservoir to hit empty. Instead, we added pure water early, letting the system blend into a soft EC of 0.45, with a reservoir temperature of 21.9°C and a pH tuned to 6.3 — perfect for this phase. In the soil, EC sits at 0.95, giving the plants enough to sip on while encouraging them to cannibalize their stored energy, pushing out their richest colors, aromas, and trichome production.
And what a show they’re putting on.
The colors in the room are breathtaking: purples, oranges, yellows, deep greens — a painter’s palette. But above all, there’s this serene dark fade taking over, a sign of maturity and final expression. Trichome production is off the charts, with Runtz #1 still dominating the aroma game — sweet, powerful, unforgettable — while Runtz #4 emerges as the frost queen, covered head to toe in shimmering resin.
The environment is dialed in:
• Humidity at 52%
• Temperature holding at 28°C
• PPFD reduced to 683 to ease the plants into ripening
• CO₂ around 1000 ppm for that final metabolic push
We’re focusing now on presence and precision — ensuring airflow, temperatures, and humidity are in harmony. Every decision from here is about preservation, encouragement, and letting nature take the lead.
This week’s update includes a special series of photos taken through the mask lens — showing the garden from my eyes, from tops to bottoms, sides to centers, trichomes to fade tones. It’s a personal view I’m grateful to share.
The structure of the grow has become something of a symbol: four phenos in each corner, one in the center — creating an X from above, a cosmic mark that feels intentional, aligned, and just… right. They’ve bushed out so beautifully that this symmetry, almost a message from the plants themselves, is impossible to ignore.
And from the top down to the lowest buds, there’s no weak link. No “B-buds” here — they’ve become A-tier expressions, worthy of jars and not just extracts. The synergy between Plagron, Aptus Holland, and the TrolMaster & ThinkGrow lighting ecosystem is performing at an elite level — tuning spectrum, dialing environment, and nurturing these compact queens into full form.
This is a week of wonder, of silence before the final bloom. A week of gratitude.
⸻
🌟 With Grower’s Love, I want to thank:
• Our incredible community — lovers, haters, dreamers, doers
• The sponsors who make this possible
• And every grower competing in this cup — you are the fire that keeps this space glowing. I’m humbled to grow alongside you.
🎥 Full 4K episodes now on YouTube — come join us there for the full experience
📸 Daily beauty and behind-the-scenes on Instagram
Let’s celebrate the craft. Let’s finish strong.
Good luck to all. Eternity is in bloom.
Genetics - Runtz https://www.zamnesia.com/6000-zamnesia-seeds-runtz-feminized.html
Nutrients - Plagron https://plagron.com/en/hobby
- Aptus Holland https://aptus-holland.com/
Controls - Trol Master https://www.trolmaster.eu/
LED - https://www.futureofgrow.com/en
LED - https://www.thinkgrowled.com
Soil - https://www.promixgardening.com/en
Germination - Cannakan https://cannakan.com/?srsltid=AfmBOopXr-inLXajXu3QFgKXCXXos4F1oEvScjMKIB5MR5dk8-GJ-F49
DOGDOCTOR 15% off
Smoking Papers - https://ziggioriginal.com/
Terpene saver - https://grovebags.com/
As always thank you all for stopping by, for the love and for it all , this journey of mine wold just not be the same without you guys, the love and support is very much appreciloved and i fell honored with you all in my life
With true love comes happiness Always believe in your self and always do things expecting nothing and with an open heart , be a giver and the universe will give back to you in ways you could not even imagine so
As always, this is shared for educational purposes, aiming to spread understanding and appreciation for this plant. The journey with nature is one of discovery, creativity, and respect. Let’s celebrate it responsibly and continue to learn and grow together!
Growers Love To you All 💚
#EternityGrowCup #RuntzHunt #GrowersLove #CannabisCommunity #AptusHolland #ProMixSoil #TrolMaster #Zamnesia #Plagron #ZiggiPapers #Grovebags

Likes
51
Share


@BudBoutique
Follow
Welcome to Bud Boutique Grow Diary - really appreciate all your love and support :)
Dont forget to check out my other current grows!
🗓️ This Week:
- Day 30: recovered pretty well and got transplanted into 2 liter pots with a lot of mycorrhizal from Great White Shark around the roots & pothole. let's get them roots even stronger!!
- Day 34: looking good after little transplant shock but she loves the more space for the roots, I can really feel it
🍸 started to give Cal-Mag Amino & Silica Force in a low dosage (at least once a week)
- EC: 1.1
- PH: 6.5
Thank you for still staying with me 💚
___________________________________________
--- 🌱 Strain (Sponsor) 🌱 ---
🏷️ Big Band by Kannabia Seed Company
https://www.kannabia.com/en/feminized-cannabis-seeds/big-band
--- 🥗 Nutrients and Feeding (Sponsor) 🥗 ---
* 🍸 XPERT NUTRIENTS: Master Grow A+B, Master Root, Enzymes
* 📅💪 baseline + additives: 2ml/l
https://xpertnutrients.com/
---💡 Lighting ---
💡AC INFINITY - Germination Kit
https://acinfinity.com/grow-accessories/propagation/humidity-domes/humidity-dome-germination-kit-with-seedling-mat-and-led-grow-light-bars-5x8-cell-tray/#product-warranty
--- 🏭 Grow Setup ---
* 🏠🌿 Indoor: Homebox 120x120x200cm (4x4)
* 📐🌀 PrimaKlima exhausting Fan 1180m3/h (running on 60-80%) & Can Light Filter 800m3/h & 1x Fanbox 1x Dyson fan for Air circulation
https://primaklima.com/de/shop/ventilatoren-de/ec-ventilatoren/pk160ec-tc/
https://canfilters.com/products/filters/
All Likes and comments are highly appreciated!!!
don't forget to check out my Instagram: budboutiquee
- Bud Boutique

Likes
15
Share


@All_our_small_plants
Follow
Bewässerung: 2500 ml jeden 3 Tag in der Dreizehnten Woche
pH-Wert: 6.3
EC-Wert: 1,6 mS/cm
Temperatur: 28ºC
Luftfeuchtigkeit: 50%
Schädlingsbekämpfung: Wir haben seit ein paar Tagen die Nematoden in der Erde und es sind schon deutlich weniger Trauermücken unterwegs.
PPFD: 600 µmol/m²/s
DLI: 38 mol/m²/Tag
Düngemittel: Sie bekommt ab jetzt nur noch Wasser.
Besonderheiten: Müssen jeden Tag Gießen durch die hohen Temperaturen. Haben wieder Raub Milben gekauft und sie an die Pflanze gehängt falls sich irgendwelche Schädlinge ins Zelt Trauen.
-Tag 85 Heute haben wir bei ihr die Trichome Kontrolliert, man kann erkennen das sie noch nicht alle milchig sind, es gibt noch ein paar Durchsichtige und fast keine Amber. sie braucht noch eine bisschen mehr zeit.
-Tag 89 Heute wieder Wasser gegeben.