
Likes
Comments
Share

@therealgrowmie
Follow
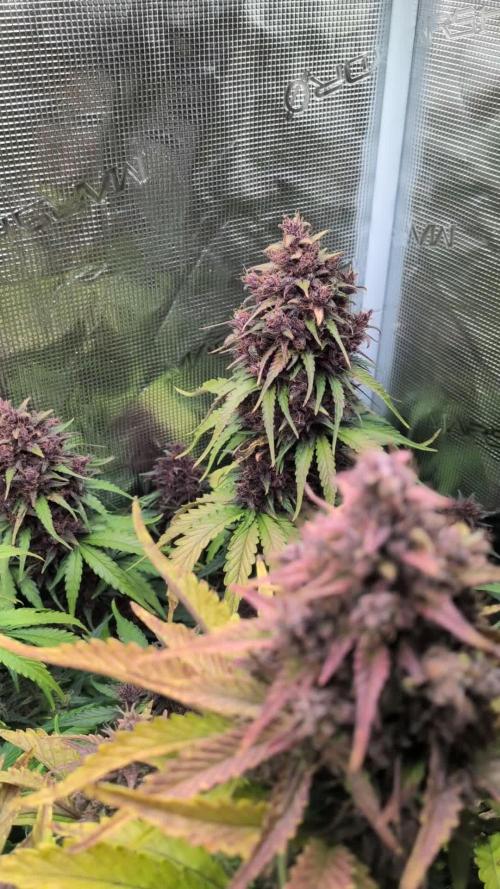
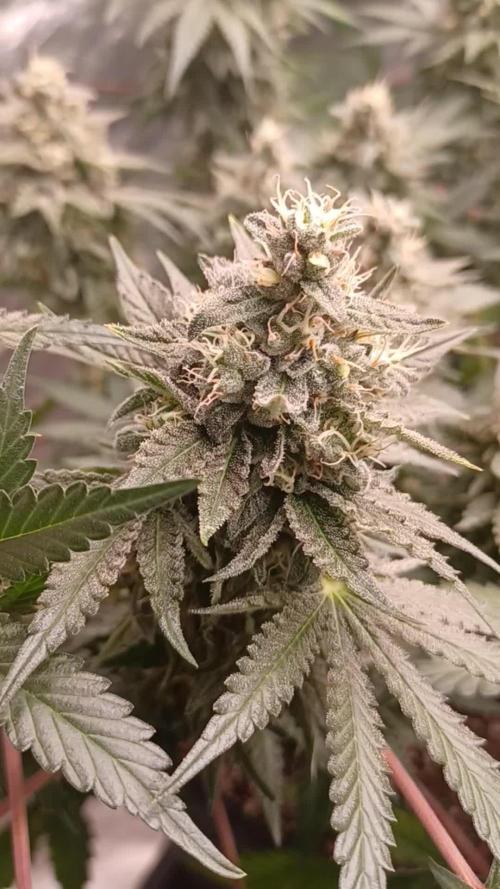
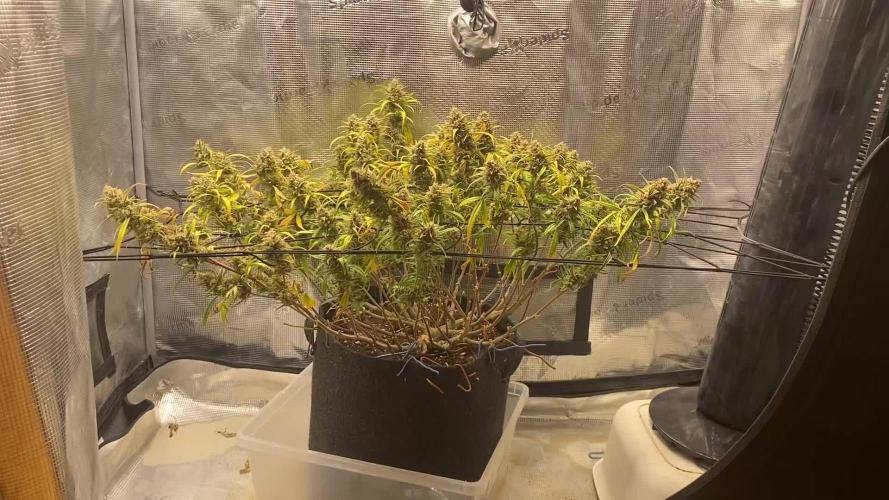
Ladies and Gentlemen — we’re closing in on the harvest window! 🌿✨
This run has been particularly fast, as we’re only at day 70. The plants are nicely stacked, and I’ll let them ripen right up to the last minute to hit around 20% amber trichomes — aiming for those dense, sticky nugs. 💪
By the way, the smell is amazing. It’s only pH’d water from here on out! 😎
Stats so far:
💧 Watering: 1.5L every other day
💦 Humidity: ~55% RH
🌡️ Temp (lights on): 22–26°C
🌡️ Temp (lights off): 20–22°C
📈 Avg. VPD (lights on): ~1.45 kPa


Likes
Comments
Share


Likes
19
Share


@Naujas
Follow
everything turned out very well :) and it's only with 50w and with 40x40cm space :) It was an interesting journey with her, a slightly different cultivation and old mistakes were discovered :) the flowers are not dense, but they are really very, very sticky :) I'm happy:)
Likes
8
Share

@DogDoctorOfficial
Follow
Skywalker OG — Legends of the 12/12 Galaxy
Week 8 from seed | Week 3 Flower
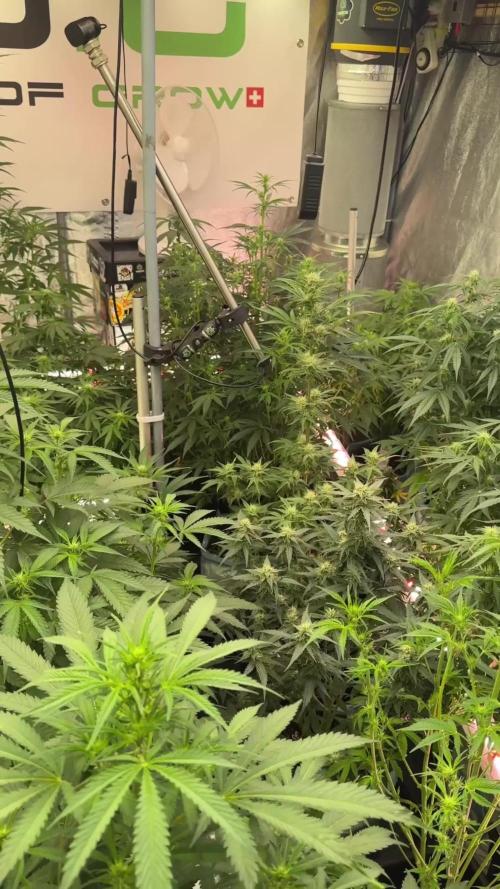
Another week in the jungle with our Skywalker OG girls growing under 12/12 from seed, and the room is looking healthy, vibrant, and full of life.
For anyone joining the diary now, here is a quick recap of the journey so far.
These plants were grown 12/12 directly from seed, a style I enjoy exploring because it allows the plant to express its structure naturally while keeping the cycle compact and efficient. After the early development stages and a recent defoliation session last week, the girls are now entering a beautiful phase where the canopy starts filling again.
And as often happens after a good cleanup…
it already looks like no defoliation ever happened.
The Skywalkers are doing exactly what they do best:
growing bushy, strong, and lush green.
The canopy is filling fast, and by the looks of it, we may have another light defoliation session coming soon to maintain airflow and light penetration deeper into the plant.
⸻
Environmental Conditions
At this stage the room is running slightly on the aggressive side, but with strong airflow and air exchange we are keeping things stable.
Current room parameters
Temperature: ~28°C
Relative Humidity: ~70% (slowly reducing)
Airflow: Strong circulation + active air exchange
Yes, these numbers are slightly higher than the textbook recommendations, but the key here is air movement and gas exchange. With strong airflow inside the canopy and constant air renewal, the plants remain comfortable and actively transpiring.
Still, over the coming weeks we will gradually reduce humidity and slightly lower temperature as the flowers begin to develop further.
⸻
Light Intensity
PPFD in the room varies depending on plant size and position.
Most of the Skywalker OG plants are receiving between:
800 – 1300 PPFD
There is also one wild card in the room pushing 1800–2000 PPFD, but that plant belongs to another genetic experiment and not to the Skywalker OG group.
For the Skywalkers, the current light intensity is pushing vigorous growth without visible stress, which is exactly what we want at this stage.
⸻
Feeding Strategy
The girls are clearly eating well right now.
Current nutrient EC: 2.4
Runoff EC (substrate): ~0.9
This tells us the plants are actively taking nutrients from the medium.
As long as the plants continue eating and the runoff remains stable, the recipe stays the same. If feeding slows or runoff EC starts climbing, we adjust accordingly.
For now, the system is balanced and working.
⸻
Current Nutrient Recipe
The current feeding program includes:
CalMag Pro
Terra Bloom
Power Buds
Green Sensation
Pure Zym
Sugar Royal
Vita race is available as a foliar spray, but at this stage of flowering I prefer not spraying the plants unless absolutely necessary.
Keeping flowers dry helps avoid unnecessary risks.
⸻
Why We Transitioned From Power Roots to Power Buds
Early in the cycle the focus was on root development, which is why we used Power Roots.
Now that the plants are established and entering full flower development, the focus shifts toward flower initiation and early bud formation.
This is where Power Buds comes into play.
It helps stimulate the plant’s natural hormonal signals related to flower site formation and bud development, encouraging the plant to direct more energy toward the reproductive stage.
⸻
Why We Added Green Sensation
Green Sensation is introduced at this stage to support:
• bud development
• terpene production
• overall flower density
• plant metabolism during bloom
It acts as a metabolic booster, helping plants maintain energy while building flowers.
The idea is not to push plants aggressively, but to support their natural flowering process.
⸻
Mixing Order — Why It Matters
The order in which nutrients are mixed is often overlooked, but it is important for solution stability.
The mixing process always starts with CalMag.
CalMag is added first until the base EC reaches approximately 0.7.
This establishes a stable mineral foundation for the rest of the solution.
After that we add:
1️⃣ Base nutrient (Terra Bloom)
2️⃣ Flower additives
3️⃣ Enzymes and metabolic boosters
Adding nutrients in the proper order helps prevent chemical precipitation and nutrient instability, keeping the solution balanced and fully available for the plant.
In other words:
Chemistry matters.
⸻
What to Expect Next
Over the coming weeks we expect to see:
• more vertical stretch slowing down
• flower sites stacking
• increased aroma development
• stronger nutrient demand
The main focus will be maintaining airflow, light penetration, and environmental balance as the canopy thickens.
If the jungle keeps expanding at this pace, another selective defoliation may happen soon to keep the plants breathing comfortably.
⸻
Final Thoughts
For now the room feels alive and balanced.
The Skywalker OG girls are healthy, green, and moving steadily into the flowering phase. It is always a pleasure to watch the jungle slowly organize itself as the plants begin their real work.
⸻
Thank You
A big thank you to everyone following this diary.
To the OG supporters, the new growers, the curious readers, the critics, the silent observers, and the GrowDiaries community as a whole.
Whether you comment often or simply watch quietly from the background, you are all part of this journey.
And of course, gratitude to the partners supporting this work.
The jungle keeps growing — one week at a time.
🌿
📡 Please stay tuned they can try and take us down but we never quit https://www.youtube.com/@DOGDOGTHEDOCTOR NEW
🙏 Thank you for your patience and continued support.
FOR DISCOUNT CODES AND MORE JUST FOLLOW THE LINK https://website.beacons.ai/dogdoctorofficial
📲 Don’t forget to Subscribe and follow me on Instagram and YouTube @DogDoctorOfficial for exclusive content, real-time updates, and behind-the-scenes magic. We’ve got so much more coming, including transplanting and all the amazing techniques that go along with it. You won’t want to miss it.
GrowDiaries Journal: https://growdiaries.com/grower/dogdoctorofficial
Instagram: https://www.instagram.com/dogdoctorofficial/
YouTube: https://www.youtube.com/@dogdoctorofficial Deleted by Youtube
Vimeo : https://vimeo.com/dogdoctorofficial Under construction stay tuned ⸻
Explore the Gear that Powers My Grow
If you’re curious about the tech I’m using, check out these links:
🔆 Lighting & Environmental Control
• Future of Grow — Advanced LED lighting technology
https://www.futureofgrow.com/
DISCOUNT CODE: DOG20
• Lumiflora — Under-canopy LED lighting
https://lumiflorade.com/
• TrollMaster — Environmental controllers and automation gear (past collaboration)
⸻
Genetics
• Zamnesia Seeds — Genetics used in this project
https://www.zamnesia.com/
⸻
🌱 Soil, Substrates, Boosters & Root Support
• Plagron — Substrates, bio mixes, and supportive products
https://plagron.com/en/
⸻
🎒 Storage, Curing & Preservation
• Grove Bags — Curing and storage solutions
https://grovebags.com/
⸻
📸 Photography Equipment & Tools
(Not sponsors, but part of my creative toolkit)
• Sony A6700
• Sony full-frame macro lens + few more
• Stacking photography workflow - learning
• iPhone (for behind-the-scenes shots)
We’ve got much more coming as we move through the grow cycles. Trust me, you won’t want to miss the next steps, let’s push the boundaries of indoor horticulture together!
As always, this is shared for educational purposes, aiming to spread understanding and appreciation for this plant. Let’s celebrate it responsibly and continue to learn and grow together.
With true love comes happiness. Always believe in yourself, and always do things expecting nothing and with an open heart. Be a giver, and the universe will give back in ways you could never imagine.
💚 Growers love to all 💚
📸 P.S. – The Eye Behind the Lens
All photos in this diary (for now — except for the ones showing the camera, which I took with an iPhone) are taken with a Sony A6700 paired with a Sony full-frame macro lens and a few more.
Photography is part of the story — it’s how we share the fine textures, the glow, and the quiet details that words can’t always capture.
I’ve also started experimenting with photo stacking — a technique where multiple images, each taken at a slightly different focus point, are layered together to create one perfectly sharp image from front to back.
It’s not digital enhancement or AI; it’s pure photography — a way to reveal the plant’s beauty in microscopic depth, from trichome to petal.
You’ll even see a few shots of "ghost me" capturing the shots — camera, lens, setup — because every grow deserves not just to be cultivated, but documented like art.
FOR DISCOUNT CODES AND MORE JUST FOLLOW THE LINK https://website.beacons.ai/dogdoctorofficial
NEW DISCORD - Official Server Invite Link : https://discord.gg/ksjAkA5T74

Likes
19
Share


@4Haut
Follow
Hi folks, now it’s almost the end of the fourth week. Three days ago, I had to repot from a 1.5-liter container to an 11-liter fabric pot. Everything went smoothly. I was a bit nervous, but it turned out to be no problem. The roots have spread throughout the entire pot and along the edges, and they looked fresh and healthy. 🌿
She is growing very well in my opinion. Two of the lower leaves are yellow and limp, but the rest are beautifully green and juicy.
Happy growing boysNgirls :)

Likes
34
Share


@MisterSix
Follow
Week 5 for my plant so far it might be 4 more week to go, i have cut down a little bit of nitrogen
The bud get nicer and got more trichomes but it seem not harden up by now.
I have 5 large branches as in the video and 5 other small branches, how many gram dry will i get anyone have a guess i'm excited
the last picture is the bud i cut down because the downside of it has greymold, i dry it for 5 day and cure for 6 day seem pretty nice, enter your thought :)
If there anything i would do in this stay to maximize the crop, need suggestion

Likes
25
Share


@Rob691
Follow
Let's go for this session. Long time I wanted to grow Desfran seeds. First because it's almost 100% sativa, and it definitely gets my preference. Second, because it grows fast and high... if everything goes ok !
Germination day 5 : 3/3 Desfran
Germination day 12 : The litle girls growing gently. The second pair of leaves is coming, and I thing I'll turn into "week 1" on saturday with their first repotting.

Likes
20
Share


@Skunklerman
Follow
Having trouble keeping humidity up as my grow is in the basement. Have home humidifier set to 35% but not enough even with a humidifier in the tent set to 60. Lights out isn’t an issue, it’s when lights on and the 6” exhaust is running that my temps are good but rh too low.
UPDATE 12/21: The girls are back on track I fixed the whole home humidifier and added more humidifiers so my humidity is up to 50s. Plants are extremely healthy and the soil ecosystem is dreamy. Lots of worms at subsurface, cover crop is spreading and growing well and the plants are loving life.

Processing
Likes
5
Share


@JerMeds
Follow
I got there new drip system installed, I took a video of it finishing out 3 gallons to the 6. They are all very healthy and growing really fast. It has been hot but they are absolutely unphased. I just have to water just about every day.
I'm letting them feed off the soil and only giving them enhancers. Hopefully I'm laying the foundation for a big harvest.
I will be starting them on Sensi Bloom A and B at small dose soon.
One of my White Widow XXL Autos died so that opened a spot for an extra IB.
Shes just getting above ground and no issues to report.

Likes
7
Share

@NSABND
Follow
Day 57 😁👌all the queens are ok 🙏
Day 58 the queens got some fertilizer 💪😃👍
Day 59 what should i say... everything seems to fine 😃🙏👍
Likes
4
Share


@AlpAge_Cino
Follow
Not so much to say this week : everything looks OK. OAH #7 is still struggling to live and will be replaced by feminized Runtz from Pevgrow soon (mother plant for a futur run).
I put back the FC-E3000 driver in tent in order to warm up inside day air to 28-30°C range and let plants manage high RH and CO2 (still between 700-900 ppm, so no CO2 supplement for now) : no problem for Amnesia as it enjoy this kind of temp.
2023/06/13 : another (and last) round of Boom Boom Spray, 5 days after first one, during vegetation grow.
2023/06/16 : as planed, I removed dying plants (#1 and #7) and added one Runtz feminized from PEVseeds for next run with clones. From 10 seeds, 1 never popped and 3 died as root could'nt get out of the Jiffy, so it will be a poor 60% rate!😪
And I almost forgot, pistils are out!
Likes
1
Share

@Easybudzzz
Follow
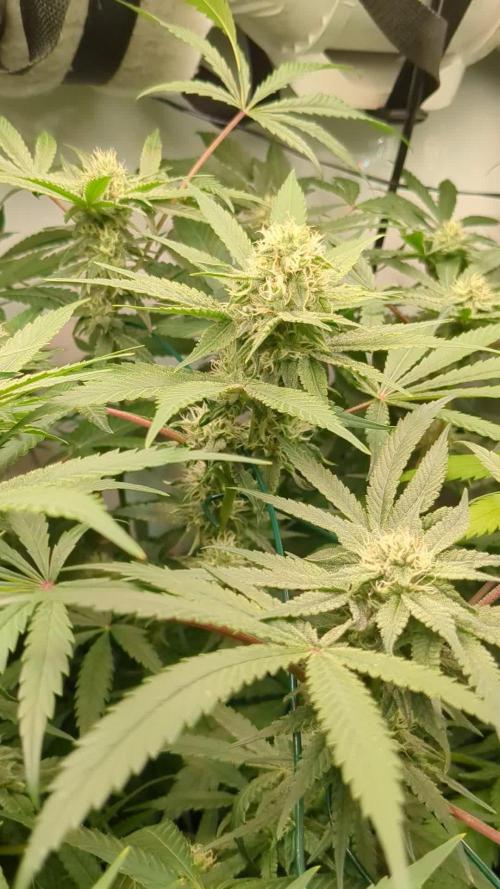
Everything is still going very well. Resin production is already very strong, and the resin has a delicious aroma. No fertilizer has been applied, and the two lamps are running together at a combined 250 watts. The distance between the lamps and the plants is actually too small, but this doesn't seem to bother them.

Likes
35
Share

@Cooky_420L
Follow
7' semaine de floraison, elles ont 94 jours dont 50 jours de floraison. C'était la dernière semaine d'engraissage. Aucun soucis cette semaine ,A1 à reçu 2x 2L de nutriments et B1 à reçu 3x 2L de nutriments dans la semaine ( 1.5 ml PK13/14 , 1 ml Green sensation) EC 153 . Réglages culture inchangé.
Merci aux Growmies qui me suivent ✌️ Bonne semaine de culture à tous les p'tites ✋️ vertes 🌱🌞🌱
Likes
6
Share

Likes
24
Share


@Grnhead
Follow
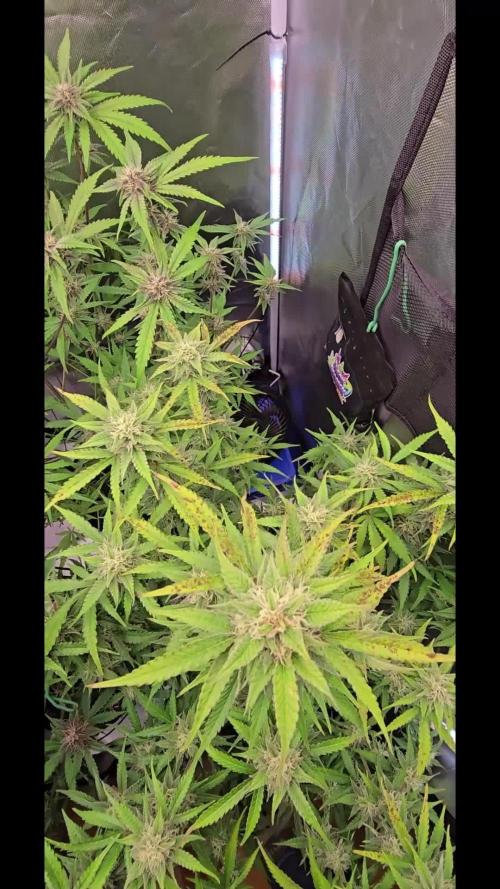
The smell is really starting to come in. Bought 2 sets of 80 mm internal fans to increase the airflow through the plant and in the box. Many of the lower leaves are curling down and I think it was a mixture of the high morning humidity and the lack of air flow. Now there are 5 internal fans and a large external fan, and it should be more than enough air flow. Growth is starting to slow finally, the height is perfect right now but I have a feeling it’s going to keep getting taller. I keep tying her down as best as I can.


Likes
28
Share


@DreamIT
Follow
-Sponsored by:
🎭ZAMNESIA SEEDS🎭-💡VIPARSPECTRA💡-💐GREEN BUZZ LIQUIDS💐-🛠️WEDRYER🛠️
🏁18/6 hello growerz, with today I start the resumption of diaries on GD. I have 13 new genetics in germination and as many diaries. I start by putting the seeds in water for 24 hours, after a day I will put the two seeds in two different jiffies, one with humic acid from greenhouseseeds and the other with just plain water. Get comfortable and follow the updates 😉👋🦄
19/6 The seeds were divided and placed in two different jiffies, one with humic acid and one with water only.
21/6 after another 24 hours in the dark the jiffies were moved under the lamp. let's start the dances!
23/6 the seed in the jiffy with only water has already sprouted and is about to open, while the one in the jiffy does not want to know yet, but we are in no hurry
24/6 the seed in jiffy with humic acid begins to show, I trust it will fully emerge by evening. the other looks a little tired but is fine
25/6 still nothing on the second suit, I'm starting to worry
30/6 despite not being in great shape, the born seed proceeds with its life, while the second one that does not want to be born will give way to a lava cake always of zamnesia
__________________________________________
Personal advertising (contains affiliate links)
__________________________________________
🦄Zamnesia boasts the most complete and accurate site where you can find everything related to cannabis and the "psychedelic" world. Autoflowering, feminized seeds, mushrooms, salvia divinorum, afrodisiacim of everything, and more! ( no affiliate link)
✅https://bit.ly/Zamnesiaseeds
__________________________________________
Did you know that Green Buzz Liquids fertilizers are 100% vegan? A complete line of products ready to give the best to each of your plants! Visit the site and see my journals to see how they work 🦄
🤯 And with the code "dreami t" you will immediately receive a 15% discount on your purchases
✅https: //bit.ly/GreenBuzzLiquidsPro
__________________________________________
👀 Are you looking for a good lamp to start with? 👀
🌞Viparspectra has something more than the others, take a look at their site.
⏩ Use "GDVIP" for an extra discount or "DREAMIT3" for an extra 5 %% discount
👀 Search for it on Amazon
✅Amazon USA: https://amzn.to/30xSTVq
✅Amazon Canada: https://amzn.to/38udUVe
✅Viparspectra UE: bit.ly/ViparspectraUE
✅Viparspectra USA: bit.ly/ViparspectraUS
______________________________________________
🌈 Tired of blowing on your weed hoping it dries quickly? Check out the Wedryer website! You will find a well-made accessory that will help your weed dry in just 8-10 days without the annoying risk of finding mold or other annoyances! (no affiliate links)
✅https: //bit.ly/Wedryer_
______________________________________________
📷🥇Follow the best photos on Instagram 🥇📷
https://www.instagram.com/dreamit420/
Backup
https://www.instagram.com/dreamit4200/
🔻🔻Leave a comment with your opinion if you pass by here🔻🔻
🤟🦄💚 Thank you and good growth 💚🦄🤟
Likes
26
Share


@dataTwiiix
Follow
01/07/21: 3ème semaine de floraison. Les premiers boutons de buds se développe à leurs aises pour ma première expérience avec des graines non auto. Je suis conquis.
01/13: la troisième semaine de floraison se termine très bien :D

Processing
Likes
6
Share


@El3vated
Follow
This week I transplanted directly into a 5 gallon pot. There were no signs of stress after transplanting. So far, it is looking short, stacked and healthy.


