


Likes
Comments
Share


@Elcogollosagrado
Follow
Seguimos con la semana 9 de floración perdón por inictavidad el trabajo es lo que tiene saludos cultivadores🤙🏻😊🏼🌱

Likes
15
Share

@tsf_homegrow
Follow
🇩🇪
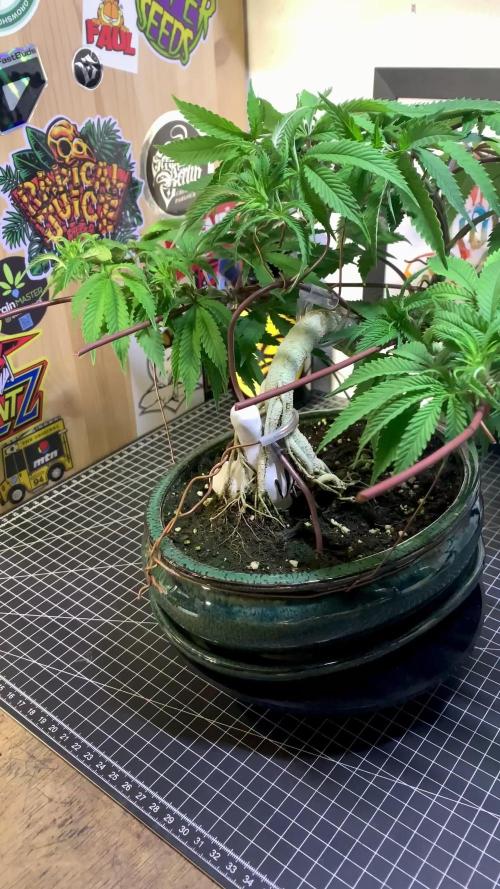
31.1. mal wieder in Form gebracht und einige Triebe entfernt die nächsten Wochen werd ich alle Triebe versuchen auf eine Höhe zu bringen. Und ich muss vermutlich etwas höher mit der Dünger Dosis langsam zeigen sich ein paar Defizite. Aber das sollte sich mit der Zeit regeln. Happy growing💛✌️
🇬🇧
1.31. I've shaped it again and removed some shoots. Over the next few weeks, I'll try to get all the shoots to the same height. And I'll probably need to increase the fertilizer dose a bit; some deficiencies are slowly becoming apparent. But that should sort itself out over time.
Happy growing💛✌️

Likes
33
Share


@EeyoreTheHomie
Follow
I don't have single complaint. I love this strain and will absolutely be growing more in the future! Great bud structure, never a yellow leaf, just overall badass plant. Very happy I took a clone lol.


Processing
Likes
9
Share


@High_Grade_Dadli
Follow
Main crown got damn last week on plant with lil to no training done to it...leave are also a bit yellow going to straighten it out this week
Likes
39
Share


@DjDaveAtHome
Follow
Strange week for the plants as I switch in Hygrozyme Enzyme to help with the roots. A lot of dead tissue being consumed by beneficial microbes and fungi. PH rise more than 10 fold every 24 hours while EC levels rise by a point or two. The old roots are dying and being consumed new while bright, crisp, white roots are appearing.
New growth is vigorous and the plants seem to enjoy the transition as hard as it is.
Dinamed Plus from Dinafem Seeds (1) and Blueberry Headband (1)from Humboldt Seeds.
https://www.dinafem.org/en/dinamed-cbd-plus/
https://www.humboldtseeds.net/en/blueberry-headband/
Lighting
https://www.horticulturelightinggroup.ca/products/260w-qb-v2-led-kit
DWC Nutients
https://generalhydroponics.com/floraseries
FloraGro 1 ml/l
FloraBloom .5 ml/l
FloraMicro 1 ml/l
Diamond Nectar: N/A
https://generalhydroponics.com/diamond-nectar
Cal Mag: 2 ml/l
https://generalhydroponics.com/calimagic
SuperThrive: .5 ml/l
https://superthrive.com/
https://hylineproducts.com/products/hygrozyme/#one
Grozyme: 2.5 ml/ltr
Tarantula
https://www.advancednutrients.com/products/tarantula/
Epsom salts
Tarantula Tea
4 liters RO or tap water
5 ml (1 tsp) organic sulphur free molasses
5 ml Alaskan Organic grow fertilizer (or something comparable)
5 ml Alaskan bloom fertilizer (or something comparable)
5 ml Seaweed or kelp fertilizer
2-4 ml Advanced Nutrients Tarantula


Likes
6
Share


@Rugginho94
Follow
58 days of flowering: I started cutting the most mature apicals 42/57. I will wait for the remaining 7-14 days.
first 42: 370.5g

Processing
Likes
20
Share


@Kaneberrill
Follow
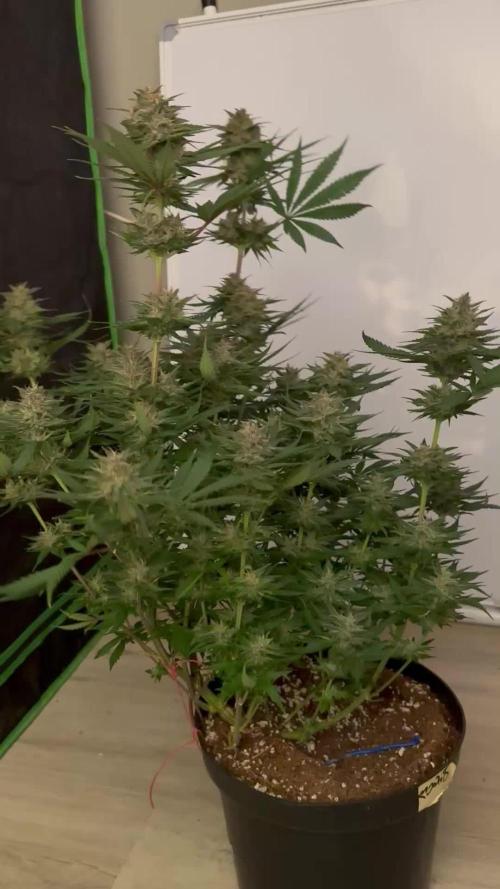
Bit of stretching apparently due to not enough strength in My led light which is 200w??



Likes
1
Share


@RussianGrower
Follow
10 weeks. 70 days. Auto AK 47. Soon I will make updates at harvest and create a new diary of guerrilla outdoor.


Likes
21
Share


@JuicyFruit
Follow
Week 9 - Day 63 - 26/11/19
Im so grateful to be a part of this community and to be at this milestone so to speak :) had an amazing time growing this plant, thanks to everyone who had a look or contributed to my diary!
Harvest was fun but that little 16cm tall plant stunk my whole house out of cheese when i started trimming her :)
Added a few photos and videos of the harvesting, i got a little ball of hash off the scissors which i smoked in a bong and it was nice! very hashy!
its taken about 2 hours to finish trimming but ive stored all the trim in the freezer along with the dwarf trim from my last diary :) im making cannabutter and edibles this week. really excited for that.
So i hung my drying rack outside the tent beside the passive intake. temps are between 20-22c in the room so it should dry fine and im hoping the passive intake will drag the smell in and keep it sort of fresh in the room :)
This diary has got me excited for my Quick One plant as its much taller and has colas like arms :D.
Il update in 3-7 days when buds are dried and then il be updating a lot throughout curing :)
Day 65 - 28/11/19
Still drying these buds :) they look much smaller now, i smoked a small bud and although its much drier than harvest its still spongy/sticky and stretchy when breaking apart so 2-3 more days drying i think.
Smell is wonderful especially if you get it on your hands, its like tropical fruit cheese and the effects of thc are not as pronounced with this strain but i felt very relaxed, no muscle pain etc and no paranoia or anxiety. i havent had a clear relaxed headspace before bed in a very long time. Any 1:1 THC/CBD is a must grow, give it a try if you havent already, i couldnt have picked a better starter medical plant as i love a good old cheese strain :)
And i made some cannabutter out of the 59g of sugar leaves i got from this diary and my first diary. il have to upload a few pictures of the process later and let you all know if the cannabutter worked in my brownies :)
Day 66 - 29/11/19
Started curing and added a photo to show :) buds were at 59-60% when left in the jar alone for a few hours so i threw in my boveda 58% pack and started burping 5-6 times per day :) i could have cured for a week before adding the boveda pack but i had barely any bud in the huge jar so i thought it would be wise to add the boveda to prevent mold and to keep it curing perfectly!
Day 67 - 30/11/19
Posted a picture of a handful of buds :) i smoked a few in a bong and had a joint and it left me nice and medicated! no anxiety no paranoia nicely locked to the couch and sleepy. perfect nightime smoke as it wont trip you out or mess with your head, just a nice happy little mellow buzz!
Flavour hasnt really came through yet, not sure what to expect as im a newbie but its slightly like cheese/flowery/herbs.
Curing is definitely helping every day! the smell is getting better, buds are getting really smooth and they look amazing also! really excited for the next few weeks curing :)
Final Update - Day 69 - 02/12/19
Finally here at the end of this diary and i have to say i loved growing this plant. it was a dark green colour throughout growing and took whatever i threw at it.
Buds are nice and dry and curing well. i saved the best buds until last and added a couple of photos of them and a video also! they are covered in trichomes and feel great.
Not much of a smell from the buds and it tastes like a sweet floral cheese mixture.
Im pretty couchlocked from a bong of this strain so im gonna end this diary here and go relax but many thanks for following along folks and take a look at my other diaries if you get a chance :)
Peace!

Likes
1
Share


@I_Identify_As_A_Dan
Follow
Week 9 for Strawberry gorilla by fast buds
Shes getting so close to the end 😍 I had to remove a little bit of bud rot at the start of the week, but ever since haven't been able to find anymore developing 😇
Quite surprising how little water these girls drink... still only got fed once this week with a bit of (WCA) Water Soluble Calcium & (FFJ) Fermented fruit juice for its last few weeks of life now.
Really excepted her to drink more with this hot hot weather.
Likes
16
Share


@Naturalist
Follow
Starting to bud up & the gelatos are stretching quite a bit at 30" to 24" on the LSDs.
Runoff PPMs are running a bit high at 1183/pH 5.7 average last watering, going to flush straight water next time.

Likes
5
Share


@CzAlmighty
Follow
Hi friends . 🦍🦍🦍🦍🦍🦍
fifteenth day after switching to flower phase. the flowers are strong. The flower responded very well to the transplanting. I bend the flower every 5 days. This will be a very beautiful harvest if nothing goes wrong.🤗
Have a nice day and thank you for watching.💚

Likes
18
Share


@OrganicAutomatic
Follow
Perfect strain. 5 gelato's grew in 3gal pot. The ones that been lst took a week to 3 week more than the ones that grew naturally. #4 did lst given 47dry g. #2 grew naturally and give 40 dry g.
Overall 204 dry g out of 5 gelato's.

Likes
8
Share

@DogDoctorOfficial
Follow
💙 Project Blue Tent – Week 10
Pickle Lemon Haze F1 – Pheno A
🌸 The Week We Stop Touching And Start Watching
Hello everyone, and welcome back to another chapter of Project Blue Tent! 💙🌱
And this week...
there isn't a huge intervention to report.
😂
And honestly?
That's exactly what I wanted.
After everything we did during the previous weeks, the girls have reached the point where the best thing we can do is step back and let them work.
Pickle Lemon Haze F1 Pheno A is looking absolutely beautiful.
She's healthy.
She's vigorous.
She's flowering.
And she's showing us the results of all the work we've put into her over the previous weeks.
So this week, we're not changing the architecture.
We're not performing another major defoliation.
We're not moving branches around.
We're not trying to force anything.
We're watching.
And we introduced one new element to the experiment:
💡 LumiFlora 150W Under-Canopy Lighting.
🌿 PHENO A – LETTING HER RECOVER AND DEVELOP
Pickle Lemon Haze Pheno A is approximately 145 cm tall, and she's carrying a substantial flowering structure after her long vegetative period and aggressive stretch.
If you've followed the previous update, you'll remember that this girl went through quite a transformation.
The plants stretched far more than expected.
The vertical space became limited.
The LEDs were getting too close.
We moved the carbon filter and extractor outside the tent.
We raised the LEDs.
We opened the canopy with a major defoliation.
We installed a second SCROG.
We added additional airflow underneath the canopy.
And we adjusted the flowering nutrition.
There was a lot happening.
But now?
It's time to see what all of that work actually accomplished.
And looking at Pheno A...
I'm very happy.
🌸
She's not asking for another big intervention.
She's asking for time.
So that's what we're giving her.
✂️ THE DEFOILATION IS NOW TELLING ITS STORY
One of the things I'm watching particularly closely this week is the response to the major defoliation we performed previously.
When we did it, the plants looked dramatically different.
We removed a substantial amount of foliage because the canopy had become extremely dense.
But the objective was never simply to remove leaves.
The objective was to make the flowering structure more functional.
Now we're beginning to see the result.
The plant has opened up.
The branches are easier to see.
The flowering sites have more space around them.
Air can move through the structure more freely.
And Pheno A continues developing beautifully.
That's the part I love about this stage.
The work was done weeks ago.
Now we're watching the plant respond to it.
There's nothing to rush.
There's nothing to force.
We simply observe.
🌿
And that's actually a very important part of cultivation.
Knowing when to act is important.
Knowing when NOT to act can be just as important.
💡 INTRODUCING THE LUMIFLORA UNDER-CANOPY LIGHT
There is one new addition this week.
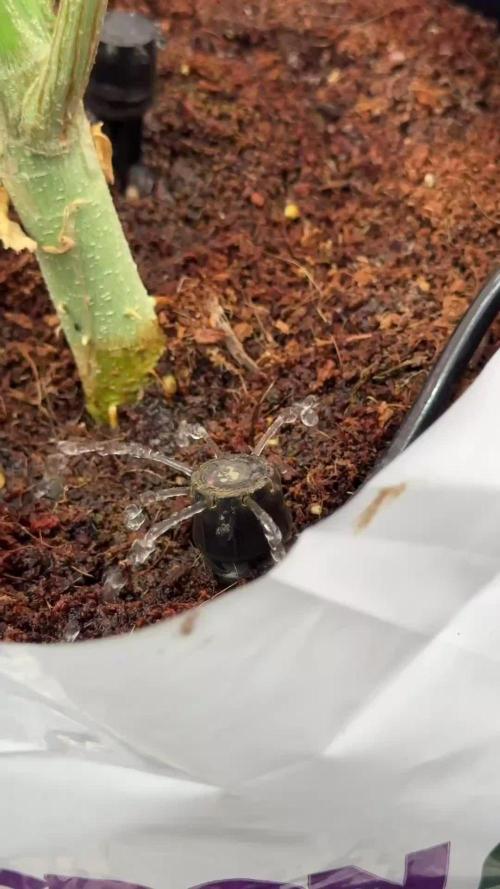
The **LumiFlora 150W full-spectrum under-canopy light** is now part of the setup.
And with plants this large, the reason for introducing supplemental lighting underneath becomes pretty obvious.
The main LEDs are providing the primary light from above.
But when a plant reaches this size and develops this much structure, the lower portions of the canopy naturally receive less direct light.
That's simply how a dense canopy works.
So instead of constantly removing more foliage to chase light penetration, we're taking another approach.
We're bringing supplemental light to the lower canopy.
The LumiFlora is a **150W full-spectrum fixture**, with additional emphasis toward the red portion of the spectrum.
We're positioning it underneath the canopy to provide additional usable light to areas that naturally receive less from the main fixtures.
The idea isn't to replace the overhead lighting.
It's to complement it.
The main LEDs continue doing the heavy lifting from above.
The LumiFlora gives the lower portion of the plant another source of light.
And now...
we watch.
💡🌱🌸
I'm particularly interested in seeing how the lower flowering sites respond over the coming weeks.
That's the experiment now.
🕸️ THE SECOND SCROG IS STILL DOING ITS JOB
The second SCROG that we installed last week is also staying exactly where it is.
And that's another reason why we're not doing much this week.
It's working.
The first SCROG helped us organize the plant during the vegetative phase.
The second SCROG is now helping support the flowering branches as they continue developing.
With Pheno A being such a tall and vigorous plant, that additional support will become increasingly useful as the flowers gain weight.
We're not trying to force her into another shape now.
The architecture has already been established.
We're simply giving that architecture the support it needs to finish.
🌬️ AIRFLOW – KEEPING THE CANOPY MOVING
The airflow arrangement we created last week is also staying in place.
We have airflow working above and below the canopy, with the additional Zamnesia clip fan underneath helping move air through the lower portion of the plant.
That's especially useful now that we've introduced supplemental lighting underneath the canopy.
More light underneath means we want the lower canopy to remain well ventilated as well.
So we're keeping the air moving through multiple levels of the plant.
Again...
nothing dramatic.
Nothing complicated.
Just a stable environment and consistent airflow.
And when everything is working?
Don't fix what isn't broken.
😂💙
NUTRITION – KEEPING THE GIRL HAPPY
The feeding program also remains consistent.
We're continuing with the PLAGRON Hydro program:
PLAGRON Hydro A — 2.2 ml/L
PLAGRON Hydro B — 2.2 ml/L
🌱 PLAGRON Hydro Roots — 1 ml/L
🌸 PLAGRON Power Buds — 1 ml/L
pH adjusted as required
The plants are responding beautifully, so there is no reason to make unnecessary changes.
They're drinking.
They're flowering.
They're developing.
And they're showing us healthy growth.
So we continue.
This is another part of the experiment that I really enjoy.
Sometimes the best feeding strategy is simply consistency and observation.
Don't feed a number.
Watch the plant.
💙
🌸 THIS WEEK IS ABOUT PATIENCE
If I had to describe this week's update in one word, it would be:
Patience.
We've already done the big work.
Now we're waiting to see the results.
Pheno A has had time to recover from the defoliation.
She's settling into the second SCROG.
The airflow is established.
The LEDs have been raised.
The vertical space problem has been solved.
The nutrition is stable.
And now we've introduced supplemental under-canopy lighting.
That's enough variables.
We don't need to keep adding more.
😂
So this week we're simply watching her flower.
🌿 FROM BUILDING THE PLANT TO BUILDING THE FLOWERS
For so many weeks, the story of Pickle Lemon Haze Pheno A was about building the plant.
Growing.
Training.
Stretching.
Topping.
SCROG.
Branch development.
Canopy management.
Defoliation.
But now?
The structure is there.
The framework is established.
The support is in place.
The environment is stable.
And the story is changing.
Now I want to see those flowering sites become the main character.
🌸
That's why we're not touching much.
We're giving her the opportunity to turn all that structure into flowers.
🔬 SAME ROOM. SAME ENVIRONMENT. HER OWN STORY.
One of the most interesting parts of Project Blue Tent is that all four plants are sharing the same ecosystem.
Same room.
Same lighting.
Same irrigation.
Same nutrition.
Same environmental conditions.
Same cultivation philosophy.
And yet...
each phenotype still tells her own story.
Pickle Lemon Haze Pheno A has certainly given us one hell of a chapter.
😂💙
She's been vigorous.
She's stretched aggressively.
She's needed structural management.
She's gone through a major defoliation.
She even lost one branch during training.
And despite all of that...
she's still standing beautifully.
That's her story.
And now we're getting to see what she does with the space we've created for her.
🌸 CURRENT GROW CONDITIONS
🌸 Flowering: Week 10
📏 Height: approximately 145 cm
💡 Light schedule: 12/12
☀️ Day temperature: 27°C
🌙 Night temperature: 27°C
💧 Relative humidity: 61%
⚗️ pH: 6.01
⚡ EC: approximately 2.49 mS/cm
🌡️ Solution temperature: 24°C
🌱 Substrate temperature: 24°C
🌬️ CO₂: approximately 666 ppm
💦 Watering: approximately 1.6 L per plant / 24h
? Pot size: 8 L
💡 LumiFlora Under-Canopy: 150W Full Spectrum
💙 THE BEST THING WE CAN DO RIGHT NOW
Looking at Pheno A this week, I keep coming back to the same thought:
Leave her alone.
😂
Not literally, of course.
We're still monitoring everything.
We're still checking the environment.
We're still watching the nutrition.
We're still observing the flowers.
We're still making sure the airflow is doing its job.
But we're not trying to constantly manipulate the plant.
We've done the structural work.
Now we want the plant to show us the result.
And that's a very satisfying stage to reach.
🔭 LOOKING AHEAD
Over the next few weeks, I'll be watching several things closely.
🌸 Flower development throughout the canopy.
💡 The response of the lower flowering sites to the LumiFlora.
🌿 How Pheno A continues recovering from the heavy defoliation.
🕸️ How the second SCROG supports the developing branches.
🌬️ How the airflow performs through the mature canopy.
How the plants continue responding to the current feeding program.
But for now...
no major changes.
No unnecessary intervention.
Just observation.
Because Pheno A is looking happy.
And when she's happy...
I'm happy.
😂💙
🌸 FINAL THOUGHTS – NOW WE WATCH
What a difference a few weeks can make.
Not long ago, we were looking at this plant and wondering how we were going to fit her into the tent.
The stretch was aggressive.
The LEDs were getting too close.
The canopy was becoming too dense.
We had to move equipment.
We had to raise the lights.
We had to defoliate.
We had to install another SCROG.
We had to improve the airflow.
And now?
We're standing back and watching.
That's the beauty of this stage.
The work has already been done.
The plant has been given the structure.
The room has been given the space.
The branches have been given support.
The canopy has been opened.
The environment is stable.
And now we've added one more tool to the experiment:
The LumiFlora 150W full-spectrum under-canopy light.
It's not about throwing more and more equipment at the plants.
It's about giving the lower canopy an additional source of light now that the plants have become so large.
And then...
we wait.
Because sometimes the best thing a grower can do is recognize when the plant doesn't need another intervention.
Pickle Lemon Haze Pheno A has already done her part.
She's built the structure.
She's survived the stretch.
She's recovered from the defoliation.
She's adapted to the new architecture.
She's continued flowering.
And now...
she gets to finish.
💙🌸🌿
🙏 A HUGE THANK YOU
A huge thank you once again to Zamnesia for making Project Blue Tent possible and for giving us the opportunity to explore these beautiful Pickle Lemon Haze F1 genetics phenotype by phenotype.
Thank you to PLAGRON for the Hydro nutrient line supporting these vigorous girls through their flowering cycle.
A massive thank you to Zamnesia for the Phytonaut LED lighting, curved scissors and clip fans that continue playing such important roles inside this project.
Thank you to Mars Hydro for the irrigation and drainage system that keeps these girls consistently supplied and the ecosystem running smoothly.
And a special thank you to **LumiFlora** for the 150W full-spectrum under-canopy light, which we're now introducing into the experiment to see how supplemental lower-canopy lighting performs during this stage of flowering.
And of course, thank you to GrowDiaries for giving us the platform to document the entire journey.
Most importantly...
thank you to everyone following Project Blue Tent.
This week wasn't about doing more.
It was about seeing what everything we've already done has created.
We trained her.
We supported her.
We opened her up.
We gave her room.
We improved the airflow.
We raised the lights.
And now...
we watch.
Pickle Lemon Haze Pheno A is healthy.
She's vigorous.
She's flowering beautifully.
And she's got everything she needs to continue the journey.
So this week, we're putting the tools down...
taking a step back...
and letting this beautiful girl do what she does best.
Grow.
Flower.
Finish.
💙🌸🌿
Until next week...
More flowers.
More observation.
Less interference.
And hopefully...
a whole lot more Pickle Lemon Haze F1 magic.
Growers Love, happy growing, and take care everyone! 🌱💙
Likes
8
Share


@dreamLife
Follow
Finalmente el día de cosecha, la producción no fue de las más abundantes pero suficiente para mi consumo personal, bastante entretenido el cultivo en DWC, lo repetiré en mi siguiente cultivo pero con una semilla automática.

Likes
44
Share


@Cogollo_eu
Follow
**Encontrarás la traducción a español al final de la descripción**
From/Desde: 10/05/19 || To/Hasta: 16/05/19
From day/Desde día: 78 || To day/Hasta día: 84
You can find the Money Maker Diary here:
** Podéis encontrar el diario de las Money Maker aquí:**
https://growdiaries.com/diaries/25667-gorillamakingmoney-gorilla-vs-money-m
-----IMAGES & VIDEOS-----
5 - HomeMade Organic & Cheap CO2 generator (more info in week summary)
9, 10, 11 & 12: The bud on the right is a Gorilla one, the buds in the left or/and in the middle are Money Maker ones.
15 - Same Gorilla plant buds, one affected by CO2 in the roots and the other not.
-----WEEK SUMMARY-----
The smell is more sweet and intense every day, friends that came home turned them eyes into crystals when they see this little babys. The size isn't awesome, but the high ammount of buds full of crystals plus the strong sweet aroma makes them awesome. Buds are growing and fattenning very very well.
This week i added a boost of HomeMade CO2, i never measured the results of this invention so i can't give CO2 measurements. This method is widely used in home aquariums and there is where it comes from. For those interested i'm going to write here more detailed instructions. The 4 liters i've made will last for about 2 weeks.
---NEEDINGS---
- 250 ml Bottle
- 6~10 l Bottle
- 400 g Sugar / l water
- 1 Envelope of organic baker's yeast / l water (CHEMICAL WILL NOT WORK)
- 3 mid plastic tubes 40~50 cm
- 1 short plastic tube 5~6 cm
- 4 tube adapters
- Hot glue to seal adapters
The process of creating CO2 is simple, mix water, organic yeast and sugar in a bottle, and the sugar will free CO2 in the process of fermenting to alcohol due to the yeast.
1. Make a hole in the center of the big bottle cap, insert an adapter and secure it with hot glue
2. Make 3 holes in the small bottle cap and glue the other 3 adapters
3. Link both caps with one of the mid tubes and insert the other tubes on free adapters
4. Insert a short tube in the bottom of the small cap in the adapter that came from the big cap
5. Watch the Video!!
-----WATERING CALENDAR-----
Plants are beginning to drain the pots a bit faster so from now on i will raise the water ammount on each watering day 0.25 l.
11/05/19 - 1,5 l with All week nutrients -(Nirvana & Blombastic) also Big Bud half dosed @ PH6.4 & 2 E.C.
14/05/19 - 1,5 l with Bud Candy, Big Bud, Nirvana, B52, Bud Factor-X, Sensizym & Blombastic @ PH6.4 & 1.5 E.C.
*****ESPAÑOL*****
-----IMÁGENES Y VÍDEOS-----
5: Generador de CO2 casero, barato y orgánico (más info en el sumario semanal)
9, 10, 11 & 12: El cogollo que sale a la derecha es de una Gorila, el de la izquierda y/o el de en medio son de una Money Maker
15: Dos cogollos de la misma planta, uno afectado por CO2 en las raíces y el otro no
-----SUMARIO SEMANAL-----
El olor es más dulce e intenso día a día, los amigos que vienen a casa a verlas se quedan ojipláticos al verlas. El tamaño no es una maravilla, pero la gran cantidad de cogollos llenos de cristales añadido al aroma que entra por las fosas nasales las hacen increíbles. Los cogollos crecen y engordan de maravilla.
Esta semana he añadido un boost de CO2 casero, nunca he hecho mediciones de los resultados por lo que no puedo darlas. Este método es ampliamente usado en peceras caseras y de ahí saqué la idea. Para aquellos interesados dejo aquí instrucciones más detalladas. Con los 4 litros de agua que he preparado yo da para unas 2 semanas.
---NECESITAMOS---
- Botella de 250 ml
- Botella de 5 a 10 litros
- 400 g de azúcar por litro de agua
- 1 sobre de levadura de postre orgánica (LA QUÍMICA NO FUNCIONARÁ)
- 3 tubos de plástico de tamaño medio 40~50 cm
- 1 tubo de plástico de tamaño pequeño 5~6 cm
- 4 adaptadores para los tubos
- Cola caliente para pegar y sellar los adaptadores
El proceso de generar CO2 es simple, mezcla agua, levadura orgánica y azúcar en una botella, y el azúcar liberará CO2 en el proceso de fermentación a alcohol.
1. Haz un agujero en la tapa de la botella grande, inserta un adaptador y séllalo con cola caliente
2. Haz 3 agujeros en el tapón pequeño y haz lo mismo con los otros 3 adaptadores
3. Conecta los 2 tapones con uno de los tubos y conecta los otros 2 tubos a los adaptadores restantes
4. Conecta el tubo pequeño en la parte libre del adaptador del tapón pequeño que viene del tapón grande
5. Mira el vídeo
-----CALENDARIO DE RIEGO-----
Las platas comienzan a secar los tiestos un poco más rápido, asi que de ahora en adelante incrementaré 250 ml de agua adicionales en cada riego.
11/05/19 - 1,5 l con todos los nutrientes semanales -(Nirvana & Blombastic) BigBud mitad de dosis @ PH6,4 & 2 E.C.
14/05/19 - 1,5 l con Bud Candy, Big Bud, Nirvana, B52, Bud Factor-X, Sensizym y Blombastic @ PH6,4 & 1,5 E.C.
Likes
34
Share


@Grey_Wolf
Follow
Original sensible seeds Girl Scout Cookies Organically Grown 23rd Feb 2020
This lovely lady smells Fantastic!! I have to brush past her to get to the other end of the Greenhouse and every time I do she lets off her scent.
I can only descibe it as a mix of Dankness and a Sweetpastry Bakery like smell. The buds are starting to fill in better this week and she looks fairly healthy.
Gave her some fresh worm castings as well as Lime , Liquid potassium and High Tea. She is now in the middle of a two to three day fasting where Im not giving anything at all to allow the pot to dry a little and allow oxygen to feed the roots. When I do water I'll add fresh Mycorrhizae to innoculate the roots again.
Thankyou for Looking in on my Update See you next week . 👍