The Grow Awards 2026 🏆
Likes
Comments
Share
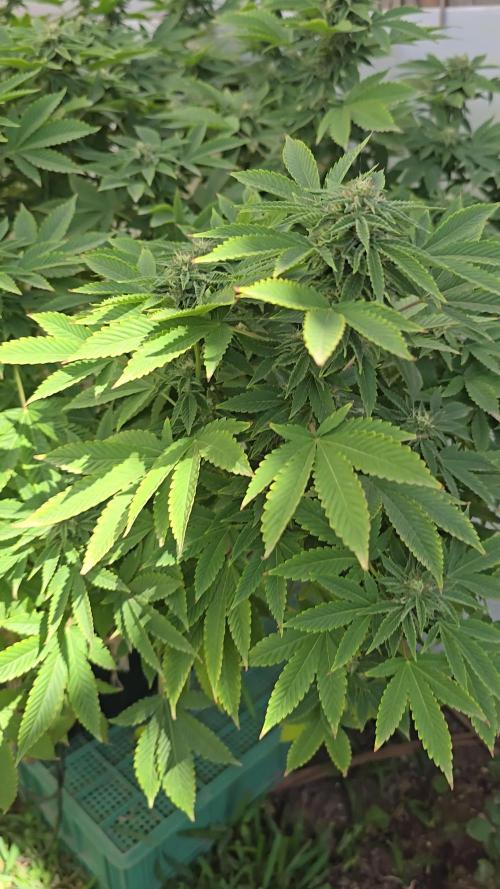
the week passed splendidly, the bushes began to bloom and the smell was crackling the plants develop very well, I continue to water them with clean water and do not use chemicals. I removed the large leaves that were inside, on the sides I left now the light penetrates better in the middle
Likes
44
Share
@rudiak
Follow
Hey everyone! It’s been another fabulous week of the girls fattening up getting ready for the ever looming harvest time! The colas are huge and glistening like a glitter ball! The back right girl has been on flush since day 51, 2 more went on flush on day 53, and the final girl front right went on flush today, day 56! Over the week I gave 3 girls a really heavy defoliation taking the majority of fan leaves off to allow good airflow and try fattening up those lower buds. It’s still impossible to tell if I prefer defoliation or not but we are getting close to harvest so should have a definitive answer to that soon! The back right girl has had absolutely no defoliation or trimming through her life cycle. I still regularly think back to when we broke one of the girls and transplanted, the cannabis gods were on our side warning us 4 girls will be huge, we were very lucky or would be seriously short of space as of now. As the girls are going to be harvested at slightly different times to ensure each are at their optimum, I have had to construct a dry box. How I built my smell free DIY dry box: Take a large cardboard box, cut an extraction hole in the top at one end and mount some ducting and seal the gap around the edge. Cut a flap in the opposite end at the bottom which will be the passive intake and promoting a draft through the hanging buds. Poke some holes in each end of the box using a screwdriver and thread some thin rope or string through the box tying the ends together once finished to give you sturdy locations to hang some pegs from. Finally I attached an extra bit of card on one of the flaps at the top; this overlaps the slight gap in the top between the flaps that could allow light to enter. Once completed I put the ducting into one of the lower intakes of the tent; the negative pressure in the tent then uses the air in the dry box as a passive intake creating a smell free area to dry your cannabis outside of your grow tent. This also keeps a slight breeze flowing through the box to ensure even drying. Happy toking guys and hope you enjoy the pics and vids, thought it was getting hard to tell how big these girls were in pics anymore so the vids help a lot, and I was lazy this week! :P
Likes
3
Share
@Jaschkoo0
Follow
On Day 30 i gave each 200ml of water with some melasse. One Day later i gave them some sf nemathodes. On Day 32 i gave them 500ml water each with a cup of brennesseljauche mixed in the 1.5l of water . On Day 33 i transplantet them into their living soil beed placed some Mykoryzha. I mixed 1l with 2ml calmag 1ml alfa boost 2ml powerzyme 1ml bio grow and some supervite.
Likes
12
Share
AutoBlueberry breed by #DivineSeeds #DivineSeedsSquad #DivineSeedsBreedingCompany Origin:Afghani/Thai Type:50% Indica/ 40% Sativa/ 10% Ruderalis Flowering:56 days THC:22% Harvest:400-550 g/m2 Height:110-150 cm Thier Growing under the #Growatt600w and in my #TopoLite 24×24×48 Grow Tent! I'm also using #TNBNaturals #TheEnhancer Co2 Despersal Canister and using thier Ph⬆️⬇️ for my Decolinated Tap Water! Green and Growing Up Great! She's leaving her 2nd week of Veg and Stretching out into her 3rd week! She's Growing in my special blend of ProMix potting mix, a 1/2 bag of Earthworm castings and 2 light handfuls of Diatomaceous Earth mixed Up well for before transplanted! Diatomaceous Earth: Diatomaceous earth is made from the fossilized remains of tiny, aquatic organisms called diatoms. Their skeletons are made of a natural substance called silica. WHAT IS DIATOMACEOUS EARTH? In a nutshell, DE comes from the fossilised remains of small marine organisms called diatoms. Over a 30 million year period, these hard-shelled algae collected on the bottom of bodies of water, eventually forming into a type of sedimentary rock. Fast forwarding, it wasn’t until around 1836 that a German peasant Peter Kasten discovered the ivory-coloured, powdery substance while drilling a well in northern Germany. Ever since, the usefulness of DE for multiple purposes, including industrial and horticultural applications, has been well-reported. Just sprinkle some diatomaceous earth on top of your soil and watch mother nature's secret weapon work its magic.CONDITIONS THE SOIL When it comes to growing cannabis, everyone strives to provide the best soil to grow the best plants—but there’s always a way to make it even better. Making the soil a better medium is called soil conditioning, which is exactly what diatomaceous earth does. It works by improving the retention of moisture in your potting soil, holding a large amount of fluid and drying at a rate that’s much slower. This natural soil additive also helps to retain nutrients and allows for better oxygenation of the substrate. NATURALLY CONTROLS PESTS DE is an all-natural, safe-to-use substance that doesn’t harm the cannabis plant with toxic chemicals. The nature of diatomaceous earth makes it useful against most types of insect infestation you might be experiencing; and unlike chemical insecticides, insects can’t develop a resistance to the effects of DE. So once they’re gone, they’re gone for good. DE is an abrasive. and when used as an insecticide, it gradually scrapes away an insect’s exoskeleton, absorbs the fluids, and dehydrates insects and other critters to eventual death. IMPROVES PLANT STABILITY When using DE in your soil, it can be especially beneficial as it frees up nutrients so that they are made available to the plants as needed. This works via the silica content of DE being absorbed into the plant tissue, which helps improve the plant’s ability to respond and receive more nutrients as DE activates. This in turn results in greater yields and better stability under small pH fluctuations! https://divineseeds.net/ https://instagram.com/divine.seeds?igshid=osxe2v7en33v https://divineseeds.net/ Thanks Again to All my Friends, Family's, Teams, Sponsors, Followers and Subscribers!!! Your Genetics are Merry Magnificent, Mega Marvelous and Mighty Medical! Love um!!! I really Can't stress enough how Thankful and Grateful I am of All of you and what you've Shared with Us! Means the World!!! It's definitely a Pleasure being able to Grow with these Phenomenal Grow Lights! Please Enjoy! BudBrothers4-Life! Cheers Famz!!! Much Props and Much Topz!💯🔥 #Osree #GrowStarStore #Growatt #TNBNaturals #TNBTeam #GrowYourOwn #Bliss https://instagram.com/as420.ca?igshid=1f116alw054wp The Grow Bags: https://www.as420
Likes
60
Share
Hey, growers I hope that all is well with your grows. I'm here to do my wk.2 check-in to update y'all on my greencrack grow. Everything is going very well so far, started all 3 of them on a small ½ tsp dosage of foxfarm's grow big and big bloom on day 10 of veg and they responded nicely. I'll be starting lst this week and will again give them ½ tsp of each nutrient in their feed.
Likes
14
Share
@MG2009
Follow
03/20/2022 Biscotti Skunk looking lovely first four pictures.next up is lemon OG,followed by the three Grape Skunk girls middle one is my favorite so far (Middle in height) I did a light feeding of fish and seaweed, a little extra something just incase they get hungry in final weeks.
Likes
17
Share
@Patf2027
Follow
Some good weather this week. Haven’t done anything but water(6.5ish). Gonna do nutrients one more time at next water then start flush. Buds have been getting a little fatter. Smells good and decently strong. My guess is harvest will be around week 11-12
Likes
45
Share
W11 - GRETA 🌱is a beauty 😊 I am giving her last days to bulk up her buds and trichomes !!! Patience is a blessing 👍
Processing
Likes
10
Share
@DonPablo_
Follow
buds are very visible and getting some mass (still really small though) and really satisfied with the number of bud sites. REALLY REALLY can't wait to harvest these ladies. P.S. the plant at the end of the last video is an autoflower we planted a few weeks ago.
Likes
Comments
Share
Seedling stage still about to enter day 1 Veg
Likes
26
Share
@Dunk_Junk
Follow
Apologies for not updating last week. She is the last girl left in the tent so I decided to get some canes and spread her out to the extents of the tent. She is progressing, the hairs are turning but have not gone very dark yet. Still some 'new' white hairs around. I have not even looked at the trichomes yet, the flowers look quite airy at this stage. As there are no other diaries of this strain I'm flying by the seat of my pants here 😂 I'm thinking at least another 3 weeks left..
Likes
37
Share
######################################### HARVEST (Day 110 / December 21) ######################################### ----------------------------------------------------------- GROW SUMMARY ----------------------------------------------------------- Grown in 4x4 tent - but I only used 2x4 because of heater and dehumidification but each plant averaged a 2x3 canopy. Each plant had a dedicated light, Sage 2 used the HLG 300 V2 Rspec and Sage 3 used the CMH 315. It's not an accurate comparison of lights because there was some overlap but I'm just utilizing my resources the best I can for this dedicated autoflower tent. The plants were grown in hydroponics using a custom two-site PA hydroponics clone RDWC system with Advanced Nutrients Sensi Coco line, Microbial Mass and Orca for beneficials. All around a pretty easy grow and things went very well. Sage #3 had an issue just after stretch, and I think I burnt it a bit when the CMH was at 22". I also experimented with a single water change which was only performed when switching to bloom nutrients around week 7 and turned out surprisingly well - see the results below. It's always fun to see the two contrasting phenotypes side by side. ----------------------------------------------------------- HARVEST ----------------------------------------------------------- From day 106 to day 110, I just stopped feeding and let the ppms run down. No dark period and no flush. On day 110 they were chopped. I probably could have let them go a bit longer, but my concerns were growing with Sage 3 and the sugar leaves being brittle and flacking off onto lower buds promoting bud rot. The smell of this flower on the plant was funk and was hard to control the funk... even with a carbon filter. Trichomes are slightly amber, mostly milky overall. I'm convinced hydroponics can add a couple of weeks of veg time to the run compared to coco/soil. Cutting the Scrog net was required. ----------------------------------------------------------- DRYING ----------------------------------------------------------- The plants were dried in a 3x3 tent, so I had to cut the plants in 1/4 sections to fit in the 3x3 drying tent for a slow dry. Branches were hung to dry on burlap twine in a tent in complete darkness, branches upside down. The temps were dialed in at 60F by pointing AC at the intake vent on side of the tent. Humidity was dialed in at 63%/60F for 24hr, 62%/60F for the next 48hr. Then 60%/60F for the third day and onward. Ambient RH in my house is 30% due to winter so I had to use two humidifiers and an Inkbird controller to add humidity to the room and block the humidity streams from hitting plants directly. AC Infinity T6/S6 exhaust and intake fans were on the setting of '2' during drying until day 8, then I could turn down to a setting of '1' once the plants were not transpiring excess moisture. I pulled the branches to trim as they were ready around starting around day 12. ----------------------------------------------------------- TRIMMING ----------------------------------------------------------- I trimmed each branch as it was ready but there were times when I pulled more than I could trim without being interrupted so a few branches did overdry on my trim table due to the low ambient RH due to winter. Very few fan leaves on branches, so most trim was all sugar leaves. I went tight with trim to ensure a better flower product and more supply for edible totaling in over 11 ounces of trim product. ----------------------------------------------------------- CURING ----------------------------------------------------------- Flower product was transferred to 1L mason jars averaging 35g of product per jar. I added a mini hygrometer to each jar and boveda/boost 8gr humidity pack. The RH averaged 62-64% when trimmed flowers went in jars. I started by burping once a day for the first seven days, once every other day for the next seven days, rolling jars often. The burp was only for 3-5 second for air exchange. Because the flower product was already at almost 62% when packaged in jars, quite the contrast from drying in summer conditions, I only needed to burp once per day and mold really wasn't much of an issue due to low humidity in winter. ----------------------------------------------------------- YIELD ----------------------------------------------------------- * Weight calculated at 62% humidity after 10 day cure. ============================== FLOWER PRODUCT ============================== Sage 2: 301g (10.75oz) Sage 3: 377g (13.46oz) ---------------------------------------- Total: 670g (23.93oz) ============================== TRIM PRODUCT ============================== Sage 2: 204g Sage 3: 135g ---------------------------------------- Total: 327g (11.67oz) **I went tight on the trim for better flower product and sufficient supply for edibles, and is calculated in overall yield. ** All major fan leaves, stems, and branches removed from trim product. ============================== TOTAL OVERALL YIELD ============================== Flower: 678g (24.21oz) Trim: 327g (11.68oz) ---------------------------------------- Total: 1005g (35.89oz) (2.24lb) ============================== SPACE YIELD ============================== 1005g / 12 sqft (3x4 canopy) = 83.75g per sqft ============================== WATTAGE YIELD ============================== 615 Watts / 12 Square Foot (3x4 canopy) = 51.25 watts per sqft. 1005g / 615 watts = 1.63 grams per watt ----------------------------------------------------------- PRODUCT TEST ----------------------------------------------------------- On day 10 of cure, I tested the flower and passed some to a few friends for their input. Feedback was positive. One little bud was given to a friend and he reported it stunk his entire car. Sticky, trichome-covered fire! Smoke is smooth, no cough. White ash. The 60/40 (sativa/indica) is a blend that is on point. Sage Scout definitely is a heavy hitter; upwards of 3.5 hour noticeable head/body change with no couchlock at the end. In regards to flavor and smell, it's not fully there yet on only day 10 of cure. The flavors/scents are still muted but I expect the flavours to prevail after 6-8 weeks of curing. Very funky and strong smell that bursts past the mason jar lids. Piney sweet scent. ----------------------------------------------------------- REGRETS ----------------------------------------------------------- Honestly, I only have two regrets with this run. 1. More aggressive lolipopping! I just feel if I had lolipopped more, I would have had a denser product overall. The flower product is indeed dense, and all in all, I'm happy with the result, but it's I'm adding as a reminder for the next run. I need to be more selective. 2. I slacked on the training of Sage #2 due to the hard-to-reach factor which probably affected about additional 1-2 oz of yield. ----------------------------------------------------------- NEXT RUN ----------------------------------------------------------- 1. I’m was very happy with Microbial Mass product in combination with Orca. Once again, I was overall happy with Advanced Coco blend for RWDC. I went with Coco product because Coco is similar to hydroponics, the AN Coco line just has added Calmag to it. I didn’t really see any issues with the AN Coco line and I like the autonomous factor of AN sensi products because my photoperiod tent takes some of my attention, so it is nice to have this autolower tent on auto-pilot for the majority of the grow. 2. When harvesting, I did find a few spots of concern in the root system, so I will definitely upgrade the pump from 250gph to a 400gph for better flow to combat that issue. 3. My experiment with a single water change when switching to bloom nutrients was a surprising result. Sage 2 (purple pheno) performed well with no deficiencies which I had trouble sorting out the deficiency on Sage 3. I continue to wonder if it was salt build-up, but it seemed to start shortly after the change to bloom nutrients so maybe it was a nitrogen/calmag issue. I may add an additional water change mid-flower (week 11) to the next run and see if it makes any difference is the same conditions happen. 4. I'll also like to move the two-site system to the front of the tent for better accessibility to train the plants. 5. I'm also looking at the floorplan of the tent and I think I can run a single system in parallel next to this two-site system and still have room for heater/dehumidifier and still keep accessibility for training. ----------------------------------------------------------- FINAL THOUGHTS ----------------------------------------------------------- Night Owl genetics has performed once again in my RDWC setup. I also feel a dedicated light for each plant really helped improve the yield. If I calculate a 2x3 space for each plant, with a total of 615 watts / 12 sq ft, running at 51.25 watts per square foot is the result. In regards to gram per watt, I've calculated the result is nearly 1.63 gram per watt when using 1005g / 615 watts. My goal was a pound per plant, I was happy to exceed that goal line with autoflowers with 2.24lb total yield. ----------------------------------------------------------- THE END ----------------------------------------------------------- Thanks for checking out my diary! I typically journal in my notebook but I put some time and effort into documenting my grows on this platform in hopes it will help a new or experienced grower with their DWC journey. Any questions or suggestions are welcomed. Happy growing!
Likes
233
Share
🐶🐶🐶🐶🐶 👉Alrighty Then👈🐶🐶🐶🐶🐶🐶 We're 42 days in and we be moving along great 👈 👉The SweetDream Rose is the tallest and biggest mover 😲 gotta love that purple hues coming in 👈 We've also got some double tops on some branches as well as some triple internode branching 👈 All plants are blooming like crazy 🤪 🙀 We got some great growth right across the board on all plants 👈 All plants receiving at least a min of 850 PPFD 🐶 🐕 🐶 🐕 🐶 🐕 🐶 So we are back for another round 😛 But this grow is special because my big boy needs some love too , he's been getting on the old side of things and his hips have been giving him trouble so I've been buying CBD treats for him and it works great so 😉 👍 I've decided to grow this for my little buddy 🐶 so I can make him some Doggy 🐕 Treats and plus I've never tryed it myself and I really wanna give it a go👈 😊 so let's see what it's all about 👈 I will post the recipes at the end of harvest 👏 So Let's Do This👈 👉Soil Provided by ProMix.ca 👉Nutrients Provided by Agrogardens 👉Lighting Provided by MarsHydro.ca 👉Seeds Provided by Kannabia Seeds
Likes
11
Share
@MrGoonai
Follow
11/21/24 Short facts: - Watered: 1 x 0.5L, 1 x 0.75L, 1 x 1.5L, 1 x 1.75L — 3.5L - VPD @ 1.4 — raised by 0.1 - Light @ 80% ~700 to 1050 PPFD - BioBizz Bio-Bloom increased to 3ml/L - BioBizz Bio-Grow increased to 3ml/L - Getting colder! At night between 18 to 19°C --------------------------------------------------------------------------------- She isn’t doing well, and her condition has worsened this week. Most of her leaves are now yellowing, with some completely dying off. I’m attempting to save her by ordering a special fertilizer designed to increase nitrogen, as well as provide magnesium and other essential minerals. I plan to feed her with it tomorrow. If that doesn’t work, I’ll have to accept that she’s dying. Unfortunately, she has also lost some of her fruity aroma, and the smell is no longer as strong... I’ve seen reports from other growers about the AvT, showing cases of senescence, but it usually occurred only toward the very end. So, we’ll see if this is just a phenotype with an unusually early onset of senescence. She’s definitely harder to grow than I initially expected. Since the weather is getting quite cold for the region - and we’ve already had a bit of snow - the cellar where my grow tent is set up is cooling down, with nighttime temperatures dropping to 18–19°C. Therefore, I’ve ordered some heat mats, which should arrive tomorrow. I’m aiming to stabilize the root temperature at around 22°C consistently, so the nights won’t be too cold anymore. I’ll go into more detail in next week’s update.
Likes
72
Share
Another good week!! I need to LST and defoliate... probably going to do that tomorrow. I fed them this week as well as watered. I will add the flowering nutrients going forward!! Otherwise, I hope this grow continues to go well!! Cheers!!
Processing
Likes
1
Share
Nearing the end for the CBD crack. very few heads, rock solid buds and smell. Just what I like. The BDM has gone crazy with lots of little buds even though I did EXACTLY the same training on her. Crazy, huh? Given them each a HEAVY dose of PK and Bio/PK and anticipating 10-14 days left in CBD C and about 2-3 weeks left in the BDM. She hasn't started hardening up yet, whereas the CBD C has.