The Grow Awards 2026 🏆 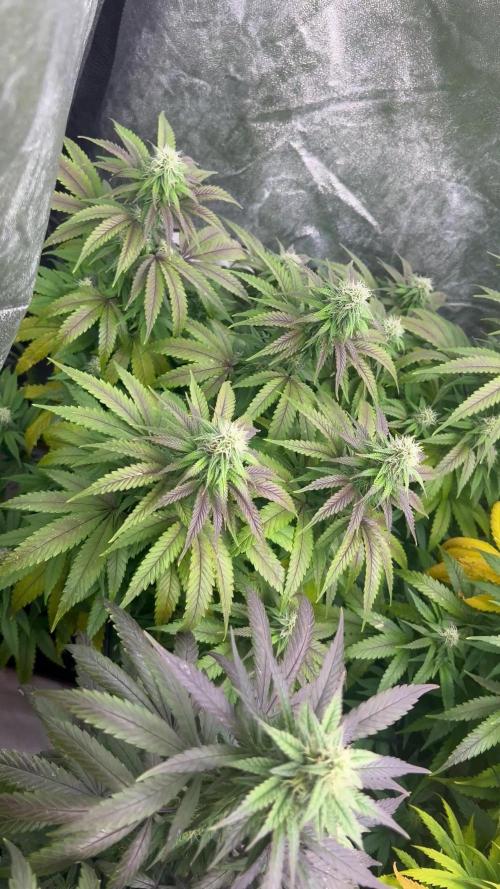


Likes
Comments
Share
@ozelott
Follow
Debido al frío se están volviendo moradas.
Un poco de color para el invierno
Dos Si Dos 33 · Barney's Farm
Girl Scout Cookies · Barney's Farm
Lemon Runtz · Elev8 Seeds
Critical · Advanced Seeds
Rainbow Runtz · Philosopher Seeds
Tropimango · Philosopher Seeds
Wedding Cake · Royal Queen Seeds
Banana Kush · Eurogrow
Critical · Eurogrow
Og Kush · Eurogrow
Cronic · Eurogrow
Black Bomb · Philosopher Seeds
Wedding Cake · Eurogrow


Processing
Likes
15
Share
@MG2009
Follow
08/26/2020
2nd week of flowering and temps are down in soil to 68° going to be 56 tonight. Put a video of her sister plant.
These girls should go another 8-9weeks but our first frost date is around the 10th of October hope for a warm and dry fall.
08/29/2020
got her tied down, snapped the center branch so I tied her stem upright. Gonna give her one last dose of blood meal (12-0-0)before week 3 starts that should be good for the next 4weeks, and 2 tbls of (4-9-3) so my last feeding will be (16-9-3) for the stretching fingers are crossed🙏
Likes
7
Share
@Ereks007
Follow
It's been a smooth grow year ..I am only using flora nova ...and pro tekt. Silica ..water is from local tap ..filtered with rv filter. There is movement og ,fatso bx1 x wilson, sunset sherbert x Sunday driver x Natrual Born Killer strains ....thanks for viewing
Likes
4
Share
@GERGrowDesigns
Follow
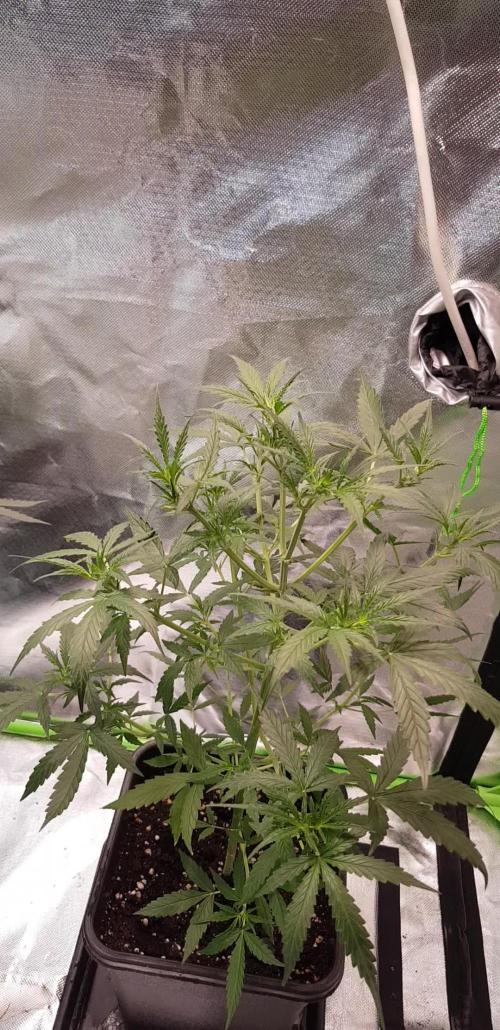
Welcome to Veg Week 4 of Divine Seeds Auto Black Op1um
I'm excited to share my grow journey with you all as part of the Divine Seeds Autoflowering Competition 2025. It's going to be an incredible ride, full of learning, growing, and connecting with fellow growers from all around the world!
For this competition, I’ve chosen the Feminized Automatic strain: Black Op1um
Here’s what I’m working with:
• 🌱 Tent: 120x60x80
• 🧑🌾 Breeder Company: Divine Seeds
• 💧 Humidity Range: 50
• ⏳ Flowering Time: 8W-10W
• Strain Info: 21-23%THC
• 🌡️ Temperature: 26
• 🍵 Pot Size: 0.5l
• Nutrient Brand: Narcos
• ⚡ Lights : 200W x 2
A huge thank you to Divine Seeds for allowing me to be a part of this amazing competition and Sponsoring the Strains. Big thanks for supporting the grower community worldwide! Your genetics and passion speak for themselves!
I would truly appreciate every bit of feedback, help, questions, or discussions – and of course, your likes and interactions mean the world to me as I try to stand out in this exciting competition!
Let’s grow together – and don’t forget to stop by again to see the latest updates!
Happy growing!
Stay lifted and stay curious!
Peace & Buds!

Likes
7
Share
@Budman788son
Follow
Well as you can see the double stuffed sorbet has grown wildly long while all the others seem to have stayed short.
I have taken two clones of the white runtz to test how long the roots will take to pop out.
Edit I have started to do a little lst to the bigger plants and removing the big leafs.


Likes
37
Share
@Stork
Follow
Time for drying. Btw drying them like this was a bad idea buds are pressed from one side may be conceded to move them, well I still prefer hanging drying 🤪

Likes
Comments
Share
@Elguacho420
Follow
Buenas a tod@s... Otra semanita de floración para estas hermosas.... Han crecido bastante, las veo muy bien, riengo generalmente cada 2 días, el pH perfecto, absorben muy bien los nutrientes, el sustrato muy bien desde q lo eh cambiado este cultivo... Esty muy contento y el resultado va tomando forma, trabajando duro se obtienen buenos resultados a la larga, hay algunos fallos para mejorar pero de momento las niñas están bien y van creciendo y engordando favorablemente... Me gustaría tener más espacio y más material tecnológico para el cultivo, pero de momento es lo q hay y nos apañamos bien... Buenos humos para todos 🏻💨💨
😎💀
🇦🇷🤝🏻🇪🇦
Likes
10
Share
@YAKDADDYDWC
Follow
Had major problems with temps rising this week was forced to pull out the aircon..... gona cost a fortune!!! To top it off i got gnats but 8 think im on top of it geez i have had some troubles from enviroment because its summer and i would have better results in winter


Likes
27
Share
@cheetah844
Follow
Coming along nicely, staying short & stout. I've had NL flower that smelled unbelievably beautiful & it was a great night time relaxing strain. I hope this one is similar


Likes
14
Share
@Quintall
Follow
Die unteren Blätter Sterben langsam ab bzw färben sich gelb. Kanns kaum abwarten...
Likes
16
Share
@SeshHouseCannabis
Follow
This is the final week of feeding, hopefully the plants will be ready to harvest in a few weeks. After flushing only Purpinator and Fulltilt will be used in this week.


Likes
57
Share
@DudeGrowsWeed
Follow
Seedsman Auto Lemon is growing strong and stretching for the stars. She was defoliated this week, but bushed back out again. Fed her some Espoma Organic Grow this week.
Likes
2
Share
@GanjaFarmar
Follow
So far the biggest but least formed plant in the tent. The blue cheese has hit 57 days from seed, and to be honest its looking all healthy! I cant wait for the next few weeks for the nugs to dense up!
Likes
17
Share
@kizdog
Follow
Honestly not much to say about the dry and trim, which is definitely a good thing. 12 days hanging in the tent, and the plants were ready to trim. me & the Mrs. absolutely sailed through it. Stores like a dream, and smokes the same. Not a crazy amount of flavour, but the aroma that it has is lime and cream. And the taste is more earthy and spicy. Loving and savouring every bit of it. Sorry I’m very late with this, but I’ve been busy getting my next plants started! You should see them come up soon, as I’m quite behind in my posting. I’m very happy! 🤟💚
Likes
4
Share
@Nookandplant42o
Follow
Darker coloring, and more distinct shapes from her sisters this girl grew on top something very cool Christmas tree shape and plump flowers well resined with one by one shape stems with 3 leaves and longer maturation time probably even new pistils more plant already fat and resinous so we can explore more of her.

Likes
5
Share
@AlpenZilla
Follow
🗓️ Week 10 – Flower Week 6 (MAC n Cheese only)
📉 Nutrient management:
At one point this week, MAC n Cheese showed elevated runoff EC values up to 2.2, signaling salt buildup.
Through adjusted watering and reduced feed strength, the runoff was successfully brought down to a stable ~1.6–1.7.
🌿 Plant status:
She looks vital and healthy – deep green foliage with no signs of fresh deficiencies or toxicity.
Responding well to the current input EC of 1.0–1.3.
📝 Summary:
Salt levels were close to the edge earlier in the week, but MAC n Cheese recovered well with a more balanced nutrient approach.
Bloom development is now progressing evenly.
Next week: Switching from Big Bud to Overdrive.
