The Grow Awards 2026 🏆 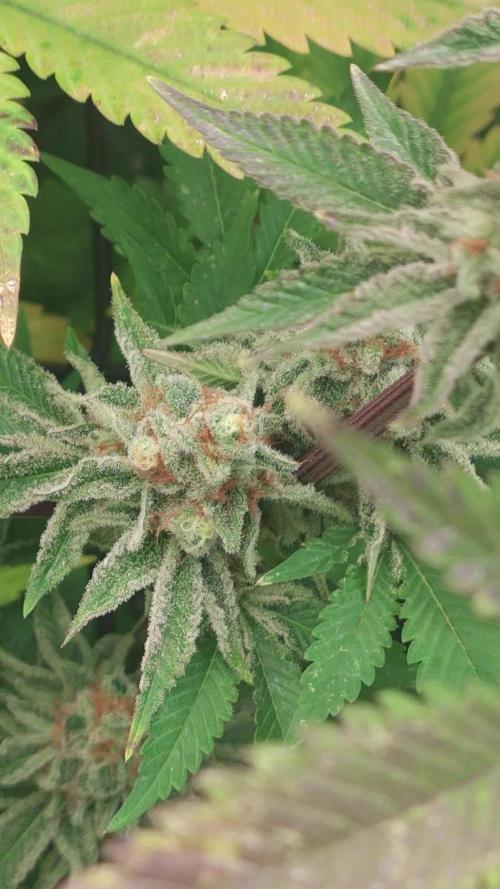


Likes
Comments
Share
@purpleme
Follow
Leichte Kalzium mängel gezogen. Diese Woche auch noch die ppdf erhöht. Da ich aber probleme mit der Temperatur bekommen habe, sind die werte gegen ende der woche dann wieder gesunken und fallen jetzt weiter bis sie reif sind. Gewicht ist gemacht und sie prpduzieren schon etwas mehr trichome, weswegen sie sich jetzt entspannen können und das ding entspannt bis zum ende gecrused wird. Lüfter Einstellungen sind angepasst worden, da die nacht rh zu hoch war + tag gleich mit angepasst und gieß intervalle werden auch allmählich generativer eingestellt.
Guten rutsch und auf ein prächtiges nächstes Jahr.


Likes
13
Share
@ChitownCannaChica
Follow
Have been flushing the past 2 weeks hence the yellow and purple leaves. Chopping her down right after this photo shoot. Probably get 14-20 grams dry, but not bad for a solo cup auto with pretty quality buds. Stem has been green the whole time— so she’s healthy. The smell is an earthy pine cone. Easy peezy with dynomyco!
✌️💚🌿💨


Likes
2
Share
@Sensiseeker
Follow
These plants are absolutely filling up the 5x5, if they keep it up I may have to remove one. I filled the reservoir with 6 gallons of water at midnight the other night and by noon the next day it was empty. I am putting in 6-7 gallons of water in res at a time and it is typically gone in 12 hours.


Processing
Likes
41
Share
@Wicked_Stix
Follow
Been wanting to try out this auto ghost og from original sensible seeds for a while and finally got the opportunity to get one wet.
I originally started this setup to compete in the solo cup challenge, but I needed something that will be minimal maintainence and doesn't require hand watering. So this is what I ended up with. I will not be entering since I know it will bring controversy, but I am going to follow the rules and treat this grow as if I am competing.
I didn't want to use regular solo cups because last time I had a lot of algae growing in the root zone when I harvested. I opted to use a black light proof cup. These cups were 27 oz originally so I filled them with 16 oz of water, marked the level, then cut them down to 16 oz. I set the drain pipes about an inch from the bottom so they have a little reserve if I have pump or power issues. I know people will see the drains as a way for roots to grow out of the cup but in reality I have to keep the entire pipe free of roots or it will clog and overflow. So I am actually losing a little volume due to this.
I filled the bottom inch or so of the cups with river gravel to stop the perlite from washing into the reservoir.
I am running a 5 gallon reservoir with a small air pump and the plants will be getting irritated 24 hours a day from an aquarium power head pump. I set the system up to be totally self contained and easily portable. It was all built from things I had laying around other than 97¢ for the cups. I will be keeping the feed simple as always feeding maxigro and maxibloom with a couple flower boosters.


Likes
16
Share
@Symbiosis_420
Follow
This girl has definitely stopped stretching, so now almost all of the growth is going to be located at the buds. I plant to increase nutrient concentration, but also light intensity (this one by pulling the LEDs closer to the canopy). This week it will hang at 30 cm from the top of the canopy, maybe next I will push it further to 20 cm next week...
By the way, the thunderstorms are over so now I can consistently keep the humidity around 45% with just the 3 cpu fans ;)
I am experimenting with trying to clone some branches even after 5 weeks of flowering. It's just for the LoLs, and to learn a little bit. I took a lot of clones from the bottom of this plant before with great success during defoliation, so I decided to up the challenge. I know you shouldn't stress the plant too much during flower, but she seems healthy enough to take it without a problem.
// on the nutes of this week//
So this week I decided to up the nutes again to 1.0, as the lower leaves are showing deficiencies, and this time the EC of the runoff is low (plus I've been feeding only 0.8EC or 400ppm, which is much less than people generally feed at this stage), so I'm more confident that it's not a nutrient lock out. We will see how she likes it.
Remember that my noob friendly approach is that keeping my plant on a diet is better than killing it by overfeeding it.

Likes
16
Share
@Siriuz
Follow
Very happy to start my new Collection from sweet seeds 👽🌱
Thanks a lot for all your kindess
May God bless you always
We are running photoperiod
For the very first time
I think its time for us to grow big
And hopefully we get her into bloom
Happy growing everyone
Day 1 - Place seed into peat pellet and left her fully in a dark
RH was 45/60%
Temp 22/25C
Day 2 - took her out of the dark to get light for 12 HRS
Then back to darkness again
Until next morning
Day 3 - She is finally up and got to fix her a lil since its root was not attach well to peat pellet, just cover her lightly with more Peat moss and place better its root and cotyledons for better growing
She is all set and good to grow
Happy growing everyone 🌱👽
Likes
2
Share
@Boomerplantmom
Follow
First week after flip
Added 2nd light on 12/30 at 12" 100%
LST taller stems to spread out wider Recommended 9.4" spacing drops ppfd in center. Moved 7" apart to get even 850 ppfd across
12/28-1/3 Jane log week 9

Likes
12
Share
@Jays_Not_Here_Man
Follow
The girls are starting to wrap up their cycle. I have been watching the trichomes closely, and we are getting very close

Likes
27
Share
@RDWCGrowing
Follow
1/20/2023- So much to do pre grow and over the next 16 days, absolute first order of business is that I have to take down my current Grow---TIMBER-- Then I have a list of things I have to get done in order to be ready to start this grow 1 Feb.
With that said
T - 2 days until start 48 hour Flush
T - 2 days until Start 48 hours of Light
T - 4 days until TIMBER!!!
Items that need to be done before 1 Feb 2023
1. I need to clean the tent out
2. I need to clean the equipment- Proper Sanitization between grows in Hydro is a must!!!
3. I need to get the hole in the ceiling above my tent repaired- For my last grow I had a deep sink installed in my grow room, to make Hydroponics a little bit easier and have a water source in the same room. The seals on the pipes they were installing broke and leaked through the ceiling causing some damage all the way across my grow room, I was already weeks into my grow and couldn't risk them working above my tent and it would have been very awkward positon for them to be working in as well, so have to get this done quickly between chop and germination.
4. I have to install my new light- I was using a Vivosun 4000 and for this grow I am switching up to a Spider-farmer SF 7000.
1/20/23- For this upcoming grow I am working with M/F photo seeds so I ordered 4 Sex determination kits. I recieved my my 4 Sex determination testing kits from Rimrock Analytics today. I will be using these to test my plants at week 2 of Veg so that when/if I take clones I know I am taking them off females. As well as I don't want to accidently pollinate my tent during this grow I am looking for big beautiful buds not seeded buds. :-)
1/24/2023- Harvest of current grow- Started at 2:00pm and finshed wet trim and firt batch into the freeze dryer.
1/25/2023- Next batch into the freeze dryer and cleaning all my equipment for this Grow.
T-1 Day until the workers are supposed to be here to fix the hole in the Grow Room.
T-3 days until I instll my new Gorilla Grow Tent and my New Light Spider Farmer SE-7000 for this grow.
T-7 Days until Start of Germination
1/26/2023- Harvest is done ran through the Freeze dryer and dry tim completed.
1/27/2023- Grow Room repairs completed. Hole is gone Letting the paint dry before I install the new tent.
T-2 days until Install the New Gorilla Grow tent and the new Light
T-3 days until I put the hydro equipment in the new tent
T-5 days until Germination
1/29/2023- Day 0- Final Pre Germination activities
Germination Start T-3 days
The paint on the ceiling was dry and it was time to finish prepping for Germination. I got the following items knocked off my list.
New 4X4 Gorilla Grow Tent is up and ready
New Spider Farmer SE-7000 Light is installed- Thanks Moony Grows for the suggestion and for the Code that got me some money off and free shipping (Moonygrows)!! I turned the lights all the way up to max and set the timer to 18/6 0600-0000. I will keep an eye on the temperature and humidity without my plants and see how hot it gets with the new light.
I put my Hydro system back together and put in 40 gallons of water into it, time to monitor for leaks the next few days.
I Setup my cloning machine for Germination Days 3-11
1/30/2023
let me break down the situation, ROOM in the TENT.. Enough said.. No really I tried putting my exhaust system up in the new tent with my new light, The light is so big corner to corner that it really didn't give me enough room for the lights be be raised, with the exahust hanging the buckets my plants are Starting in are 2 and 1/2 feet off the ground, great for plenty of room for roots but not so great for upwards space for the plant to grow. In a 6' 11 tent with the exauhst in side and hanging that only gave me a little over 4 feet of grow room to play with. My last grow if you saw my diary, anyone could tell I was struggling to keep the buds off the lights. No good, Since space was such an issue I was running my carbon filter inside on the ground but It really needed to be up sucking the heat out not shooting the cool out. With that setup I was sucking air through the filter and pushing it out the tent at a bottom exhaust hole cold out. Wasn't doing me any good for my heat. I was hitting temps of up to 85 degrees. I bought a portable AC unit and have been running it in the grow room to try and keep temps below 85 and I have had to lower the power on my lights during grow also not ideal.. With that said a friend of mine MoonyGrows (Check out his diary) took the time to look at my issue send me a picture of my grow tent setup with detailed instructions on how to suck the air out from the top but putting my filter and fan on top of my tent so no room issue and I am sucking the air out from the top where the heat is instead of pushing the air out from the bottom where the cool is... THANK YOU MoonyGrows For taking the time to help me get this straightened out.. Now I have room and I have the exhausts working right and now my temps with everything at 100% are topping out at 80 this dropped the temp by 5 + degrees at 100% max.
T-2 days until Start of Germination
Prepped my seed tray with humidity dome
Prepped my Rapid Rooter plugs. I Used RO water, and I added a few drops of Hydrogen peroxide to Oxygenate the water. I then PH balanced between 5.7-6.0 the same that they will be getting in the Cloning Machine and when they get to thier final grow pod. I perfere the 5.8x range and I hit 5.84 for these rapid rooters. If you want to see a complete video on the process HowWeedGrow has an amzing video that shows step by step how to do it and explains it better than I ever could including how to plant the seeds. Which I will cover when I get to that step on Wed. https://www.howweedgrow.com/how-germinate-weed-seeds-cannabis-rapid-rooters/
1/31/2023
T-1 day until Germination Start
All set and ready have my Rapid Rooter plugs ready to go have my seeds out.. Have my seed tray warming up tonight. Tomorrow morning right into the Rapid Rooter then strait into the tray. I will spray the dome to start the humidity in there.
2/1/2023
Germination Day!!
Let the games begin!
0600am Put the seeds into the Root Riots. And then put the seeded Root Riots into their first home the Seed tray. I have them under the light 24/7. Sprayed the dome
7:30pm Sprayed the Dome to keep humidity going on the dome.
2/2/2023
Day 1 of Germination
Sprayed the Dome in the morning
Sprayed the Dome in the evening
2/3/2023
Day 2 of Germination
Roots are starting to come out the bottom of the root riot plugs and the heads are slowly popping out of Number 4 just below the surface.
Afternoon- Number 4 has popped up
Evening- Number 3 has popped up as well. Happy Dance!!
2/4/2023
Day 3 - Germination
Surprise Surprise Surprise- all 4 have now poked their heads up.. Happy day!! 100% Germination succeeded.
Now major milestone to track is how many are female and how many are male.
I will take look at the roots this afternoon/evening and see if they have enough root to go into the cloning machine for the next 7 days before they go into their Hydro Pods.
Day 3 - Germination - Evening..
Roots looked good and they were tall enough to make it into the cloning machine.
Now that they are all in the cloning machine I have switched the lighting to veg state 18 on 6 off.
2/5/2023
Day 4 - Germination - Morning
All the Ladies (fingers crossed) looking great stretching nicely and look nice and green, Photo synthesis underway....
UPDATE!! After a very interesting POD cast on FSTS by Dr. Bruce Bugsbee from Utah University, I have shifted my lighting to 24 hours on through seedling and then I am going to shift to 20 hours on the rest of Veg.
2/6/2023
Day 5 - Germination
While Checking on my conditions inside the new tent last night, I found that the Humidity was down to 39 Percent. I added an AquaOasis Cool Mist Humidifier, the reason I selected this humidifier is that I needed one that could be turned on and off utilizing my Inkbird Humidity Controller IHC200 that I have my Pro Breeze Dehumidifier currently running with.
Root structures are starting to get there about 1/4 of an inch.
2/7/2023
Day 6 - Germination
Everything seems on track more roots poking out of each today. They are each getting a little taller as well.
Checked in the evening and number 3 was drooping the Root riot plug on the bottome was dry and the roots were not in the water yet. I raised the water just enough that the longest root that was sticking out is now hitting the water.
2/8/2023
Day 7 - Germination
Everything looked good while checking in on them this morning number 3 is now full up and no droop again.
2/9/2023
Day 8 - Germination
T-2 days until Plant into Forever Pods and we start week 1 of Veg .. :-)
Surprising thing to me is that number 1 and 2 were later in popping then 3 and 4 but the roots are growing longer in 1 and 2.
2/10/2023
Day 9 - Germination
Number 1 and Number 2 are definitely ready for transplant today.. Based on how they were yesterday and where they are today I am hoping by tomorrow 3 and 4 are ready. Today they look to me where 1 and 2 did yesterday.. I really hope 3 and 4 catch up by tomorrow since..
T-1 day until transplant to new/ final home for grow.
Need the roots long enough to have some clay down in the basket to keep the root riot out of the water and only roots in the water..
2/11/2023
Day 10 - Germination
Today they got placed in thier forever Home, 7 days from Sprout and 7 days until Week 1 Start.
PPM- 180 this is water out of the Tap
Temp Water: 70.7
Temp Tent: 77
Humidity: 40% I have a humidifier going 24/7 to try and bring this up.. I also have Humidity Domes on each plant.
2/12/2023
Day 11 - Germination
Sprayed the domes, all are looking good.. Nothing much to do at this phase but Keep monitoring the PH level in the system and making sure they have a comfortable home.
T-6 days until Week 1 start
2/13/2023
Day 12 - Germination
Sprayed the domes, They were looking a little yellow today so I moved the light down to assist. Nothing much to do at this phase but Keep monitoring the PH level in the system and making sure they have a comfortable home.
T-5 days until Week 1 start
2/14/2023
Day 13 - Germination
Sprayed the domes, They were looking a little Florissant yellow today, with what looks like slight burn on the tips, I talked with a fellow grower and we agreed that It was probably that I was drowning them, Yes you can drown you plants even in Hydro, but only early on.. :-) It usually happens with the water being too high, which soaks not only the roots but the medium (root Riot plug in this case). I lowered the water from touching the bottom of the pot to about 1" away. This will probably take 3-4 days to resolve. I will continue my daily monitoring.
T-4 days until Week 1 start
2/15/2023
Day 14 - Germination
Sprayed the domes, continue my daily monitoring they look a little darker green instead of lime green now that I lowered the water levels in the system, so I think that I might have resolved the issue but it will take a few days for recovery to happen.
T-3 days until Week 1 start
2/16/2023
Day 15 - Germination
I looked in on them this morning, 3 and 4 look like they are doing well and recovering nicely. Number 1 not so much it has brown spots on the leaves, this very well can still be a side effect of the overwatering but I decide to go ahead and add Nutes earlier than I was planning just incase. I was going to wait until Saturday but I think intervention is necessary now especially after drowning them early on.
I added 1/2 what I am planning on adding for week 1 start. I also think I am going to adjust my chart to add 1/2 2 days after plant from now on. I don't think it would hurt it to have some Nutes to pull from.
.25ml/Gal Calmag = 12.5ml
1ml/gal GH FloraMicro= 50ml
1ml/gal GH FloraGro = 50ml
1ml/gal GH FloraBloom = 50ml
T-2 days until Week 1 start = I will drain the system and start it over on Saturday with Week 1 Nutes.
2/17/2023
Day 16- Germination
I didn't even want to post today after looking in on them this morning, 3 of the 4 are now showing signs of dronwing.. Brown spots on the leaves, the water levels were still too high.. I drained about another inch out of the tanks.. Will see how quick they recover.. I start week 1 tomorrow and will have to ensure my water levels are at least 1" away from the basket on this round.

Likes
Comments
Share
@SmokinTehHerbz
Follow
Jacks at 3.6/1.2/2.4 grams per gallon starting after transplant once per day.

Likes
4
Share
@SuperGluedGrow
Follow
Number 2 pheno might herm on me so I have to watch but I have limited plants and I really want to keep these genetics so I need atleast one female. Number 3 the mutant stopped growing before I topped, or maybe not stopped but it threw out pistils at the apical meristem and not producing leaves so I topped to see if I could promote side growth but it hasn't worked; I'm going to keep her around just for the fun of it. 4 is my hope of producing female and a good clone.
Likes
20
Share
@DeepRootsGrowTrees
Follow
KRITIC AUTO by KANNABIA
Week #5 Overall June 23rd-30th
Week #2 Flower
This week she's doing well no issues with her feeding she's a good looking plant. Stay Growing!!
Kannabia.com KRITIC AUTO

Likes
8
Share
@Shadowpup369
Follow
These two did great even through a lil stress they still came out on top. I almost want to run it back but I think it's time for something fruity maybe, maybe having a terpene profile that helps initiate a more stone heavy affect and be indica heavy.

Likes
12
Share
@Sundance
Follow
The weak plant is small and sick. The healthy plant is beautiful even I expected a little bigger plant. Leaves and flowers started to be purple.
Likes
Comments
Share
@eldruida_lamota
Follow
Vamos familia, actualizamos la novena semana de floración y última de estas Fruit cake de Seedstockers, salieron las 3 de 3, 100% ratio éxito.
Temperatura y humedad dentro de los rangos correctos dentro de la etapa de floración.
La tierra utilizada es al mix top crop, por cambiar.
De 3 ejemplares seleccioné los 2 mejores para completar el indoor, también cambié el fotoperiodo a 12/12 y apliqué una buena poda de bajos, se ven bien sanas las plantas, tienen un buen color y progresan a muy buen tanto que se me fueron de altura un poco, la solución fue doblar un poco las plantas, también están madurando las flores y tienen una capa blanca de tricomas.
Agrobeta:
https://www.agrobeta.com/agrobetatiendaonline/36-abonos-canamo
Hasta aquí todo, Buenos humos 💨💨💨


Likes
3
Share
@JeyGanesha
Follow
Quarta settimana di fioritura anche queste runz layer cake sta venendo very strong 😂🙏💪