


Likes
170
Share


@SlowpokeFuegobud
Follow
🍪 😍🍪 😍🍪 😍🍪 😍🍪 😍🍪 😍
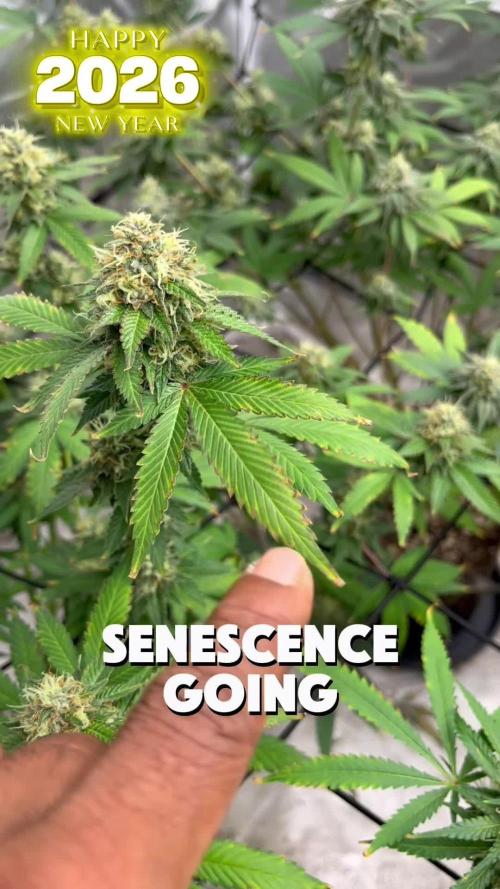
Welcome to week 13, dear growmies!! 😘
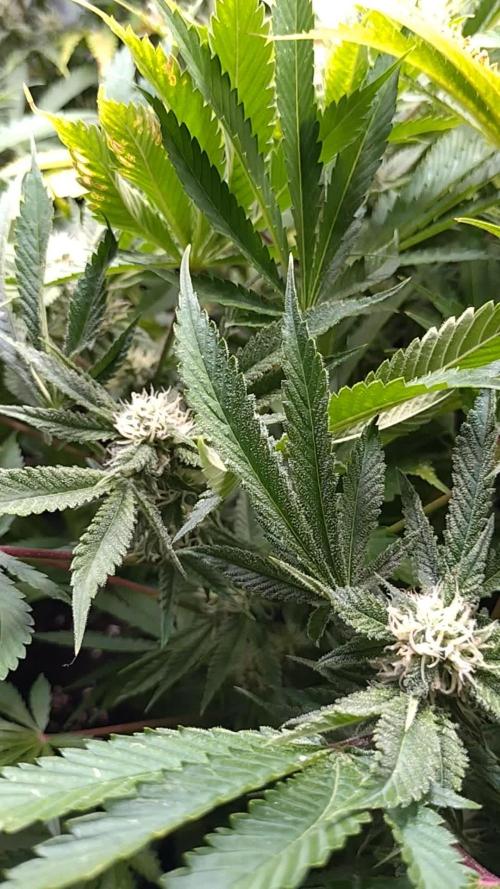
The buds look absolutely stunning!! 😬 I love them! Smell sweet and promising!! 🍪 But I'll wait a little bit longer..
DAY 87
Watered with 2ml bloom + pk + 3ml growzyme + humics + bigfruits + epsom 💧
DAY 90
Only boosters from now on! 💧
Thanks for showing up and supporting me and the girls, bless you, growmies!! 😘
Shouts go out to my sponsors @GreenBuzzNutrients, thanks so much for your support!! 💚 💚 💚
If anyone would like to try their amazing organic products, you can find a generous discount code of 25% in my weekly comments! 😜 🙏
If you want a recommendation which product to get first.. BIGFRUITS!! 😍 I love the tasty terps with this one!!
https://greenbuzznutrients.com/
Thanks also of course @Anesia_Seeds, for the beautiful genetics!! 💜 💜 💜
________________________________________________________
Strain Information:
Foster
Foster is a balanced hybrid with a slight sativa dominance and it’s the result of crossing a particularly THC-rich Emperor Cookies Dough with our highly potent Sleepy Joe. The combination of these two exceptionally strong parents has resulted in a premium strain that delivers a fine balanced aroma and an insane high.
Foster’s high is deceptively slow at first and creeps up, but after a few minutes her outsized potency unfolds with dizzying energy and euphoria. The mind is suddenly full of motivation and a feeling of lightness spreads. At the same time, the body is flooded with tingling, warm effects and greatly relaxed. The strain clears your mind for new ideas and concepts, lets you dream and makes you feel really happy. Due to her high potency and measured THC levels of up to 35%, she will delight and challenge those with a high tolerance with ease, while certainly beaming away novices for several hours. Because of this, she is not recommended for beginners and you should not underestimate this fragrant beauty.
Growing Foster
Foster is a resilient and vigorous strain that produces excellent results indoors, outdoors and in the greenhouse. She tips the scales in yields of up to 550g/m² or 1000g per plant, grows quickly and forms many strong side branches with large heavy buds. Towards the end of the flowering period, the buds are covered in a thick layer of glistening resin and emit an intense sweet, fresh and floral scent.
She is perfect for growing in a SCROG or SOG and has a very favorable calyx-to-leaf ratio, making manicuring easy. Her terpene profile is complex, offering an aroma and flavor reminiscent of coffee, caramel, freshly baked cookies, and vanilla. It’s a seductive treat that shouldn’t fool you with her mind-blowing potency. She is among the strongest strains on the market and has enough THC to blow your head off.
Therapeutic effects
Due to its complex terpene and cannabinoid profile, it has a similar wide range of uses in the therapeutic field as in the recreational field. It helps to reduce stress, has a mood-enhancing effect and is extremely helpful for pain and inflammation.
https://anesiaseeds.com/product/foster/
________________________________________________________________________________
SETUP:
80x80x180 cm Zelsius
240W Full Spectrum LED IR UV dimmable
DW240H-A6-HS
Heatsink color red
LED Chips:
512pcs SAMSUNG LM301H + 24pcs Osram 660nm + 8pcs Osram IR 730nm + 8pcs UV 385nm
Color mix: 2700K + 4000K
2,8umol/J
Driver HLG-240H-C2100B
Coverage: veg 5x3ft / flower 4x2ft
Product size: 628x205x68mm
Green Buzz Nutrients
Shouts go out to my sponsors @GreenBuzzNutrients, thanks so much for your support! 💚 💚 💚
If anyone would like to try their amazing organic products, use code GD42025 for generous 25% discount (for orders of minimum 75€) ✨
https://greenbuzznutrients.com/
Biobizz Lightmix
custom exhaust fan 320/270cm³/h
Carbon Active Granulate 240cm³/h
tab water pH 8 - EC 0,25 with Calmag to 0,5
Advanced Hydroponics pH minus Grow + Bloom to pH 6.2
🍪 😍🍪 😍🍪 😍🍪 😍🍪 😍🍪 😍

Likes
14
Share


@GODSGIFT_2005_JM
Follow
For LIQUIDS & NUTES ******GREEN BUZZ NUTRIENTS***** organic.
Also i’m using their LIVING SOIL CULTURE in powder form!
MARSHYDRO ⛺️ has large openings on the sides which is useful for mid section groom room work. 🤩
☀️ MARSHYDRO FC 3000 LED 300W
💨MARSHYDRO 6” in-line EXTRACTOR with speed-variation knob, comes complete with ducting and carbon filter.

Likes
9
Share


@Growlife23
Follow
No purple yet kind of bummed out about that but we'll see what happens the buds are getting fatter so I'm happy about that nice and hard the smell is awesome can't wait to smoke this
Processing
Likes
8
Share


@eldruida_lamota
Follow
Que hay de nuevo familia, mis green ak xL están dando sus frutos, no veas que bonitas que se están poniendo, floración algo lenta y variedad difícil de cultivar pero que si sabes realmente merece la pena.

Likes
16
Share


@GreeneScene
Follow
The other 3 GDP went through a flush today. Zkittlez was flushed. The very first GDP flushed in the 24th got flushed a 2nd time alongside the other 3 GDP. I’m still eyeballing to see when Runtz will be “ ready “.
Finally got my dry box slapped together, DIY TIL I DIE BABY. Still it came out well for a first try.
Heat ran out of control & I learned the HARD way why we don’t let our girls hang out above 85 for extended periods of time. I kinda had some severe foxtailing going on.
Just biding my time until harvest , fingers crossed I don’t mess this last leg of the race up I’d be distraught .
UPDATE : Lastly I found an area of BUD ROT on Runtz not knowing that’s what I had found the dust got flung in the air twice sooooo there’s spores in my tent & possibly on all my plants now .
Trouble is I’ve flushed 5/10 plants & watered 5 others in the tent so humidity is super high.
I’ve added in an additional dehumidifier because it is riding at 70%-80% . Within 3 mins of adding additional dehumidifier & opening tent doors as we as pointing circulatory fans at plants instead of the grow lights overall humidity dropped from 73% to 53% & still declining .
Hopefully this is enough to keep the other 9 plants healthy & im going to have to harvest Runtz without Flushing .
RUNTZ CHOP COMING IN THE NEXT FEW DAYS
Another week on the GreeneScene in the books 📚

Likes
70
Share


@Fatnastyz
Follow
She has finally finished, since this journal was only to help me track my Success feeding, for the first time. Ill do my actual review and etc. for my Eternity cup entry.
To sum this one up. Stank ass, Loud AF and greasy nuggets!
Thank you all for stopping by and chatting. Enjoy this place 😁💪😻🔥🔥🔥🤘

Likes
34
Share


@Mom74
Follow
Heute habe ich mich getraut mit Blitz zu fotografieren. Habe viel von Lichtverschmutzung gelesen und gezögert. Man kann nun die kleinen Unterschiede der Damen sehen. Berry Bomb am ehesten.Seine Buds erinnern an die Fülle einer Himbeere. Ich hoffe es ist so fruchtig wie beschrieben. Dann habe ich begonnen meinen eigenen Biodünger selber herzustellen aus Kaffeesatz,Bananenschalen und Eierschale. Bin gespannt wie es den Mädels schmeckt. Auf jeden Fall ist es um einiges günstiger und schnell verfügbar da ich Hühner habe und immer frische Eier. Hühnermist habe ich auch und abgelagerten Pferdemist.Nur das beste für die Süßen. Bald geht es zur Ernte zu.Habe mir Canna Flush bestellt und werde es zu gegebenen Zeitpunkt anwenden. Zumindest habe ich alle gegeben und hoffe die Damen tun es auch.

Likes
17
Share

@PhinolaGreen
Follow
10. Woche
Sieht bis auf paar Probleme eigentlich gar nicht schlecht aus. Ich habe auch so langsam die Balance raus für den Dünger und weiß jetzt, wie ich den in Zukunft richtig anwenden kann 😄
Likes
8
Share


@Wackytabacky_420
Follow
🚨 Durbin Thai/Cinderella 99 week 19 update 🚨
🚨 134 days old!! 🚨
🌸 Day 43 of Flower 🌸
So this is a clone I received on Jan 31st. She has been transplanted from a solo cup 2 a 5 gal pot. She had 2 be topped in her second week of rooting do 2 the top frying from to much light in young clone stage. Since the topping this lady has come 2 life!! She has been defoliated 4 times! Most recent defoliation 3/24! She spent her first month feeding just off nutrients in fox farm soil. On 3/2/22 I gave her her first Gaia Green trio feeding!! She has exploded with growth since!! She was defoliated on 3/27 again. She was given her second feeding of @gaiagreenorganics on 4/02. This lady was defoliated on 4/10 and 4/19 and 5/1. She received a all purpose/bloom feed of Gaia green on 5/2. She was also flipped to 12/12 light cycle on 5/2. She received a heavy defoliation on 5/29. 5/30 gave the girl a 15 tablespoon dose of Gaia green worm castings. Installed the new Marshydro Fc-4800 in the tent on 5/31!! She received her full bloom feeding of 5 tablespoons of power bloom on 6/2!!This is what she looks like today!!
💡 Grow Sponsor💡
@marshydroled__amazon
@marshydronnier
#marshydro
#fc4800
Marshydro equipment--
Marshydro- 4x4 grow tent
Marshydro- Fc4800
Marshydro- 6" inline exhaust fan with digital temp and humidity sensor
Marshydro- 6" carbon filter
Marshydro- 6" Black duct line
Other companies in this grow-
@foxfarmsoilandfertilizer - 100% ffof
@gaiagreenorganics
@inkbirdofficial - WiFi temp control
@madmanplant- 6" Tent shelves
#rvagrown #rvagrower #cannabisgrower #homegrown #hightimes #weed4ptsd #weed4veterans #veterangrown #tricomes #ledgrown #weedstrains #indoorgrow #indoorgrown #tentgrown #supportlocal #growlocal #letsgrowrva #weedismedicine #420 #veterangrower #clonegrown #marshydro #fc4800
Likes
33
Share


@Sweetie420
Follow
So we start flowering. I used Remo Nutrients and we gonna see hows going. I'm curious. I hope flowers grow bigger and bigger because for now they are really Small 😪
I have also A regular plant and she also show her flowers. Everything going wel, i think 😊 If I made something wrong please correct me 🙏
Wish You Best 💯💣🍭

Likes
46
Share


@Dr_Rook
Follow
Todo sigue su curso. Las niñas han recibido su primera comida con una EC de 1, parece que les han gustado.
Esta tercera vez es la vez que menos me han estirado en la primera semana de floración, seguramente estiren más en la siguiente. La estructura me gusta, se ven fuertes.
La temperatura está siendo más alta desde que cambié la lámpara, está al ser el doble de potente, también da más calor, cuando haga más frío me vendrá bien. Aún la tengo configurada al 80% que equivale a 176w, a partir de la tercera la pondré a tope de potencia.
La semana que viene seguramente de su primera comida de floración y a ver cómo siguen evolucionando 💪

Likes
10
Share


@StickyFingah420
Follow
Planta hermosa, por problemas de respaldo no tengo sus fotos finales y es una pena :( pero puedo decirles que es una planta que rinde bien, entrega frutos de calidad y no es para nada exigente.
Likes
12
Share


@Fccfarms
Follow
Vegged for 19 days in the big tent and 2 weeks f seed in propergation room proir.
Week 1 day 1 of flowering cycle. Started on Saturday 22nd June. Bring on the summertime heat . I wonder how these girls will cope.
Likes
8
Share


@Antarctic
Follow
31.07.2025 – 06.08.2025
🌸 Week 3 Flower — Bud stacking begins! 🌸
This week was a turning point — stretch finally slowed down and the plants are now fully focusing on bud formation. The tent started getting really humid due to the extra leaf mass and transpiration 🌿💦. That’s when I realized: a dehumidifier is a must. Without it, RH would climb over 70%, which is dangerous at this stage.
Temperatures are still steady (27°C day / 20°C night), but now I’m working on dropping humidity to ~55–60% for safer flowering.
Nutrient-wise, I reduced nitrogen even more, focusing on PK boosters and bloom nutrients. Bud sites are stacking nicely, pistils are shooting everywhere 🧡, and the first serious trichome production has started ✨.
Mistakes from earlier (too much IR, uneven light distribution) are still visible on some plants, but overall the crop is healthy and vigorous. Next week should be the start of real frost explosion ❄️.


Likes
168
Share


@BudBoutique
Follow
Welcome to Bud Boutique Grow Diary - really appreciate all your love and support :)
Dont forget to check out my other current grows!
🗓️ This Week:
- LETS CHOP IT ✂️✂️✂️
- beautiful big bud structure - smelling amazing
- last trichome check again after 48hrs Darkness - looking perfect!!
- Now lets dry inside the tent for 12-14 Days - Trimjail soon
Thank you for still staying with me 💚
___________________________________________
--- 🌱 Strain ---
🏷️ OG KUSH by Barney's Farm
https://www.barneysfarm.com/og-kush-646
---💡 Lighting ---
💡LUMATEK ZEUS PRO 600
https://lumatek-lighting.com/zeus-600w-pro-29/
--- 🥗 Nutrients and Feeding
* 🍸 PLAGRON Algae Baseline grow/bloom + Additives: Power Roots, Sugar Royal, Pure Enzym, Silic Rock, Power Buds, Green Sensation
* 📅💪 baseline grow/bloow: 4ml/l & additives: 1ml/l each
https://plagron.com/de/hobby/produkte
--- 🏭 Grow Setup ---
* 🏠🌿 Indoor: Homebox 120x120x200cm (4x4)
* 📐🌀 PrimaKlima exhausting Fan 1180m3/h (running on 60-80%) & Can Light Filter 800m3/h & 1x Fanbox 1x Dyson fan for Air circulation
https://primaklima.com/de/shop/ventilatoren-de/ec-ventilatoren/pk160ec-tc/
https://canfilters.com/products/filters/
All Likes and comments are highly appreciated!!!
don't forget to check out my Instagram: budboutiquee <3
- Bud Boutique
Likes
6
Share


@Mr_nugs_lover_David
Follow
It was such a nice experience for me with this strain, first time ever growing her, she had a little bit of long internodes and thought she wasn't gonna be very productive, however the nuggets are so so hard and compact and the quality is just brutal, doesn't even look like she's s been outdoor grown, I love this strain for the rare strong smell like very sweet and floral with that strange diesel notes mix the sweet tones, I would love be growing her my whole life, I definitely will keep growing this lady FOR SURE!. thank you so much and hope you guys enjoy! 💎🙏🔝💚

Likes
10
Share


@keyto
Follow
Topped the rest, waited to regenerate and finally transplanted into 22L Fabrics. (Infused with 2ml/L root juice & calmag)

Likes
3
Share


@Rinna
Follow
Did some more defoliation but keeping her going as she's wrapping up the stretch. Really starting to flower now, which took way longer than I expected. She's a late bloomer for sure, not the best for growing outdoors, this was a test seed though so I just kept her going. Amsterdam Genetics doesn't recommend this one for growing outdoors btw.

Likes
12
Share


@Virke
Follow
They started blooming early and im very satisfied with their appetite
Next week bigger heads hipefully after some Big Bud additive😉