
Likes
Comments
Share

@BombBuds
Follow
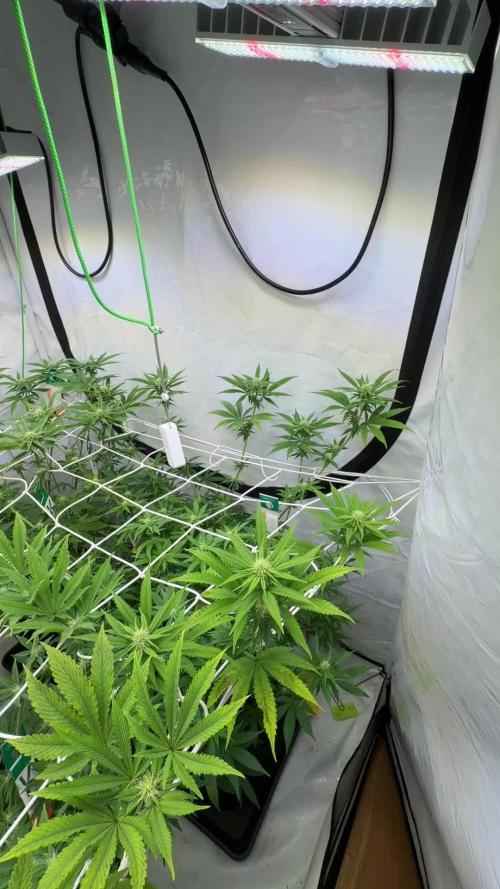
Ende Woche 2 Blüte. Alles schaut schön aus buds bilden sich und von den Milben nichts mehr zu sehen.


Likes
65
Share


@Schnabeldino
Follow
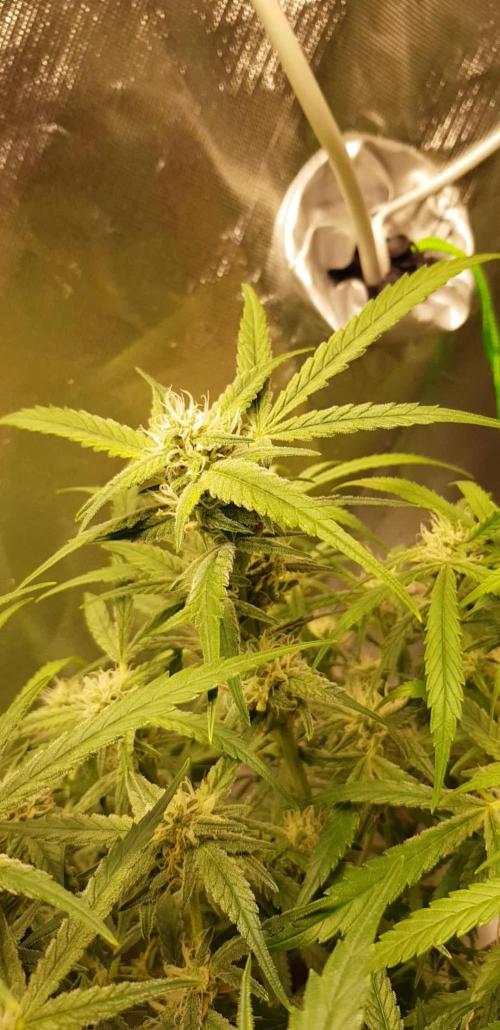
📅 Week 14 | Days 99–105 📅 🍏🍌 Late Flowering Stage – Apples & Bananas 🍏🍌
Day 105 🌞 – Apples & Bananas (Final Curtain Call)
🔸 Visuals: Apples & Bananas is closing the show with pure elegance. The buds are thick, dense, and solid as stones – the kind that make your trimming scissors sigh in advance. Each cola is stacked beautifully from top to bottom, wearing a frosty coat of trichomes that sparkle like morning frost on autumn fruit. The pistils have curled in and taken on a rich amber-orange, giving her a warm, ripe glow. Resin production is full throttle, and the sugar leaves are sticky enough to glue your gloves together.
🔸 Climate:
The temperature couldn't be worse...towards the end, of course, it will be almost 30 degrees for the next few days.
Humidity is steady between 50–58%, just right to keep those chunky buds safe from mold.
VPD stays at 1.4 – 1.6, encouraging a stress-free final swell.
🔸 Nutrients & Water: She’s had her last nutrient boost, and is now on a clean water flush (pH-adjusted, EC ~0.5). Water uptake has slowed, letting her pull the final goodness from her leaves into those already weighty flowers.
📈 Current Conditions
🌡️🔆 = 28°C
🌡️🌜 = 21°C
💨 VPD = 1.4
💨 RH = 55%
🔦 PPFD = 900 µmol (12/12)
🔦⌚ DLI = ~38
🛠️ Setup (unchanged)
💡 2 × Sanlight Evo 4-120 @ 90%
⛺ 120 × 120 × 180 cm
🍯 18 L pot
🌱 Bio-Bizz Light Mix
💊 Advanced Nutrients
💧 Tap water (EC 0.5)

Likes
5
Share


@SurSideCrew
Follow
Scotts OG de Rare Dank, nos esperabamos una OG Kush típica poco ramificada y con corta flora, pero nos sorprendió que era bastante mas Sativa y ramificada! Se estira muchisimo en el cambio de fotoperiodo. Cogollos no muy compactos pero muy dulces, terroso, kushy, pino, cookies.. Muy vigorosa y muy buena para hacer clones! No soporta muy bien el estrés, altas Temperaturas o tierras con alto ec... Tiende a ponerse violeta con el frío


Likes
34
Share


Likes
9
Share


@MassEric
Follow
Another week down and we are definitely off to the races. The stretch is real...... As in holy crap these are racing toward the ceiling. Eleven inches in a week. Looks like I'm going to be adding something to the top area to help keep things stable once the bugs really start filling in. Not my favorite trait in a plant when they run like this. Well, this is why we pheno hunt right? I'll give the clones I took early on to a friend for an outdoor grow.
Darn timelapse had an issue with the camera towards the end so it got a big wonky. All reset for the next week. Thinking of moving it close to a bud to see if we can just watch one of those form.
Likes
51
Share


@nonick123
Follow
Día 92 (20/01) CBD Auto 20:1 #1 - Reviso los tricomas, y a pesar de tener muchos pistilos blancos, detecto un 50% de tricomas nublados / 50% tricomas transparentes
La cosecha se acerca para este monstruo!
Día 93 (21/01) CBD Auto 20:1 #1 - Los cogollos siguen engordando! Never ending lady!
Día 94 (22/01) CBD Auto 20:1 #1 - Los cogollos siguen y siguen engordando. Increible!
Día 95 (23/01) CBD Auto 20:1 #1 - Cada día pistilos nuevos y mayor densidad! 😍💥
Día 96 (24/01) CBD Auto 20:1 #1 - Se acerca la cosecha
Día 97 (25/01) CBD Auto 20:1 #1 - Reviso los tricomas: 49% transparentes, 50% nublados y 1% ambar.
La senescencia general de la planta con muchas hojas amarillas y el estado de los tricomas me llevan a la cosecha!
Día 98 (26/01) CBD Auto 20:1 #1 - Cosecha! 😍💥💨😁
Un viaje apasionante con esta monstruosa planta que ha crecido hasta 1,60 metros tras Supercropping en dos ocasiones, LST en incontables veces, Lollypopping en 2 ocasiones, varias defoliaciones...
Hubiera sido increible tener en tierra madre (suelo) o en una maceta de 21 litros en exterior...
Cogollos estilo sativa, no muy gruesos pero si densos y con forma de bate de beisbol, que en ningún momento paran de formar más y más pistilos nuevos! 💥
El color de los tricomas y la senescencia general de planta nos indica que ya está lista después de 98 días desde germinación
Desprende un olor muy tropical, dulce, como una mezcla de papaya y mango, con un toque picante de fondo
Esperemos a ver con que perfil terpenico nos sorprende después del secado y curado!
Unos colores verde lima durante toda la fase de floración que ha ido mutando a morado en las puntas de los cogollos conforme se produce la senescencia
Esperando a probarla para el efecto 😁

Likes
6
Share

@GERGrowDesigns
Follow
Welcome to Flower Week 4-5 of Divine Seeds Auto Fractal
I'm excited to share my grow journey with you all as part of the Divine Seeds Autoflowering Competition 2025. It's going to be an incredible ride, full of learning, growing, and connecting with fellow growers from all around the world!
For this competition, I’ve chosen the Feminized Automatic strain: Auto Fractal
Here’s what I’m working with:
• 🌱 Tent: 120x60x80
• 🧑🌾 Breeder Company: Divine Seeds
• 💧 Humidity Range: 50
• ⏳ Flowering Time: 60 Days
• Strain Info: 23%THC
• 🌡️ Temperature: 26
• 🍵 Pot Size: 3
• Nutrient Brand: Narcos
• ⚡ Lights : 200W x 2
A huge thank you to Divine Seeds for allowing me to be a part of this amazing competition and Sponsoring the Strains. Big thanks for supporting the grower community worldwide! Your genetics and passion speak for themselves!
I would truly appreciate every bit of feedback, help, questions, or discussions – and of course, your likes and interactions mean the world to me as I try to stand out in this exciting competition!
Let’s grow together – and don’t forget to stop by again to see the latest updates!
Happy growing!
Stay lifted and stay curious!
Peace & Buds!

Likes
5
Share


@TheBulldozerSicily
Follow
Risultato finale inaspettato! Questa è la prima volta in outdoor, e pensare che le volevo regalare perché non me la sentivo di farle crescere a casa perché troppi vicini di casa, poi mi sono affezionato ed eccole qua, le più grandi piante mai riuscite!! Sono molto contento!!

Likes
7
Share


@gablmo
Follow
Another busy week with the vege. I gave it microbes, a HID lamp at 400 watts, sprayed for bugs and also covered the media with plastic wrap to get rid of 3 or 4 gnarts and of course a had another flood with the GoGro water system and I took one plant out of the garden because she is frozen in time. I still don't know why. The trellis is doing good. Lots of work.


Processing
Likes
12
Share


@GrowGuy97
Follow
Have seen a lot of good diary’s on these had to get some for myself to see how it goes! Hopefully we get some super purple buds! Stay tuned & happy growing friends!🤙🏼✌️🏼🌱
Day 1 - Finally got them planted & water with fox farm big bloom (6tsp per gal)
Day 2 - all 5 have sprouted & doing great!
Day 3 - 2 out of 5 seeds have fallen off but they are all still growing & looking good! Watered them a little more this morning👍🏼
Day 4 - Looking great🙏🏼
Day 5 - Grow babies Grow!!
Day 6 - Plain PH water 6.4


Likes
Comments
Share


@Cannabisii
Follow
Moved to a bigger tent and added two additional plants so I could have everything in one spot.
The plants in this diary are on the left side of the tent and along the back wall. The other plants are another GSC clone that is a little smaller, and a Wedding Cake from Seedking.com. they are being grown the same way as the others.
I'm very impressed with how the GSC clones are flowering relative to the gorilla glue. They are just way more dense and bigger flowers. Fingers crossed the gorilla glue fills out.

Likes
174
Share


@DreamIT
Follow
😬😆UnCoNvEnTiOnAl GrOwTh 😆😬
____________________________________________________________________________________________
🤪 23.01 ...
🤪 24.1 These days, I will work the honey cream a little and send it to bloom under the viparspectra lamp. I recently removed a plant under this lamp and in the few days it remained under there, I noticed a visual increase in the trichomes, I hope it keeps this line and makes me literally explode the flowers: D
🤪 25.1
🤪 26.1
🤪 27.1
🤪 28.1
🤪 29.1
______________________________________________________________________________________________________
📜👀 A look at the details of what I'm growing 👀📜
🍊💚 Red Mandarine F1 🍊💚🌱🍭 Sweet Seeds 🍭🌱
📋 Details 📋
⚧ Gender
▪️ Feminised
➰ Genes
▪️ 55% Indica / 45% Sativa
🎄 Genetics
▪️ Red Poison Auto (SWS39) хCalifornia Orange x Skunk hybrid)
🚜Harvest
▪️ 400 - 500 g / m²
🌷Flowering
▪️ 49 - 63 days
✨THC
▪️ 16%
✅CBD
▪️ 0,2%
🏡Room Type
▪️ Indoor
🌄Room Type
▪️ Outdoor
🕋Room Type
▪️ N/D
🎂Release Year
▪️ 2019
___________________________________________________________________________________________
👀📷🥇 Follow the best photos on Instagram 🥇📷👀
https://www.instagram.com/dreamit420/
🔻🔻🔻Leave a comment with your opinions if you pass by here🔻🔻🔻
🤟🤗💚Thanks and Enjoy growth 💚🤗🤟

Likes
121
Share


@DogDoctorOfficial
Follow
Day 43 F and this girls are getting more beautiful each day, I’m amazed how new trichomes are pumping day by day, and the amount of them 🤩 yes, freakin Fu##ing yes 🙌 🙌🙌 shoutouts to MARSHYDRO and to AptusHolland for the help in this department 🙌🙌🙌
I believe we are getting closer and closer to harvest day by the speed on this girls , but time will tell and so will the colors on the trichomes 😆 for now i will keep giving plain water with some enzymes and microbial live to help keep the soil alive for the next run 💚💚💚🙏🙏🙏
Day 44 F and the trichomes are getting closer to be ready but still not there yet , i do like the numbers, the color on them, the structure 🤩💚🙏 felling pretty blessed with it all 🙏🙏🙏
Growers love guys and i my wishes for you all are that for a great 2020too 💚💚💚🙏🙏🙏🙌🙌🙌 thanks for stoping by and read my diaries 🙏🙏🙏💚💚💚 I truly appreciate the love and it all 💚💚💚💚🙏🙏🙏🙌🙌🙌
And with and enormous honneur and pleasure that i start collaborating with MARSHYDRO, they wore kind enough and send me a 4x4 grow tent and a TSW2000 for me to do tests and reviews, i got to admit the quality on the materials, the easy assembling, the user manual, even the art detail that came with a bunch of cool stickers, are plus things that can not go unnoticed 🙏💚 Thanks Marshydro for so many details 🙌😉 i will try and post them all in here, but you can follow me on my instagram account https://instagram.com/dogdoctorofficial for every day updates , videos giveaways etc, or in my youtube channel- https://youtube.com/channel/UCR7ta4DKLFMg2xxTMr2cpIg keep tuned 💚💚💚
Thank you MARSHYDRO for having faith in my love for growing , lets make magic together 🙏🙏🙏
Genetics - Cookies Fam genetics - 3x SunsetSherbet
Grow tent - MARSHYDRO 4x4
Ligth - MARSHYDRO TSW 2000 @ 100%
Food - HAPTUS HOLLAND
Filter - vanguard hydroponics Falcon Filters
Extraction - 2 x vanguard hydroponics 280m3h
Extraction control - SMSCOM Smart MK2
All i grow is medicine for myself, for me and for my best friend with is me 😆 nothing to sell, so don’t even ask 😅💚💚💚
All info and full product details can be find in can find @
https://www.mars-hydro.com/grow-tent
https://www.mars-hydro.com/led-grow-light/mars-ts-series-led-grow-light/mars-tsw-2000-led-full-spectrum-hydroponic-led-grow-light
https://marshydro.eu/ DISCOUNT CODE - DOGDOCTOR 💚💚💚🙏🙏🙏💚💚💚
https://marshydroau.com/
https://aptus-holland.com/
More info and updates @
https://growdiaries.com/grower/dogdoctor
https://instagram.com/dogdoctorofficial
https://youtube.com/channel/UCR7ta4DKLFMg2xxTMr2cpIg
💚💚💚Growers love to you all 💚💚💚

Likes
35
Share


@NewfieFarmer
Follow
This was a brilliant plant, it kinda stunted a little bit, but that was my fault. It was so beautiful during flower, and the smell is not like weed at all, but more like juicy fruit chewing gum. Amazing and smooth to smoke as well.
Likes
3
Share


@BR1CK_SANCHEZ
Follow
This week was a little rocky. Two girls on the outer edges are good, but the middle one is drooping and foxtailing already. It's weird because my middle plant was larfy last run as well. I might push her to the corner and let her do her thing with less attention... because I just got a photoperiod runtz clone that's gonna need some space and perhaps its own light. LST seems to be going well for the other two though. Sometimes with autos, it's just a genetic thing. They can be temperamental girls sometimes.
Likes
12
Share


@Ieiogrow94
Follow
Eccoci qui...
Un altra settimana è finita e ci avviciniamo sempre di più alla fine di questa avventura pazzesca.
Come potete vedere si è formata un'apicale importante con moltissima resina, ed ora sta iniziando a manifestarsi il viola che stavo aspettando!!!
Grazie a @KhalifaGenetics e @xpertnutrients per la collab e a tutti per il supporto🔥🌲❤️

Processing
Likes
21
Share


@LittleBigTrees
Follow
This week I Realised I'd used the wrong feed chart so I was over feeding 🙄 the leaves burnt on a few plants so I've only fed them water this week and will resume feeding from next week.
There are still no pre sex pistils showing but it can't be far off now.
As soon as pistils start to show I'll start feeding bloom feed.
I've turned the light up to 30000lux using HLG's online calculator for converting a lux meter/app reading to PAR , my light is 3000k which with lm301H Led's works out @ 465ppfd which is about the max the plants can use in veg without supliments co2.
Here's the link for anyone using quantum boards, it has different spectrum calculators.
It's been really useful setting my light up so big thank you to HLG (even though I have a Geeklight) and a thank you to the GML show on YouTube for bringing it to growers attention (I love that weekly show, so much info and perspective)
https://horticulturelightinggroup.com/blogs/calculators/converting-lux-to-ppfd
Hope everyone's staying safe and growing 😎