
Likes
Comments
Share

@BEM_Genetix
Follow
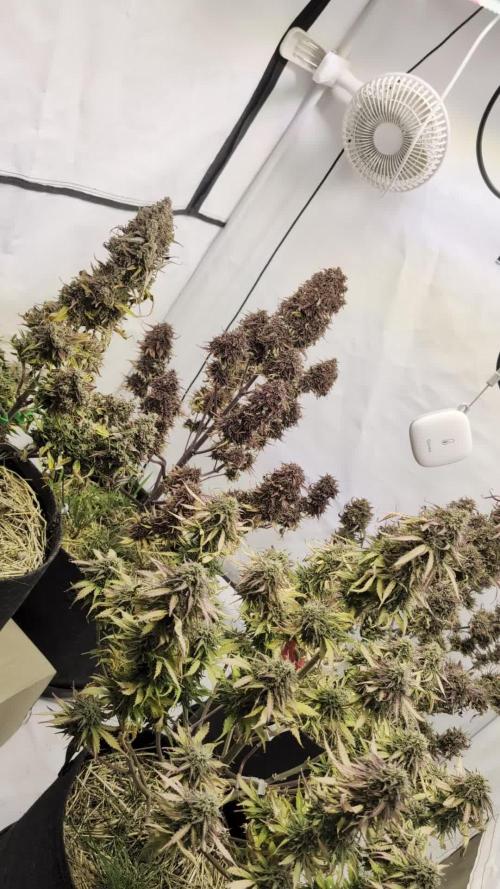
Sie stehen jetzt 48 Std in der Dunkelheit und dann werden sie geerntet und im ganzen aufgegangen. Die Terps sind überwältigend und die buds sind schön dick und fest.
They've now been in the dark for 48 hours, and then they'll be harvested and fully opened. The terpenes are stunning, and the buds are beautifully thick and firm.


Likes
73
Share


@Roberts
Follow
Cookies and cream auto is growing great. She is just finishing bulking and has about 10 days left roughly. I will be switching her to ph water this weekend so in 2 days. She has grown great under the Medic Grow Mini Sun-2 light. Next update is harvesting. Thank you Medic Grow, and MSNL Seeds. 🤜🏻🤛🏻🌱🌱🌱
Thank you grow diaries community for the 👇likes👇, follows, comments, and subscriptions on my YouTube channel👇. ❄️🌱🍻
Happy Growing 🌱🌱🌱
https://youtube.com/channel/UCAhN7yRzWLpcaRHhMIQ7X4g

Likes
Comments
Share


@The_Lonely_Farmer
Follow
So these girls are shorter than expected allthough the 2 girls are of decent height enough for me too flip along side my aptus fed girls.
I have defoliate all areas that covers light getting too the lowers and also removed excess branching too focus energy towards the main tops also did this via a little lst 🌱
One of each plus an extra 412 so hopefully they stick through and make it too harvest which they look too be healthy so far.
I will next defoliate on week 3 of flower and also remove excess plant matter taking up neccasary energy 🌱
Shogun is serving them well so fa!
Lights will be 12/12 tonight
Week 1 flower commences then
Stay blessed 💚
Likes
8
Share


@Mr_nugs_lover_David
Follow
Very good journey to me, she has responded very well to the lst training, providing me beautiful colas, enough for me to have nice clean organic nuggets to smoke. I would definitely would run this Ak420 by seedstockers again, the sweetest phenotype was the number #2 which you can take a look at here in my page!

Likes
16
Share


@Rinna
Follow
The ladies are still doing great and stacking very nicely! The trichomes on both pheno’s are insane, super dense buds too. The leaves do look very very dark green with slight tip burns, so I dosed down the nutrients slightly from 1100+ to 950 ppm. The grow light makes the leaves look more light green than they actually are (check the night shots). Both plant smell super super sweet, not really blueberry (yet) though.


Processing
Likes
36
Share


@The_Projexx
Follow
On the start of week #6 for these fine ladies !! They are starting to put on some weight now this will be their last week with some Big Bud some Im really gonna pack it in there and then Im going to switch to Overdrive for the final stages of ripening !
A shout out to everyone who drops into the diary keep on keeping on folks ! AND a big shout out to Humbolt for letting me test some of there Pineapple Skunk !
-Happy Growing!
Day#36F Things are really starting to frost up , They're gaining mass getting them ready for the final stage of growth !!
Day#37F Watered 2L each whole line up ( PPM 1019 ) They are swelling up and getting ready to ripen up !
Day#38F Responding well to watering , frosting up nicely , swelling daily !
Day#39 n/a moving
Day#40 n/a building grow room
Day#41 n/a
Day#42 watered whole line up but no pictures . Will update as of tomorrow

Likes
10
Share


@Ieiogrow94
Follow
Eccoci qui...
Per problemi di lavoro ho tardato un pò la pubblicazione delle foto, le piccole sono molto in forma ed ho fatto molto bene a puntare su di loro mettendone 2.
Sono entrambe molto stabili e stanno iniziando a formare palchi di resina, sono molto entusiasta e credo di avere tra le mani ottime strain.
Grazie a tutti per il supporto, NON VEDO L'ORA DI RACCOGLIERLA 🔥🌲❤️

Likes
28
Share


@SensiHank
Follow
Brachiale Buds, Intensiver Geruch, Vorfreude auf den geschmack ! so kann man die Woche in kürze beschreribe. DIe Buds werden immer dicker und die Ladys reifen immer mehr vor sich hin : bald muss ich wieder das Microscope raus suchen um die Trichome zu checken :slight_smile: ich bin wirklich gespannt ob die Ladys noch ihre Dunkle farbe bekommen oder ich es nächstes mal etwas kälter machen muss wärend der nachtphasen :slight_smile: mal schauen

Likes
28
Share


@TeamQuality420
Follow
My pictures seem to have re organized themselves, just give me a few here and I'll get the full rundown .
So this week ( day 21-23) was MAJOR defoliating.
What my first step is to start taking the largest fan leaves . My next step is about halfway through the canopy I'll stop and then I'll start working on the very bottom of the plant now at this stage in the game anything that doesn't even have a nice Bud site so a nice white hair sticking bud at the very bottom like shoots I'll just cut them right off.
This is the first steps of a main line but I don't complete the actual full main line I probably will try it sometime soon just not this time.
So you take off anything that is a small shoot coming off the main stems and then your next step is .
STOP. It might be a minute it might be 10 minutes, 20 min , it might be an hour or more ( my tip is don't wait a full day I try and do it within the first 12 hours of starting it) but I always stop just to look at what I've done sometimes if you get going too quickly you can end up doing way too much.
Stand to talk to canopy and look what sites are getting hit by light what places are these families beneficial to use for photosynthesis. Anything that is not doing as much good will be taken off and at that point I'll probably do another you know 5-10 minutes of defoliation maybe take one or two more shoots at the bottom to ensure what's left there is a huge fat cola that's going to give you those huge buds .
After this you're going to want to do your best to support those stems that are going to hold a lot more weight as if the plant would have been with all the shoots so you're going to want to just make sure that you have staking in place or some sort of support system to keep them from flopping over a breaking them in the future because that's one thing yeah it's great but then it'll get to a point where oh no stuff falling over and then it's just more hassle than it is helpful.
I got alot more pictures to follow this week so stay tuned !!!

Likes
21
Share


@darb35
Follow
Day 43 - Both girls are doing well, one stopped growing tall at around 68 cm, other one is still growing.
Hope this week they will start getting frosty (:
Likes
18
Share


@frenchies_farm
Follow
Not a big yield cause I was working on my grow room so I didn’t take enaugh care of them…
The smell of these plant is fantastic
Likes
15
Share

@paetel
Follow
Life has taken some very unexpected turns, so I’m just posting a few pictures for now. I’ll probably only post another update once the harvest is done. In July, I’ll be moving to a new apartment with some extra space, and I’m planning to extend the growing area.

Likes
18
Share


@Jackweed77
Follow
the girls have grown longer than I expected🤷♂️ ... luckily the stretching period is over 🤪... we hope that the flowers will surprise me as well as the stretching😍💚👊

Likes
38
Share


@GreenHouseLab
Follow
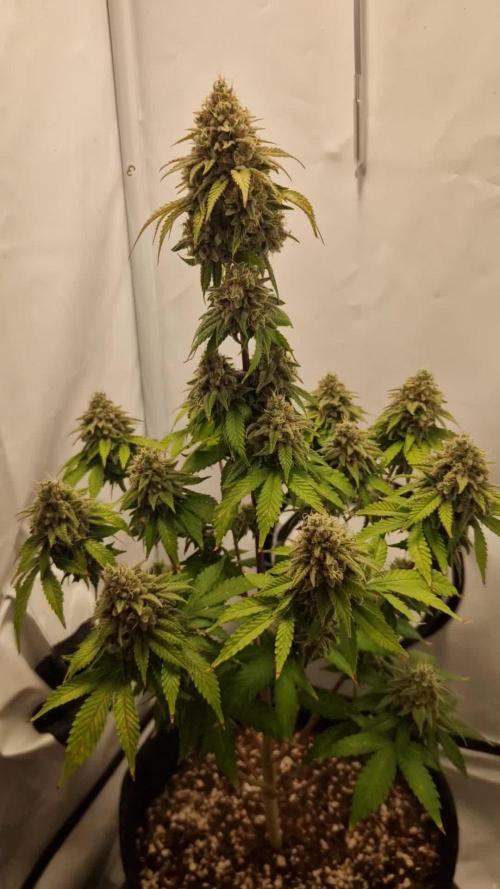
Week 11 has better defined picture of this cultivar in her final phase. Ended up being exactly 12 weeks from seed.
Smells delicious will be hanging whole as the humidity was initially very low at 45% now with a humidifier currently sitting at 55% and 70 Deg which is not bad. She received 48hrs of darkness.
Likes
33
Share

@HinduGod
Follow
WOW LOOK AT DAT!!!! DAT PLANT IS STARTING TO GET DA FADE ON!!!! IT SHOULD BE DONE IN DA NEXT 10-14 DAYS!!!! TODAY I SET UP DA HINDU DRIP IRRIGATION YOU CAN SEE IT IN DA VIDEO IT WORKS VERY VERY GOOD!!!!!!😎
Likes
55
Share


@Organic_LarF
Follow
Just nature at work!!!
Love it!!!
Thats it for this week boys and girls,
Thanks for reading and passing by and 💚💚💚👏👏👏👍👍👍 for Marshydro leds. Quality/price top!
Grow safe buds and feel free to check out my other ladies doing fine thanks!
🌈viparspectra🌈
🎟️Organic_LarF♡viparspectra 🎟️
for your discount!!!!
https://www.viparspectra.com/?aff=nbemz68cxril&utm_source=affiliate
🌈Join us now🌈
🙏🌿🌿🌿🙏
Special thanks to
🏅🌿greenbuzzliquids🌿🏅
Use organic_larF for 15% discount
👏👏👏Weedseedsexpress!!!! 👏👏👏
LarfxWSE for discount at
weedseedsexpress!!! 15% off!!!
👽👽👽Zamnesia!!! 👽👽👽
Add OrganicLarF as a code when buying your own MarsHydro LED light and get a nice reduction!!!👽🚀🛸
Likes
6
Share


@DrJekyll_MrKush
Follow
This week marked a serious shift. The main colas are swelling fast, and you can clearly see the difference compared to last week. Structure is tightening up, buds are stacking, and weight is starting to show. The side buds are finally coming in, building up volume after a slower start.
I’ve cut back on the heavy PK (Boom Nutrients) and switched to Overdrive by Advanced Nutrients for the next week. The idea is to push the final stretch without overfeeding or stressing them out.
What’s wild is how Medusa F1 seems to change overnight—this strain really doesn’t play around in late flower. In just the last two weeks, the visual progress has been drastic.
Space is still a big question mark. Running 7 plants in a 90x90 tent is tight, but airflow and light coverage are holding up for now. The big question is whether it’ll translate to actual yield or just look impressive.
So far, so good. Let’s see if these girls can fill out the tent and make it all worth it.
Likes
6
Share


@Mo_Powers
Follow
she has recovered really well. i think repotting and stopping the fertiliser has helped her. now she is getting green sensation again in small doses. she has gone into bloom. she is currently getting 10 hours of light.

Processing
Likes
28
Share


@Datiko
Follow
SHE IS FASTER THAN I THOUGHT, AND I HOPE SHE WILLNOT BE STRESSED BY TOPPING

Likes
17
Share


@ButterfliesLittleFarm
Follow
Hello Diary.
It has completed its sixth week of flowering, a total of 9 weeks since Purple Punch sprouted.
As you can see in the photos, the plants look beautiful, the flowers are large and hard, full of trichomes. I believe the yield will be better than I had hoped. The smell is very intense.
I would also say that Purple Punch is quite resistant, along with them, as you know on "Farm", there is also one plant Watermelon Auto that has suffered a lot due to over-feeding, which cannot be said for Purple Punch.
The treatment they receive is the same.
Watering is every three days, I regulate or lower the p.H of water to values between 6.1 and 6.5. And I do that with every preparation of water for irrigation.
I stopped adding any additives the previous week so they get clean water.
Let’s take a look at the review of the week.
26/03/2021 - Day 59.
Watering. p.H. water I regulated to 6.4
Temp / Humidity on the farm - 25 degrees and 32% humidity.
29/03/2021 - Day 62.
Watering. p.H - 6.3
Temp / Humidity on the farm - 25 degrees and 36% humidity.
30/03/2021 - Day 63.
Photography. This time I didn't photograph them on a black background, I didn't want to stress them too much, I'll take detailed photos for the end anyway.
That’s it for this week, without much excitement, I’m patiently waiting for the harvest. See you soon.