
Likes
Comments
Share

@MaltedMadness02
Follow
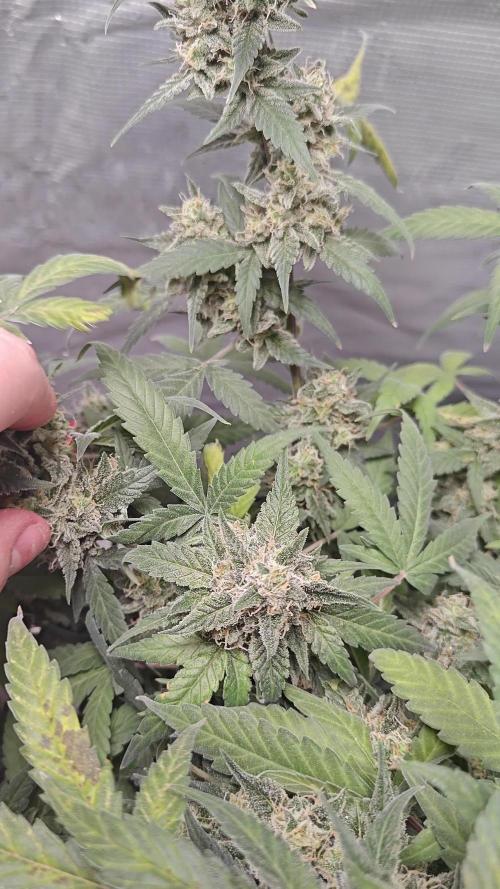
She's made it! Harvesting before any more degrading happens. Worried I screwed her by letting her go without water, but she seems pretty vigorous. Here's to hoping the dry goes well, got her in a tent that's properly vented and has a fan inside blowing air underneath the canopy (not at the plant itself). Its kept between .78 kPa and .9 kPa VPD wise. Hopefully it has enough air exchange that mold won't be a problem. Check back for updates on how she's looking through the dry! I will also add more pictures when she is trimmed. Can't wait to see her buds then.

Likes
52
Share


@Roberts
Follow
I am dropping FBT2403 today to germinate. The seed was lightly scuffed, and dropping in s glass of water. Cover up and placed in the grow room for the warmth. In 24 to 48 hours when she sprouts her tap root. I will place it directly into the Rockwool. She will be in a 5 gallon DWC in Agrogardens nutrition. She will be growing under a Medic grow mini Sun-2 320 watt light. I run 4 plants of different strains under this light daily. 🤞 for a good grow, and thank you Agrogardens, Medic grow, and Fast Buds. 🤜🏻🤛🏻🌱🌱🌱
Thank you grow diaries community for the 👇likes👇, follows, comments, and subscriptions on my YouTube channel👇. ❄️🌱🍻
Happy Growing 🌱🌱🌱
https://youtube.com/channel/UCAhN7yRzWLpcaRHhMIQ7X4g
If anyone needs to purchase fastbuds here is a link for my affiliate program
https://myfastbuds.com/?a_aid=60910eaff2419
Processing
Likes
18
Share


@DjDaveAtHome
Follow
Blueberry Headband (1) from Humboldt Seeds, Cheese (1) and Orange Juice (1) from Dinafem Seeds.
https://www.dinafem.org/en/orange-juice/
https://www.dinafem.org/en/blueberry-headband/
https://www.dinafem.org/en/cheese/
Lighting
https://www.horticulturelightinggroup.ca/products/260w-qb-v2-led-kit
Soil Amendments
https://www.gaiagreen.com/product-page/all-purpose-4-4-4
https://www.gaiagreen.com/product-page/glacial-rock-dust
https://www.gaiagreen.com/product-page/mineralized-phosphate
http://www.seasoil.com/
Worm castings
Sunshine Mix #4
Epsom Salts
Molasses


Likes
44
Share


@TheMachinist
Follow
***Attention***
Please note that if you only read my entries at the beginning of each week, I try to post pictures daily, with note updates as well.
*******************************************************************************************************
Feb 24, 2018:
I've decided to have a positive outlook on this grow, despite all the errors I made, and problems unstable genetics provided me. Though my crop is heavily seeded, the trichome production seems on point, I should end up with some decent smoke. It's a humbling lesson to learn, don't relax your attention at all, these wonderful plants are capable of extraordinary things when improperly motivated. I’m excited to pop some Nirvana seeds in a couple months but until then I’ll try to get the most from this crop.
...
Feb 23, 2018:
Just another day, might just do straight water feeding the next few in a row since I'm finally seeing some tip burn. Considering I've been going pretty hard with the solution ppm i'm surprised I've not seen burn before, I started in FFOF so soil was hot from the start.
...
Feb 22, 2018:
Super depressing news folks, it seems my crop seeding is more extensive than previously thought. I am just disappointed in myself for not catching the plant throwing sacks earlier. Even after countless hours researching, it seems that once again I am doomed to learn through experience. hopefully these seeds mature and then finish the buds so I can harvest. I knew the risks of growing bag seed and am not paying for it. Can't wait to start the next round. My next round will be seeds from Nirvana, their AK-48 and Aurora Indica.
...
Feb 21, 2018:
Did a bit more staking, with that thick canopy of branches was hard to see a few branches drooping. Managed to bend/break a branch with a golf ball sized bud, not sure if the stalk will heal itself this far into flower, but I clothes pinned it straight and will monitor. still seeing lots of clear and no amber, still a ways to go. Tested a lower bud on the plant that got heavily seeded and found the high quick, and just a hair racy but much better than the first tester a couple weeks ago. Only have taken 2 buds for testing 2 weeks apart, being this is my first grow I wanted to experiment and see how the high changes as the flowers mature.
...
Feb 20. 2018:
Watered with 6.5PH RO water with 2mL/gal Cal-Mag. Nothing much else to comment on, just watching the buds grow. One plant is going to be finishing much earlier than the others, not sure what to do about that since i was plannig on using my grow tent as my drying area. More colas are starting to lean, as of now they are propped up by the canopy, but will probably have to stake a few eventually. Getting a few orange hairs, which i've read can indicate less than 3wks to go, which makes sense as that would be almost 8 weeks flowering. Im not making any decision based on time, as the plant will let me know when it's ready, but knowing when to start my water only feeds is helpful.
...
Feb 19, 2018: Alrighty guys, girls, and zimzers we are staring week 12 from seed and we are 32 days since first sign of pistils. I am now feeding full flowering nutrients (Fox Farm Tiger Bloom) and the girls seem to really like it, I've seen no evidence of leaf tip burn, to avoid burn in an all soil grow I'm increasing the nutrient concentration gradually, waiting at least 3-waterings before increasing from last watering. I've only had to stake up 2-3 top cola's, as the plant they are on is in front and doesn't' have as much support from surrounding plants. Although these plants were grown from seeds form the same bud, the different phenotypes are generating vastly different smells. I try to bump and move the plants as little as possible, every time I move anything the air is filled with a musky greasy and sometimes fruity pungent odor!
**As a side note, I would like to point out that I have done almost no defoliation, the under canopy you see has developed naturally due to the plants dropping fan leaves as necessary. I have done some pruning of lower flowering branches, but these branches contained no fan leaves, only resource draining under canopy bud sites and branches.**
Likes
18
Share


@mrHazeCake
Follow
26/09 The second week of vegetation has begun, the sprout feels super great, I buried it 2-3 cm, so it looks a little shorter.
I will start fertilizing from about the 15th day, until that moment I just pour water with the addition of Piranha 2ml / l, today I poured 10ml from a syringe around the sprout and today it stood all day without a cup under full light
Tonight I added to the AD Piranha solution more nutrition for these mycorrhiza fungus in the form of Bud Candy. And carefully poured 5 ml of the solution 2-3 cm from the sprout on one side. Perhaps this will immediately help develop an excellent root system.
I continue to occasionally wet the ground for it so that it would be more humid around it, since I have a fairly strong lamp for such a grow box, I think that it can be hot, although other plants felt great at this stage
30/09
Last night I poured her compote with Piranha and BudCandy 2 ml / l each, poured about 500 ml into her eye and lo and behold, she responded with rapid growth, she adds very much every day. I will try to alternate watering with ordinary water so as not to overfeed. And super genetics, she is gaining the thickness of the trunk already!
Likes
14
Share


@Mycroft
Follow
The end is near !
The buds are developping quite well - i don't overfeed them so i don't expect are spectacular grow, but they are doinf very nicely on their level.
They still drink a lot and get wider with each new day. 🙌


Likes
Comments
Share

@KurtThePlantGuru
Follow
This is actually Week 6, little delayed on this diary.
Grease Monkey is performing beautifully, noticing first signs of fade. Was going to give one more feed before I start flushing, as it could definnetly still use some nutrients!
Buds are bulking incredibly, fat golf ball sized nugs, that real of rubber tires, fastfood/garlic burger, with notes of an oil spill or diesel spill.
Super intoxicating aroma, never smelled anything like this before
Packing on frost amazing, bulking up super well. If it wasn't for the Herm, would've been my best grow yet!


Likes
19
Share


@Mazgoth
Follow
If you are going to try this beauty for 2 weeks dont give her 0 nut because you are gonna have 100% nut burn,dont even use root juice or whatever nut you have for early stage but just water,she dont need anything special to grow bigger and bigger just good conditions and right food and you will se the magic to happen,give her more space than i gave because in my situation the roots got on the top and she needed more space BUT she didn't disappoint me😍
Likes
60
Share


@SooSan
Follow
12/12 + 144 jours
Vu qu’il y a 16 plantes mais que sur growdiaries on ne peut mettre que 8 variétés j'ai divisé en 2 diaries pour le bas de la tente
1️⃣
🏠 90x60x90
☀️ FC-E 4800 => puissance a 60%
🍁
Black Bomb / Philosopher Seed
Amnesia Lemon / PEV Seeds
Amnesia Lemon /PEV Seeds 35g
Blueberry / PEV Seeds = 17g
Blueberry / 00 Seeds = 17g
Wappa / Paradise Seed = 11g
Dark Phoenix / Green House Seed
Quick Sherbet / Exotic Seeds = 14,5
Mango Cream / Exotic Seeds 19,5g
Banana Frosting / Sensi Seed = 11g
Hindu Kush / Sensi Seed 10,5g
Mix 1 / Sweet Seed = 26,5g
Mix 2 / Sweet Seed = 15g
Mix 3 / Sweet Seed = 22,5g
Mix 4 / Sweet Seed = 14,5g
📎 https://growdiaries.com/diaries/122084-grow-journal-by-soosan
📎https://growdiaries.com/diaries/124052-grow-journal-by-soosan
2️⃣
🏠 30x60x50
☀️TS1000 => 100w = 54g
🍁
Quick Sherbet - Exotic Seed = 12g
Quick Sherbet - Exotic Seed = 12g
Quick Sherbet - Exotic Seed = 17,5g
Quick Sherbet - Exotic Seed = 12,5g
📎 https://growdiaries.com/diaries/122080-grow-journal-by-soosan


Likes
11
Share


@Organic_LarF
Follow
OG kush and hulkberry are nicely thickning,
Green gelato showing some deficiancies.
Keep up those green tumbs!!!

Likes
16
Share


@EaRtH
Follow
After my first successful grow, I'm starting another one with some fine seeds from RQS. Let's do this!
20.12. - I've planted the germinated seeds into the soil. I hope they'll all sprout 🌱
22.12. - 2x Apple Fritter and 1x Creamatic sprouted 🌱
23.12. - 1x Creamatic sprouted
24.12. - Another Creamatic sprouted, however one Fritter is dead. ⚰️ Replacing with one Green Gelato
27.12. - Today I've planted the Green Gelato seed into soil. Other are looking really good 😊
28.12. - Green Gelato sprouted 🌱
Likes
28
Share


@GIR139
Follow
Disaster struck. Lost a whole main cola on Blueberry. My best forensic investigation of the crime scene has determined that one of the many squirrels in my backyard jumped from an overhang. So upset but the rest of it looks happy
KT1 getting very frosty and smelling great. OG tall as ever, into flower but taking her sweet time.
Late summer has brought cool temps to Southern Ontario and they seem to like it
Thanks for looking - happy growing

Likes
9
Share

@LoccoMotive
Follow
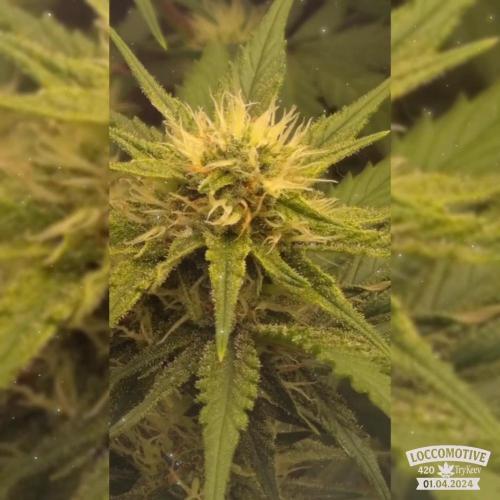
🌿 Woche 6 – Eine entwicklungsreiche 3. Blütewoche
🌱 Wachstum
Auch wenn ich 2 gute Triebe verloren hab, ✂️bin ich super happy. 😄🍀
Beide Pflanzen sehen trotz allen Widrigkeiten super aus. 💪🌱
Es geht auf jeden Fall in Richtung Ernte. 🍂✂️
🌱 Living Soil
Da es mit diesem Run bald zu Ende geht, 📅 muss ich mir Gedanken machen,
den nächsten Grow gut vorzubereiten – gerade was das Bodenleben angeht. 🌏
Aber auch, was die verfügbaren Nährstoffe betrifft.
Eine Behandlung mit Wurmhumus und Gesteinsmehl + Komposttee-Dusche ☕💧
sollten ausreichen, um für den nächsten kompletten Run gerüstet zu sein. 🛡️🌱
💡 Licht & Schatten
PPFD wird langsam, Step by Step erhöht. 📈 Aktuell ca. 700 µmol/m²/s.
Je höher die Triebe wachsen, desto mehr Licht bekommen sie ohnehin. ☀️🌿
☀️ Wetter
Die Temperaturen sind und bleiben brutal: 25–31 °C 🌡️🔥
Die Lady´s schlagen sich tapfer unter diesen Bedingungen. 💪
💧 Gießen
🕒 Alle 2–3 Tage
🚿 Jeweils 2,2 l Wasser 💦
🎶 The Grow must go on! 🌱✨
Likes
28
Share


@Harrythehat
Follow
Day 1
Top up 1 x 10 lire with 60 ml bloom
nutrient change tomorrow.
nothing near harvest yet
Day 2
nutrient changed refilled @ 60 ml per 10 litres
top ups will be 50 ml now
day 3
1 x 10 litre top up 50ml bloom
day 4
2 x 10 litres with 50 ml bloom in each top up
Still no signs of trichomes turning
used maybe 12/4 litres
nutrient use has dropped a little bit must be getting near to harvesting some soon
day 5
2 x 10 litre top ups with 50ml bloom in each probably used around 17 litres
day 6
2 x 10 litres 50 ml bloom in each used around 16 litres
last day of this week 1 x 10 litre 50 ml bloom

Likes
10
Share


@TiRobotProds
Follow
Nous somme dans la 9ème semaine de fruits encore 2 semaines pour cette dame. Rinçage des racines.

Likes
176
Share


@NuggetPawn
Follow
I started picking for forbidden fruits the day after last week’s post, checking the colas with the scope and only picking tops that were approx 10-20% amber.
As I snipped colas I also removed a lot of upper fan leaves, this is to allow light to reach lower buds for a final ripening.
Once picked, I placed approx 100g in each brown paper bag, folded the top and sat on a rack. I slowly rolled the bags around once or twice a day just so the buds didn’t stick together. Seems to have worked well, no dreaded hay smell to note and nicely dried.
I think I’ll be taking some more colas tops off in a few days time and I’ll keep the plants alive for another week or two, depending on how fast they come along.
I have 4 Mimosa EVO (no diary) about 7 weeks into veg at the moment and I think it would be nice to give them another 2 weeks as I need big plants to make clones from them, ready for the next diary coming soon... hopefully with successfully taken clones 😊


Processing
Likes
2
Share


@frostyherbals
Follow
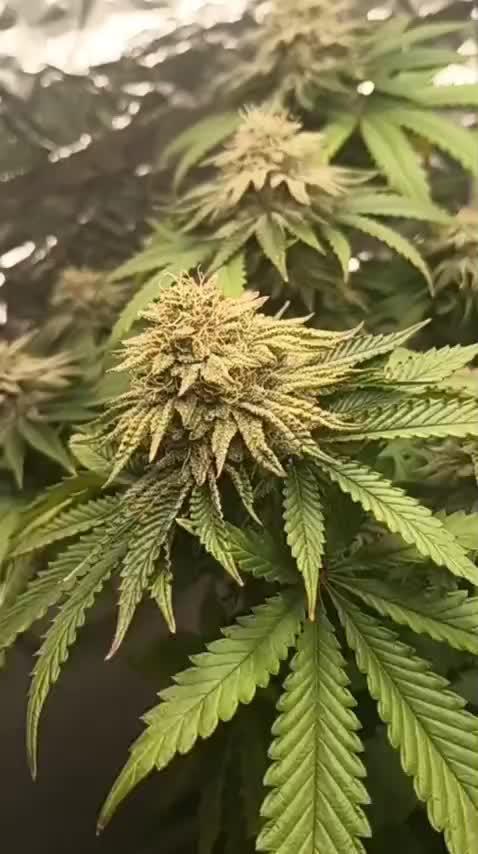
Really happy with how things are looking, despite expecting slightly larger buds. I think next time, I'll defoliate and lollipop a bit more to focus the plants energy on the main tops.
It stinks like mint, skunk, and sweet. Really nice trichome coverage, lots of dank buds in the mix here. Even the lowers that aren't getting as much light are looking dank.
I started the week out around 500ppm and steadily dropped to below 400ppm. The ppms kept creeping up every time I'd drop them...so I kept dropping them to see where it would stabilize. I ended the week at 381ppm.
In preparations for harvest, I'll plan to steadily reduce the ppm to about 200ppm, rather than doing a flush with RO. I'm working with really great starting water between 50-80ppm, which absolutely requires CalMag at .5 to .75 tsp/g.
