


Likes
Comments
Share


@ElPracticante
Follow
Recta final!! 25/12 Solo queda el secado. Ha sido un bonito regalo de Navidad. 2kg húmedos y ahora a secar. Las tengo secando en el mismo armario. Echan un fuerte olor a mango. La verdad que ha sido muy guay sacar adelante este proyecto pero ha requerido mucho esfuerzo y también estudiar mucho, para ser la primera vez muy bien. Deseando mucho mucho probarla. Espero que nos guste mucho. Feliz Navidad para todos!!! Seguimos.. 6 días colgadas y 4 en una malla de secado.. 5/1/25 en botes de curado, les he puesto un termohigrometro en los botes y está a 60 de humedad así qir no voy a hacer nada más que abrir y cerrar hasta que estén listas.. ya os

Likes
18
Share


@JeyGanesha
Follow
Seconda settimana di fioritura si è allungata la mia bella. Iniziano a profumare bene...sto notando che i nutrienti di Advance nutrient dati per via fogliare funzionano davvero bene... complimenti anche ad Advanced nutrient

Likes
27
Share


@BoytzzBudzz
Follow
Yoooo!
Welcome back 🙌🏼
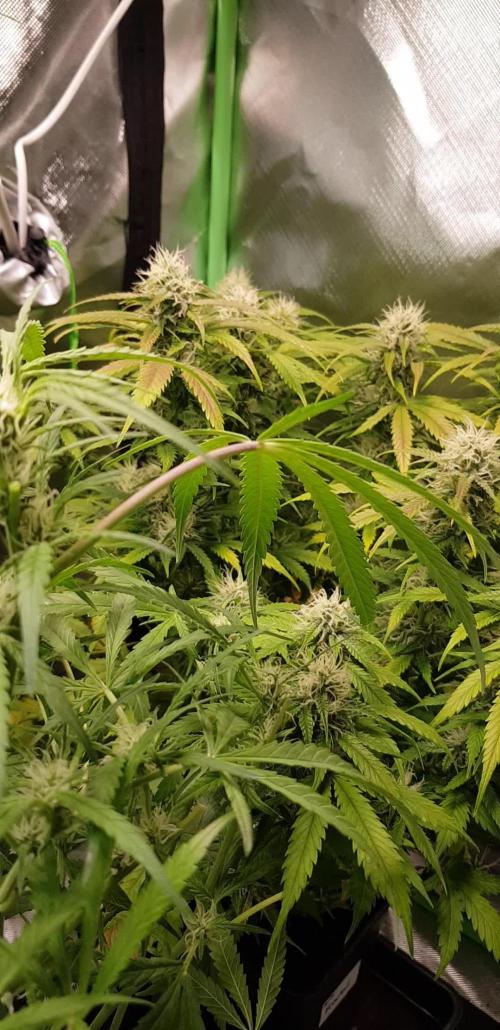
Just a quick update for week 7 of flower. Plants looking incredible. Zkittlez is really packing on the frost now and starting to develop some lovely colours. The Runtz seems to be continually packing on size and developing - most of the trichs are still clear but I’m seeing cloudy and a few amber ones here and there, so I’m looking to get the flush going in a few days time.
Thanks for stopping by!
Cheers 🤟🏻

Likes
7
Share


@Sunstonedgrows
Follow
The first week has gone well and now we are looking at week 2. Good strong growth right now and is looking great. My goal over the next weeks is to get this guy ready to be trained and ready for flower!

Likes
8
Share

@GERGrowDesigns
Follow
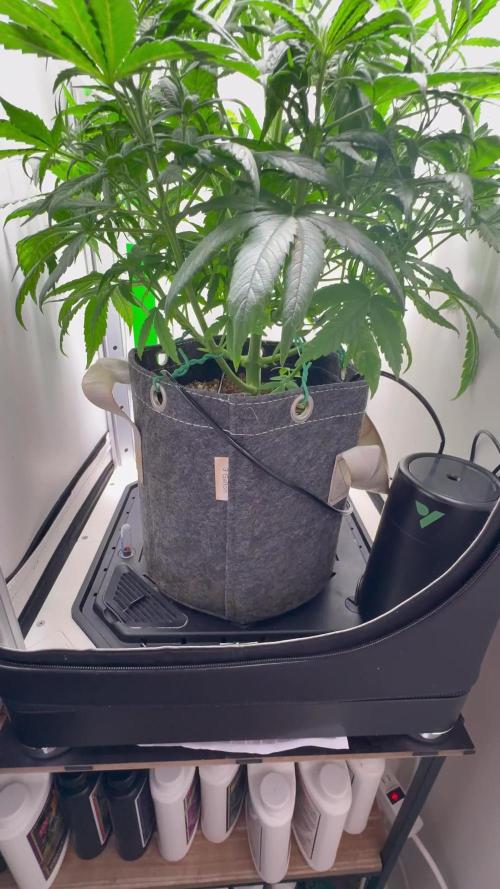
Welcome to Flower Week2-3 of Divine Seeds Auto Black Opium
I'm excited to share my grow journey with you all as part of the Divine Seeds Autoflowering Competition 2025. It's going to be an incredible ride, full of learning, growing, and connecting with fellow growers from all around the world!
For this competition, I’ve chosen the Feminized Automatic strain: Auto Black Opium
Here’s what I’m working with:
• 🌱 Tent: 120x60x80
• 🧑🌾 Breeder Company: Divine Seeds
• 💧 Humidity Range: 50
• ⏳ Flowering Time: 60-63 Days
• Strain Info: 25%THC
• 🌡️ Temperature: 26
• 🍵 Pot Size: 0.5l
• Nutrient Brand: Narcos
• ⚡ Lights : 200W x 2
A huge thank you to Divine Seeds for allowing me to be a part of this amazing competition and Sponsoring the Strains. Big thanks for supporting the grower community worldwide! Your genetics and passion speak for themselves!
I would truly appreciate every bit of feedback, help, questions, or discussions – and of course, your likes and interactions mean the world to me as I try to stand out in this exciting competition!
Let’s grow together – and don’t forget to stop by again to see the latest updates!
Happy growing!
Stay lifted and stay curious!
Peace & Buds!

Likes
8
Share


@FirstTime97
Follow
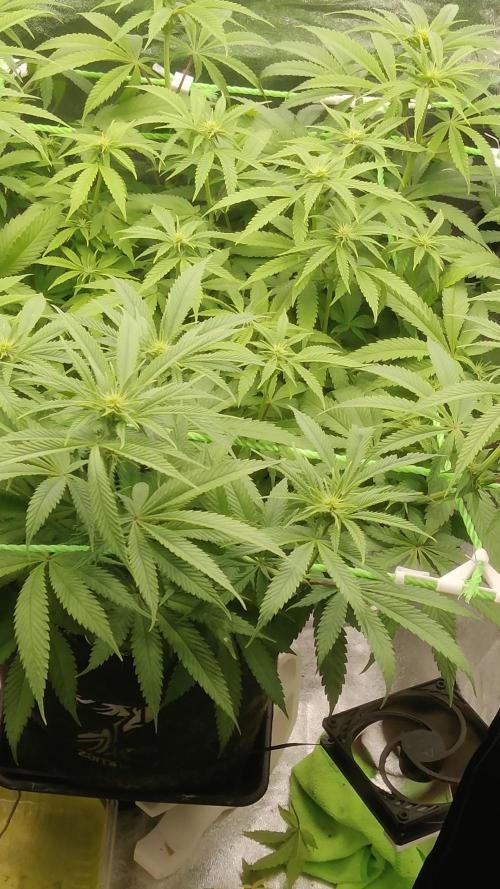
Second week of nutes given on Saturday nice bit of growth from the plants really stretching n reaching out now soaking up as much light as they can quite a few deficiencies showing been giving 1ml calmag ontop of the nutes on the bottle per litre of water , very cramped 1 plant taken out the tent to create abit of space currently 45 in there 2.4m x 2.4m would only recommend putting 36/38 plants it top capacity in 7/9 litre pots

Processing
Likes
20
Share


Likes
Comments
Share


Likes
42
Share


@Ukfarmer420
Follow
Hi guys been a way for a while but I'm back, the ladys are well into flower now. The strawberry chemdawg ogz are beasts and super frosty there a bit behind the blackberry moonrock. But alot bigger.


Likes
47
Share


@DonPeyote
Follow
Algunas colas tuvieron que ser amarradas para que no cedan por el peso, comienza el engorde con altas expectativas de esta cepa... Ya veremos si la repetimos

Likes
26
Share


@pifflestikkz
Follow
Day 8
08/07/24 Monday
Light water with De-chlorinated tap pH 6.2 with half t spoon of DyNoMyCo.
They seem to be loving it!!
Germination week complete, Let's start the VEG 🤩
Updated short videos of strains ,✌️💚

Likes
2
Share


@FarmerJons12
Follow
Leaves are getting more yellow. Light burn?
Turning the light down to 18 hours soon
Likes
Comments
Share


@MrIssa3x3
Follow
Day 22 Def the most stretched girls I’ve grown to date. Still no real complaints. Watering between every and every other day. Good bud sites. Lights on a 7 maybe 14 in a way at strongest.


Likes
7
Share


@Marihuanacali89
Follow
Bueno familia ya estamos entrando en 5 semana de flora con mucha fuerza ,mucha resina y muchísimo olor... La verdad que para ser un cultivo con nuevos fertilizantes y el riego automático la verdad que ni tan mal ..pensaba que el siguiente cuando me hubiera adaptado a lo nuevo es el que me saldría bien ..pero cuajo a la primera jejejeje
@marshydro_amazonled @130.devin_mars
@marshydroled_amazon @coco_pan2022 @marshydro_amazon @co.ol9055 de 120x120x200 con el Fce-6500 con 650 w
Con humidificador
Dos ventiladores
Extractor con filtro y intractor
Y controladores de @wifiindoor mediante WiFi desde app movil
Todo con la gama mineral de @intensenutrientsspain @lidiacomercial
Sustrato de @millsspain
@geckoseeds
2- #thebigjeff
2- #lagalleta
3- #geckolope
3- #stramberrymint
@art_genetix
3- #zerodosi
Y todos los demás productos de mi nuevo grow @locamariagrow
buenos humos mi manada ganja 💪💪💪💪🤘🤘🤘🤘🤘💚💚💚💚💚💚💚🐺🐺🐺🐺🐺🐺🐺🍋🍋🍋🍋🍋🍋🍋🍋🍋


Processing
Likes
32
Share


@Teamdirtbag2
Follow
Plants are going into flower. I took night time pics so you can see them sleep. They are a all looking great. This girl is shorter at the moment at 18 inches. Very nice branching on all three plants. I should defoleate and remove some of the bottom branches now.

Likes
10
Share

@CCSAUTOGROW
Follow
Last week of veg for Tangie Auto. She's a beauty & is already smelling like citrus & tangerine 😋. Getting ready for the stretch!


