


Likes
Comments
Share

@Gram_Solo
Follow
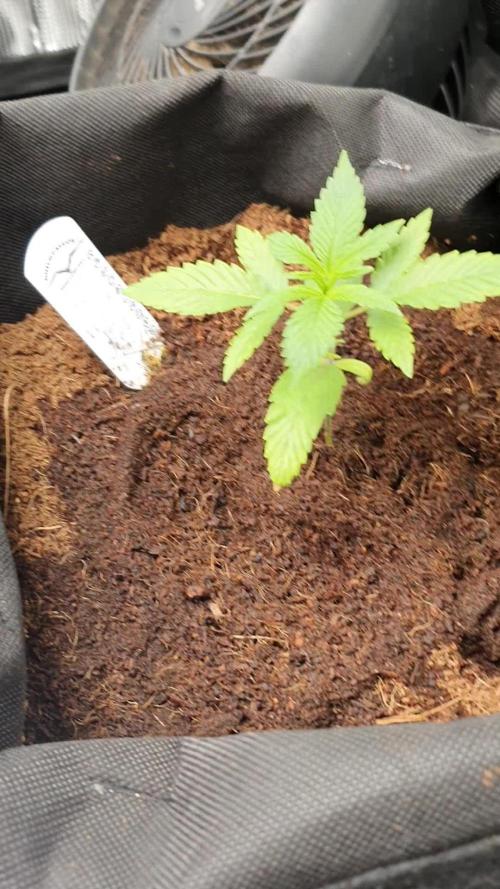
I forgot to soak the coco with nutrients before planting the seed, didn't realise coco doesn't have as many nutes to start off so that's why we're looking abit pale, had no idea about his haha
But it's all good! We can sort it. they looking like there improving past few days. Watered every day 1 litre around the outside in a circle and the stem. Added calmag grow nutes and voodoo juice. Colour is coming back to the leaves
Will keep doing this for next few days while there recovering. 🚑🏥
Likes
112
Share


@Tropicannibis_Todd
Follow
ALRIGHTY THEN
REMINDER I DO 2 UPDATES PER WEEK 👉WEEKLYROUNDUP👈👉MIDWEEKLY UPDATE👈
We just hit week 9 and all is well , have to admit shes just killing it on the resin development 😃 ......the frost is insane 👹......
👉 her baby Sister and it's coming along very well , I did little defolation last week 😏 shes is about 7 weeks now at 49 days from seed ...👈 she's also killing it 💀
Lights being readjusted and chart updated .........👍
I GOT MULTIPLE DIARIES ON THE GO 😱 please check them out 😎
CHECKOUT MY GROWMIE Green_fiend 👈 AS HES JUST A WEEK OR TWO FROM HARVEST ON HIS AFGHAN KUSH DIARY 👈
👉IF ANYONE IS LOOKING FOR A PLACE TO HANGOUT VIA GROWDIARIES AND TALK GROWING AND JUST CHILL AND WHATEVER .....👈
👉I CREATED GROWDIARIES DISCORD SERVER !!!!!!!!!!!👈
LINK IS 👉
https://discord.gg/zQmTHkbejs
AND SEE HOW IT PLAYS OUT !!!!!!!


Likes
36
Share


@MadeInGermany
Follow
Hey everyone .
This week she was left in her 1 L pot, and will not be in the 11 L pot until next week :-).
She was topped again and accepted it super 😃.
By the time she is repotted next week and given Green House Powder Feeding for the first time, she will have received a small portion of Canna Vega :-).
Otherwise it grows very quickly and vigorously, and they look beautiful 😍👌.
I wish you all a lot of fun with the new update, stay healthy and let it grow 🙏🏻👍
You can buy this Strain at :
https://sweetseeds.es/de/sweet-skunk-f1-fast-version/
Type:
Sweet Skunk F1 Fast Version
☝️🏼
Genetics:
Sweet Skunk Auto (SWS34)
X
Early Skunk
👍
Vega lamp:
2 x Todogrow Led
Quantum Board 100 W
💡
Bloom Lamp :
2 x Todogrow Led
Cxb 3590 COB 3500 K 205W
💡💡☝️🏼
Soil :
Canna Coco Professional +
☝️🏼
Fertilizer:
Green House Powder Feeding
☝️🏼🌱
Water:
Osmosis water mixed with normal water (24 hours stale that the chlorine evaporates) to 0.2 EC. Add Cal / Mag to 0.4 Ec Ph with Organic Ph - to 5.5 - 5.8 .

Likes
38
Share


@Cariboo_OG
Follow
Utopia Haze is a rare heavily sativa dominant hybrid (90% sativa/10% indica) strain created through back crossing Brazilian Sativa strains. This tasty little bud took home 1st Place for Best Sativa in the 2008 High Times’ Cannabis Cup and for good reason – with its potent 18-22% average THC level and long lasting cerebral effects, Utopia Haze is one powerhouse smoke. The Utopia Haze high comes on soon after you finish your first toke, hitting you with a strong cerebral lift that infuses you with a sense of hazy relaxation.
Type: Feminised/Photoperiod
Cultivation: Indoor/Outdoor
Flowering Time (days): 70-75
Indoor Yield (g): Up to 650
Feminised Outdoor Harvest Month: October
Feminised Outdoor Harvest Month Week: 3rd-4th week
Aroma: Citrus, Woody, Pungent, Mint
Effect: Cerebral Lift, Hazy Relaxation, Sleepy
Welcome Everyone to the Final Entry of my Utopia Haze Grow !
There is so much to discuss ! I have been extremely busy as of late trying to get this Harvest together, but i am happy to have it here for you now !
I Seriously under estimated the amount of time, help from others, and my own necessary skills to pull this off.. and i still kind of screwed it up lol !
But its worth noting i have never actually done this before and trying to document it during....was extremely hard.
It is next to impossible to work an iPhone with rubber gloves on !
First I want to discuss everything step by step so before you jump straight into the comments on how the end product is so small in "quantity"
Rest assured i am happy with its"quality"...and thats all that matters to me because Life is a journey not a destination! and i have learned so much from this grow that I couldn't be any happy even if i messed some things up :)
But at the very least I hope you read through this entry in its entirety with an open mind and focus more on the process, rather than just the outcome!
I ran out of Ice & i was only able to wash three times..(normally I've heard you should go sometimes 5-6 washes)
Preparation is Key & things will be much better next round :)
Photos 1-22
These are pretty self explanatory but for those of you just tuning in now.. this is what happens to a very happy plant when you don't have the necessary tools to monitor key components of growing cannabis.. Ph, as well as EC levels play a very key role in the outcome of your grow lol that being said I was just able to save this plant by purchasing both tools but that doesn't mean the plant didn't suffer because of the prior events.. This was a Huge reason behind me choosing to turn this harvest into what i would consider
"Solventless Hash Rosin" from "Ice water extracted Bubble hash".
Pictures 23
The idea here is the process of using "fresh Frozen Cannabis" this has been discussed many a time online on such sites as instagram and here on grow diaries as well.. I personally have Never tried the process so i decided to try it out and make a judgement for myself..
Video 24
The Cannabis has now been in the freezer for 72 hours making it very well frozen.. as you can tell i struggled getting it all into the 25u Screen Wash Bag. One thing of note i would do differently is i will de-stem my next batch as i also believe this played a part in the amount of plant matter that escaped through the sieves.
Photo/Video's 25-28
The idea here is "ice water Seiving" & especially with the bags that I am using here that are only have screen material on the bottom portion of the bag it is very important to have spaces in-between the screens to allow the water to pass directly through the screens into the bottom bucket with the least amount of resistance.. because the hash is so extremely temperature dependant if it gets warm on the side of the bag.. it will stick there and not make it to the bottom to become use able product..
29
You do not need to use as much Ice as i used here lol... the idea is to keep everything very cold..i certainly achieved that but at the sacrifice of using so much that i ended up grinding product and producing "contaminants" but in the end they are just plant matter that i would be smoking when i rolled up my joint either way so.. I'm not super disappointed..
But it should be noted that what you want to achieve here is a Layering effect where you have the wash bag between two small layers of ice while the "water current" washes the Trichomes away allowing them to be separated by the screens setup below :)
Before Starting the machine you should allow some time (i.e.;10-12minutes pre soak to allow the product to become saturated) before the first cycle.
By video 32 I have just ran out of ice lol..
Video 33-34
Here I have a tip for you.. to separate the screens that you sieve through.. cut 5 gallon buckets to stretch them across nice and tight.. it'll make scooping your Bubble that much easier ! i learned this from the many "Frenchy" videos I have watched :)
Picture 35
Here in lays the problem for most people.. drying your hash without loosing vast amounts of "Terpenes" whilst also stay ever vigilant against mold !
Thanks to all those videos I've watched on youtube.. id like to think this was one of my most successful parts of this process..
Things to Note; Terpenes start to seriously evaporate at temperatures 68F or 20C
you need to stay as cold as possible whilst bringing the Relative Humidity in the space down into the 40-30% to stay away from that nasty mold !
I used my cold storage room in the basement.. with a dehumidifier running to keep the space at 45% RH & staying at a constant 15c.
All while spreading the hash as thin as possible across parchment paper, on top of the white screens with a fan moving air across both sides of the paper.
Pictures 36-38
These are some macros i took in the middle of my drying session I fell in love with the colour.
Yes i know the black spots are plant material but they will get caught when i bag the hash & squish the oil out.
Thing to Note; at this stage it is important to ensure you 'micro plane" the hash down as fine as you can whilst staying weary of the temperature... any "chunks" will hold pockets of moisture.. that lead to potential problems..ie; mold ...
Picture/Video 39-41
Successfully planed bubble hash ready to be bagged and Squished !
Picture 42
Ive decided to follow Pedro.. from Pedros Grow Room and double bag to be on the safe side so i don't have any blow outs.
So thats One 25u bag inside one 160u bag ! :)
Pictures 43
This is almost 3 grams of the bubble hash from above, already melting in the bag.. this is where i ran into trouble again lol things started getting to warm in the house and i was only able to get one of the three squish's i did on video :( things started getting sticky.
Picture 44
This is basically just a photo of the equipment I'm using; 3x5 LowTemp Cage in the frame I built myself, with a 20Ton bottle jack.
Something to note here is this is an older Lowtemp model with only a single heating zone which is which i have it closed here heating Both sides of the press :)
As well as the importance of having adequate pressure on your plates.. my rig is very overkill for the size of hash bags..lol
Video 45
Here is the lovely press video.. its didn't quite work the way i wanted either lol my directional folding wasn't quite tight enough for a big "drip" :)
&the Press was set to 65°c
Photo's 46-50 are pretty self explanatory :) I had a blow out.. but still managed to pull an 80% return from the hash once squished...& yes it tasted amazing :)
Was it worth it in the end... that could be debated.. for some..i understand..its not your thing, but for those of us that are interested in making our own concentrates.. free from Solvents...
I wouldn't make it any other way :)
If even ONE of you reading this diary finds it helpful to reference for ANYTHING.....even if its "what not to do" ill consider it a success !
Thanks again for tagging along on this garden adventure.. its been one heck of a journey !
Much Love from B.C. Canada,
Until Next time,
Cariboo

Likes
10
Share


@DaddyPrime2
Follow
8/28 beautiful plant with nice nodal stacking. not too much stretching. she stretched outwards more than up. love the structure of this plant. this week fed her with 3 tsp 711 grow and 2 tsp 374 bloom. top dressed and still topping with diatomaceous earth as needed.


Likes
2
Share


@GreenForMiles
Follow
This strain was everything the breeders promised. All the buds were purple and some fan leaves turned pink. She isn’t really dripping in resin but I still needed gloves during trim.
Likes
132
Share


@rhodes68
Follow
1/25 Week 11
Ripley :
Flushing begins with a five gallon flush to move the runoff to under 200ppm and defoliated by pulling almost every leaf on a stem, and god what a bunch there were.
This opens the plant and removes those sources of nuets.
Going to doing this as quickly as we may so will be monitoring runoff as we go.
Tara: Slight Defoliation just trying to keep these leafy SOBs open.
Back on Heavy dose of CocoTek and placed in best light I can we just watching the bud growth for how to help this big girl. Will not pick up Peak again until ready to withdraw the CT.
Better pics when I can
1/26
Ripley : Second day of flush just keep running water through it till runoff gets low no longer PHing the water, nothing much left in there anyway.
Fading really showing now
Tara -Zilla : She likes the nuet and light change buds really building now
Not getting any taller
1/27 New pics of Ripley she is getting so damn frosty in flush
Tara building buds very quickly
1/28 Continuing flush on Ripley, she will be harvested in two days, its fast but we need the space.
Tara no changes except more buds
1/30 Ripley removed from tent for harvest. Opened up Tara's binds.
Tara now the Queen of all she surveys... All hail Queen Tara The Beast ! 😜
*****RIPLEY HARVEST DAY !!!!! *****
Pics up top
Wet weight - 1,140 grams 40.7 Ounces
Just looking at it we be lucky to only lose 75% in dry but still not bad!
Not a pleasant job trimming - LOTS of leaves
UPDATE
261 grams dry, yeah took a beating on the dry but expected it.
Likes
10
Share


@reirrac1
Follow
This is my first time topping a plant... and it ended up being the tallest I’ve ever grown lol. Tried to clean up the lower half of the plant pretty well. Ended up with a few stretchy stalks, but for the most part they stacked evenly and pretty close. Rubbing the stem smells like pungent clementine and cheese, excited to see what terpenes this one will produce.

Processing
Likes
6
Share


@Fullmeltalchemist
Follow
D71/F24 - 11.29 - There's not much to say about these two. They didn't even hiccup after the defoliation, though it does appear their stretch has just about finished. They both have fat greasy prebuds right now, and the Passion Berry has particularly long pistils. A pleasure to watch em grow! <3
D76/F29 - 12.4 - Just like holy fuck these things are monsters. 🙏🙌 Praise be to Swerve 👑, I'm astonished at the pace and vigor of these two plants


Likes
12
Share


@Cannibalgardens
Follow
Well firstly the team at seedstockers has some great genetics and they perform well , this girl could have been a real producer if it was grown better.. but that being said the customer service was great and so was the strain selection ...She had no real issues except I was growing in a unfinished basement which really hurt me in the beginning and I had hot soil so it was a rough start ...These are weds though and they bounce back as fast as the go down hill ..The plant has a great structure a main fat bud with many side branches that could have really gotten fat ...The colour and the smell is fantastic so is the taste when you smoke her ..she dried for 6-7 days and is easily burned with grey / White ash , flushed for a week prior to harvest .. I would defenitely grow again just in amore stable environment to get the most out of her but with all my mistakes she still gave me some stinky and sticky buds cheers canna family ...

Likes
13
Share


@GrowGuy97
Follow
Day 14 - All the ladies are growing extremely fast & look very healthy so far! Can’t wait to see what they look like in flower😋 Thanks for following & happy growing friends!🙏🏼✌️🏼🌱
Likes
8
Share


@HappyGrower420
Follow
103 day and still counting. What an autoflower :) i will start flushing tomorrow.Hopefully in next 2 weeks finish.she half amber pistilis on main buds.


Likes
16
Share


@eldruida_lamota
Follow
Vamos familia, actualizamos la quinta semana de floración de estas Panty Punch de Seedstockers, salieron 3, que van creciendo a buen ritmo aunque marquen una pequeña deficiencia ya estoy solucionandola, veremos cómo progresan.
Empezamos añadiendo varios productos de la gama de Agrobeta para la
Floración.
Temperatura y humedad dentro de los rangos correctos.
Vamos viendo cómo avanzan estas próximas semanas.
Agrobeta:
https://www.agrobeta.com/agrobetatiendaonline/36-abonos-canamo
Hasta aquí todo, Buenos humos 💨💨💨
Likes
26
Share


@BrMarijuana
Follow
Devido a Rega a cada dois dias, resolvi fracionar a dosagem semanal de fertilização para toda Rega, sendo assim, rego a cada dois dias da semana, totalizando três regas semanais, com isso fraciono a dosagem para 2ml líquido e 0,16g de mineral a cada litro d'água, totalizando 6ml líquido e 0,50g de mineral por semana.

Likes
43
Share


@Joni2017
Follow
the princesses follow their rhythm 12 cm💪, for now with 125 ml in the irrigation they go well, depending on how you see them this week I will go up to 200 ml per plant.
How do you see it?😜👍
Every day, turn the plants 90 degrees to ensure they grow straight👆👌


