


Likes
1
Share


@Pierrougarou21
Follow
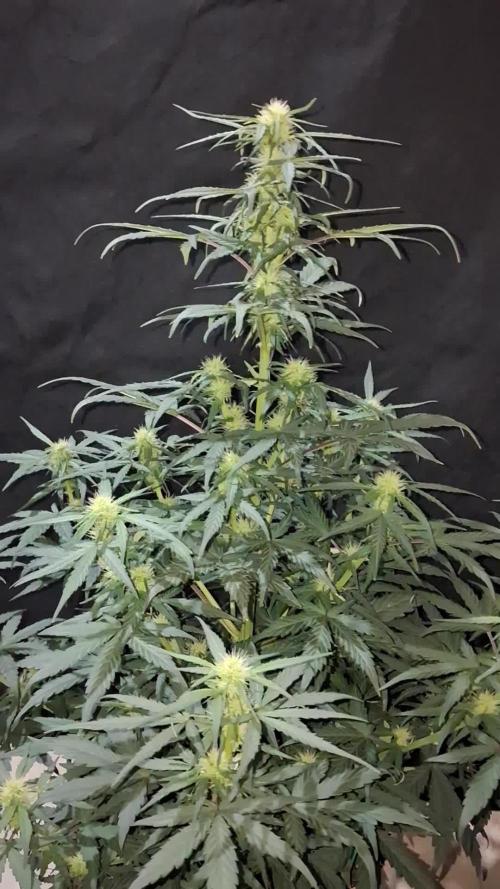
Debut de semaine 6
Arrosage a l enhancer .
L odeur se fait plus présente
Les differents sites floraux se couvrent de trichromes et commencent a gonfler de jours en jours certaines filles commencent une sénescence précoce. J aurais du ajouter 1 ou 2 G de biobloom a la troisieme semaine de floraison. Ayant des clones des differenets filles je saurais lors d un prochain run comment tirer le meilleur et agir pour chacune d entre
Likes
43
Share


@Ygrowz
Follow
I grew 3 plants 2 grew well but stalled due to water and lighting at back of a cold tent once this was sorted all grew within there height range which is small and compact with my 6.5 liter pot range 8n biobizz all mix with mycorrhizal added. This is my first ever grow and the genetics wowed me i took a lot of info in about autoflowering plants and the 2 main things that run true are pot size and reduce feed as autoFlowering plants need less due to restricted height although I saw amazing growth in 3rd -6 weeks this if you dial in could increase your yields.
The plants had a mild floral berry smell during early stages and kept this smell allways through.
Once in bloom they grew vigours and buds oozed resin . There colour are truly amazing I have 2 dark plants that changed colours! And 1 tall lilac plant that too on its amazing colour during late Flowering planted in cold weather these came through sweet looking.
Final weight on last plant #2 dry buds in sugar leaf I leave on is 12.6 grams there still 2 lower branches I've tried to seed with her hermI pollen

Likes
4
Share


@Growstopher
Follow
4.7.25. Just finished up with germination and seedling stage. First week of veg and plant is at 3rd internode so time to tie down method!
Thanks for checking out grow

Likes
9
Share


@bigolebuds
Follow
Week 8 12/22-29: Getting close to chop day.. planning to start the “flush” soon.. Trichomes looking cloudyyyy

Likes
11
Share


@smoker420
Follow
Started using bat boost great stuff 2nd grow using it good potassium booster organic
Likes
17
Share


@Dark_Shadow_420
Follow
Está genética ya la cosecha muchas veces teniendo muy buenos resultados en todas sus cosechas.
En el caso de este esqueje el resultado fue el correcto Aunque tuvo sus inconvenientes como la flora antes de tiempo la cual fue batalla con un sodio el cual me sirvió para poner a revegetar el mismo, el olor que presenta esta genética en la fase de floración es muy fuerte y rico. Es una de mi genética favorito la cual recomiendo para todos los cultivadores principiantes y más experimentados ya que es una planta Qué es fácil de cultivar y que tiene muy buenos resultados


Likes
8
Share


@Ferenc
Follow
Hi there! Some more LST is done especially on Orange Sherbet and Wedding Cheeskace. Purple Punch and Frosty Gelato remain small and it is too hot now they were burnt also I removed some leaves. Outside is 30 degrees inside 38 OMG. They are not in my house so just see them once a week harder to look after them... They are flowering also all good hopefully the heat wont damage them that much. Lamp distance is back because it was a bit too close also I guess...


Likes
2
Share


@Stickybuds789
Follow
This is number 3 of 3 !!!
This one bolted from day 1! Ended up close to 1.5 metres. Took a lot of time defoliating watering but turned out amazing one of the best I’ve grew to date
It’s been a few week since I last posted and now the buds are dry just under 6 oz!
The smoke is super smooth super strong
The buds are solid and so full of resin they just crumble with crystals sticking to fingers absolute top shelf green


Likes
33
Share


@StickyFingah420
Follow
Día 88 y penúltimo antes del corte.
Ya se aplicó Flawless Finish para un acabado impecable como su nombre lo indica. Siempre prefiero hacer el lavado de raiz solo aplicando agua en las últimas 2 semanas, pero esta vez lo hice aplicando el finalizador y luego los últimos riegos con agua purificada.
La verdad es que estoy contento con los resultados de esta nena, que es hermosa por cierto, desprende olores ácidos, cítricos, dulces.
Los colores son hermosos y las flores están rebosantes de tricomas, lo que la vuelve muy vistosa.
Es todo por ahora, estaré manteniendoles informados en estos últimos días.
Buenos humos! 👽
Likes
104
Share


@Schnabeldino
Follow
_____ Week 8 | Day 57 - 63 ______
Feeding: I give her 25% less fertilizer than indicated by Advanced...
Day 57 🌞💫
💫 - install the other 2 Spider-farmer light bars | 4 / 160 Watt = 40 Watt each bar
Day 59 🌞💧
💧- each Plant 3 Liter, with small drain
Day 62 🌞⛅
⛅ - I have changed the light for 1 week now and so far there are only small signs of flowering to be seen... Since then, they have grown about 5-10 cm
____________________________________________________________________________________________
Light - 12/12 h - 560 Watt
- 2x 200 Watt Toplight
- 4 x 40 Watt Lightbars
PPFD - 900 - 1000 µmol
Temp. avg. - 22,1°
Hum. avg. - 65 % RLH

Likes
4
Share


@Ledros
Follow
Day 50 (2020-06-28): Start of a new week, otherwise nothing new to report!
Day 51 (2020-06-29): G14 buds are finally starting to fill out a bit. CBD Crack is looking and smelling great.
Day 52 (2020-06-30): Feeding today at 5.8 PH, increased nutes to 75% of recommended amount.
Day 53 (2020-07-01): Hmm, looks like I will need to go back to 50% on nutes, some tip burn showing up in the G14.
Day 54 (2020-07-02): Feeding today back to 50% flowering dose at 5.8 PH.
Day 55 (2020-07-03): Nothing new to report.
Day 56 (2020-07-04): G14 buds continue to fill out. Waiting one more day to water again.
Likes
198
Share


@DevilsBud
Follow
FLOWERING STARTS
In the the new marshydro set-up
120x120x200 4'x'4
FC-4800 lamp
Pubes are showing on all of them happy days in the absolutely amazing marshydro tent 👌🏻💯👌🏻 and no balls in the room yet so that's good at least i know that first grow i had issues with hight but with my 120x120x200 that not going to be end problem so stretch like ya never stretch before 💪🏻 i am prepared now lol the FC-4800 is a beast and still tweaking hight dimmer don't want to burn them but also want to utilize the lamp as much as I can but will get under control 🤘🏻😎🤘🏻
1/11/21
Did some last defoliation and spread the plants out bit Tru the tent got lamp dialed in dimmer around 55% and hight around 45cm above the plants and every week will bump up the dimmer with 5% they are looking very good healthy and i am very proud of the results so far gave the proper nutrients and the normal watering in between everything cool in the hood
Will be updated soon happy growings Growmies
visit www.marshydro.eu
for your best gear and use the PROMO CODE: DEVILSBUD
Some info about the Marshydro FC-4800
Superb Quality LED Chips: The whole light is composed of 1206 pcs Samsung lm301b and Osram 660nm chips. More than two times as many LEDs are used to drive the grow lights at low currents and to avoid overdrive. Quality is guaranteed and efficiency is up to 2.8 μmol/j.
Even PAR Distribution and High PPFD Output: The multi-light bar design and the densely distributed light chips enable the LED grow lights to achieve the optimum PPFD required for plant growth over the entire effective coverage area.
Specifically Designed Spectrum: To ensure even plant growth, blue and red light are enhanced on the basis of a full spectrum combination. Not only does this accelerate plant growth, but it also improves the yield and quality of the plants at the same time.
Dimming Daisy Chain Function: The dimming function saves on electricity costs and enables brightness from 10% to 100% for the different stages of plant growth. A single master light can connect up to 30 lights in a daisy-chain system.
Business LED Grow Light: The light's wavy heat sink dissipates heat quickly and the IP65 waterproof allows the light to operate in humid conditions. 180° collapsible feature for easier installation. All these features provide favorable assistance for commercial cultivation.
And some tent info
●【Lock All Light Insid】MARS HYDRO Grow Tent Interior is made of diamond mylar. Non-toxic to the environment, no harm to plants. High-quality 1680D canvas being double stitched, (ALL OTHERS BRAND grow tent is 601D canvas) which is tear-proof for perfect light locking, No light leaks or rips at all.
●【Durability Grow Tent】Stable Metal corner adapters and poles are the trustful supporters of the tent. No rusting nor paint-falling. Quick easy tool-free installation. Carries strong heavy-duty SBS zippers, double layer lining to create a light-proof seal.
●【Easy Observation of your Plants】Special peeks window made by double layers of cloths. Observe the growing conditions of your plants without opening the tent and avoid disturbing plants. The peek window also serves to dissipate heat and ventilate air.
●【Removable Tray Keep Clean】The package includes a removable waterproof floor tray to hold soil and fallen leaves. The tray can be taken out easily to wash. Removable and water-proof makes cleaning easy.
●【Good Ventilation&Fast Assembly】 Circular double-sleeved vent holes with adjustable nylon strap for air circulation by exhaust fan, ducting, carbon filter, or reflector. Better allows proper light, heat, and airflow. Quick tool-free installation. Reinforced by a sturdy metal frame to ensure security and stability, supports up to 140lb. Perfectly safeguard your plants to thrive even in winter


Likes
34
Share


@Birale91
Follow
Day 71. Start week 4 looking great by now.
Day 74. Starting to have a bit smell of fruit with citrus. Hope her taste will be good.
Lots of trichomes on early stage of bloom. :)
Video on day 75 and 77.
Likes
49
Share


@Targona
Follow
Targona 43 days since my little girl sprouted from seeds🌱
Sixth week of growth of my Apple Fritter Automatic 🍎🍏🍎
Nutrients:
I use Advanced Hydroponics Of Holland nutrients - three basic components, still according to the table for vegetative growth 💓 -
- Dutch fertilizer Formula 1 Grow - supplies the plant with substances necessary for the perfect development of roots, stem and leaves; intended for the growth phase 🌾
- Dutch fertilizer Formula 2 Bloom - contains a large amount of nutrients necessary for rapid growth and fruit development, supplies the plant with energy; intended for the flowering phase 🌸🌿
- Dutch fertilizer Formula 3 Micro - increases oxygen intake, improves plant immunity, ensures better absorption of nutrients; intended for the growth and flowering phase 🌴
-------------------------------------------------- -------------------------------------------------- ---------
BioBizz Calmag - The special Calmag supplement was designed for professional and hobby growers who need to supply their plants with calcium and magnesium in organic quality for a long time or immediately. 100% organic 💩💩 and certified BioBizz Calmag is made from calcium carbonate and magnesium sulfate supplemented with humic acid.
-------------------------------------------------- -------------------------------------------------- ------------
BioBizz Bio pH- is an organic pH regulator. An aqueous solution of citric acid, which occurs naturally in citrus fruits 🍋🍋
---------------------------------------------------------------- ----------------
During the flowering period, I add stimulants:
- JUNGLE X Environ is a highly effective complex preparation for stimulating flower formation. 🌸🏵️
- Bud Candy - carbohydrates for my girls 🍭🍭🍭
Anyway, this is the last watering that I mix like this. I will gently switch to mainly organic nutrients, with the addition of very gentle flower stimulants, which are only slightly or partially mineral.
In general:
Apple Fritter Automatic 🍎🍏🍎 - The girl still responds well to nutrients. Actually all the girls in the tent, except for their sister - Melonade Runtz, which I'm sorry about.
However, as I wrote above, I will be switching to a different fertilization system, so we'll see, girls, it shouldn't stress me out, because it will be much lower doses of organic nutrients.
I really like the main "bud", I can already see that it will be a thick and strong flower 💚🌺🌱🌿
Training:
During this period, I decided to try only a slight defoliation. In previous rounds, I did more defoliation every week, now I try to do the opposite and leave more space for flowers and nature. I wonder if this will affect the harvest 💚🌞🌞
Light: Mars Hydro TS1000 The plants respond effectively and the light is technically very well managed - I try to have 50 cm between the light and the plants, so I move it up regularly 💡💡💡
Thanks for the likes
See you soon 😍😍
Likes
35
Share


@eldruida_lamota
Follow
Bueno familia ya finalizamos, estas red hot cookies son una cepa bestial.
La verdad que el secado muy bien 7 días en Malla y a los botes, 45% humedad y 23 grados es la temperatura ambiental que han tenido en el secado.
4 plantas que se cultivaron en un armario de 1.20 pero estos ejemplares solo ocuparon 80x80.
Así que ya está cultivada esta gran variedad que es novedad este 2020, americana de la familia Cookies, la Tropicanna Cookies (Girl Scout Cookies x Tangie) con un porcentaje de thc entre los 17/25%, una bomba.
Que decir de Agrobeta, lo peta 💪 en cuanto a nutrientes. Un saludo y buenos humos.
Likes
11
Share


@Greenfingers666
Follow
WOW WOW WOW
looking nice this is better than i could of imagined {PLATTER} {MEZZAY}{DISH]OF GG4-GOLOSA-ELEVEN-ROSES-,CRITICAL-MASS-BLUEBERRY and OG.
Without the scrog/spacers this would have been a mess but with the spacers i was able to train all the plants to which direction i wanted them to grow
As you can see the media is full of flower heads now and all have enough space to blossom.
The reason for this project is to consume the small space i have and to fill the media with enough plants to give me the best yielding weight possible.
All the main colors are fat and thick for plenty of bud to grow..??
Where i would normally only have 1 plant in that space i would never get the same amount of bud as i will with this unit.
Who wants the blueprint?
At least 16 main colors to come plus a bit more because 8 were topped/L.L.O.G training
WATCH THIS SPACE-
watered 5ltrs feed

