
Likes
Comments
Share

@Skipi007
Follow
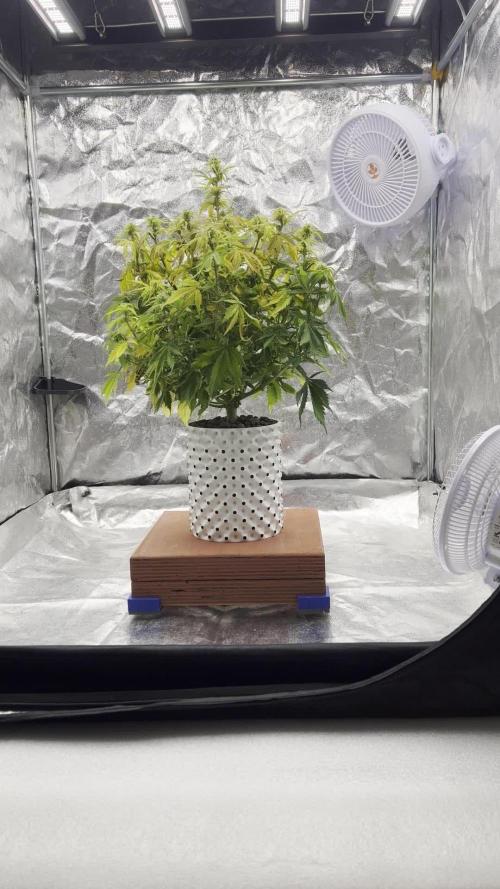
Hi, this week was a bit more action-packed, at the beginning of the week the plants showed various problems, I rinsed them all thoroughly and continued feeding as before. Plant 1 and 2 gradually recovered but plant no. 3 is on the verge of life, finally I realized that the plant lacked nutrients but not from watering but the roots had nothing to drink from, I will try to save it by putting it in a larger pot and covering it with coconut with perlite. I originally didn't plan on growing it in a tent but then I kept it there and wanted to try how it would grow in a small pot, but it was a bad idea. Plant no. 1 is still growing but plant 2 is already putting most of its energy into buds. Plant 1 and 2 are 1 to 2 weeks apart, I'm a little afraid that plant 1 will have time to mature enough.
------------------------------------------------------------------------------------------------------------------------------------------------
In the middle of the week, it is visible on plant 1 and 2 that they are receiving nutrients as they should. I started monitoring the ppm of watering and drainage every day. I used to do it randomly, but it is better to do it daily. The next day, I adjust pk13-14 according to the result. Plant no. 3 is still alive and growing slowly, but I don't see any improvement in it. I probably don't expect any miracles from it. I will see how it does in the next few days. Maybe I will let it grow into a garden on its own.
Likes
54
Share


@FavoriteCookie
Follow
Hey guy's
Ok so here we are at day 74.
Girl scout cookies, First of all DAMN what a smell straight up cookies like some mint and a faint liquorice notes to it. But this girl is picky and i learned a lot for my first run of this pheno, Next time around she will go straight up organic with only 6.5 ph water from the Blumat and i topped her to grow 4 tops next time around that will help her breathe better against mold (i think).
The main cola single top was so "sappy" and so dense and so fat it was thicker then both my fists together (I have big hands too), so at day 69 i spotted some mold on on her.......... i though i was doomed and all work for nothing i though i would never get to try it this time around after all this time and care. No i cut the main cola cut all the mold i could see with magnifier microscope and rinsed her in clean spring water then dried for a week, i might have lost a few nice buds but hey i saved her fruit in the end and i let the rest of the plant flower out until tonight 00.01 my time. need 75 to feel good about my self 😬. I didn't get the chance to take better quality pictures i am sorry friends i hope that okay with you 😬, due to work and kids i had little to no time this week, but here is the result. 😀
Edit: I will update with dry weight when all of it is dried.
If you enjoyed this journey with me please leave a like and until next time, Cheers So after drying and trimming we are finally have our dry weight 70.2 G Solid bud i made hash of the trim and baked cookies and munched on them all weekend 😬. Smells amazing but i kinda messed up the grow so she lack trichomes. I'll grow her one more time before i decide if she is a keeper, but i will most likely try a different pheno in the future.
Cheers!


Likes
21
Share


@Insaniac_0
Follow
Thank you.
Growing cannabis is an art that seems to evolve as you learn it. While it may only take a little knowledge to get started, It seems that this may take a life-time to perfect (doubt I'll ever make that category, but I will certainly try).
So thank-you to the community that Shares, Comments, Follows, and Likes. Your efforts in any of these actions make these journals a worth-while and perfect way for us all to learn. I personally appreciate it.
Also a huge Thanks has to go out to Grow Diaries for making this community even possible. Your efforts to supply the data storage alone is more than enough, but you the fact that you dont stop there and constantly try to improve the experience even more makes this my favorite community to to share on.
And then lastly, but certainly not least, a heartfelt Thank-you to Fast Buds for selecting me as 2nd place in a photo contest and making these seeds available, I'll try my best to honor the gift and opportunity to grow these. Your sponsorship in keeping the community active here is an in-valuable learning tool of its own. And then your branding/research helps give me confidence in knowing that I am working with great genetics before I even start my grow.
----------------------------
Germination Start 2/13/24 to 2/18/24
2/19 to 2/25 Veg Days 1 to 7
Week 0 to 1
Germination took 6 days from dropping in water to transplanting into 1 gallon pots. 29hours in a glass of 6.3ph room temp RO water. Something I would only attempt if they were both floating. They were,so leaving them that long they were able to crack open. I then placed both in paper towels wet with the glass water and pasted to the sides of the glass for 3 days (1 day too long in retrospect). I placed in rapid rooter pods and closed with toothpick tips. They popped out from the pods 1 day later but I gave them 2 days before transplant.
Video:
Incubator water level is key for rapid rooter pods to wick properly during incubation.
Transplant to 1 gal pots:
I am using a 50/50, 50%perlite/50%soil with a .5lb of dolomite lime and a .5ml of flora micro added to .5 gallon of RO water (Im mixing 2 gallons of soil total so the water to soil ratio is 1/4 of the total medium volume) to achieve a soil tested ph of 6.4. I am using a 50/50 soil/perlite mix because I plan to use these in auto pots. I also used about 1 cup of the same soil mix water to pour around the plant after transplant; you can see how the perlite rises to the top where I did this. I sprayed two domes and covered - I plan to leave covered for the first week.
Feed:
I kept them under the domes and sprayed every day that I didnt feed them, to keep humidity up while I let them find water in the soil. By the end of the week I took the domes off and took pictures.
Feed this week was another 1 cup of 6.3ph water 5 days after transplant.
Feed plan next week will increase the amount to 2 cups of plain-no-nute water with about 4 days between feeds. I want to see the water run through so if I need to use more than 2 cups I will. The idea is to water deep and through, but then make them search for more before the next feed, hopefully spreading the roots out while doing it.
Veg Plan:
I plan on 8 colas for each plant. So that will be 3 topping days and a total of 7 cuts.
I will want to cut the first time on day 21 if I have 5+ nodes. I will transfer to 5 gallon auto pots with-in 1 week of the first topping. Once I have 3 nodes of new growth past the first topping, I will top those two branches to the first node again. (that's 3 cuts total by this point) Then, after 3 new nodes of growth after that, I will do a last topping on the 4 branches. (4 new cuts added to make a total of 7 cuts and 8 colas)
I will train the branches using LST/HST with tie downs as soon as I can after the first topping day to help maintain the branches growing where I want them to. I will also introduce an adjustable tomato ring after they have settled into the 5 gallon forever pots to provide support and mobility
Hopefully all goes well, and I will have 1 to 2 weeks of growth before flip after week 8.
I think it sounds more ambitious than it really is, but if you follow this journal, we will see together.


Likes
25
Share


@PrairieFrostGrow
Follow
*********Week 6 (Flower week) - January 14 to 20, 2020 (Days 36 to 42 from germination)
The week went by pretty quick and overall and started to show more positivity. She finally set her buds 👍 and has taken off with more growth😃.....stretching. Wrestled with the idea that she might be a photo rather than an auto, had that one before, and wanted to ensure she was not. Moved her into the veg tent and with the lower light intensity and temperature she seemed to relax and finally set her bud sites......she is an auto......so why the heck so long to flip? Genetic issue or normal growth pattern??? Again, happy to see the growth but she will not be a producer of quantity so hoping the quality will be there😯😕😯
Have done some further cleaning on the bottom and removed a couple of small growing nodes. The branches were tiny and I want to keep her focused on the thicker branches she already has. Introduced Massive this week for bud density. She has become tall and lanky over the last two weeks. Not at all the growth pattern I was expecting.......would have definitely bent her top over had I known she would go like this😩 Wondering if I should bend over SW2 or not now😕
Keeping wet and happy is a balance. She was good with 2L last week and by the end of the week now she wants close to 3L. I also bumped up the CalMag on one of the feedings a bit to help ensure she doesn’t show issues. Won’t be using CalMag much longer as we are getting later in flower.
Not sure how much longer to feed......will go another full 2 weeks for sure. I suspect she will run a full 10 weeks, then if allowing a 2 week flush you only go through week 8. Really don’t know what she is going to do at this point😕😕
Going to be interesting if her sister follows everything in the same manner.......she is in a 1 gal pot...downsides from 3 gal........live and learn Baby!!!👏👍
Little more detail:
Jan 14/20 - Day 36
- only given 1L of plain water, pH 6.1
- no nutrients.
- thinking she maybe a photo period......if so then I need to back up her medium to and end of veg state and get ready to run her in 12/12 to flip her.......had happen with a Dinafem pack before.
- that would suck.....another 7 weeks to go if she is.
Jan 15/20 - Day 37
- 2L water - Dual Fuel & CalMag @ 0.5ml/L - 450ppm & pH to 5.7
- She is now 18" tall!!!!! A little odd compared to other diaries for this strain??
- Side branches firming up but the low ones are still soft.
- Her Main stem is still soft as well.....more of what you expect in veg not flower......as a comparison.
- Nodes growth is still odd, some nodes have four fan leaves for example?
Jan 16/20 - Day 38
- 1L plain water only today.
- She did not drink a lot yesterday.
- SW1 & SW2 moved to veg tent under T5.
- ThinkIng I will shock them a bit and see what happens. If a photo she should calm down and show signs of new growth.....too many hairs popping but grasping at straws here.....if she is an auto she should form buds in a couple of days???
- Set the temp in the tent to 82 degrees and humidity to 55%.
- Moved light to 14” off top cola.
Jan 17/20 - Day 39
- Nothing given today. No water.....dry out day.
- She looked good this morning.....perky and happy
- Leaves opened up and exposed buds........give her another day or so.......she is an auto......just really slow consistently through all stages.
Jan 18/20 - Day 40
- 2L full feed plus 1L plain water added to reduce the ppm and not shock her.........740ppm and 6.1pH.......total watering 3L
- nothing in PM.....pot still wet.
- concerned about bud sites not getting enough light so moved her back into the flower tent in evening.
- replaced CO2 in tent.
- Very happy today and good growth with leave up.
- 22” tall and 24” wide..
Jan 19/20 - Day 41
- 3L feeding again today. Full strength again but added Piranha and Voodoo Juice at 2ml/L as well.....975 ppm 5.9 pH.
- full strength was 1275ppm so added plain water to bring down a bit.
- runoff: 1130 ppm and 5.7 pH.....Start bringing up the pH now to 6.1.
- Cut off two more low bud sites with tiny branches.
- Tied her down more now to help make her wider. Reached up to a couple of the higher nodes I had left alone previously.
- Seeing a Kush style long branches. She is now the tallest in the tent!
Jan 20/20 - Day 42
- Awesome night after stripping. She is taller again and looks happy, more vibrant!
- 2L plain water 6.2 pH in AM.
- 2L plain water Sensyzime @ 2ml, LW8 & Rezin @ 1.5ml = 75 ppm 5.9 pH. In PM.
- She seems happy. Filling out more on the side branching.
- Bud sites are getting larger but still small overall........if like everything else with girl.......just give her time......patience😩😩😃👌
Have a great week fellow growers.......


Likes
19
Share


@DogDoctorOfficial
Follow
Up up and ... one more week here We go ❤️🤘
so they are grooving hehehehe i'm focus on producing good amount of trichomes and tryin to bring some colors to them.
i reduse nutrients and stabilized my condictions . i like this AC thing lol
I brouth down my temps to77 day time and 65 nigth time, humidety is the one i'm having problens bringing it down but is not too bad any way is going up and down and arround 55% so is ok
Peace out and stay happy and safe
D


Likes
18
Share


@as_smas_ter
Follow
After upping the nutrients last week and starting to use bloombastic i noticed my ec in the run off starting to rise. Was feeding at 1.8 but getting 2.0 out of two plants and 2.2 from another. Some of the tips have burnt but is very minor. also the slower growing cheese plant had some tips clawing down. so for the next feed i dropped the nutrients completely and just gave 5ml of bloombastic per 10 litres in phd water it had ec of 0.5. plants seem fine and back on feeding intake being 1.5 and run off around the same. i think the sweet spot for these is around 1.5/1.6 ec. Buds are fattening up nicely but the blue cheese is no where near as frosty as the cheese and the cheese has so many buds growing on it its amazing me especially after snapping the top half around week 4 defiantly my favourite baby

Likes
2
Share


@CuriosityWebster
Follow
Have these girls sitting outside 24/7 Have these girls sitting outside 24 seven whenever they are not in the sunlight I have them under a 200 W supplemental LED light
Both Durban poisons from premium cultivar did not germinate for me
I have a amnesia skittle from fast buds, soaking in a cup of water tonight will go into a container tomorrow morning
And on one of the strudels, the bottom part of the plant got a up by a bug
Been spraying every day with neem oil since
Likes
13
Share


@n0thingf4ce
Follow
Hola a todos, día 88 de floración, continuo manteniendo la rutina, voy a mantener el riego en 0.9 ec hasta el día del corte que cada día está más cerca, ya se han formado múltiples tricomas de color ámbar, me pregunto si será mejor cosechar la planta por partes para aprovechar mejor la mitad de abajo de la planta. hasta la próxima semana!
Processing
Likes
2
Share


@BigHorn
Follow
Week has gone very well. Growth has been steady. I'm going to have to think about budding soon. I'm going to run out of room with this amount of growth I'm having.

Likes
6
Share


@Sleestacker
Follow
Oh yeah fungus gnat infestation in my do si dos, spread to my early flowering jack herer’s and I panic chopped my 2 lime daiquiri’s probably 2 weeks early, fuck me!

Likes
10
Share


@SgtDoofy
Follow
2/6:
Amnesia 3 is just about 6 inches tall now. Trainwreck is only a couple inches behind. Still keeping the temps between 73-82 and the humidity in the mid to low 70s. After thoroughly watering the very healthy, young tomato plant that coesxists in the tent, the tips of some of the leaves turned yellow. That makes me wonder if soaking the soil for the first time since transplant caused a bit of nutrient burn. I'm going to avoid any nutrients the first time I water Amnesia 3 and Trainwreck fully, to avoid the same potential issue. They're not looking too thirsty yet though.
2/8:
Amnesia 3 is tall enough and has a thick enough main stem to start slowly low stress training with a rubber coated gardening wire. I pre-drilled holes in my buckets for this occasion, and the wire fits well. Each day for the next week I'll gently pull the wire to slowly bend the main stem downwards, similar to how braces work on teeth: a long, slow procedure.
2/9:
Woke up to Trainwreck's leaf tips pointing downwards, so I took it as a sign to go ahead and give it its first watering. I siphoned up a bit of the runoff water, and it came back at a PH of 4! That's not good; however, after researching a bit, it's likely that I could have siphoned up a pocket of low PH nutrient-filled water, making my reading way off in terms of the PH of the whole slurry of runoff. If the leaves don't bounce back, I'm going to take that as a potential sign of Nitrogen toxicity and will monitor more closely. Will probably make plans for a flush if it progresses any worse than downward leaves. Nitrogen toxicity can cause fragile, dark green leaves that point down in a shape similar to a claw, among other symptoms.
2/12:
Watered Amnesia 3 for the first time since transplant. Getting taller and less bushy in some spots, so I may turn up the lights from 60 to 75% tomorrow, to see if I can increase some more growth. But before, I want to make sure this watering doesn't cause any nute burn from the soil.
Likes
26
Share


@pifflestikkz
Follow
Day 29
29/07/24 Monday
Nice feeding today with De-chlorinated tap water pH 6.
Gave her 300 ml and she had a small run off.
Getting chunky in the stem now 💪💚
Day 31
31/07/24 Wednesday
De-chlorinated water pH 6 today with Plagron pk13-14 5ml to 5L
Plagron power buds 5ml to 5L
Used 300ml of the 5L solution.
I will be using these on water days from now on as they are advised to be used every irrigation.
We'll see how they perform 💪💚
Day 32
01/08/24 Thursday
Another feed today using de-chlorinated tap water pH 6, there now taking 300ml every evening.
Day 35
04/08/24 Sunday
END OF WEEK 😁
De-chlorinated tap water pH 6 today with Plagron products. 300ml each.
Had a issue with leaf invaders this week, I have treated and am checking every 48 hrs so far seems ok and not progressive.
All plants look great, very healthy, one of the Overdose is way behind and due to space maybe culled at flower I'll see how she gets on.

Likes
7
Share


@MicroHidroGrow
Follow
Arranco el cultivo directamente en flora. Dos de los esquejes no agarraron bien, pero me corre el tiempo. Además aproveché para cortar el sistema y poner a la madre de los esquejes en tierra a florar en lugar de los otros 4 esquejes que solía poner. Por lo cual van 6 esquejes en hidroponia (de los cuales dos no están en la mejor) y una madre en 10 litros de tierra, para aprovechar mejor el espacio. Conseguí nutrientes de mejor línea para esta ocasión, pero no voy a poder hacer plantas grandes porque no tengo tiempo para crecimiento. De todos modos tengo mucha fé con esta genética.
Día 04. El estirón es notorio. Dos de los esquejes no agarraron bien. El problema fue que el apuro me hizo sacarlos antes de tener un buen enraizado. Pero tomando en cuenta el apuro, no me preocupa. Espero que el ritmo de crecimiento siga constante, así puedo obtener plantas relativamente grandes. No espero demasiado, ya que los pasé a flora con 10 cm. Pero tengo mucha fé en los nutrientes y la atención que pueda darles.
Día 06. El estirón es muy interesante. Las dos chiquitas quedaron ahí. Pero no me preocupa. La planta de tierra va creciendo bastante también. Tuve una fuga se solución, por eso tuve que reponer. Pero más allá de eso, por el momento voy conforme. No apliqué ninguna técnica, pero una vez que termine la preflora, voy a cortar todo lo que quede chico. Espero obtener un rendimiento moderado.


Likes
16
Share


@Chucky324
Follow
Hello. This is the end of week 8 and the beginning of week 9 of flowering.
Although the seed description said 10 to 11 weeks, I going to cut these girls down at 10 weeks.
I need the room to grow and flower some Mac and Crack that's already growing..
Getting close to harvest I'll start flushing, But I'll give them 1 more feeding and then nothing but water till the end.
I get much better taste and the buds smoke better if I flush and get the chemicals out of the soil before harvest.
Well, that's the end of the Freak Bros. book # 10... I think there are 3 or 4 more books left in that series. I'll show them in future diaries.
My other diaries have the old underground comic book, Weirdo by Robert Crumb if you want to check them out to see.
The buds are really getting solid now and some are getting heavy and heading for the floor. Good times...
Getting some great smells now. Musk is the most common. But some, smell of Citrus with Musk under tones.
The smell is overpowering my carbon filter. I can smell these plants out by the street if the wind is blowing that way.
Pure Lemon Skunk smell by the street. Nice.
Getting near the end of their lives now and there are more yellow leaves as the plants pull what they need from the big fan leaves before turning the leaves brown. Some plants have sticky resin and some have slippery resin.
OK. Have Fun.
Chuck.


Likes
48
Share


@DreamIT
Follow
🧙♂️🍁BUBBA HAZE BY REGULAR SEEDS 🍁🧙♂️
🧙♂️ 26.3...
🧙♂️ 27.3 All great. the plant is very tall, 108 centimeters. The flowers begin to swell and form well, soon it will start to release its scent, I'm very curious 😀
🧙♂️ 28.3
🧙♂️ 29.3
🧙♂️ 30.3
🧙♂️ 31.3
🧙♂️ 1.4
____________________________________________________________________________________
😮 What ???? New to Regular Seeds?
Take a look at their site, you won't regret it !!
http://bit.ly/REGULARSEEDS
________________________________________________________________
📜 A look at the details of what I'm growing 📜
🧙♂️🍁Bubba Haze 🍁🧙♂️
⚧ Gender
▪️ Regular
➰ Genes
▪️ 75% Indica / 25% Sativa
🎄 Genetics
▪️ Bubba Kush x Jack Herer x Cannalope Haze
🚜Harvest
▪️ 550 g/m²
🌷Flowering
▪️ 8 weeks
✨THC
▪️ Very High
✅CBD
▪️ 1.0%
🏡Room Type
▪️ Indoor
🌄Room Type
▪️ Outdoor
🕋Room Type
▪️ Greenhouse
__________________________________________________________________________
📷🥇 Follow the best photos on Instagram 🥇📷
https://www.instagram.com/dreamit420/
🔻🔻Leave a comment with your opinions if you pass by here🔻🔻
🤟🤗💚Thanks and Enjoy growth 💚🤗🤟
Likes
8
Share


@JeyGanesha
Follow
La poderosa runtz forbidden sta per arrivare a maturazione.. ancora un paio di settimane più o meno e ci siamo...forse la lascio anche qualche giorno in più per farle creare un po' più di: CBN😜💪👍