
Likes
Comments
Share

@GoodTimesOrganics
Follow
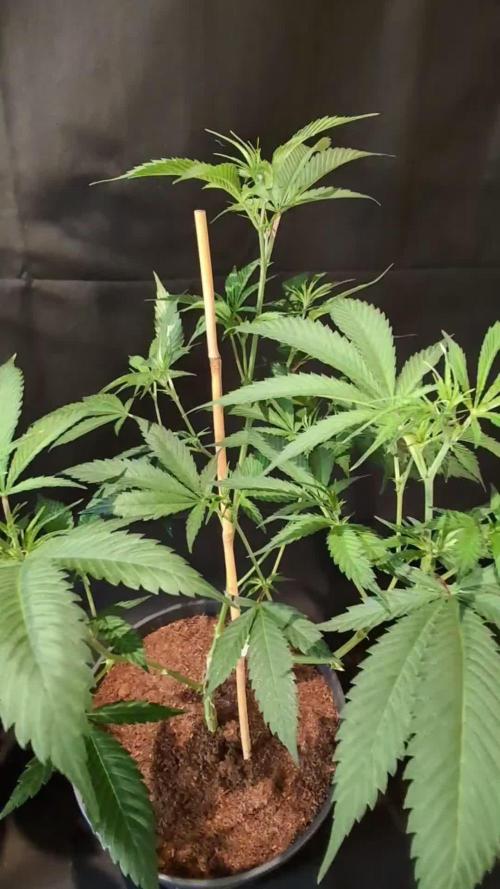
Hi liebe Community and Welcome Back! 💚
Weiter geht's im Vergleichsgrow!
Bio Tabs NL. vs. Weedefix (Stuttgart/ Germany)
Hier im Bio Tabs NL Grow haben wir nun nach Tag 35 des Einpflanzens eine Höhe von 53 cm Erreicht.
Die Triebe bilden sich schön und akkurat aus.
Die Blattfarbe ist im Bio Tabs Grow mit einem tieferen etwas dunkleren Grün zu beobachten, im Wuchsverhalten lässt sich ein etwas moderater es Wachstum beobachten. Weniger Buschig mit schlankeren Seitentrieben.
Leider ist mir ein Seitentrieb abgebrochen, daher habe ich der Fairness wegen, bei der anderen Pflanze auch einen Seitentrieb an der gleichen Stelle entfernt.
Diese Woche, habe ich mit Wasser und 5ml Orgatrex (Melasse mit Pflanzenextrakten) gegossen.
Und es zeichnet sich ein immer stärker werdendes Aroma ab.
An nächster Woche, wird es Zeit die Pflanzen in die Blüte zu schicken.
Die Bedingungen im Growschrank sind Top!
—————
🌞 Temp: 21
🌚 Temp: 18°C bis 19°C
💨 RH: 58%
VPD: 0,75 kPa
💡ppfd: 330 mpm
—————


Likes
55
Share


@Max1973
Follow
omg, another week has passed...... :)
Day 100 - and then there was 11 Buds ....... lol
Switched over to normal water on both ... smaller has been on water 1+ weeks .....
Endoscope arrives this week i hope..... harvested afew buds to fit it all in the tent and setup lights properly...
trimmed em, wired em abit to support the weight of the buds....
I'll see how the endoscope results show, as to harvest...... i think growth slowed abit over last week or 2,
because of poor light setup, not enough room in tent, and other grow 6400k led....
got a new tent on the way... 😎
Day 101 - Pics - edoscope, usb arrived... it's very good, but hard to stabalize / focus, i'll have to work out how to use it better......
the pics i posted were of a younger bud from the bottom..... i'm happy with the cloudy with amber, and harvesting.... 😎
Day 103 - vid of all trimmed and drying out upside down in tent.
Day 105 - pics vids of drying and into curing....
i'll list all the test buds and buds i trimmed in the final harvest report.....😎
Likes
53
Share


@AutoCrazy
Follow
It was a fairly busy week for this fine lady. No one likes their lady too bushy, right, 😉 so I have been cleaning up lower growth every 2-3 days as of late.
I also put her in a 20 gallon pot this week and that was a bigger challenge then I anticipated 😅😅. First I had to get her untied. Then I didn’t quite get her tied down as well as I had her in the 10 gallon pot but she is still nicely laid out IMO.
I may have to adjust how she is tied down in the weeks to come as these genetics can really stretch out!!
Stay tuned
😎🍿🍻🌱

Likes
12
Share


@bud_goode
Follow
For my second grow, I am OVER THE MOON!! I just yielded 16.1 ounces (wet trimmed) from a single lady in a small 23"x19" x 48" DIY tent.
The strain; Mandarin Cookies v2 from Ethos Genetics, was very easy to manage and did not have any issues even in my small space. It was really difficult to determine the run time, it suggested 9 weeks from the breeder, I ended up going almost 13 weeks!! the trichomes stayed white

Likes
2
Share
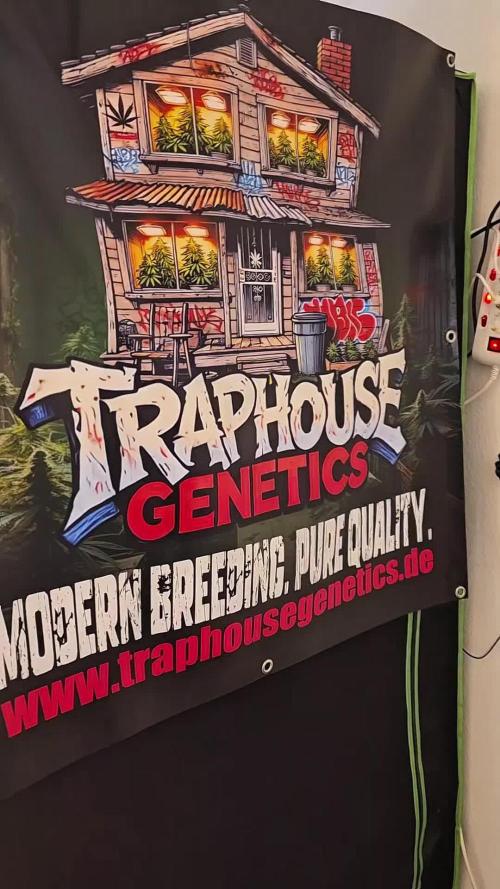

@all_about_420
Follow
Die dritte Blütewoche neigt sich dem Ende zu, und der vertikale Stretch der RS11 von Traphouse Genetics ist mittlerweile so gut wie vorbei. Die Pflanze hat ihre finale Struktur eingenommen und konzentriert sich nun voll und ganz auf das Formen der ersten echten Blütenbälle. Klassischerweise steht um den 21. Tag herum das Lollipopping auf dem Plan, um das untere Drittel zu bereinigen. Da das private Leben in den letzten Tagen aber verständlicherweise etwas mehr Aufmerksamkeit gefordert hat, wurde dieser Eingriff kurzerhand ein kleines Stück nach hinten verschoben. Ein spätes Lollipopping ist bei dieser extrem robusten Genetik absolut kein Problem – sie steht dank der verlässlichen Versorgung mit Advanced Nutrients so vital im Saft, dass sie die anstehende Rasur im unteren Bereich mühelos verkraften wird. Die Triebe sind perfekt aufgeteilt, das Blattwerk ist tiefgrün, und die Energie im 15-Liter-Topf ist maximal gebündelt, um nach dem anstehenden Clean-up die gesamte Kraft in die oberen Bud-Sites zu schießen.
Likes
5
Share


@Do_it_Dan
Follow
What can I say except this week has gone perfect for this little bubble runtz, nice growth lovely colour 😊 I'm happy that she is happy 💚 happy days 😊

Likes
52
Share


@Mr_Motalovah
Follow
Still on the hunt for those cosmic snacks, it'll be awhile until I see some fruits but here we are end of week 1..
There's only one but she's popping!
Took a bit longer than the other strains to sprout from soil but as soon as she did you could see some nice strong dark green leaves.
I placed the seeds in 500ml cups with BioBizz Light Mix soil, beforehand I mixed 1 gram of Synergy per 4 liters of soil.
These are live microbes called Mycorrhiza which live in symbiotic association with the roots.
My idea is to leave them in this container for about 14-21 days until the roots develop correctly then transplant them to their final pot which will be an 11L fabric pot.
As the light mix soil comes blended for at least two week of life, no nutrients will be added until after the transplant.
Happy Growing!😃 🌱 🌿 🌲

Likes
9
Share


@Bafforr_autoflower
Follow
Se realiza transplante a maceta definitiva de 20 LT AIRPOT
Sigue el riego día por medio


Likes
37
Share


@GODSGIFT_2005_JM
Follow
For LIQUIDS & NUTES ******GREEN BUZZ NUTRIENTS***** organic.
Also i’m using their LIVING SOIL CULTURE in powder form!
MARSHYDRO ⛺️ has large openings on the sides which is useful for mid section groom room work. 🤩
☀️ MARSHYDRO FC 3000 LED 300W
💨MARSHYDRO 6” in-line EXTRACTOR with speed-variation knob, comes complete with ducting and carbon filter.

Likes
12
Share


@Ts1Ko
Follow
As you can see one of the phenos is flowering actively but the other one is still vegetating. I had to supercropp the vegetative one, because she was growing very tall and was going to burn her leaves. Other than that everything is great ✌️

Processing
Likes
5
Share


@blacknpearl
Follow
Soil is drying a lot better now because of the improved airflow.
nov 15. megacrop 1.06gr/litre ph'ed at 6.05. about 250 ml
nov 18. megacrop 1.06gr/litre ph'ed at 6.05. about 250 ml
nov 20. megacrop 1.06gr/litre ph'ed at 6.3. about 400 ml
nov 20. LSTed against the net in the back. Changed the LED position and upped it to about 75% from around 50%
Likes
19
Share


@kimo123
Follow
Day 28
skipped watering.
I don't know what she has. Are those spotes calcium deficiency?
Day 29
1L water.
550ppfd
70%
Day 30
skipped water, but tomorrow will water 1.5
topped the middle node to keep up with the rest.
vpd ~0.8-1.1 kpa
580ppfd
Day 31
0.5L water + 20 ml orgatrex + 1g bactrex
vpd ~0.0-1.2 kpa
580 ppfd
Day 32
1.2L water. Almost no drainage
Day 33
skipped watering. snapped the first 2 trying to LST. But I kept them on I hope she will be healed
Day 34
2L water.
Processing
Likes
13
Share


@Cheesefarmer420
Follow
Week #9 of flowering is done, great week this week, still inching closer and closer to harvest day, all of the ladies except for the largest will start their flush today, I’d like to push that out to atleast 10-14 days if possible, this will insure I get a beautiful fade into harvest as well as mouth watering tastes and aromas coming off this flower, however with using final phase I’ve learned I can execute a proper and tasty flush in just 7 days if needed. Everyday I feel the smells are getting more and more intense becoming a hassle for my 4” carbon filter to keep up. Hopefully we continue to finish strong this last week or two! It will be exciting 😍
Likes
17
Share


@420DeepGrow
Follow
Gracias al equipo de AnesiaSeeds, Marshydro, XpertNutrients y Trolmaster sin ellos esto no sería posible.
💐🍁 Sticky Boof:
Prepárate para dejarte llevar por Sticky Boof, nuestra última obra maestra que está poniendo el listón muy alto para los amantes de las índicas. Nacida del legendario cruce de Super Boof y Cadillac Rainbow, Sticky Boof es una potente planta con un asombroso 80% de dominancia Indica que promete una relajación sin igual.
Prepárate para un viaje épico con el asombroso 37,5% de THC de Sticky Boof.
Sumérgete en una cosecha abundante con Sticky Boof, que produce hasta la friolera de 500 g/m² en interior y 800 - 900 g por planta en exterior. Esta variedad es generosa y está lista para llenar tu alijo de cogollos de la mejor calidad.
Sticky Boof es todo rapidez y eficacia, acelerando el tiempo de floración en sólo 7 u 8 semanas.
💡TS-3000 + TS-1000: se usaran dos de las lámparas de la serie TS de Marshydro, para cubrir todas las necesidades de las plantas durante el ciclo de cultivo, uso las dos lámparas en floracion para llegar a toda la carpa de 1.50 x 1.50 x 1.80.
https://marshydro.eu/products/mars-hydro-ts-3000-led-grow-light/
🏠 : Marshydro 1.50 x 1.50 x 1.80, carpa 100% estanca con ventanas laterales para llegar a todos los lugares durante el grow
https://marshydro.eu/products/diy-150x150x200cm-grow-tent-kit
🌬️💨 Marshydro 6inch + filtro carbon para evitar olores indeseables.
https://marshydro.eu/products/ifresh-smart-6inch-filter-kits/
🍣🍦🌴 Xpert Nutrients es una empresa especializada en la producción y comercialización de fertilizantes líquidos y tierras, que garantizan excelentes cosechas y un crecimiento activo para sus plantas durante todas las fases de cultivo.
Consigue aqui tus Nutrientes:
https://xpertnutrients.com/es/shop/
💻 Trolmaster Tent-X TCS-1 como controlador de luz, optimiza tu cultivo con la última tecnología del mercado, desde donde puedes controlar todos los parametros.
https://www.trolmaster.com/Products/Details/TCS-1
🍣🍦🌴 Xpert Nutrients es una empresa especializada en la producción y comercialización de fertilizantes líquidos y tierras, que garantizan excelentes cosechas y un crecimiento activo para sus plantas durante todas las fases de cultivo.
Consigue aqui tus Nutrientes:
https://xpertnutrients.com/es/shop/
📆 Semana 7:
Ha sido una semana algo complicada, tormentas, frio y lluvia han ralentizado el crecimiento, espero que pronto lleguen dias soleados, continuo con 1/3 nutrientes recomendados en cada riego.
Likes
77
Share


@Roberts
Follow
FBT2309 is doing great. She has grow a lot in a week. In a few days more space will open in grow room and that will help as well. Everything is looking good under the Medic Grow Mini Sun-2, in the Gen1:11 nutrition. Thank you again Gen1:11, Medic Grow, and Fast Buds. 🤜🏻🤛🏻🌱🌱🌱
Thank you grow diaries community for the 👇likes👇, follows, comments, and subscriptions on my YouTube channel👇. ❄️🌱🍻
Happy Growing 🌱🌱🌱
https://youtube.com/channel/UCAhN7yRzWLpcaRHhMIQ7X4g
If anyone needs to purchase fastbuds here is a link for my affiliate program
https://myfastbuds.com/?a_aid=60910eaff2419

Likes
37
Share


@MG2009
Follow
06/20/2018
Did some supercropping on #1, Fimmed #4 she showing pre-flowers.
( #1,#2,#3) Not showing pre-flowers. #4 Fimmed because she gets stretchy 2-3 times veg height in my own experience.
06/21/2018
Longest day of the year today,applied potash last week, topdressed with Espoma tomato Tone tomato 🍅 3-4-6 with biotone


Processing
Likes
34
Share


@ILoVeThiSpLaNt
Follow
Cime dure come cemento ricoperte di zucchero. Profilo terpenico fruttato con tocchi zkittlez. Che dire?Non vedo l'ora di fumare anche questa 😊


Likes
28
Share


@Southofheaven
Follow
Grow diaries has been a new and fun way for me to keep track of my grow, learning heaps through the questions and answers, theres some real knowledgeable growers that are helping who they can with a positive community surrounding. Good stuff. Cheers guys
