
Likes
Comments
Share


@Vet4weed
Follow
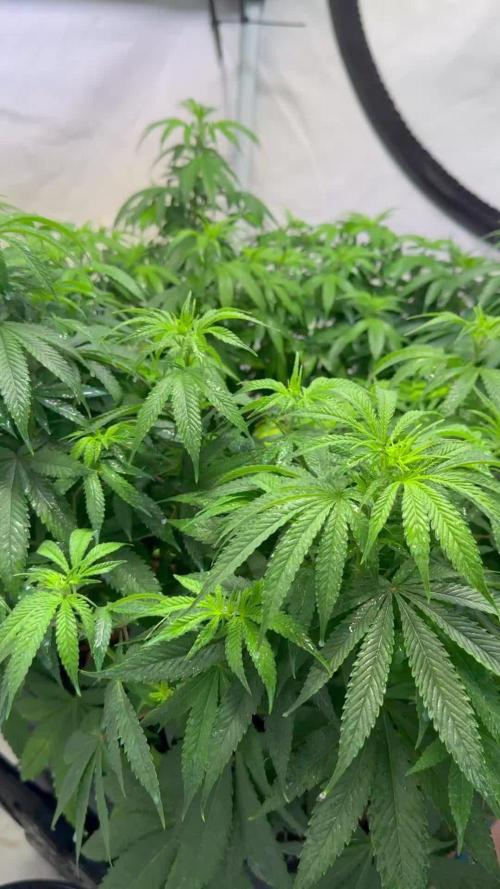
Getting closer to harvest every day. In fact, had to start early with Grace, as all of her leaves turned yellow and the trichomes are starting to cloud up. Decided to try the top bud harvest method and allow the smaller buds on the lower portions of the plant to develop more. Read somewhere that it'll allow me to reap an additional 25-50% more flower.

Likes
44
Share


@BB_UK
Follow
Well here we are at 14 days into bloom (day14) was 2 weeks ago Monday night I started the transition! And now look at these ladies! 🙌🏽 beautifully trained of course to accommodate all the bud sites that were situated! I’ve also been daily training maybe twice three times as they stretch pulling them back down and resting the main head on the scrog so the secondaries come up and allow the younger girls to rise to the top where they’re at too! The rest are not far behind now! Excited to get to the end of this one! Going to be a HUGE yield

Likes
8
Share


@PestoMaker
Follow
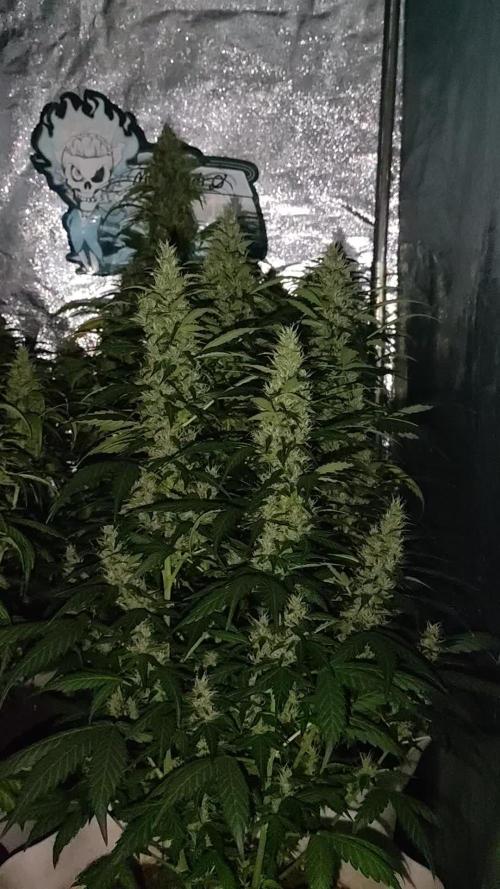
Great bud growth with white powdery resin showing. Starting to drink more water consistently every 2 to 3 days.


Likes
52
Share


@Ferenc
Follow
Day 51, 4th of November 2020:
The 3rd day since the lamp switched to be 12/12...
I raised up the nutrition intake as it can be seen above only the BioBizz family 2ml/l and removed some LST because the plant remains in shape or just set a bit but nothing significant....
She looks really bushy good genetics and strech is on the way..... 😅
Nothing really to report there is crazy 2-3 weeks from now ;)
;)

Processing
Likes
8
Share


@sweetkaya
Follow
Day 45 - Found the GC's main branch broken this morning. My error was tying it down too much. Never had plants so big so I'm still learning the best way to LST them in order to fit them in my closet. Takin the broke with philosophy: I never topped a plant, so I'm curious to see how she will develop from now and how much she will yield. Keep growing and learning every day 🙏🏼💪🏼🌱
Day 48 - Ladies are stretching much more every day, going to be two big girls 😋😋😋
Likes
12
Share


@Greenshift
Follow
Hallo zusammen!
Sie wurde die Woche 2x mit 1,2 L abgestandenem Leitungswasser (PH reguliert) gegossen.
Sie wird jetzt noch für ein paar Tage ins Dunkel gestellt und dann geerntet.
Nächsten Sonntag gibt es wieder mehr :)
Bis dahin:
happy growing u awesome people!


Likes
7
Share


@Stickygreens420
Follow
4/17/2023 - Day 50 Flower: Start to week 8. Everything is still progressing as expected with no problems. Plan to go an extra day or two between watering to cause some extra stress in hopes of resulting in better tricome and terpene production. Not sure if this actually makes a difference, but why not try.
4/19/2023 - Day 52 Flower: finally watered for the first time this week. This will likely be my last watering using the majority of the supplements I've been using. Will be water with a small amount of coconut powder from here on out. Also plan to start dropping the light intensity next week. Today I watered 4 gallons again and made another sprouted seed tea. Mixed in Jay Plantspeaker Quillaja, Rootwise Bio-Phos and Bio-Catalyst, BuildASoil Big 6 Micro Nutrients and BuildABloom.
4/20/2023 - Day 53: Happy 4/20!!!!
4/22/2023 - Day 55 Flower: watered today with about 3 gallons of water mixed with Coconut Powder and 2 gallons with molasses. Also, dropped the light intensity from full power down to level 8. The tallest colas are still only about 8 inches from the light, so my average DLI is still in the 40's. Want to bring this down a bit more in the next week or two.


Likes
4
Share


Likes
2
Share


@Organic473
Follow
These are coming up really strong. The week was really rainy but they needed it and pretty much old enough for the drench pour. I await the pre flowers to tell which ones are male/female.
Likes
11
Share


@VividGreen
Follow
Lowered bloom nutrient to 16 mL per gallon and hydroplex to 4 mL per gallon.
EC now 2.3


Likes
29
Share


@Wrongholn519
Follow
All is well. I'm continuing to feed 'bloom' nutrients every other time I water.
I'm giving heavy calmag doses every time I water.
I'm trying to take out any unnecessary vegetation that is preventing air circulation.
Lights are all at about 85% intensity... I won't be turning them up any more than that.
I have reduced my nitrogen load... By the end of next week I won't be giving any more nitrogen at all.

Likes
12
Share


@Jens_420
Follow
Hatte keine Zeit mehr die letzten Wochen zu dokumentieren.
Die letzten Wochen waren sehr hart, teilweise stand sie mal für mehrere Tage drin, da draußen so ein Mist Wetter war.
Da einige Blätter langsam sehe Gelb geworden sind und ich eigentlich schon mit Schimmel gerechnet hatte, hatte ich mich dazu entschieden sie zu ernten.
Trocknungs Bedingungen waren richtig schrecklich. Musste die Pflanzen leider im Schuppen bei geschätzter Feuchtigkeit von 60-70%, leider nicht so optimal, ging aber diesmal nicht anders.
Nach 3 Wochen Trocknung hatte ich schon leicht angst, dass die Blüten schon komplett Vergammelt sind, dem war aber nicht so.
Trocken Getrimmt sind es 28g geworden, was mich sehr verwundert hat.
KEIN SCHIMMEL, nichts!
Sehr zufrieden mit der Sorte, sehr resistent was Schimmel aufgeht, training hat sie auch immer gut eingesteckt.


Likes
12
Share


@thonhash
Follow
Finalizamos estas mataro blue,con un olor bastante “inquietante” que se hace de notar,veremos que tal una vez secado y metido al bote. Aquí ya no hay nutrientes,ya que se hizo el lavado de raíces y como dije,posterior engorde por sequía.

Likes
116
Share


@GMSgrows
Follow
Girls are growing strong another 1500 ppm 3.0 ec feed yesterday. Im not feeling well today so just a quick update. Thanks for all the looks and likes. It's a great growmunity here.