The Grow Awards 2026 🏆 


Processing
Likes
Comments
Share
@DeadwebsiteBoringcommunity
Follow
I'd like to title this Diary entry Screw You Advanced Nutrients. 7th week done.. 3 weeksish left on the Lsd-25 and 4 weeksish on the purple Lemonade.. Gonna be some chunky mothers.
Purple coming up everywhere, pretty colours. Oh yes we are very pleased so end of 7th week for these ladies and stretching has stopped thank goodness and we are now into bud building/mass building. The two lsd-25 plants definitely went into full flower "mode" sooner. The Colorful lady seems to have benn mass building all week. Probably gonna have different harvest windows on these ladies. Was hoping for same time but it's okay we are creative and will figure a way ahead. There is some CO2 being fed in the tent. With a smaller co2 bucket.
We will be trying out a new one for us and it is a product called dense from green planet. We will using dense when the regular reservoir change is suppose to happen. Before we feed only Dense we will be prepping the ladies with an extra feeding of GP3 micro. Buffering the leaves and prepping the uptake for the feeding. So with dense there will be only a feed of Dense with UC roots and ph down. The formula of dense is 0-0-62 so this is a very concentrated Potash supplement. We will be using 1/2 recommended doses as per our system and it's requirements. This will run for 4-5 days and significantly increase the Amount of Potash in the Plant fear not.. The next 2-3 days will run with just phed water then onto P-k spiking with Bloom Booster alone. At this stage Massive Bloom formulation would be great as well but we wanna cut out our nitros while still have some micros.. So we will feed smaller amounts of GP3 Micro with Powdered bloom booster, rezin and liquid weight. Right up until we do a 3 day flush before harvest.
Nutrients and Light is the idea so we will see turn outs and everything. If you are wondering what is the difference between the plants and the lady on the left looks so burnt. Left side only fed Flora Series w/ Advanced Nutrients supplements the plants on the right side is fed only Flora Series with Green planet supplements.
The nutrient formulas provided in this diary are for right plants only. We can not express the amount of disgust we feel towards Advanced Nutrients as we spent good money on their product and feel genuinely ripped off. The words smelly disgusting mess describe what happened when we added big bud to left side. Bottle smells fine but the Formula is obviously way off as we did not have issues like this when using it the first dozen or so times. We will be using chemical nutrients and powders for life now and will not use Advanced Nutrients again or recommend it for anyone. The Organic Big Bud Formula is no good for hydroponic growing and they obviously rushed it to market to make money.....
We really wanted to finish with Advanced Nutrients being the supplement on the left side but we can not. The product itself has basically made it impossible to continue confidently using any Advanced Nutrients labeled as both Organic and Safe for hydroponics. The proof is in the pudding and so glad and happy really now that we are using Green Planet and continue on this trend of cleaner greener growing and a more intelligent approach.
On a further note just to go a bit further Bud Candy for example contains sugars that are basically present in Black Molasses. So what they've basically done is filtered and bleached Black Molasses and watered it down and are selling it to us at around 40 bucks a litre. Bunch of crooks Screw you Advanced Nutrients.

Likes
16
Share
@TerpTurtle
Follow
Loving the tight bud structure on this plus size gurl.. she greasy, drinkin like a fish and F U N K Y fuely
ppfd ranging 800-1100

Likes
5
Share


Likes
90
Share
@AsNoriu
Follow
Day 127. Chop day !!!!
Zkittalicious #6 is my first plant without any airy or small bud !!!! Plus he will be like others in 100g range ...
#2 should beat all single plant records ;)))
Happy Growing !!!

Likes
10
Share
@Growrickbig
Follow
Pruned a bit from the lower part of the plant.
Still using lst
Thinking to change to hps bulb soon

Likes
23
Share


Likes
58
Share
@Mrs_Larimar
Follow
Saturday, Feb. 20th.
San fernando Valley Girls were transplanted, and moved into
Bigger Tent, and under the Marshydro SP-3000
They are showing loooong Leaves, They are growing Vigor
and they seem to behappy in their new Envoirement
I did alittle defoiliation-means i cut the Bottom shoots
Lights are running on 50 Percent
If you want to buy the tent or the Lights, here are the Links:
Light: http://bit.ly/marshydro-sp3000
Tent: http://bit.ly/marshydro-120x60tent

Likes
6
Share
@Growbody
Follow
Tag 106: Die Critical Neville Haze Automatic von Delicious Seeds wurde heute von mir geerntet. Sie hat mehrere schwere Hauptcoli bekommen und manche Seitentriebe wurden so groß wie manche ganze Pflanze von mir. Jetzt muss Sie trocknen.
Tag 114: Wow, satte 61 g Trockengewicht sind es geworden. Sie schmeckt beim Verdampfen fruchtig süß und hat jetzt schon Wumms. Und es schmeckt tatsächlich etwas "Metallisch".

Likes
10
Share
@JiminyCricket
Follow
Been doing a lot of tweaking with the new gear and multiple sets of plants. Been quite a busy week and probably behind a bit on keeping track of everything. I'm currently working on trying to get better charts made to keep track of things like light schedules, detailed feedings, height change per day, etc.
My current setup is my oldest 1st set of plants (5plants) and my 3rd set (6 seedlings), in my new 4x4 Vivosun grow tent equipped with a Spider Farmer SF-1000.
I have kept my 2nd set of plants (4plants) in my original 4x2 Vivosun equipped with 600W Vivosun LED. These plants had been extremely stressed due to not having soil or containers available with shipping constraints. They've been doing a lot better since then and I'm hoping they make a full recovery. Fingers crossed!
Running 24hr light schedule.
Both tents equipped with temp/hygro high and low ranging from about 71-81°F with an average of about 78°F.
Watering by plant pot weight, according to GH FloraTrio + CalMag Schedule.
Mild LST via tucking of leaves blocking developing sites. No more than 3 leaves removed per plant, per day to avoid stress.
______________________________________
Can't wait to start upgrading the quality of my journals and to hear you all's feedback! Happy growing and good vibes as always 🌱
______________________________________
4/29/20 - Update
Okeydoke! Feel like I've been doing too much running around everywhere. Sorry for being so hectic the past week or so if anyone has been keeping up with this 😂
For the time being, I'm currently running all three sets of my plants in my 4x4 tent. It's running all three of my fans, both lights and has the carbon filter system and humidifier hooked up to it as well. I basically have the other 4x2 just sitting as a shell for the moment. Either planning to save it for climate control when curing the first harvest or sell it to invest in another Spider Farmer SF-1000 LED or equivalent and possibly another 4x4 tent.
I have started a grow chart that's still a little sketchy but if nothing else having it here hells me keep up with it that much better.
[April 24th @ 3pm]
Plant 1- (11in.)
2- (9in.)
3- (14.75in.)
4- (13in.)
5- (10.75in.)
[April 26th @ 1:30pm]
Plant 1- (11in.)
2- (9.5in.)
3- (18in.)
4- (14in.)
5- (11.5in.)
[April 27th @ 12pm]
Plant 1- (11.5in.)
2- (10.5in.)
3- (20.5in)
4- (15.25in.)
5- (11.5in)
[April 29th @ 4am]
Plant 1- (12in.)
2- (10.5in.)
3- (23in.)
4- (16in.)
5- (11.75in.)
[April 30th @ 3:30pm]
Plant 1- (12.25in.)
2- (10.5in.)
3- (25.75in.)
4- (16.75in.)
5- (12in.)
______________________________________
The most current batch of nutrient mixes for was made this morning about (2am 4/29/20) for the 1st and second set of plants.
The first set of plant's nutrients was made to 4gal of water. The mix is a ratio of
(Cal-Mag/GHMicro/GHGro/GHBloom)
It's mixed (for the 4gal) in order; 10mL, 5mL, 10mL, 10mL.
440ppm @ 98.5°F
890EC @ 2.2°F us/cm
This new nutrient mix was applied for the first time tonight and will run about a week. I'm running a bit behind according to the GH schedule I was following due to stunting the growth I felt like over a couple issues to where I have them an extra week of veg nutrients. As I have defoliated them and they have seemed to take it pretty well, I'm hoping the increase in bloom nutrients will kick the buds into overdrive for production and the plants will start to thicken up again.
The second mix follows the same order as the first set in regards to nutrient usage. This mix is only mixed to one gallon. It as follows; 2.5mL, 2.5mL, 1.25mL, 2.5mL.
500ppm @ 98.6°F
992EC @ 0.4°F us/cm
This is mostly following the same GH nutrient schedule as the first set only about 2 weeks behind. These plants suffered from being in too small of containers for too long and I believe this stunted their growth. I've had them in suitable new containers for a couple days now and hoping this new mix of increased nutrients will bring them back to life a bit and get them back in schedule.
I'm honestly not too sure still about the ppm and EC numbers but a few bud-dies have mentioned that it plays important roles in plant health. So until I can better research good numbers and how to control it for my set up, I'm at the very least trying to keep track of the data.
I apologise about this large chunk of text! I hope you enjoy the diary anyway in spite of the fact. I'm loving the look of the buds and everything seems to be going great. Only a few months to go! 😎


Likes
18
Share
@VI_Cannabis
Follow
First day went as expected. I put the paper towel in a small see-thru plastic container and put it on the table. With a bit of water and the seeds in side, the germination has now started!
Day 2 no progression, moved the tray into my furnace room (pitch black and warm)
Day 3 major progression. I got them out and started to prep the jiffy pellets. Shortly after I transferred the roughly half inch tarp roots with seeds into the jiffy pellets, root down, seed up, slightly covered with dirt. I soaked them in water (like a beginner i overwatered heavily knowing what I know now). I placed them back in the tray and put them at a window for light.
(Note) the plan was to do outdoor so no light or tent was ordered at this point.
Day 4-7 not much progression seeing as the clouds and rain showed up...
Likes
3
Share
@KcKush
Follow
* Increased ppm from 850 to 950.
* They’ve been in veg for to long. I’ll be taking clones today. Atleast 2. I’ll probably cut the tops of since they hit the led light.
Likes
2
Share
@Shefman93
Follow
Growth rate is a little slow by comparison, still have high hopes for this pheno as it's purple...I love color in my tent.

Likes
38
Share
@Dr_Doobie
Follow
Like I said, great strain. I’ll cherish these last few ounces of headies.
I’m going to keep this log going as I set out to flower some Apple Zauce and the fuck if I’m not going to complete what I set out to do.
AZ 2 was culled and mulched. I got 3 pollen samples from it. I’m looking forward to chucking a lil pollen when the time is right.
AZ3 is recovering well from almost being trashed. Even so, I may be waiting to put it into flower. I’ll decide this week it’s right on the line of being healthy enough to flip. Either way it has a week or two before that happens.
AZ4, 5, 6 and the reveg are all super healthy and getting nice and tall. They’re all competing for canopy space and it’s a lovely sight. They are all still in .5 gallon veg cups and I will be transferring them all directly into both hdx bins with the rev’s soil mix this week or next. I’ll give them a week or two after that and then flip. I’ll also label each and grab cuttings before I flip.
I also got a pack of fast bud gorilla cookies autos that I’ll be popping and keeping in the veg tent after this batch heads into flower.
That’s the report for this week. Thanks for cruisin and happy growing! 🌱✌️🏼

Likes
Comments
Share
@thunderchief
Follow
This is a fully organic grow using the complete BioBizz range.


Likes
23
Share
@Weedinho
Follow
Looking good !
Moby Dick is looking more normal now... I think the problem of the wrinkled leaves was just plain old simple overwatering.
Critical looks totally amazing. Cant believe I raised that one.
The northern lights looks kind of like it was mainlined and it’s growing more in the form of a bush. If it manages to stretch a few inches before starting to flower it may produce good results.

Likes
32
Share
@Fergie
Follow
So that's Betty finally done , pretty happy with fast berry overall just over 900g wet from both plants😀😀😀 will be doing this strain again very soon 😀
Likes
31
Share
@AbroCadabro
Follow
I have been very busy over the last week so I haven't had much time to do any documentation. There isn't much going on at the moment so you aren't missing out on much. There have been a couple of leaves on this plant showing some strange markings. Nothing that is uniform nor reoccurring. I think these defects I show in the video are localized to just two or three leaves so I am not too concerned at the moment. I will keep an eye on her for the time being. Other than that, the plant looks really happy and is growing very well. Good color all around and getting very bushy.

Processing
Likes
14
Share
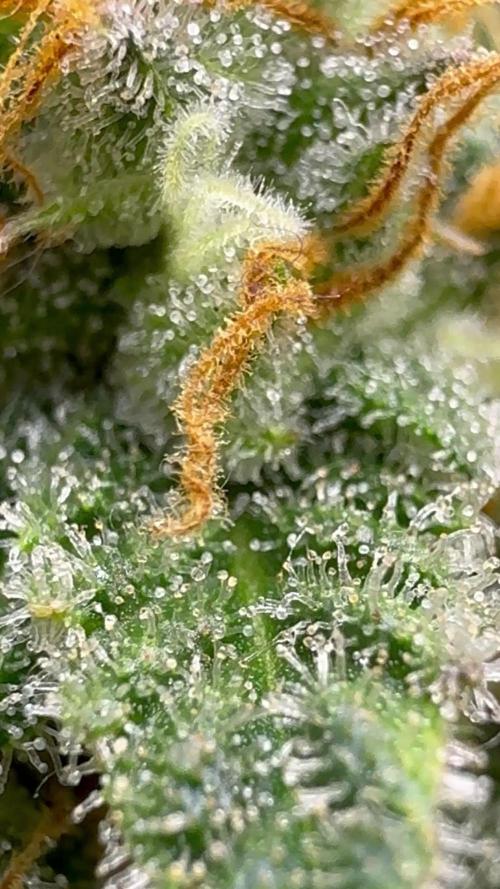
@kevgrow
Follow
Hey Friends, end of Week 10 from seed
Colas are looking Very nice
Noticed some orange color on some leaf tips so I lowered the amount nutrition when feeding
I used a magnifier to have a closer look at the colas, trichomes used to looked like little crystals, now they are bigger and cloudy.
So far no amber coloring on trichomes
I need some advice as to when I should begin flushing and harvest
Smell is slowly getting stronger, like a muffin with a small touch of gas ⛽️
Looking Forward in seeing some bud growth in the following week, will keep you guys posted!
Likes
38
Share
@DudeGrowsWeed
Follow
Baox plants got topped last week for clone cuttings, so they lost a few inches. I got 5 clones out of the 2 plants. I probably could have cut more, but lets see how these first few turn out first. These girls seem fine since the cuttings.
Likes
4
Share
@CannaChris
Follow
Week5 one plant is doing pretty good. Decided to go for topping then bending, I also cut the lowest branches. The other plant seems to have had too much heat stress and have not grown much..
Especially two of them are suffering so I put them back inside and trying now to make them recover by providing them some humidity with plastic bottles, should work hopefully
