
Processing
Likes
Comments
Share


@eldruida_lamota
Follow
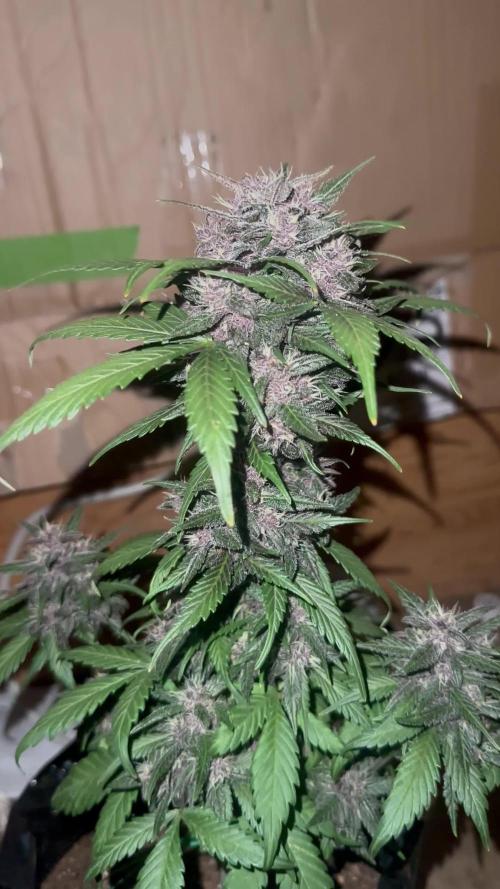
Bueno, aquí están estas candy caramelo de Zambezaseeds, la verdad que esta genética me está gustando tienen bastante densidad y son algo chatas , los nudos están muy juntos y eso me gusta porque el cogollo compacta más a mi parecer.
Sigo regulando las condiciones del ph en cada riego en 6,2 y actualmente no supera el 50% de humedad ni sube de 26 grados.
Estando a finales de mayo not bad por las condiciones climáticas pensé que sería algo más complicado 🤷♂️.
Gracias a Mars hydro y a Zambezaseeds por hacer posible estos proyectos.
.
Www.mars-hydro.com
web: http://bit.ly/2uJAjgy
ts600: http://bit.ly/3cnv0Ev
code: an420
.
Buenos humos fumetillas , las semanas que viene más y mejor 💪🖤.

Likes
12
Share


@DutchRookie87
Follow
Week 2 and 3 for the runtz, i excepted i would be a little bigger by now or i’m just not patient enough 😌 the sticky beast is taking a run tho 👌🏾


Likes
46
Share


@Wastent91
Follow
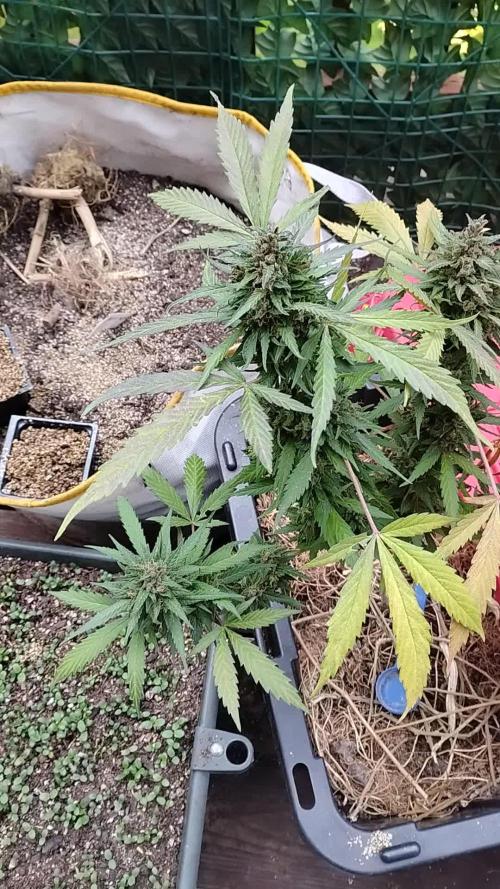
Allora ragazzi come va questa settimana? A me tutto bene! La mia coltivazione si sta riprendendo bene😆🦍💪 sono molto felice di non aver avuto ulteriori problemi,per ora, con la legge.. spero la situazione continui così! Be torniamo alla ragazza! La genetica XL sta facendo il suo corso ,infatti nonostante la dimensione del vaso sta mangiando molto bene i nutrienti e si ta formando una grande pianta robusta con una grande apicale, all'apparenza molto resistente! Si iniziano a scorgere i primi fiori e i primi sentori speziati! Mi stupisce soprattutto la struttura centrale della pianta che sta acquisendo delle striature rossastre molto tipiche! Sicuramente inizierà a crescere esponenzialmente ed occupare il poco spazio che l altra ragazza gli può cedere! Complimenti a Sweet seeds che continua a soprendermi con queste nuove genetiche XL e soprattutto anche alla qualità luce Mars hydro sempre presente sul posto! Buon 420 a tutti! Alla prossima settimana !

Likes
14
Share


@BOMbolenath
Follow
Very easy plant to harvest, didn't have too much leaves, so very easy to take out fan leaves and prepare to dry.


Likes
9
Share


@ironf1st
Follow
Had no time to update the diary.
In week 5 of veg plants thrived as well.
Im going to take clones in week 6, 12 in total
And flip them into bloom.
Gave them 3L with 5ml/l connoisseur.
1ml/L calmag
Because I noticed some deficiencies starting to show..
Understandably so, you can see how much they grow the last few days, they needed some food!

Likes
16
Share


@GreeneScene
Follow
This week made a few oopsies . I gave un-ph’d water to one of the plants “moving to fast” . Started defoliation during this week to attempt to redirect plant energy into establishing a full canopy since flowering has initiated.
Whilst defoliating I broke a branch that had to be taped to save it.
Humidity went out of whack when I stored 4 prepped 5 gal pots for transplant in the tent sooo I’ve got to buy a dehumidifier bc at one point all my plants fell out in a fit .
STILL haven’t filled these pots out, & I’m kinda sure/unsure it’s time to re-amend the soil for flowering. I’m conflicting on waiting until beginning/middle of week 7 so I can flush week 11 & 12 .
I think that covers it pretty well Week 5 in the 📚 📕 📖.

Likes
8
Share


@StonedandSteady
Follow
Pistil Popping in Action and Stretching Out!!!
#AutoWhiteRussian and #AutoMontreal *Fems* breed by Team #DivineSeeds #DivineSeedsSquad #DivineSeedsBreedingCompany Looking Magnificent and Amazingly Great in thier 4th week of Flowers! Thier Growing under the #Growatt600w and in my #TopoLite 24×24×48 Grow Tent! I'm also using #TNBNaturals #TheEnhancer Co2 Despersal Canister and using thier Ph⬆️⬇️ for my Decolinated Tap Water!
#AutoWhiteRussian breed by Outstandingly Awesome Team #DivineSeeds #DivineSeedsSquad #DivineSeedsBreedingCompany
Yo!!! This Lil Beauty popped open in under between 16-18 hours of Germination using this Wet Papertowel Method, this New Heat Mat, Baked potato ToGo Container and Regular Tap Water Helped Tremendously! Heck Yeah Growmies and Growmets!!! Let's Grow!!!
DivineSeeds:
#AutoWhiteRussian
Origin:Afghanistan
Type:Indica/ Sativa/ Ruderalis
Flowering:65 days
THC:24 %
Harvest:400-600 g/m2
Height:100-150 cm
#AutoMontreal breed by Top of The Line Team #DivineSeeds #DivineSeedsSquad #DivineSeedsBreedingCompany
Yo!!! This Lil Beautiful Bean Popped under between 20 hours of Germination using this Wet Papertowel Method, this New Heat Mat, Baked potato ToGo Container and Regular Tap Water Helped Tremendously! Heck Yeah Growmies and Growmets!!! Let's Grow!!!
DivineSeeds:
#AutoMontreal
Origin:Canada
Type:50% Indica/ 40% Sativa/ 10% Ruderalis
Flowering:65 Days
THC:23%
Harvest:550-750 g/m2
Height:120-160 cm
https://divineseeds.net/
https://instagram.com/divine.seeds?igshid=osxe2v7en33v
I love and Appreciate Everyone!!! Thanks Again Team! Cheers Famz!!! Much Props and Much Topz!💯

Likes
68
Share


@Teamdirtbag2
Follow
Well reveg is happening to only the plants in the ground. All plants are in the same place. This is so fucking strange. The potted plants are staying in flower. This is a strange occurrence for me. Everything should have reveged... better yet the difference between a potted plant and one in the ground. It's an incredible difference in size. And I water the ones in the ground with plain hose water. Straight city tap water. So this is a strange year. Its obvious the bar has been set really low this year. There will be no "tree" just bushes this year. But how big a bush you got?


Likes
18
Share


@Lady_NugWitch
Follow
Both girls are frosty but only 1 is showing the reds.. Funny how that is with these autos 😂😂😒 .. I still love how they are structured. Enjoy the video.. And thanks for checking her out!
Likes
6
Share


@ToastFarmer
Follow
Great finish to a fantastic run with this cultivar! terps were citrusy gas and sweet earthy. the smoke is thick and smooth with a earthy sweet and a little gas flavor. very nice. made some gassy smelling dry ice sift hashish. Never throw away your trim!!! it's the ultimate bonus to any harvest. this was a combined White Truffle and Trop Cherry Gas hashish. Finished up with 12 ounces of flower and 36 gr hashish

Likes
58
Share


@GODSGIFT_2005_JM
Follow
Gorilla Glue #4 CLONE to be harvested soon! Happy with the result! Special thanks:
☀️MARSHYDRO☀️ &
🌱ORIGINAL SENSIBLE SEEDS🌲

Likes
8
Share


@Sobreruedas
Follow
This week I had a few days of rain, which caused a slight increase in humidity and temperature.
Despite that, everything is going perfectly and the plant continues to develop without any issues 🌸💪

Likes
9
Share

@melodygrows
Follow
This is the part where I take lots and lots of pictures and things, I loooove me some pretty buds! She’s getting quite fat! Got a little bit of a lean going haha
She looks so pretttyyyy in the videos with flash I’ve got this week

Likes
5
Share


@Ninjabuds
Follow
This will be my 1st auto run. Other than one time I was sent some free f1 autos from rqs and I started some but I ended up tossing them for some reason or another. I am actually super excited to try out fastbuds. I have been wanting to try out fastbuds for over a year now. I'm not the greatest with seedlings so I am doing a test run with a 2x2 tent I'm gonna try and grow the best plant I get out if the 3 seeds hopefully it doesn't out grow my small 2x2 tent . Pound cake thou looks like a killer strain with some fat buds can't wait to see how fast fast buds really are. Here we go.


Likes
21
Share

@AestheticGenetix
Follow
This whole grow cycle I never added anything to the soil. I tried my first living soil set up with worms and cover crops. I didn't do anything but water from begining to end which is actually pretty crazy now that I think about it.
Around day 3 of drying. The conditions are favorable. We have to open our windows at night to cool the house down so it's really been up to nature as to what the humidity and temperature will be. Right at this moment rh is it's in the 70s because of morning dew.
But I'm also curious about how the "new" way to dry with cannatrol etc is based on dew point rather than straight 60 60.
I've never achieved straight 60 60 but I've had 67 60 and 80 60 but the main thing is to keep the rh around 60%
I'm curious to see how this turns out. She lived in nature and now she dries by nature.
Processing
Likes
13
Share


@GrowGuy97
Follow
Flower day 5 for mainline - This lady is really stretching! Can’t wait to see what the buds look like on this!😍😍 thanks for following friends & happy growing!🌱✌️🏼
Likes
5
Share


@Andres
Follow
all my ladys are fed with organic products, earthworm humus and red bird guano. I am waiting this flowers...