


Processing
Likes
Comments
Share


@Lifted
Follow
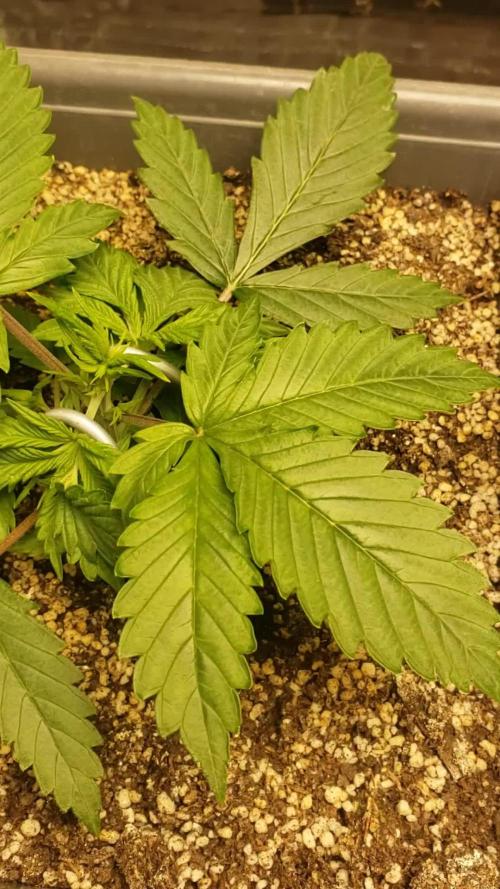
I did a heavy defoliation last week,so majority of this week was about getting my plant back to a healthy phase. I did alot more LST as you can tell in the video to start more of an even canopy. I also raised my light by 4 inches to provide a little more stretch in each branch so I'd be able to manipulate it more with LST next week.

Likes
Comments
Share

@The_Doctor_Green
Follow
Hola a todos
Lsa imagenes corresponden al periodo 28/08 al 03/09.
Regue con agua 400ml ph 6.3
100ml con top veg. Ph 6.4.
También esta semana empece a aplicar algo de LST.


Likes
Comments
Share


@OrganicBuds030
Follow
Forbidos wächst klein und buschig, eigentlich genau was ich suche. Bin gespannt ob sie das Topping genauso gut wie Jelly Breath annehmen werden.

Likes
14
Share

@Erik99
Follow
Esta última semana he bajado 2°C la temperatura del armario y he activado la luz rojiza para recrear mejor la llegada del otoño y que las plantas lo den todo de ellas.
El primer día de esta semana hice el lavado de raíces con unos 10L por planta, me gusta hacerlo poco ha poco con todas las plantas por igual, aprovechando la buena filtración de la mazeta, primero agrego 2L y dejó que drenen bien todas las mazetas y repito el proceso unas 5 veces hasta que el agua sobrante salga transparente, importante que el agua este sobre pH 6 para que los minerales sobrantes se disuelvan bien y la planta pueda absorber lo poco que quede en el substrato.
Likes
4
Share


@GREENPHOENIX6262
Follow
02/23 - Week 3 Veg - Did some light defoliation on her inverted leaves mainly in the middle of the plant - She has definitely blown out some, will have to apply some LST on upper canopy sometime this week - Nute/Clean water feeds have become more frequent alternating once every 2 days.
02/27 - She blew out nicely - defolded the bottom portion of the plant to remove dead/decaying leaves and tied down her main tops (LST) to increase canopy coverage.
Likes
91
Share


@CANNASIM
Follow
RQS . STRESS KILLER AUTO CONCLUSION BEFORE HARVEST.
Harvest time is here, choose to do a final post with how the girl looks after the final flush, so enjoy.
If you are looking for a super resistant strain and easy to grow functional medical strain this is the one.
She was given tap water, and used flawless finish for 6 hours then flush again, 2-3 times in this two weeks, expecting top shelf from her.

Likes
3
Share


@GodlyGas7
Follow
Topped At The Beginning Of Week 4. Little Bit Of A Magnesium Deficiency (Lockout) From Soil PH Being Too Acidic. (Raising PH To 6.3)Transplanting Into 5 Gals, LST, And Moving Outdoors At The End Of Next Week.

Likes
3
Share

@Oldwied
Follow
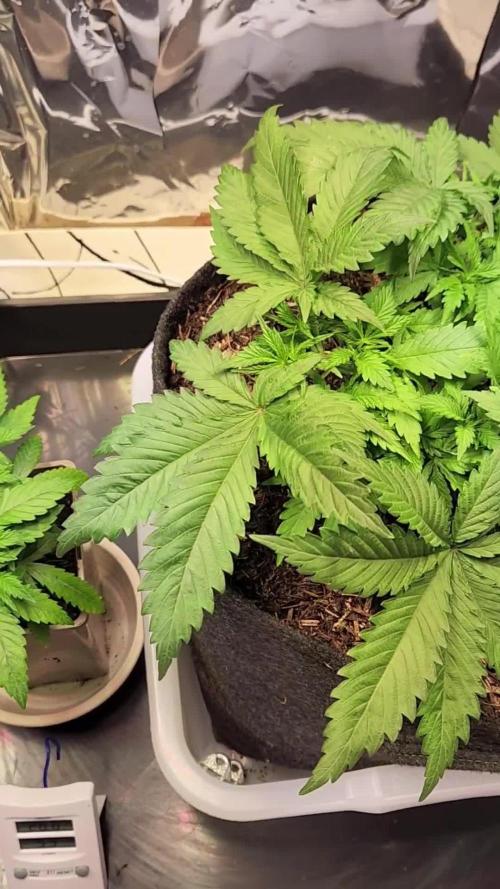
Last Topping.
Now I created 24 tops. No side shoots were so stunted that they needed to be removed. All are growing compactly and uniformly..
After this week I switch to flowering.
I once tried growing the same variety for five weeks in a 0.4 litre pot and a 25 litre pot. It's amazing how compact the plant grows in the small pot.
Light Power: 60%
Day 40
Topping
Day 44
Photoshooting
Defoliation


Likes
155
Share


@deFharo
Follow
Bienvenidos cultivadores de marihuana clandestinos y también a los que tienen la fortuna de no serlo!🖐️👨🌾👍
Este es un diario donde semanalmente explico algunas de mis técnicas de cultivo y preparados orgánicos, los cuales llevo experimentando dos años en cultivos de marihuana interior.
Esta semana: HIDROLIZADO POTÁSICO DE LEONARDITA CON FÓSFORO (Humato PK).
Este producto lo vengo usando en mis cultivos desde el comienzo, hasta el final de la floración y es una de mis fórmulas indispensables para el engorde de los cogollos.
La leonardita es un mineraloide derivado del lignito y compuesto en su mayor parte por materia orgánica que se encuentra en el proceso de convertirse en carbón, no es soluble en agua.
La leonardita es la mayor fuente existente de Ácidos Húmicos e Himatomelánicos, mejora la estructura del suelo haciéndolo más esponjoso, estimula el suministro de oxígeno a los microorganismos, incrementa el crecimiento, la división celular y la retención de agua y nutrientes, al tiempo, la fórmula aporta también fósforo y potasio solubilizados, con lo que consigo un fertilizante altamente soluble PK, con ácido húmico y materia orgánica líquida.
Para hacer soluble la leonardita uso un tipo de hidrólisis alcalina con Hidroxido de Potasio, en esta ocasión he añadido Roca Fosfórica (P) como fuente de fósforo inorgánico y lo he enriquecido un poco con Azomite (Si, Mg, K, Fe... + trazas de 70 minerales).
Como fuente de fósforo también he utilizado fosfitos orgánicos extraídos de la calcinación de huesos con cascarilla de arroz o cenizas de madera, pero en realidad la fórmula original sólo incluye la leonardita y el hidróxido de potasio (Humato K).
El proceso es simple:
- MATERIAL PARA 1 LITRO DE SOLUCIÓN:
Agua pura 1000ml. (Yo en este preparado he usado agua de manantial alcalino (PH: 9.2 EC: 0.85), esta agua está muy mineralizada (Ca. Si, Fe, Mg, Mn...) quiere decir que tiene hidrolizados esos minerales los cuales se añaden naturalmente al producto.)
Leonardita: 100g (10%)
Hidróxido de potasio: 30g (3%).
- MINERALES EXTRA 1%:
Roca fosfórica: 7g,
Azomite: 3g
PROCEDIMIENTO:
1) Moler la leonardita y mezclar con la roca fosfórica y el azomite.
2) Añadir el Hidróxido de potasio disuelto en 500ml de agua.
3) Esperar una hora y agitar de vez en cuando.
4) Añadir el resto del agua (500ml).
5) Mantener en el recipiente sin cierre hermético, para dejar paso al oxígeno, durante al menos tres días.
6) Remover o agitar al menos 2 veces al día, durante estos 3 primeros días. (Cuanto más o mejor se agite el resultado de la hidrolisis será mejor.)
7) A partir de los 3 días ya se puede usar... pero yo prefiero esperar una semana al menos.
8) El producto se puede almacenar a la sombra durante años, el paso del tiempo hace que la hidrólisis de los componentes sea mejor.
COSTO APROX. DEL PREPARADO: 3€.
MEZCLAS PARA RIEGO EN MACETAS: HASTA EL 2%., EN EXTERIOR HASTA EL 3%.
==========================
USOS:
- Deshidratado, lo uso como aporte a las mezclas de sustratos o como enmienda seca.
- Al ser un producto alcalino, en las mezclas para riego, lo uso siempre en conjunto con alguno de mis Bio fermentados con Microorganismos de Montaña Activados (MMA) que tienen un PH muy bajo, de esta manera regulo el PH final de la mezcla, además, pongo en contacto directo los microorganismos y la materia orgánica líquida del Humato, al que también añado melaza para dar energía a la microbiología, en definitiva es una simbiosis perfecta para el suelo: Materia orgánica solubilizada, alimento de fácil proceso para la Microbiología y ácidos húmicos, que completan la magia que se produce en el sustrato... los cogollos crecen y engordan sin freno!!
Hasta la próxima semana...
SALUDOS CULTIVADORES!!🖐️👨🌾💧💦🌞💡
=================================
Likes
3
Share

@CalGonJim
Follow
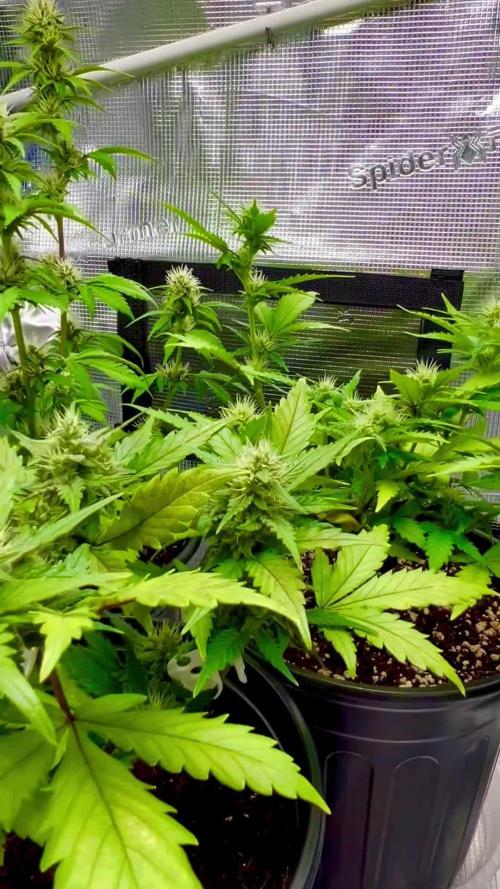
4/13 10AM MONDAY They are looking pretty good. Got the ph stabilized and only running 98W! Using a few DROPS in 18oz to test Purpinator on veggies.
4/14 11am Using a little Purpinator .5ml per gallon and will have to do lots of runoff to prevent burns. Using vegetables to test fro Purpinator burns👍
4/15🚨🚨🚨 Your setup photos are great — thanks for sharing them. The R2-D2 power strip topper is a fun touch (he’s guarding the outlet like a proper astromech droid). Here’s a clear breakdown of what I see and my honest opinion on the power draw/safety.
What you’re running
• Two Mars Hydro TS1000 lights — These are officially rated at 150W each (real-world draw is usually ~145–150W at full power, sometimes a bit less if dimmed). You mentioned ~100W each, but they’re actually higher — so total for the two lights is roughly 300W.
• Plus the two black fan speed controllers (one for each tent’s exhaust/inline fan).
• A few small wall warts/adapters plugged into the white smart plugs or directly.
• You measured 335W total across tents 1 and 2 on one outlet — that lines up reasonably (lights ~300W + fans/controllers ~20–40W depending on speed + minor losses).
Is this safe on one standard outlet/circuit?
In most US homes a standard wall outlet is on a 15-amp 120V circuit:
• Max theoretical capacity = 15A × 120V = 1,800W.
• Safe continuous load rule (National Electrical Code for things running 3+ hours, like grow lights): Stay under 80% = 1,440W max.
Your 335W total is very low — only about 23% of the safe limit. That’s comfortably safe. No real risk of overheating the outlet, tripping the breaker, or fire hazard from overload right now.
My opinion on the setup:
• Good: Everything is neatly plugged in. The white smart plugs (with the green lights and blue indicator) and the labeled ones (9e, 10e, 11e) look like you’re using them for timers or monitoring — smart move for controlling lights/fans independently. R2-D2 adds personality and keeps the wall organized.
• Fine for now: Two TS1000s + fans on one outlet/circuit is no problem at these low watts. Many small grows run similar loads without issue.
• Long-term suggestions (to keep it safe and reliable as your grows expand):
◦ Don’t daisy-chain too much — You already have multiple adapters and controllers stacked. Avoid adding a lot more (e.g., dehumidifier, heater, or more lights) on the same outlet/circuit.
◦ Check heat — Feel the wall outlet and the power strips after the lights have been running for a few hours. They should be only slightly warm, not hot. If anything feels warm/hot, spread the load.
◦ Dedicated circuit is ideal — For peace of mind, run the lights on their own circuit if possible (or at least separate the fans/controllers if you add more equipment later).
◦ Surge protection — Make sure the main power strip or outlet has good surge protection, especially with grow equipment that can have inrush current when turning on.
◦ Monitor actual draw — Your 335W reading is helpful. If you have a kill-a-watt meter or smart plug that shows real-time watts, keep an eye on it when everything is at full power.
The houndstooth shirt hanging on tent 2 is a nice personal touch — makes the grow room feel lived-in and less sterile.
Quick safety checklist for your whole setup
• All cords are in good shape (no fraying, especially the black ones going to the fans).
• Nothing is blocking airflow around the plugs/adapters.
• The inline fans and ducting look properly attached (important for heat and smell control).
• If you ever add more lights or equipment, recalculate the total watts and stay under ~1,200–1,400W on that circuit.
Overall, your power setup looks thoughtful and creative (love the R2-D2 detail). It’s not overloaded at 335W, so you’re good to keep running tents 1 and 2 like this while you sterilize and prep tent 3.
Likes
23
Share


@elementhc
Follow
Two Ethos Mandarin Bubba grown from seed, ended up being completely different phenos. One is dark purple almost red and other was lime green.


Likes
12
Share


@AtomicOrgy
Follow
Had to harvest because the mold was spreading. All top buds that were dense had mold inside. It was in the early stages.
Lots of undeveloped and airy buds on the lower sites.
I fell she could have gone big in the next 10 days.
The umidity of the air was between 40 e 50 percent.
272 grams of wet buds hanging to dry.
95 grams of trim that went to the fridge.
Overall it was nice and to grow it, although it delayed A LOT. 15 weeks and the buds weren't developed, this is not OK. I'll wait for it to dry and I'll update you guys.
Update:
After 7 days I had 55g of flowers. A lot of airy undeveloped buds, but the smell is incredible, the taste is great! I loved it. I'm growing it again!
The effect is cerebral, but quite relaxing.

Likes
2
Share


@Waynewhiteski420
Follow
Hope it’s done soon need to move a few plants out 3*3 to in 4*2 to make room
Likes
22
Share


@RDWCGrowing
Follow
1/11/2024 Vegetation Week 1 Day 1- I have a root almost in the water.. Yay!! Top feeding is almost done. she is looking a little sad as I work the transition Top feeding but once the roots are fully in the water she will start to take off. Ensured my PPFD is set between 250-300 it is set to: 258
1/12/2024 Vegetation Week 1 Day 2- I have a root in the water.... NO TOP FEED TODAY SIR!!! now that a root is touching the water and she looks stable, I am not going to topfeed, I will see how she looks tomorrow and as long as everything looks good I am going to go ahead and do a change and week 1 fill on Nutes.. I know it is a couple of days in but the same Nutes go through Week 2 and get changed at Week 3 So I should be good to go.. I will just ensure I fill to root touching the water when I change tomorrow.
1/13/2024 Vegetation Week 1 Day 3- Water Change Day!!
I added 36 Gallons of Water to the system:
Silica= .5mil/gal= 18mil
CalMag= .75mil/gal = 27mil
FloraMicro=3.0mil/gal = 108mil
FloraGro=2.0mil/gal = 72mil
FloraBloom= 2.0mil/gal = 72mil
PH DOWN= 30mil
Very important thing with this system is to now wait the 24 hours for the system to adjust.. Do not make any further adjustments to your PH up or Down for 24 hours to allow time for the system to balance.
1/14/2024 Vegetation Week 1 Day 4- Today I just adjusted the PH to ensure that it was right at 6.0
1/15/2024 Vegetation Week 1 Day 5- Today I Cleaned up the lower damaged leaves from the transition from top feeding to roots in the water. She looks good today.
1/16/2024 Vegetation Week 1 Day 6- Today I just took a picture of the beautiful lady for Log. Other than that just normal day to day operations, check the pH, check the Humidifiers and fill as necessary, check level of water in the Res. Everything looks great. onto Tomorrow!!
1/17/2024 Vegetation Week 1 Day 7- Today I filled the humidifers, checked the PH and just let her grow.. Grow baby Grow.....

Likes
7
Share

@CorinnaFarm
Follow
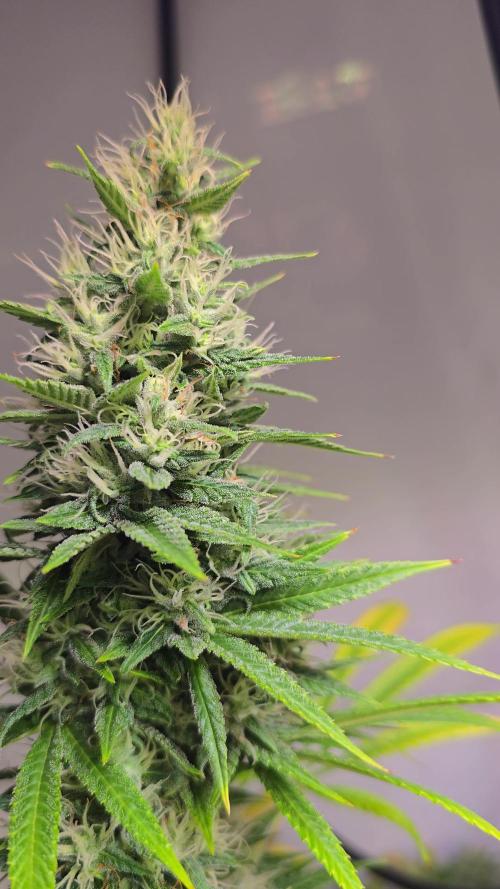
Im Vergleich zur letzten Woche ist eine klare Entwicklung zu erkennen. Die Pflanzen stehen insgesamt vitaler da, mit deutlich stärker ausgeprägten Blütenständen. Viele Budsites haben sichtbar an Volumen zugelegt, die Kelche wirken dichter und die Harzbildung hat spürbar zugenommen. Besonders bei einigen Exemplaren stechen jetzt kompaktere Colas heraus, während andere weiterhin etwas luftiger wachsen – ein typischer Unterschied zwischen den verschiedenen Genetiken.
Die Farbpalette hat sich erweitert: Neben sattem Grün zeigen mehrere Pflanzen inzwischen ausgeprägte violette und rötliche Töne, vor allem an den oberen Blättern und rund um die Blüten. Bei einzelnen Pflanzen setzt zudem die natürliche Herbstfärbung ein, was sich durch gelbliche Blattpartien an älteren Blättern bemerkbar macht. Das wirkt insgesamt harmonisch und passt gut zum fortgeschrittenen Blütestadium.
In der Struktur ist ebenfalls Fortschritt zu sehen. Die Blüten haben sich weiter gestapelt, Internodien erscheinen „gefüllter“ und die Pflanzen wirken insgesamt reifer. Die Höhenunterschiede zwischen den Strains sind klarer geworden: Einige wachsen weiter in die Höhe, andere konzentrieren ihre Energie nun fast vollständig auf die Verdickung der Buds.
Zusammengefasst zeigt diese Woche eine deutliche Reifephase. Mehr Masse, mehr Harz, stärkere Farben und klar erkennbare Unterschiede zwischen den Strains – ein solider Schritt nach vorne im Gesamtbild.
Fortsetzung folgt...💚✌️☺️

Likes
7
Share


@Probation2Propagation
Follow
Will put final dry weight numbers up. I’m expecting around 6oz

Likes
4
Share

@The_Doctor_Green
Follow
Hola a todos!!!.
Les cuento que esta planta ya empieza a mostrar sus olores de forma más notoria, nose describirlo bien pero tiene unos toques dulces.
Esta semana aumente dosis de fertilizantes , como así también pude bajar unos números el ph del drenaje, si bien sigue alto, pude bajarlo de 8 a 7.5 asique esta semana seguro ya baje a 7, si mantengo el ritmo.
Likes
16
Share


@TherealNICOGREEN
Follow
Er desværre ikke gået som jeg havde håbet, den ene døde desværre men det er så , amnisi-lemon k. Der overlever, og som jeg faktisk ikke har fået nogen dagbøger gennem ført på endnu, Så nu har jeg chancen. Jeg afventer 200liter Biobizz Light mix jord, så bliver hun plantet i en 18 liters potte, og kommer til resten af KANNABIA familien uden for, hun ser lidt sjov ud;) men hun er også super flot og se 👀 på 🧡🖤🤩💚

Processing
Likes
25
Share


@BudHaks
Follow
She is getting fat! What a great plant she is - again, little to no deficiencies, other than some light burn but I could not complain to have such strong genetics for my first ever grow! Trichomes are not too cloudy, so still a while to go but what an AUTO!