
Likes
Comments
Share


@dushi_genetics
Follow
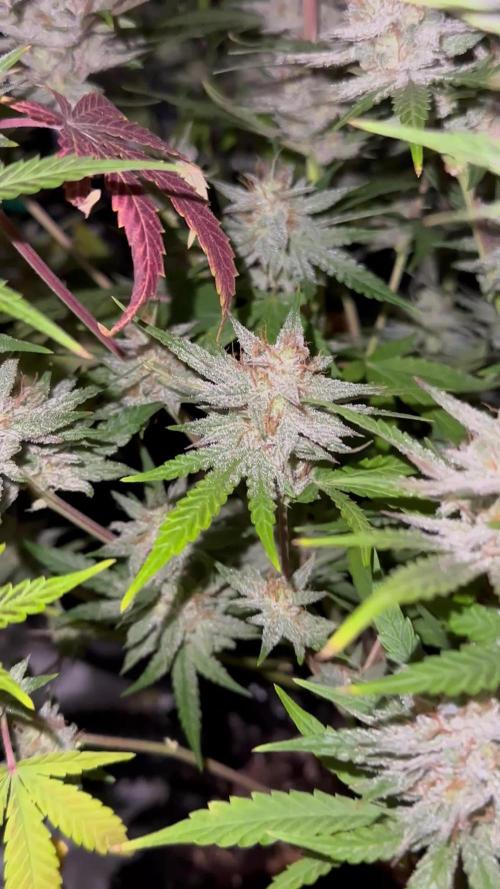
Day 15 flowering stage, flowers looking nice and smell is stronger.


Likes
12
Share


@JZ4Seasons
Follow
3rd week ... life goes on ... leaves come out ... branches grow ... what else? ☕️😂😂😂
Period : 05/04 - 11/04/25
DIARIE:
A small word about my growing equipment (pic 1):
- I use two 9.2L airpots (yellow base) that I modify by cutting the first three levels of the top plastic extensions inside in order to install the FloraFlex caps that fit perfectly. The bases are placed at the very bottom to stay around 9L.
- Under the airpots, there are under-pots with a drainage tray of about 400 ml. It's practical but very insufficient, I would replace them with a drainage system made by myself like the FloraFlex PotPro Platform (Not found in my country 😭).
- I put a scale under the under-pots. I had this idea when I started growing again. For me it's incredibly effective! I have a reference weight and I weigh it "before" and "after" watering, as well as daily, so I know when to water. I press the pots and the scales light up. Perfect watering when it's needed!!!
Other information :
- Watering volume per plant : 600 ml
- Ro water : EC 0.0 & PH 5.8
- Light : Dimmer 60 %
- PPFD : 350
- No PH check
🐍Day 1 : My 2 "girls" continue to develop well 🌿
🐍Day 2 : The plants are growing very well. 1st watering.
🐍Day 3 : I'm really happy with the progress of my two BBGs! The branches are growing but, for me, are not yet long enough to start LST.
🐍Day 4 : Dim. : 80% - PPFD: 390 - I fixed the Floraflex on the airpots (Hot glue, easy to remove) so that the caps do not lift with the attachment of the branches during the LST. 2nd watering.
🐍Day 5 : Installing a 6" Mars Hydro oscillating fan, my little Winflex fans, as old as the grow tent, are dying.
🐍Day 6 : Some photos and short vidéos. 3rd and last watering for this week.
🐍Day 7 : PPFD : 430 - Changing the sprinklers. The black clips allow you to plug two of the three holes and also make removing easier. Installation of the "Gravity Dripper" allows for much slower watering, at 2 cm in the grow medium. Start of LST...
A big thank you if you come to see my diarie, smoke lots of good weed but don't forget, in reality, man doesn't fly! 😂😂😂

Likes
8
Share


@The_Doctor_Green
Follow
Después de 2 semanas de secado logre enfrascarse 26 gramos de Big bang, el aroma y sabor, no se como describirlos.
El efecto es lindo, al menos en mi caso lo sentí cerebral al principio y luego me agarro un sueño😣😣🤣🤣🤣💪💪💪 .
Los cogollos quedan bien compactos , tan compactos que si hay humedad por condiciones q te cuestan controlar, se pueden arruinar, ya en el final del proceso.
Asique presten atención al final.


Likes
1
Share

@senya_grow
Follow
It's just the perfect strain, with the best scent. Genetics surpasses all expectations. It's just beautiful and there are no words. They still take everything I give them and don't resent it)
Habt ihr bessere Auto gesehen?
Likes
Comments
Share


@Marmotaaaas
Follow
Terminando la 3° semana desde germinación an tomado de buena gana en las macetas de 25 ya pronto subiré mas el panel y dentro de 2 semanas mas o menos se cambiara a 12-12 para comenzar la siguiente face


Likes
3
Share

@Bob29
Follow
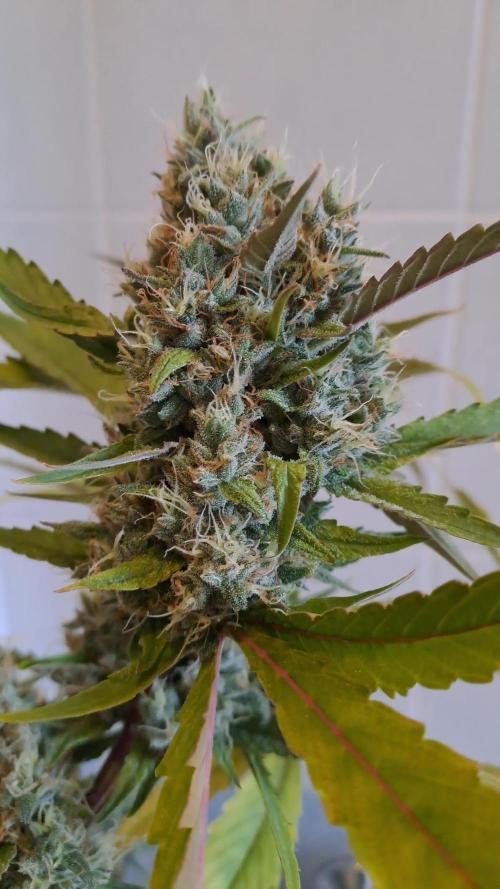
I am really satisfied with the cultivation. The buds are big and super resinous.


Likes
60
Share


@SooSan
Follow
12/12 + 102 jours
Vu qu’il y a 16 plantes mais que sur growdiaries on ne peut mettre que 8 variétés j'ai divisé en 2 diaries pour le bas de la tente
1️⃣
🏠 90x60x90
☀️ FC-E 4800 => puissance a 75%
🍁
1x Black Bomb / Philosopher Seed
2x Amnesia Lemon / PEV Seeds
1x Blueberry / PEV Seeds
1x Blueberry / 00 Seeds
1x Wappa / Paradise Seed
1x Dark Phoenix / Green House Seed
1x Quick Sherbet / Exotic Seeds
1x Mango Cream / Exotic Seeds
1x Banana Frosting / Sensi Seed
1x Hindu Kush / Sensi Seed
4x Fast Mix / Sweet Seed
📎 https://growdiaries.com/diaries/122084-grow-journal-by-soosan
📎https://growdiaries.com/diaries/124052-grow-journal-by-soosan
2️⃣
🏠 30x60x50
☀️TS1000 => 100w = 54g
🍁
Quick Sherbet - Exotic Seed = 12g
Quick Sherbet - Exotic Seed = 12g
Quick Sherbet - Exotic Seed = 17,5g
Quick Sherbet - Exotic Seed = 12,5g
📎 https://growdiaries.com/diaries/122080-grow-journal-by-soosan


Likes
2
Share


@MT_Farmer
Follow
I put a net in to try to get a more even canopy and utilise the space of the tent. It didnt really work too well though. I ended up only leaving it in for periods as i found it really annoying to water and manage devices in the tent with the net in.


Likes
13
Share


@NordicClosetGrower
Follow
Finally received a couple of humidifiers to test from the local shop. These shitty low cost humidifiers will not really do, I can only have them on non stop until the water runs out. If I connect them to a sensor that switches them off, it won't go back on because it doesn't have a mechanical switch, I have to press on each time.
Still, let's see if this helps my poor dry leafs a little bit
Likes
111
Share


@DogDoctorOfficial
Follow
Harvesting An ELEPHANT !!!
And after 118 day from seed and 101 from wen she started her mix veg/flowering process, i cant say for sure but i am starting to believe that this auto world do veg, then veg and flower in conjunction for a wile and only after they a wile they move to a flowering stage completely but thats another post another day lol today was harvest day for this Auto Elephant from SSSC , and let me tel you she is a delight with huge fruits, so big that i normally cut and hang the all plant and for this i did not take the risk of doing that and getting bud rot , better safe than sorry, so what i broke her in smaller peaces and put it all in the rack.
Now not much to do than waiting for it to get around 10/15% humidity and jar with it all.
This one as you guys can see from the video , this is a full covered in trichomes BIG MAMA and touching her is like touching super glue or something lol i was trying to put all the colas in one picture , but is simply just not possible , they all look great so i selected 4 of them for a true back back ground <3
Thank you Super Sativa Seed Club for this opportunity, i fell like a champion no matter what with this 2 Mamas, much respect on the work you guys did on this Elephant
As always thank you all for stoping by for your love and for it all, i fell humble and honored


Likes
200
Share


@Ferenc
Follow
Day 96, 15th of December 2020:
Wao and wao... this is what I can say.
A bit late I was on holiday I usually start the week with the first day but now with the last one.
So let's start with the "black sheep" of this group as she is alone here RQS Wedding Gelato.
Easy growing issue free little bushy lady. Absolutely great choice of grow. Pretty much ready for Christmas but she can be cut even now lol....
And now let's speak about the Original Sensible Seeds' girls...
Well Black Ghost OG similarly to RQS Wedding Gelato is calm little bushy and issue free lady.... no problem all good ready for Christmas....
Runtz Gum the thick chick with heavy big buds and excellent appearance is really amazing. I placed a stick there and fixed her to look better... It was not necessarily but i have done it.
She needs more time pretty much done ny Christmas or a bit after....
Gelato from Original Sensible Seeds is similar in terms of acting such as streching and all that ...
The same situation applies not much to really say we wait ;)
I am really happy to have these ladies....
Well, Do-Si-Dos OG is the craziest one ever... lol.... not only due her crazy kind of streching style but the trichome developement that comes along to the fan leaf "holder" stem is pretty crazy....
Those buds are like a diamonds sticky and she would be ready to harvest but need to wait because I need to go....
I really had to fix her by placing a stick there I broke one stem but fixed as it did not come off... so crazy especially now because of the weight of the buds... now she looks even more beautiful...
I think she is the most challenging grow ever.
Original Sensible Seeds genetics is unique really high quality just look at them.
Royal Queen Seeds as well but this is my second grow from them my first was a Green Gelato which is the same calm littlw bushy plant. Amazing very good for newbies ;)
I am going on holiday again and back on 28th of December so after harvest starts.
Girls will be cut after.
The 7th weeks starts with tomorrow 16th of December....
Only flushing and no more nutritient will be used.
Soon full report comes. Lamp is the same 11 hours on and 13 off....
The last 4 days they will get 4 days darkness and only ventilation will be working no even more water ;)

Likes
21
Share


@Masterkeif
Follow
Males decided to show themselves, had 3 males out of 6 plants, after pulling the males I ended up with 2 sour 60 females and 1 berry Ryder female, Starting nutes next watering and continuing the lst

Likes
15
Share


@Bluemels
Follow
Tag 98: Die letzten 2 Wochen sind angebochen😀!! Ab sofort wird die Triple G nicht mehr gedüngt. Sie ist schon jetzt sehr klebrig. Und riecht intensiv.
Das Klima ist ganz gut, nicht so warm gerade.
Tag 102: Es scheint ein Kühler August zu werden, das ist ganz Wunderbar für meine Pflanzen 😍 jetzt in der Endphase.
Likes
3
Share


@Moon_garden
Follow
Week 5 since light switch to 12/12
The terps are AMAZING and very very strong. Entire place smells when I open the tent. And lingers for way too long. So hard to pin down the exact smell as it changes through the weeks. Sweet creamy skunky gas with a slight new shoe smell. Like that strong brand new fresh rubber or plastic smell you get when you open a brand new pair of sneakers.
Everything the same as last few weeks. Same feeding and nutes. I switched to nutes that have zero nitrogen around week 3 but wish I waited another week as my leaves are getting yellow pretty fast already. Assuming it is the nitrogen that's causing it. Buds look super frosty though!!

