
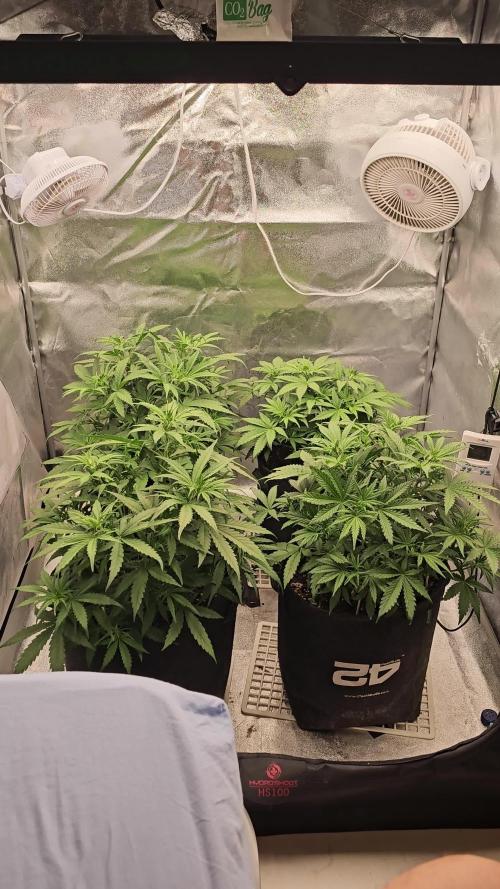
Processing
Likes
Comments
Share


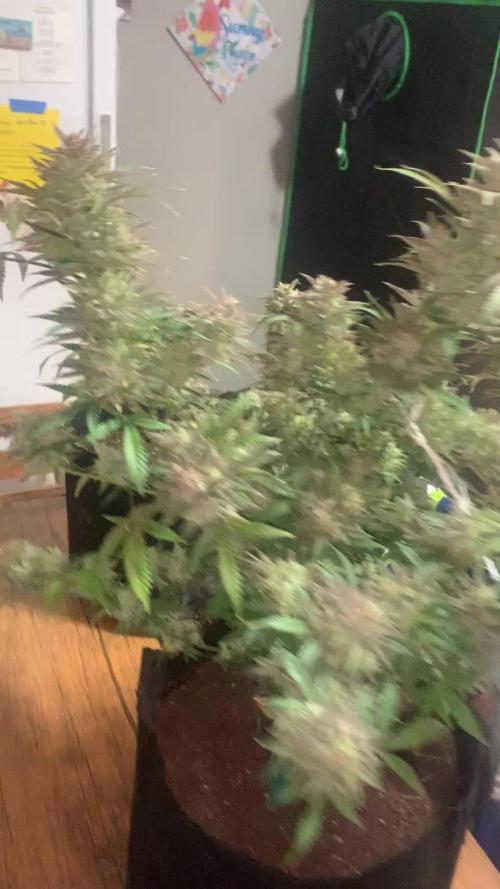
@AMNESIA1100
Follow
Not sure if these 2 are auto plants? The blackberry are flowering quiet obviously, but these 2 are either really slow or I accidentally bought non autos. Anybody help? Cheers


Likes
12
Share


@Maskull
Follow
Not to happy with the development with the green crack but still could do a lot hears hopeing
The buddhas didn't start of that well probley was because I dont have a incubator

Likes
6
Share


@I_Identify_As_A_Dan
Follow
Week 10 for Space Panda by Atlasseed,
The roots on her are just insanely nice.
She finally got her transplant into 25L of fairly good soil mix of biobizz light mix/coco mix + a good feed of @bokashibiochar + a feeding of BioGrow by greenhousefeeding
I think a few days of adjusting and she will start to explode.


Likes
17
Share


@TheCannaProphet
Follow
-----------------------------------------------------
~SWEET SEEDS JACK 47 STRAIN DESCRIPTION~
-----------------------------------------------------
A 3rd generation Autoflowering strain, this hybrid is the result of a cross between an Autoflowering Jack Herer from the Sweet Seeds®️ R&D Department and our elite clone of AK 47.
Probably the most potent Autoflowering strain available in the market. This is a very productive Autoflowering plant with abundant, compact and very resinous buds. The aromas and tastes of this strain are sweet, fresh, lemony and with hints of incense.
Variety: Sweet Seeds Jack 47 Auto #SWS31
Indica: 20%
Sativa: 76.9%
Ruderalis: 3.1%
THC: 18-21%
CBD: 1.1%
Indoor Yield: 450-600 g/m²
Outdoor Yield: 50-200 g/plant
Harvest Indoor / Outdoor: 9 weeks from germination
Height: 50-120 cm
Effects: Creativity, Psychoactive, Stimulating
Taste: Citrus, Lemon, Incense, Cool, Sweet
________________________________________________________________________________________________________________________________________________________________________________________________________________________________________________________________________________________________________________________________________________________________________________________________________________________________________________________
THE SETUP:
~Planted into Jiffy Peat Pellets that were hydrated with de-chlorinated water with SuperThrive added then ph'd to 6.0 @ 80℉
~Grown 100% organic in 10g fabric pots with Mother Earth 70/30 Coco/Perlite medium amended with 2tbs/g of Down To Earth 4-4-4 / 2 cups/g of Earthworm Castings / 1tbs/g of Dr. Earth Flower Girl 3-9-4, 1tbs/g of Dr. Earth Bat Guano, 3/4 cup of Down To Earth Azomite and 1 tsp/g Down To Earth Fish Bone Meal.
~24hr light cycle during Germination / 19/5 light cycle for Vegetation and 12/12 for Flower
~Straight water ph'd @ 6.2-6.8 when needed and weekly Compost Tea's.
________________________________________________________________________________________________________________________________________________________________________________________________________________________________________________________________________________________________________________________________________________________________________________________________________________________________________________________
WEEKLY UPDATES:
7/26- Here we go into her fourth week and man oh man is she looking F I N E ! 😍 She's got great color and abundant new growth and I'm tucking shade leaves to get good light penetration through her canopy. This girl's shaping up to be one epic autoflower with the size, growth and overall health & vigor to back it up!
I have both UnitFarm LED's fired up now (560w at the wall total) and have them hung @ 30" above canopy and she appears to be loving it! 😍💚
I went ahead and top dressed her today with 2 tbsp/g of Dr. Earth Premium Gold 4-4-4 and Dr. Earth Flower Girl 3-9-4 in a 40/60 ratio respectively. I'll also add 2 tbsp each of Down to Earth Bat Guano and Bio-Fish, topping it all off with 1 cup of worm castings, after which I'll water it in with straight de-chlorinated water ph'd to 6.2-6.5 @ 74℉.
7/28- Her growth and excellent health continue. She has great color and some really tight node spacing. I'm guessing that she's not going to be the tallest girl but, from past experience, there's no doubt she'll look phenomenal when all is said and done....We'll have to wait and see!
I'm watering her from the bottom, pouring her water into her drip tray under her 4g pot, allowing her to draw the water up into the medium. I like this method for a couple of reasons... First, it keeps shit simple and second, it keeps the top 1/2" of medium dry which just about eliminates any worries of Fungus Gnats (I can't stand those little bastardo's).
She recieved 0.5g of de-chlorinated water with 5ml/g of Botanicare CalMag+ added then ph'd to 6.2 @ 74℉ which I then poured into her drip pan. Within 5 minutes the 0.5 was all absorbed...perfect!
7/30- This JACK47XL from Sweet Seeds is on a roll! She's got abundant growth, albeit not the tallest plant, great color and is looking like she's starting to stretch out now. Curious to see how long she goes before starting to flower as that will determine how big she actually gets.
She's getting watered every other day now with 0.5g of straight de-chlorinated water ph'd to 6.2 @ 72℉. I'm alternating the way I water, between pouring it into her drip pan and letting her draw it up into her pot, and from the top with the goal being to keep her medium moist but not wet. This will provide the ideal environment for all the beneficial mycorrhiza and bacteria which are feeding her!
8/1- Well Week Five is in the rear view mirror and it looks like my girl may be starting to flower!
Her color remains fantastic along with her health! I'm continuing to water her daily with 0.5g of de-chlorinated water that is ph'd to 6.3-6.5 @ 74℉
I'm also looking her over throughout the day, tucking shade leaves out of the way of flower sites to ensure that they get plenty of light. I have refrained from removing any shade leaves or topping her to avoid causing any undue stress to her. The only training she's recieved is some LST which continues as well.
Today I went ahead and gave her some Compost Tea that I began brewing 72hrs. ago to give the microbial colony a 'Happy Hour' on the house!
~Thanks for stopping in! Things should be getting a lot more interesting in the coming weeks...Stay lifted and be Blessed! 😎🙏~

Likes
15
Share


@Rangaku
Follow
Mimosa is the queen of the tent so far , thick and bushy looking strong . She loved being tied down and is filling out nicely. I’ll need to do a defol soon and keep her nice and spread out to get the light in and keep up the growth rate .
Flushed her this week and keen to see her stretch out this next week .
Likes
13
Share


@Youngbuds1
Follow
So as you can see I now have four flowering which I guess were the autos and I have one gelato that is still vegging and is doing damn good. There are two that have lighter color leaves, I’m trying to focus on on these and see if I can get better production. As for the tall GG in the back, leaves are waxy and have resin production starting. A lot better, overall I’m learning more and more every week!
Hope everyone is enjoying my grow and stick around, ask questions. Happy New Year!

Likes
Comments
Share

@NastyNatiBuds513
Follow
Forbidden Runtz Is A Great Addition To The Fast Buds Line Up. Very Colorful And A Treat To Watch Grow 👀
Likes
95
Share


@Roberts
Follow
Northern lights has been doing some stretching. I did hst her today, as she was getting close to the light. Hopefully she takes the hst well and makes a great bush of buds. Thank you Spider Farmer, and Pro-mix. 🤜🏻🤛🏻🌱🌱


Likes
8
Share


@Lykal
Follow
Esta semana dei a primeira poda top! Na planta #3 e #6 tentei dar a poda FIM (primeira vez que tento esta técnica vamos ver como corre)

Likes
Comments
Share
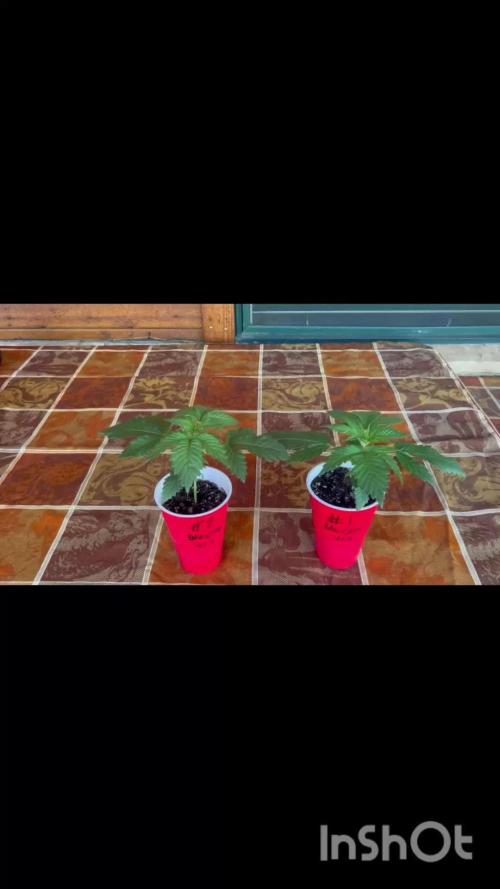

@BlackBear833
Follow
After three weeks in the solo cups I transplanted to 1 gallon pots and three days later I noticed yellowing on one of the plants so in 16oz of water I mixed in 1/4 tsp of Epsom salt and gave it to both plants in fear of magnesium deficiency but the other plant is thriving and growing strong. YouTube video:


Likes
71
Share

@Roberts
Follow
Quebec Blast is doing well. She is showing first signs of flowering a week into light change. I adjusted nutrition more to her current demands, with a solution change today. Everything is going well, I don't expect a lot of stretching. I could be wrong. I am growing her under a Spider Farmer SE5000 light at 70 percent. She is in New Level Hydro 5 gallon bucket. Thank you Spider Farmer, New Level Hydro, and Quebec Seeds. 🤜🤛💪🌱
Thank you grow diaries community for the 👇likes👇, follows, comments, and subscriptions on my YouTube channel👇. ❄️🌱🍻 Happy Growing 🌱🌱🌱
https://youtube.com/channel/UCAhN7yRzWLpcaRHhMIQ7X4g
SE5000
https://amzn.to/3qFpAML
Spider Farmer Official Website Links:
US&Worldwide: https://www.spider-farmer.com
UK: https://spiderfarmer.co.uk
CA: https://spiderfarmer.ca
EU: https://spiderfarmer.eu
AU: https://spiderfarmer.com.au
Coupon Code: saveurcash
Www.newlevelhydro.com
Www.hygrozyme.com

Likes
16
Share


@GreeneScene
Follow
The other 3 GDP went through a flush today. Zkittlez was flushed. The very first GDP flushed in the 24th got flushed a 2nd time alongside the other 3 GDP. I’m still eyeballing to see when Runtz will be “ ready “.
Finally got my dry box slapped together, DIY TIL I DIE BABY. Still it came out well for a first try.
Heat ran out of control & I learned the HARD way why we don’t let our girls hang out above 85 for extended periods of time. I kinda had some severe foxtailing going on.
Just biding my time until harvest , fingers crossed I don’t mess this last leg of the race up I’d be distraught .
UPDATE : Lastly I found an area of BUD ROT on Runtz not knowing that’s what I had found the dust got flung in the air twice sooooo there’s spores in my tent & possibly on all my plants now .
Trouble is I’ve flushed 5/10 plants & watered 5 others in the tent so humidity is super high.
I’ve added in an additional dehumidifier because it is riding at 70%-80% . Within 3 mins of adding additional dehumidifier & opening tent doors as we as pointing circulatory fans at plants instead of the grow lights overall humidity dropped from 73% to 53% & still declining .
Hopefully this is enough to keep the other 9 plants healthy & im going to have to harvest Runtz without Flushing .
RUNTZ CHOP COMING IN THE NEXT FEW DAYS
Another week on the GreeneScene in the books 📚
Likes
11
Share


@Madman2020
Follow
Kind of given up on this one. I had an issue catchung runoff which led to me not watering plants enough
Not watering plants to runoff will result in higher substrate Ec(Generative cue and also could burn plants)
Also its about 20• outside which does not work for the plantsr dark period. December and january are tough months.
I recently learned that i should


Likes
Comments
Share

@Growfather1
Follow
Hello everyone,
Going into week 2 everything looks fine the girls are doing great and will get their first topping this week.
Thanks for stopping by and have a nice day.
Growfather

Likes
20
Share


@DaddyPrime2
Follow
5/29 plants are healthy.
6/2 they've definitely been stretching this week. Pistils have shown and the calyx of plant #2 are already showing definite purple. Its obvious even with how little of it showing. #2 was the first to show sex and progression of transitioning. Plant #1 has shown sex but only on half of her node? Plant #3 is still the tallest, with the most stretching happening. She's a lighter green than the rest and she hasn't quit shown a full pistil yet


