


Likes
Comments
Share


@starke
Follow
I don't know where to start and I must admit I'm completely overwhelmed by this beautiful beautiful plant ❤️❤️❤️ Aaaaaaaaaaaaaaaaaaaaaaaaaaah, I'm so happy 😍😍😍
She is a blessing!
Excuse the outburst, but she is magical ☀️ I applaud you guys at Humboldt for creating such a wonderful strain 🙌
Some details upfront, before I rave some more:
- 134 Days in total: 70 Days in Veg, 64 Days in Flower with 128W LED in a 60x60x160cm tent
- 7 Days Drying regularly, 9 Days Drying in the Fridge
- 432g - Wet weight with stems
- 103g of those for Fresh Harvest Infused Oil - 190ml Olive oil with 30mg/ml THC & CBD - approx. 20g dry (for dry weight calc.)
- 87g for the DrZiggy's Low And Slow Drying in the fridge - 20g dry
- 242g for regular Drying @50% RH and 22°C - 55g dry
- 30g dried sticky trim in the freezer
Summary of my growing experience with this strain:
She takes well to massive training and a little neglect in the beginning, meaning she recovers well, which is what I want 😊 I didn't experience any major deficiencies. She had a little nitrogen deficiency during the later veg phase, which she showed with lighter green leaves. I blame this on my long veg time and my pot size of only 11l. She consumed all her soil and nutes by the end of veg. I will keep that in mind for my next grow. Since I increased my nitrogen levels so close to flowering phase, I overdid it a little on the nitrogen which showed a little bit during later flowering phase with downwards clawing leaves. So I will be more careful with nitrogen especially while transitioning into Flower. I did not flush this plant and she smokes already beautifully mild after only a couple of days of curing. Drying her took 7 days in the tent and 9 days in the fridge. She crusted up with lots of stickiness while drying and gave off a good bit of scissor hash & kief when trimming. Smoking her is a great and different experience to me. It's my first time with a 1:1 strain and I can definitely notice the CBD content. She shows in a very well balanced body high with a slight and gentle knock on the THC door. The first couple of days I felt a craving for higher THC which settled down after only a couple of days. Very interesting and definitely worth growing. So you guessed right, I totally recommend growing this beauty. Especially if you are interested in exploring a 1:1 THC:CBD strain with all its magical medicinal values 🙏
Why I grew this strain:
Like @Experimentgreen on here, I grew this strain for my Mama ❤️ She is open minded to trying to solve some of her health issues with these beautiful plants and the magic they bring but she also likes to have a bit of fun, she doesn't mind. So a 1:1 strain was quite handy. She suffers from neuropathic pain, arthritis in her joints, restless legs and insomnia. All very relatable issues and perfectly suitable to be introduced to some good CBD and THC content. She already has a little tolerance, since she is treating her restless legs with gummi bears I made with a strength of 1.5mg/gummi bear. This small dose already helps her on a daily for her restless legs. Beautiful 😍
So with this special mission in mind, I wanted to process the plant with only the very best options and create Cannabis Oil (Capsules) for my Mom to take. I chose a method called "Fresh Harvest Infused Cannabis oil" by the wonderful member SweetSue over at 420magazine: https://www.420magazine.com/community/threads/fresh-harvest-infused-cannabis-oil.363371/ I hope it's ok to relink, no need to duplicate already existing and well researched content, right? I will not go into detail and def. recommend reading through the whole thread. I only document the short version here, but feel free to ask me, I'm happy to share my experience. The oil I made has 30mg/ml of THC and CBD. That's a good value.
I calculated the strength the following:
75g fresh Flower in 200ml Olive Oil - with 10% CBD&THC
85% extraction efficiency with the infusion method
85% * 10% THC&CBD = 0.0850
0.0850 * 75g = 6.375 gram of available THC & CBD
6.375gram * 1000 = 6375mg/THC
6375mg/CBD
6375mg/200ml = 31.875mg/ml CBD & THC
I created capsules with 3mg per capsule. We are currently trying to find the right dose for her. She started taking one capsule 60-90min before bed for 3 days now and will increase by 1 capsule tonight. We continue until a max dose of 15mg/day but always re-evaluate how she feels. She's documenting her experience quite cute. Very heartwarming and powerful. So far she sleeps better and she falls asleep faster, which she hadn't done in a long while. Onset is pretty precisely between 60 and 90 minutes. She has not had any restless legs so far. I'm excited for her and can't wait to see where this takes us.
I also made her a salve/creme she uses as a topical on her joints. When she uses it early enough, before the big pain hits, she feels it helps. Of course this is not a science study and everything is purely based on personal experience. I thought I share, in case anyone is interested, also I want to give back a little, since I consume so much knowledge from all over the internet, including here, so thanks 🙏

Likes
Comments
Share


@Piro420
Follow
Some light burn on some tops but looking like some very fat nice nugs.
Sticky and smelly I have a good feeling the terps are going to be
Likes
2
Share

@DogDoctorOfficial
Follow
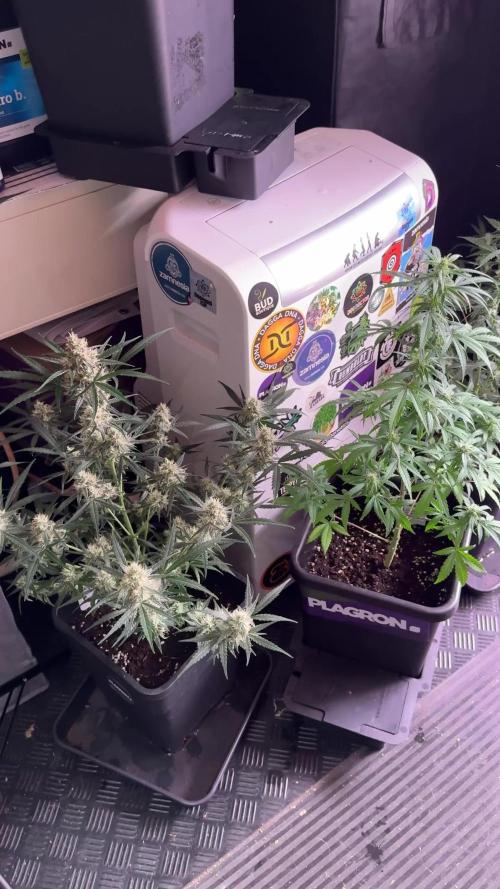
👑 Godfather OG – Pheno A Week 8 | The Demanding Queen
Welcome back to another chapter of the 8×8 Adventure!
If last week Godfather OG Pheno A was reaching for the sky, this week she's making something very clear...
She's demanding. 👑
Of all the ladies in the room, this phenotype has been one of the harder ones to keep up with. She seems to want more food, more attention, more everything. While the rest of the room follows along quite comfortably, she keeps asking for just a little bit more.
But that's also what makes phenotype hunting so fascinating.
Twelve genetics.
One environment.
One feeding strategy.
24 completely different personalities.
And Godfather OG Pheno A definitely has a personality.
🌱 A Plant That Keeps Asking for More
At approximately 169 cm, she's still one of the tallest plants in the room.
The impressive part isn't simply her height, though. It's how much flower development she's carrying along that structure.
She's still stretching, still reaching, and still building new flower sites while gradually transitioning toward heavier production.
Keeping up with her hasn't always been easy, but she's rewarding the extra attention with some beautiful development.
🌸 The Flowers Are Starting to Get Interesting
This is probably what I'm enjoying most this week.
The bud formation is becoming much more obvious, and the flowers are beginning to take on their own shape rather than simply looking like early clusters.
There's a lot of fresh white pistil growth, increasingly visible resin production, and a structure that makes me very curious about where she'll end up.
And then there's the smell...
She's starting to develop an aroma that is becoming increasingly noticeable every time I work around her.
I have a feeling this girl may surprise me.
It's still too early to make any predictions, but she's certainly giving me reasons to keep watching closely.
🍃 A Lighter Shade of Green
One thing that's particularly noticeable this week is the lighter coloration in some of her foliage.
She's not wearing the same deep green uniformity as some of the other phenotypes, and there are areas of lighter green across the leaves.
Considering how demanding she has been nutritionally, it's something I'm keeping an eye on.
At the same time, the plant is continuing to grow, the flowers are developing, and the overall structure remains beautiful.
So rather than trying to immediately "fix" something that isn't necessarily broken, I'm watching her response and letting the plant tell me where she wants to go.
That's part of the experiment.
✂️ No Defoliation... Yet
We're not defoliating Godfather OG Pheno A this week.
Her natural structure is still giving the flowers plenty of room, and I don't feel the need to interfere just for the sake of doing something.
Eventually, she will probably receive the same treatment as some of the others.
But for now...
She gets to be herself.
Sometimes the best cultivation technique is knowing when to leave the scissors alone.
🍽️ Feeding the Queen
As always in the 8×8 Adventure, the room continues to follow a shared feeding strategy.
This week's nutrition included:
Terra Bloom – 2.2 ml/L
Green Sensation – 1 ml/L
Sugar Royal – 1 ml/L
Power Buds – 1 ml/L
Lemon Kick – 0.03 ml/L when required
The increase in Terra Bloom is part of the room's flowering strategy rather than something specifically adjusted for this phenotype.
But Godfather OG Pheno A certainly seems to be one of the ladies asking us to pay attention to what that feeding produces.
🌡️ Environmental Conditions
The room remains remarkably consistent:
Day temperature: 29°C
Night temperature: 25°C
Humidity: 60%
pH: 6.0
TDS/EC: approximately 2.0 mS/cm
Solution temperature: 22°C
Root-zone temperature: 21°C
CO₂: 639 ppm
Watering: approximately 1.4 L per plant / 24h
Light schedule: 12/12
Height: 169 cm
And that's exactly what makes her behaviour so interesting.
The environment hasn't changed dramatically.
She has.
👑 The Queen May Have a Surprise Coming
Looking at her this week, I keep coming back to the same thought:
There might be something special hiding inside this phenotype.
She's demanding.
She's hungry.
She's tall.
She's still developing.
And she's beginning to smell very, very interesting.
She's certainly not the easiest girl in the room.
But sometimes the difficult ones are the ones that teach us the most.
And when I look at those flowers developing along her towering structure, I can't help wondering what she's going to look like when she finally decides that stretching is over and it's time to put everything into the flowers.
For now, I'm simply enjoying the journey.
💚 Thank You
Thank you for joining me for another week of the 8×8 Adventure.
This project continues to remind me why growing multiple phenotypes under the same conditions is so fascinating. We can give them the same room, the same light, the same nutrition and the same care...
And they will still find completely different ways to express themselves.
Godfather OG Pheno A may be one of the demanding queens of this room, but she's also becoming one of the most interesting.
A huge thank you to everyone following along, supporting the diary, sharing knowledge and enjoying the journey with me.
And of course, my gratitude to:
💚 GrowDiaries
👑 Zamnesia for the genetics
🌱 Plagron for the nutrition
💡 Future of Grow LED for the lighting
🌿 TrolMaster for environmental control
✨ Lumiflora for the under-canopy lighting
I'll see you next week to find out whether our demanding Queen finally starts slowing down...
Or whether she has even more to ask from us. 👑🌱
Growers Love and happy growing, everyone! 💚
Likes
4
Share


@Ninjabuds
Follow
My OG Kush plant is from Royal Queen Seeds, and I know they sometimes get a bad rap, but I've grown their OG Kush before and it was fantastic. This pheno has some awesome leaves and just a really good structure overall.
It's been a challenging week with the constant rain and ridiculously high humidity. Keeping things dry indoors has been a real struggle. Despite the weather, I managed to flip all my feminized photoperiod plants to flower this week. I'm hoping the switch will go smoothly, but with this humidity, it's going to be tough.


Processing
Likes
3
Share


@LongJohn420
Follow
Gorilla Zkittles going down friday looks awesome! Gelato is gonna get one more time nutes and then to flush till day 70.
Pretty happy with these.. Gelato smells like blueberries and GoZKi has that fruity dank smell nice 😋

Likes
16
Share


@SirBudAlotts
Follow
So this week was just a few adjustments in regards to environmental conditions...done abit of defoliation for air movement and prevention of extra moisture...The aim is no mold or bacteria having any chance to multiply or even exist..absolutely not! I ain't about to ruin this ladies!
Other than that...no issues..just maintain the process and environment. I do not want any major changes in that regards, especially during the early flowering stage.
I would like to thank all the Grommies for checking out this grow and showing love.🌿

Likes
34
Share
@DogDoctorOfficial
Follow
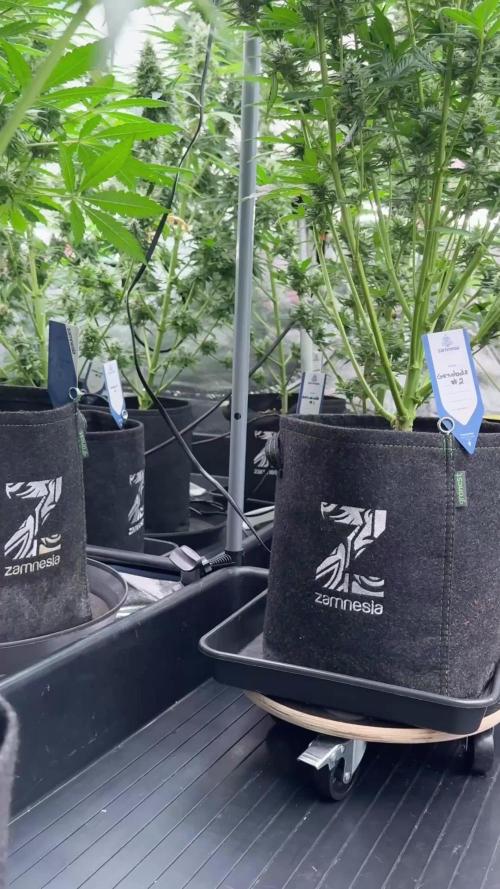
Week 6 Flower — Sundae Driver (deep dive)
Quick recap — From seed to Week 6
• Germination: Pillbox + water enriched with Aptus Regulator / Start Booster; three seeds, two kept.
• Early transplant: Seedlings moved directly into final 11 L fabric pots with a living / amended super-soil (Janeco Light Mix + Aptus line + mycorrhizae, substrate buffer, micro-mix).
• Short veg: Minimal veg time (early transplant strategy), light training (leaf-tucking) and one deliberate supercrop to control a “moon-shot” top.
• Flower flip: You used an 11/13 light schedule to encourage a firm, fast transition into flower.
• Now: Week 6 of flower — plants are large, heavy, and beginning to show clear resin development.
⸻
This week’s snapshot (what you told me)
• Solution EC: 0.7 mS/cm (you stopped All-in-One liquid and pulled solution EC down)
• Solution pH: ~6.1
• Soil/substrate EC: still comparatively high (you reported earlier numbers around 5–6 mS/cm) — the living soil is doing the heavy lifting.
• Feed plan kept: Plagron PowerBuds, Green Sensation, Sugar Royal (all low-dose), plus Aptus Regulator and Aptus CalMag Boost.
• Plants: heavy, bulking, obvious frost/trichome production; supercrop site is producing well.
⸻
Why you lowered solution EC and stopped the All-in-One liquid
• Letting the soil lead. Your living, richly amended soil already holds lots of available ions. Pulling water-solution EC back to ~0.7 makes the fertigation a light steering input rather than the dominant nutrient source. That reduces the risk of salt buildup while letting the soil biology and reserves feed the plants.
• Encouraging ripening, not more vegetative growth. Lowering soluble N input and total EC reduces vegetative vigor and encourages the plant to reallocate energy into flower development and resin production.
• Cleaner profile. A lighter solution often helps express terpenes and can reduce harsh residual taste if you choose to flush later.
• Risk management. With a high substrate EC you avoid compounding salts, but you must monitor runoff EC/pH to ensure you’re not drifting into deficiency or toxicity.
⸻
Trichomes & white pistils, what you’re seeing and what it means
• White pistils (hairs): still plentiful, the plant is mid-flower, still producing new pistils while older ones will start darkening in the coming weeks. A lot of white pistils now is normal at Week 6; they will darken and curl as maturity approaches.
• Trichome types & stages: you’re seeing more glandular heads and sticky sugar leaves. Trichomes progress roughly: clear → cloudy/milky → amber.
• Clear: immature (not peak potency)
• Cloudy/milky: peak cannabinoid expression, usually target harvest for a balanced high
• Amber: more degraded THC → more sedative, couch-type effect; some amber is normal depending on desired effect
• What heavy trichome coverage now means: the plants have moved into active resin production; enzymes and carbon flux are being directed to terpene and cannabinoid pathways. Continued support (sugars, PK, stable environment) helps maximize resin and terpene development.
⸻
Supercrop update — technical recap & why it worked
• Mechanics: you bruised/softened the stem, bent it, and closed the wound so the plant formed a strengthened knuckle. That redirection reduces apical dominance and sends auxin to lateral sites.
• Results you observed: rapid curve-up, additional bud sites along the bent branch, and notable fruiting at the knuckle/top area. That’s expected, the wound redirects hormonal flow and the plant compensates by boosting side growth and flowers.
• Monitoring: the knuckle strengthens over 3–7 days; watch for any slow-healing splits and keep airflow over the site to prevent moisture pooling.
⸻
Why you kept Plagron + Aptus (what each brings)
• Plagron PowerBuds / Green Sensation / Sugar Royal: targeted bloom stimulators (PK, co-factors, carbs/aminos). They help compact flowers, feed terpene pathways, and provide sugars/precursors that support aroma and density.
• Plagron Sugar Royal: acts as a carbohydrate/secondary biostimulant — supports microbes and gives a sugar boost that plants and microbes use for energy in resin synthesis.
• Aptus Regulator: supports stress resilience, uptake efficiency, cell wall strength — especially valuable under high light/heat.
• Aptus CalMag Boost: maintains Ca/Mg balance, essential for cell structure and avoiding tip burn when uptake is rapid.
• Strategy: Plagron drives bloom chemistry; Aptus protects physiology and supports clean uptake. With soil heavy on reserves, both are applied as focused steering tools.
⸻
Week 6: What is happening physiologically
• The plant transitions from stretch to stacking: calyxes thicken, pistils begin to darken in the coming weeks, and trichome density increases.
• Carbohydrate flux is prioritized to the floral sink; you’ll see faster water uptake and increased K demand.
• Leaf yellowing in lower leaves often begins around now as N is remobilized to flowers, this is frequently normal in mid-late flower if controlled and not extreme.
⸻
What to expect next (practical timeline & signals)
Expect (over the next 1–3 weeks):
• Continued calyx swelling and denser flowers.
• Trichomes moving from mostly clear → cloudy (you’ll start seeing the ‘frost’ become more opaque).
• Stronger terpene aroma as sugars and PK feed resin pathways.
• Heavier water uptake and faster EC changes between runs.
Don’t expect (yet):
• Final resin peak — that typically comes later (weeks 7–10 depending on genetics).
• Immediate massive ambering — amber trichomes usually develop later in the finish window.
• No surprises — biological systems still can flip; remain monitoring-forward.
Watch closely for:
• Runoff EC & pH after a couple of waterings — if runoff EC climbs very high, consider a mild runoff correction.
• Humidity & bud density: keep RH controlled to avoid botrytis (mid 40–55% during heavy stacking; lower as flowers bulk).
• Magnesium / Potassium signs: interveinal yellowing (Mg) or edge cupping/crisping (K) — maintain CalMag and consider K if uptake accelerates.
⸻
Actionable checklist for Week 6
• Continue solution EC ~0.7 and pH ~6.1; treat fertigation as steering.
• Measure runoff EC/pH at least once this week — log the results.
• Keep Plagron bloom stack + Aptus Regulator & CalMag at light doses.
• Keep canopy airflow high; consider lowering RH progressively if buds bulk fast.
• Prepare stakes / soft ties or light trellis for heavy colas (supercrop sites may need support).
• Microscope checks: start daily/alternate-day inspection of trichomes with 30–60× loupe — photograph if you want a timeline.
• Avoid heavy new training; minor tucks/leaf removal to open air/light only.
⸻
A short note on flushing (planning)
• Many growers flush with pH-balanced plain water 1–2 weeks before harvest to reduce soluble salts and tighten flavor; opinions vary. If you intend to flush, start planning timing based on trichome stage, not calendar alone. Your living soil and current low-solution EC approach already help keep things cleaner.
⸻
Final reflection — gratitude & community
Week 6 is where the plant’s intent becomes visible: form into flower, pack on weight, and build resin. Your measured decision to pull back water EC while continuing Plagron’s bloom stimulants and Aptus support is a smart “steer, don’t force” approach that lets the living soil and the plant do the heavy metabolic work.
📲 Don’t forget to Subscribe and follow me on Instagram and YouTube @DogDoctorOfficial for exclusive content, real-time updates, and behind-the-scenes magic. We’ve got so much more coming, including transplanting and all the amazing techniques that go along with it. You won’t want to miss it.
• GrowDiaries Journal: https://growdiaries.com/grower/dogdoctorofficial
• Instagram: https://www.instagram.com/dogdoctorofficial/
• YouTube: https://www.youtube.com/@dogdoctorofficial
⸻
Explore the Gear that Powers My Grow
If you’re curious about the tech I’m using, check out these links:
• Genetics, gear, nutrients, and more – Zamnesia: https://www.zamnesia.com/
• Environmental control & automation – TrolMaster: https://www.trolmaster.eu/
• Advanced LED lighting – Future of Grow: https://www.futureofgrow.com/
• Root and growth nutrition – Aptus Holland: https://aptus-holland.com/
• Nutrient systems & boosters – Plagron: https://plagron.com/en/
• Soil & substrate excellence – PRO-MIX BX: https://www.pthorticulture.com/en-us/products/pro-mix-bx-mycorrhizae
• Curing and storage – Grove Bags: https://grovebags.com/
⸻
We’ve got much more coming as we move through the grow cycles. Trust me, you won’t want to miss the next steps, let’s push the boundaries of indoor horticulture together!
As always, this is shared for educational purposes, aiming to spread understanding and appreciation for this plant. Let’s celebrate it responsibly and continue to learn and grow together.
With true love comes happiness. Always believe in yourself, and always do things expecting nothing and with an open heart. Be a giver, and the universe will give back in ways you could never imagine.
💚 Growers love to all 💚


Likes
29
Share


@Drgreenthumb627
Follow
a really interesting plant, old school from the piney skunky smell to the christmas tree bud structure, i can already tell this will be one of my favorites

Likes
49
Share


@Roberts
Follow
The Mandarin Squeeze sisters have been making good vegging progress this last week. I changed the solution on them a few days ago. The ph has been very stable, and good growth has shown this. They got some further lst and selective defoliation today. Everything is going really good at the moment. Thank you Terpyz Mutant Genetics, and Spider Farmer. 🤜🏻🤛🏻🌱🌱🌱
Thank you grow diaries community for the 👇likes👇, follows, comments, and subscriptions on my YouTube channel👇.
❄️🌱🍻 Happy Growing 🌱🌱🌱
https://youtube.com/channel/UCAhN7yRzWLpcaRHhMIQ7X4g

Likes
7
Share


@NCgrower252
Follow
The plants are growing nicely! They were all flushed with plain pH balanced water on Friday and will be fed nutrients listed above on: 5/31

Likes
10
Share


@ButterfliesLittleFarm
Follow
Hello Diary,
Purple Lemonade has reached the end of the third week of flowering, and as you can see in the photos, it looks great.
The plant has stopped growing, barely 1cm this week. 61cm tall is great considering the height of my grow box.
Purple Lemonade has formed its final shape and will now direct all its energy into the development of flowers.
The main cola dominates above the other branches and is completely covered in flowers that are already covered in trichomes.
All three plants have started to smell more intensely, when I open the grow box I immediately feel the smell that overwhelms me.
The leaves are a healthy green color, there are no signs of a lack of anything.
It is obvious that the new nutrients Bio Grow and Bio Bloom Fertiliser are doing their job great.
Watering has become more frequent, the plants have become much thirstier.
I continued to add CalMg and Bio Bloom Fertiliser with each watering.
All in all, I am very happy with how Purple Lemonade is progressing,
I try to provide her with the best possible conditions and she returns the favor in her own way.
Here is what the past week looked like.
29/08/2024 - Day 36.
Watering.
I prepared 9 liters of water, added CalMg and Bio Bloom Fertilizer and lowered the p.H. to 6.0.
With that amount of water, I watered all three plants on the "Farm".
01/09/2024 - Day 39.
Watering.
I repeated the same procedure as three days earlier.
03/09/2024 - Day 41.
Watering.
Same procedure.
04/09/2024 - Day 42.
End of the 6th week, or the third week of flowering. Photographing and measuring the height of the plants.
Purple Lemonade - Day 42. - 61 cm.
That's all from me for this week, see you soon.
Likes
31
Share


Likes
28
Share


@Salgeezi
Follow
Growing fine. I just have tendency to get stoned along with a pair of scissors in my hand and go to town on the girls. Still trying to fill the tent which I don't think is fully going to happen
Still deciding if I'm going to out a screen on


Likes
10
Share


@SkunkyDog420
Follow
Hallo zusammen 🤙.
Sie wächst sehr schön und macht keine Probleme
Rabattcode für den BIOTABS-Webshop https://biotabs.nl/en/shop/ GDBT420, damit erhalten Sie 15 Prozent
Processing
Likes
41
Share


@Silverback_Guerilla
Follow
12/20 - 12/26:
Busy week...Merry Christmas!
...will update later-


Likes
9
Share

@Kali_flauer
Follow
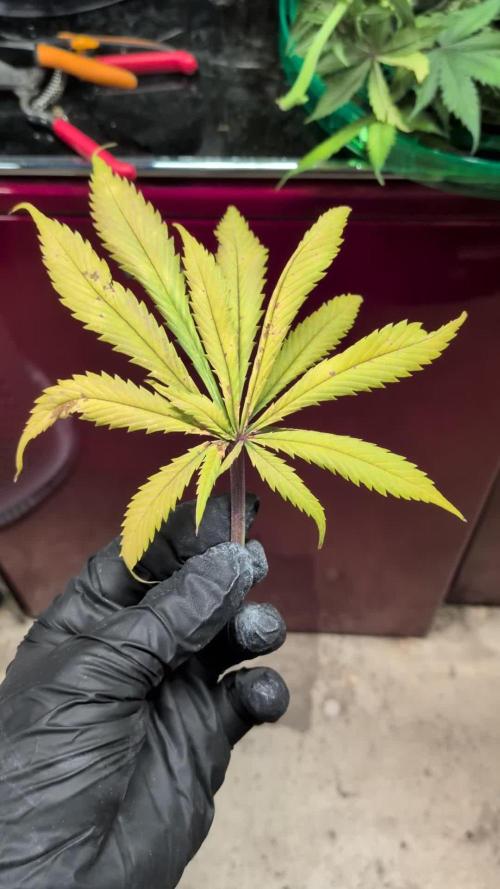
Chopped 04/09/26Purple Lemonade definitely surprised me in many ways. She unexpectedly showed very strong sativa traits after a very short and stocky indica veg period. She was the only plant in the grow to suffer major issues (pH dropped to 5 in runoff a few weeks ago) which was a little frustrating. I was going to give a lower rating, but the more I look back on it, the more I realize that if I was more consistent in how I am monitoring my plants, her issues could have been entirely prevented. Really my biggest issue is just her growth pattern and overall structure. LST in veg was virtually impossible, then when she started her stretch she was growing an inch per day! Very difficult to manage, and I agree with other opinions that she is nitrogen sensitive. Be very careful to not overdo it on nutes and she will reward you for the work.
Her aroma is nowhere near as powerful as LCCs, but now that they are apart I am finally able to pick up some of her nuiance. Very similar in scent to LCC, but she has retained more of the sweet side of the aroma since the chop. I'll be very curious to compare the smoke between the 2. Anyways, thanks for checking this out, I'll have everything uploaded when it's ready in the next week or 2. Happy growing 🌱
04/15/26 - got her all chopped, trimmed and dried. Her total smokeable bud weight came out to 32g. While I'm happy overall, it's a shame because she easily could have yielded 2+ ounces. I threw close to half of her in the trim because the smaller buds were loose, airy, and full of leaves. Wouldn't have been worth the 6 hours of trimming for a few more subpar buds. The rest of her is alright, still nowhere near as dense as I would like, but that's likely my fault and not the genetics of the strain. Will update again one last time in a week with the smoke report.

Likes
34
Share


@TripleCcannabis
Follow
Going into week two I did a reservoir change and added 1 tsp of GH Floramicro, Floragro and Florabloom for a total of 3 tsp of base nutrients instead of 3 3/4 to try and combat the yellowing of the leaves. Iv also added 18 ml of B-52 to help alleviate the stress this girls experiencing. May increase nutrients dependent on leaf colour and how much water/nutes are used over the next few days. I will also be adding in some benificial fungi + bacteria and some calmag. This will happen over the next few days as I dont want to shock her. After adding the calcium, magnesium and iron the yellowing improved significantly. As you can see in the video from day 13 though the roots are a little brown. I did add RAW microbes and im wondering if the browning is just a stain. If not though, being new to this I don't know if this amount of browning is something to worry about just yet. On day 13 I removed the plant dome as my humidifier finally arrived. Nice bonus is my temps went down since its a cool mist humidifier. As of day 13 I'm running at 60% RH and 23.5 C. Any comment to let me know your take on the root browning would be awesome. Thanks for following.