Likes
Comments
Share


Likes
4
Share

@Flavors
Follow
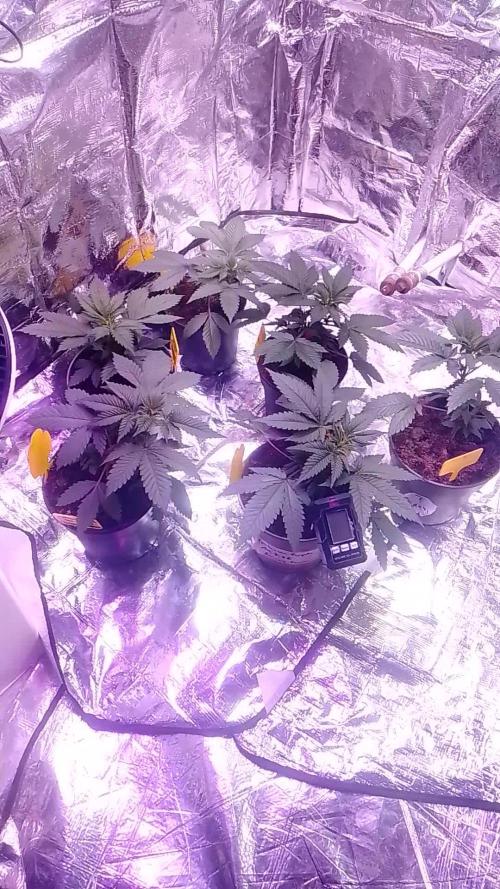
🌱 Sticky Broccoli – Grow Diary 🌱
Week 8 | Vegetative Stage | Coco + Perlite
This week continued with LST and additional topping ✂️🌿
Plant is responding well with multiple new tops forming.
Canopy is becoming wider and more even 🌐
LST is keeping growth low and spread out for better light penetration.
New shoots are developing rapidly from all trained branches 🚀
Structure is now bushy with strong lateral growth.
Stem remains thick and flexible, handling training well 💪
Foliage is healthy green with no signs of stress or deficiency.
Roots fully established in the larger pot ?
Watering consistent with light runoff 💧
Environment remains stable with steady airflow 🌬️
📈 Focus next week: maintain LST, stop topping soon, and begin final canopy shaping before transition to flower 🌸🔥
Likes
14
Share


@GodZilla_Owner
Follow
Week 7 – Day 51 (BT27)
A quiet week for RedPure#4 – mostly just watering, observing, and removing an occasional leaf 🍃
The stretch seems to be coming to an end. Height is stable at 40 cm, and space is still manageable 😅
Her buds continue to swell and look very promising 🍇
However, the drain pH remains low at 5.7, which might explain some of the issues she’s showing.
After some digging, I suspect the combination of BioBizz soil and Advanced Nutrients is the cause.
BioBizz relies on microbes for pH buffering, unlike Plagron or Canna, which use dolomite lime.
On top of that, I’m feeding the microbes with Bud Candy – which likely lowers the pH even further 🔬
📌 Takeaway: If you're using Advanced Nutrients, a substrate like Plagron Growmix or Canna Terra might be more compatible.
With BioBizz, the pH in runoff stays constantly low despite using water with pH 6.6.
RedPure remains the most sensitive strain in the tent – but also one of the most aromatic 🌸💜

Processing
Likes
32
Share


@Platinouuu
Follow
Saludos mis amigos! Muchas felicidades en estos días navideños y salud por el buen tiempo que pasamos a los nuestros. Por aca les dejo el proceso, sigo nutriendo solo con agua, pero en estos días usare solo RECHARGE para así darle un toquecito adicional. Me gusta ese producto, me ha hido muy bien con el. Siguen creciendo los masos de moñas, se tornan cada vez mas color vino, rojizo. contentas, olorosas, frutoso... les comento que es como cuando te pasan una barra de STARBURST POR LA NARIZ... JAJAJA! 😇 disculpen la analogía, pero literal es como les comunico. MUUUy contento ésta navidad con los resultados. Seguimos creciendo, deseando que les valla mejor, un abrazo... BUENOS HUMOS!


Likes
102
Share


@Aleks555
Follow
Hello everyone. The week went well, our girl is growing, enjoying a diet of 2000 ppm. On December 17.12.2023, we'll switch the light to 12/12, it's time to start flowering.
We took clones from our girl on December 10, 2023. The clones look healthy, but I haven't seen any roots yet, so I'm not sure whether to switch our girl to flowering or wait a bit longer. You'll find out about my decision next week. Don't forget to leave comments and ratings. Thanks, everyone.

Likes
11
Share


@madlangs
Follow
All going very well. They have a crazy stretch on them.
18.3.23
Turned tap back on when lights came on
22.3.23
Gave all 7ml pk 5-8 3ml acti Vera, and gnatrol 4ml bio heaven and recharge each in 1L water from top
Ph 6.1
Ec 3.0.
Ppfd around 900
Had to put pineapple chunk outside. She got pushed out of the room watering from the bottom like in room
Mont Blanc 56cm
Blue sherbet 94 +75cm
Purple punch 96 + 100cm
kush mints 106cm


Likes
24
Share


@AsNoriu
Follow
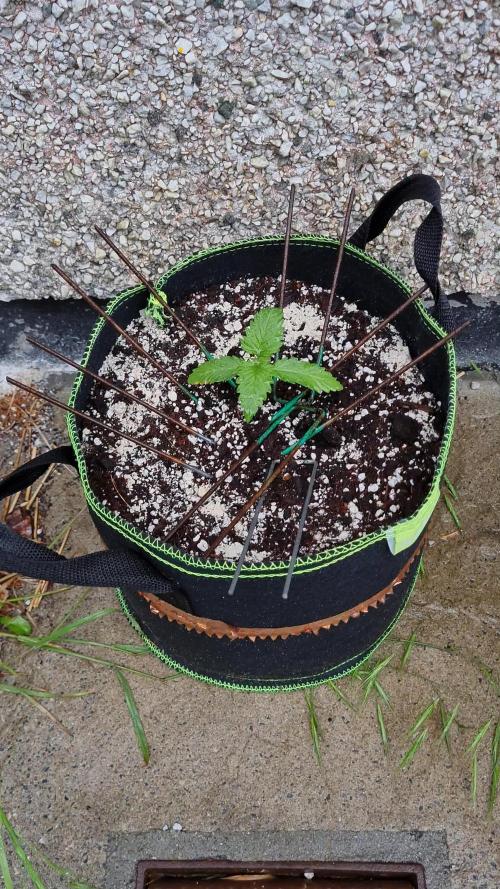
Day 29. Girl is going , a bit slower than Ice, i was hoping Chocolopez will be same big runner, still very nice plant is forming.
Mars TS1000 - Light is solid and does job. For last week output is on max . Still rotate a lot, but am happy with development. I miss more good wind inside, but i live in shared house ;)))))))))))) even really silent air system is still loud on desired speeds ...
Hope next week ill send her to flower. Will top up with Worm Castings and Mycorrhizae during training in few days, when girls will be watered next time. Rhythm is good, every 3 days pots are light. 1.5 liters to each went straight in after photo shoot.
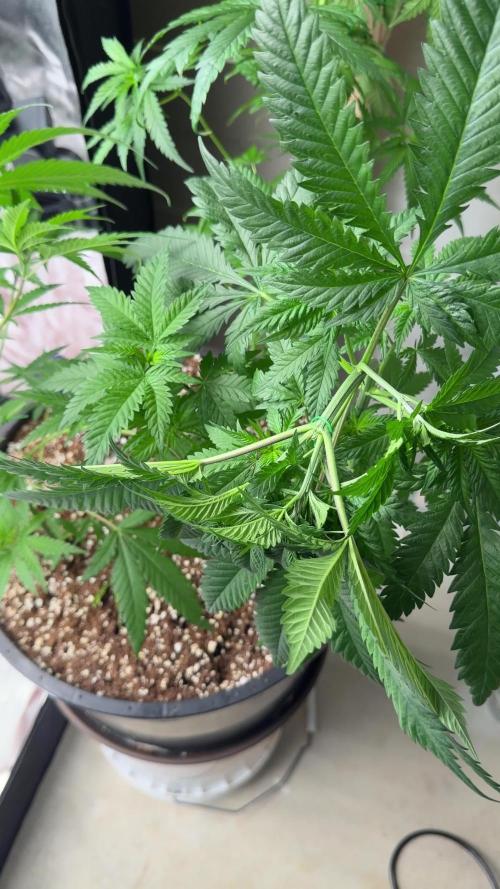
Day 31. Applied BioBizz Leaf Coat when lights went off. Loads of training was made today too.
Day 32. Now girls are trained daily. Top shoot twisting, leaf tucking, rotation around axis , changing positions inside of tent and so on. Always wash hands before any training, it is a must.
Still havent made mind, scrog or lst ... Think tomorrow will be watering day and i have to decide which way to go , i am fliping them at next watering 100%, otherwise again rush to harvest before late spring holidays ...
Happy Growing !!!

Likes
36
Share


@Ganjagrandaddy
Follow
Day 27 from seed: An exciting week this week with a change to Mega crop. This nute has it all and even my Los girls are responding well to it. At 1g/L it is keeping them very happy at the moment. Seeing how quickly they have grown this week is a comfort tbh. The last thing I want is 1oz plants. Inwont be working the #1and #2 too much as they are fairly squat. # 3 is getting well over her pot edges so will be a good trainee I hope.

Likes
31
Share


@valiotoro
Follow
Beautiful buds super sticky✂️
Delicious smell something new to me!
Cant Wait the curing to taste this beauty
Likes
14
Share


@GrowWithTheFlow710
Follow
Long time extractor, first time growing (both s/o and myself). Already starting the next grow.
This was one plant/pheno in a 4x4 sharing a 600w light @ 75% or less the entire time. Only tracking ONE PLANT this harvest but for reference - we pulled just over a lb dry weight total from all 4.
End dry weight - Buds: 104 grams - Sugar Trim - 35 grams
End flower rosin - 14.5 grams (1st press) - 1.2 grams (2nd press) [Press 96 grams] ~15% yield (not great but expected from autoflower)
Chopped a little earlier than desired (10/70/20 amber/cloudy/clear profile) due to a scare of a nanner. Being new growers, we recently learned we could have plucked the nanner off and let it flower another couple weeks. Dried branches at 65-70f/55-60rh for 7 days then stored in grove bags until pressed in 37u micron bag, ~180f, 2.5min.

Processing
Likes
22
Share


@Hawkbo
Follow
Finally got my buddy to come out and add in a 20 amp outlet so I can fire up a better light. Still using quantum boards but with a 4500k spectrum. Got in a foliar with the Growzyme from green buzz liquids. Fed them right before I took the pics they look a little sad but hopefully they bounce back quickly. Not much else going on.
The code bangdang will get you discounts at..
Gorillagrowtent.com
Rainsciencegrowbags.com
KindLEDgrowlights.com and more (see Instagram Bio for @bangdangbuds)
Also check out my Instagram if your interested in entering a giveaway for a green buzz liquids starter kit including some living organics, fast plants spray and some seeds of the winner choice.
Likes
10
Share


@TiRobotProds
Follow
Bonjour à tous nous sommes à la semaine 7 de végétation, elle se développe bien.
Likes
20
Share


@Wackytabacky_420
Follow
🚨 Northern lights week 10 update 🚨
🚨 week 7 of flower!! 70 days old!! 🚨
Hey fellow growers!! This is my last post of this Northern lights before chop!! She is being flushed in prep 4 harvest!! She has matured nicely with every moment given under her beautiful light by...
💡light sponsor💡
@marshydro_amazonled
@marshydro12
#marshydro
#TSW2000
Low stress training clips-
@madmadameplant
@madmanplant
Www.madmanplant.com
Other companies in this grow-
@foxfarmsoilandfertilizer - 100% ffof
@acinfinityinc - fabric pots
@generalhydroponics - flora trio line
@vivosun.official - inline exhaust fan
@opulent_systems - 4x4x80 grow tent
@growerschoiceofficial - 1 Northern lights seeds
@inkbird_official - temp and rh controls
Her feed has been ph water 4 the week. Well stay posted 4 wet and dry weights!! Thanks 4 the support and checking out my page. Best of luck and Happy growing!!🌱💚💨🔥🔥🔥

Likes
85
Share


@420DeepGrow
Follow
Estoy muy contento con esta genetica y con este grow, gracias @Seedman.
Quinta semana de floración, se esta terminando de formar una linda colita y se esta llenando de resina. Comienza a oler, sus aromas son muy frescos.
📅 Dia 29: Riego con nutrientes EC 1200, EC escurrida 1750
📅 Dia 30: Riego con nutrientes EC 1200, EC escurrida 1750
📅 Dia 31: Riego con nutrientes EC 1200, EC escurrida 1750, cada vez se nota mas la linda cola que esta haciendo
📅 Dia 32: Riego con nutrientes EC 1200, EC escurrida 1750
📅 Dia 33: Riego con nutrientes EC 1000 EC escurrida 1650
📅 Dia 34: Riego con nutrientes EC 1280 EC escurrida 1750, la planta acepta la comida que le doy perfectamente.
📅 Dia 35: Riego con nutrientes EC 1280, no dejo escurrir agua

Likes
20
Share

@420DeepGrow
Follow
Así finaliza una increíble cosecha de Papaya Zoap de Sweet Seeds !
Desde el inicio, esta planta demostró ser robusta 💪 y fácil de cuidar, con un crecimiento rápido y resistente. Durante la floración, los aromas tropicales empezaron a destacar, anticipando lo que Sería una experiencia única. Los cogollos están densos, cubiertos de resina y con un aroma increíblemente dulce, con toques cítricos y exóticos. En cuanto al rendimiento, ha sido bastante satisfactoria, y la calidad de la hierba es de primera


Likes
8
Share

@KnightRider
Follow
Hey Cannafam Happy Monday 😊
Its been a pretty good week for my gal, we started the week with really hot weather for May, with temps of 30c daytime and 18c at night, the tempratures have slowly tapered off daily by a couple of degrees each day and by Thursday - Saturday we were looking at 22c daytime 14c nightime.
The days have been solid sunshine with humidity about 55 until today when its been raining all day, current temp is 17c and humidity has shot up to 97. Daylight is currently at 16 hours 7 minutes currently.
With all the Sun this week shes had good solid growth and is just starting her 3rd set of true leaves and is looking nice and healthy 😊 No feed again this week just great white with every watering.
I have had a slight issue this week when the wind blew the diamatous earth onto a couple of leaves, i've now learnt from this that it actually breaches the leaves cell walls and causes damage, in the picture showing this it looks like nute burn or potassium deficiency but i observed the effect a short time after and gave her a very gentle finger tip wash. Im now thinking of putting the powder around the pot but thats not much good when raining. On the squirrel front the turf pins are working, i know this as both pots were side by side and my little friend tried to dig up my other grow!
The weathers looking a bit more unsettled for the next week but with her solid start hopefully she should be ok.
Thats all from me for now, thanks for stopping by 😊✌️