
Likes
Comments
Share


Likes
9
Share


@TiRobotProds
Follow
Les pompoms commencent a se former belle structure de cette plante. Boit énormément. Les engrais se mettre en marche et cela fait une énorme différence.

Likes
5
Share


@SkunkyDog420
Follow
Hallo zusammen 🤙
Sie wächst sehr schön und macht keine Probleme
Rabattcode für den BIOTABS-Webshop https://biotabs.nl/en/shop/ GDBT420, damit erhalten Sie 15 Prozent


Likes
15
Share


@Herbinator
Follow
AMAZING WEEK! The environment is reading for flowering. Lighting, feeding, watering, air temp and CO2 are all stable and should give my plants a stress free life.
Humidity is still high, so I'll need to come up with a plan for dealing with that ASAP.
I've introduced CO2 into the grow with my brand new AirBomz unit. It uses a light sensor that releases CO2 when the lights turn on, and then uses a timer to release every 2hrs until the light switch off. I doubt I'll reach the 1200PPM stated by the manufacturer, mainly because I'm running an extraction, but I figure some is better than none. Cool controller also included.
After doing some reading I can see there's two things that I need to look out for:
A) Switching off the extraction so it doesn't suck away the precious CO2 before the plants have had a chance to absorb it
B) Making sure the room doesn't get too hot whilst the extraction is off, causing heat stress
My solution is:
A) Switch off extraction for 15mins at the AirBomz 2hr interval
B) Use the Temp Controller the switch off the circulation fan when temp exceeds 27C
C) Controller then switches on the active intake when temp exceeds 28C
D) Temp is held at 29C whilst the extraction is off
D) Extraction turns back on after 15 mins, temp drops below 27C
E) Temp controller switches off active intake...
F) ...And switches on the circulation fan
G) Repeats every 2hrs
NEXT WEEK:
Work out how much the girls are drinking! I'll know when I change the reservoir.

Likes
68
Share


@I_and_I
Follow
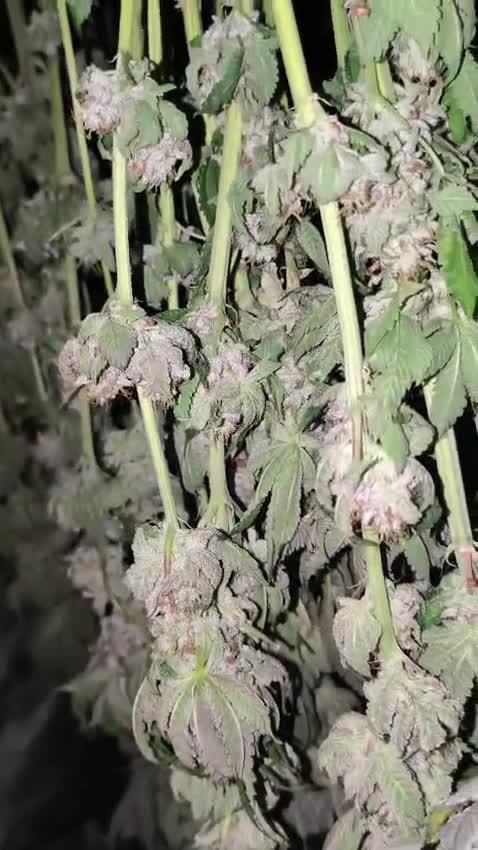
I had fun with this barneys gorilla zkittlez, although it seems like it was ready around 7 weeks, its as if the plant has been in the early stages of self seeding when I've harvested on day 54~ of flower.. Can't think any other reason why this would've happened
Anyway overall the bud is 95% amazing, just a slight sadness at the miniscule seeds forming close to the stems in the centre of some buds that takes away from the taste a little

Likes
77
Share


@ArucambaAutoflowers297
Follow
4 of the ladies are 13 days old and 1 is 7 days old and had a rough start when she sprouted. Last grow i got a bit too comfortable and fed way too much which i believe caused the lockours since my runoff was good. Its my 4th grow and ill be doing "water,water,feed" till flower, maybe "water,feed,water" if everything goes great. I really want to avoid future lockouts. What is your technique. Id love to hear from you guys how you avoid lockouts. Happy New Year!!
Likes
36
Share


@OGTrauma
Follow
Hi Potheads, During the course of the week there was a small addition of 3 More CFL LIGHTS through the use of Splitters and sockets thus freeing more outlets, the remaining were programmed to have different schedule that had increasing / peak /decreasing intensities of light sources according time before total blackout, harshly emulating outdoors but with the benefit of keeping thermals , consumption and electronics lifespam at range.
VEGGING WEEK TWO:
10 days of 21 vegging remaining if everything goes according to the plan but there is an impending menace that has to go out before putting plants to flower . Plants had a good growth response to the budget light, used soil and non-canon nutrient combos , but in the aspect plague control has been a bit more tedious, and even through im using an agressive product (Aceite de Springhill - Anasac) it does keep them at bay but it doesn't totally eradicate them, seeing a few small flying white dots and some moths when plants are shaken in search of bugs , having really low stretch horizontal plants does make harder to inspect the reverse of the leafs, some of them with clear signs of being chewed , and the bit size is like a hole made with a mechanical pencil and that can react to pesticide toxicity if overdose.
This is totally my fault because the reused soil with a lot of organic content is a perfect host for plagues and doing aggresive LST is easing the way to climb or jump towards the plants for any bug.
For plant placement inside the tent , u can use week 1, pic 1 for reference.
G13 Hashplant : The four specimens are the most affected by plagues persistence, because they have the most vegetal mass and trained branches that vermin can hide. In consequence, it also has received more spray doses of Aceite de Springhill (paraffin oil) and this losing battle contrasts absolutely with their spectacular growth , ramification and thick stems.
Santa Bilbo: The four specimens received topping with lst through last week, if there is a net above their cup, its because i already know that when it's stretches, it shows ALL her sativa ascendancy, don't believe in her morphology, preflowering is very messy indeed!. Also, The nutrient deficency didn't had heavy impact on the plants after they were transplanted and received both nutrient & plague control formulas.
Eleven Roses: All the plants were healthy but with different vigor, making the desition of the ones that will stay inside according to their reaction to topping. Eleven roses, althrough is declared 100% indica by her crushing effect, it can present phenos with longer internodal distance and flowering stretch , so i reccomend a bit of height control in it's grow stage as well.


Likes
16
Share


@willertex
Follow
📅 D50 - 20/12
📜 Advanced Nutrients Setup
✍️ 1.4 EC
♒ 6 pH
🌊 10 L
📏 50 cm
📅 D52 - 22/12
📜 She goes better now
✍️ 1.4 EC
♒ 6,4 pH
🌊 10 L
📏 50 cm
Likes
145
Share


@biggreens420
Follow
Going into flush this week for 2 week ph6 water with terpinator trichs are nice and cloudy hairs are less visible I think shes ready what do you guys think? a good week could do with a bit more swell buds are nice and dense pungent and extremely sticky frost is unreal looking forward to getting this girl down thanks for reading happy growing guys..


Likes
167
Share


@PapaNugs
Follow
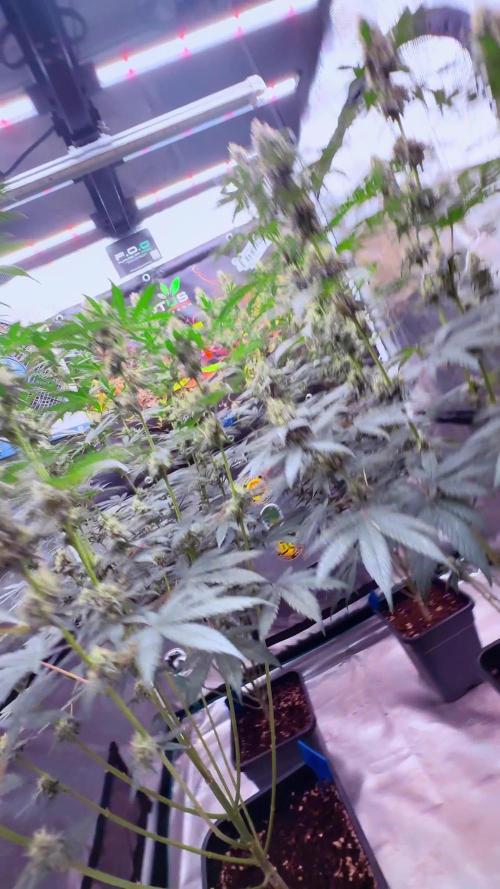
Was another good week of growth. After getting transplanted, the girl got topped. She took a few days to fully recover. Whether that be from topping, transplanting or most likely both, we are on track again.
Dimmed to 40%
Here are the lights details:
Medic Grow Mini Sun-2 150W LED
Model: MN150-022
Spectrum mode: V1
Efficacy: 2.8 umol/J
Thanks for stopping by!
You can find the light on Grow Diaries:
https://growdiaries.com/grow-lights/medic-grow/mini-sun-2-150-watts
You can find the light on Medic Grow's website:
https://medicgrow.com/

Likes
34
Share


@PabloTheGrower
Follow
What's up growmies,
We reached the final stages...almost ready to cut. Its probably going to take an extra week compared to the Strawberry Cola. But the productions is maybe 30% more on this one. Veery long staked colas. Starting at the bottom of the plant all the way to the top. Sweet and fruity smells and drinking almost double the 💧 water compared to her neighbour.
One more week of nutes and then another week with plain water is what she'll have probably.
The root is a giant, white ball filling half the bucket space. I've used great white which from my experience is very very good. Doesn't perform miracles like Jesus though. The water temps in the reservoir needs to be in the correct range or else it almost always will develop phytium.
If you can't keep the water cool ( 17/21ºC) you're better off with a steril system using H2O2.
See you guys next week.
Good grows
Likes
61
Share

@daggaDNA
Follow
DAY36🌻BIG BLOCK
Bred by
Cannabis Brothers California
Lineage
Blockberry x Motorbreath 15 (Legend OG)
Tap water feeding (Premium program)
Aptus
Light (BS600) + UVA/UVB 3hrs daily
@future_of_grow
Soil (lightmix) & pH
Plagron
Tent size
4x4 (120x120)
Pot size
6L (1.6 gal)
Media sponsor
Skunk Magazine
5th week of 12/12 ended for my Big Block by Cannabis Brothers California.
As you can see, I don't do heavy defoliation on my plants as I think it's not natural to shock them like that. I don't give a flying f@ck about yield. My philosophy is turned towards good flavors before all and I like to follow plants development in more natural way when comes to defoliation. I believe that plant will always adapt and focus on where energy comes from, and in indoor grows we all know that bottoms will get bleachy as we enter late flowering. On the other side, nobody wants mids and small buds, so yes, of course I remove bottoms, but only first few nodes and not in a way of lollipopping or something like that. I'm just trying to be in balance with natural process of plant development at all times. I'm not saying defoliation is wrong, but since I never grow the same cultivar twice, it's way safer to observe their natural behaviour, instead of forcing techniquies other growers are claiming to be "the best".
With that being said, my plants are exploding from happiness, as you can see. I got two of more indica leaning phenotypes and two taller - more sativa alike specimens. But all have a distinctive OG structure and smell is getting super intense. It smells diesel and chem like no run before. It's the reason why I'm growing it in the first place. And what better way to try out the true OG than from the original creators of White Fire OG. Yes. If you didn't know Terence and Philip, in collab with Rascal, the real OG's, also known as Payaso and Cannabis Gardener, are behind the legendary OG cross and all the rest are just white labeling this famous cross. Know your genetics, brothers and sisters. There are too many copycats out there, so try to show respect to the origins. Noone can make a patent on a certain cultivar, but we as consumers, need to know who are we going to support in the future. Breeding is art and I like to pay respect to those who actually do the work of breeding. Just look at the Blue Dream for instance. Do we actually know who stands behind this cross and who has the original tissue of this genetics? Ask Google a little bit, dig in, and you'll be shocked. Show respect to those who truly deserve one.
Peace in and out!


Likes
6
Share


@k0nz1
Follow
This week starts with lollipopping. Now the ladies have to bounce back and build Up the strong flowers and resin.
EC raised to 1.6 in the autopot reservoire
PH 5.8-6.2
VPD 1.2-1.3
Lets goooooo
Likes
5
Share


@NicoCordoba97
Follow
Obvesvacion por Maceta.
Maceta 1: Mucha altura y poca expancion laterales, los cobollos se ven con ojitas muy chicas y definidas, no son tan gordos y comprimidos. Satisfecho. 😃
Maceta 2: Creo que tuvo un desarrollo como espere, con cobollos lindos por el medio y una punta imponente, ¿puede que podia ser mejor? no lo se. MUY satisfecho. 😄
Maceta 3: Fue Historia.
Maceta 4: Petiza, con su unica punta que es igual al cobollo a mediana altura de la maceta 2, puede que haya sido el sustrato ya que tanto la maceta 3 como esta 4 crecieron de igual manera, poco desarroyo, mismos cuidados que las demas. Por ovias razones la regaba menos ya que no consumia tanto y deje de darle productos ya que no lo veia necesario. Decepcionado. 😑
Ahora voy a Cosechar. 😎

Likes
11
Share


@Preston22
Follow
Looking a little stressed after doing a little LST but girls looking like they are still fighting.