The Grow Awards 2026 🏆 


Likes
34
Share
@Southwest_budders21
Follow
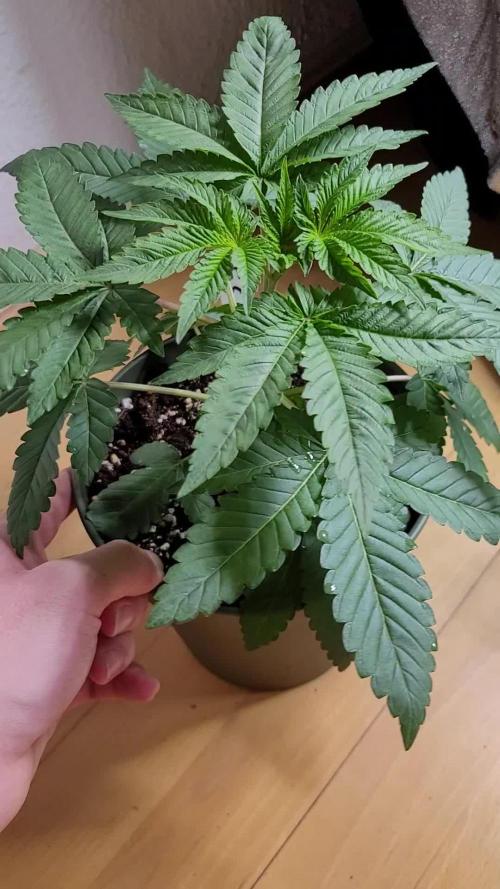
Not much to say at the minute but Candyman is looking happy, I really hope they are female now 🤞🏻 added a small amount of Nutrients and already seems to be loving it and getting bigger daily 😍
Likes
5
Share
@OnlyTomatoes
Follow
[ Information ]
For all grow information, including strain and room details, please see the first week of veg.
[ Updates ]
(Flower) Day 1 - Light intensity increased to 65%. C02 increased to 1300ppm average. Day temp/humidity 85/70 (1-1.2VPD), night temp/humidity 75/65 (.8-1VPD). Fed a diluted compost tea mixture before lights on. Base water was R/O and tap water mixed lightly with silica and Tribus microbes. Tea was a mixture of Fish Hydrolysate, Bat Guano, Molasses, Fulvic/Humic, Kelp, and Earthworm Castings. 8 gallons of tea were added to 72 gallons of water mixture for an 80gal batch total. The batch was mixed for a half hour before feeding to the room. I did not PH or PPM test the mixture, organic material is hard to get an accurate PPM reading so the numbers are useless to me. I will be working to bring the lights to 100% power over this first week of flower.
Day 4 - Light intensity increased daily, currently at 90%. Will raise to full power tomorrow. C02 increased to 1800ppm average. Temp and humidity for day and night are still the same. Lights were raised slightly to maintain 12 inches from canopy height, and a few growth nodes that were above the canopy got topped. Watered today with an 80gal (1.25gal p/pot) mixture, 10% tap 90% r/o water. 6.8 PH, 2.2ec. Foliar sprayed yesterday before lights off with a neem mixture for weekly IPM. Canopies are stretching relatively evenly, though I will be adding in support nets within a few days to help maintain the even spread. I've run this strain before so I'm fairly confident that I know what to expect during these few stretch weeks.
Day 7 - Lights have been at 100% since day 5. C02 still 1800-2000ppm on average. Plants are stretching quickly into the lights, I have yet to readjust their height. The best growth usually happens when I do nothing, and I've done almost nothing the past couple days besides enjoy the unusually warm spring weather my area is currently experiencing. Watered today, 100gal (1.5gal p/pot) mixture, <1ec. Mainly an organic feeding for microbe health, also wanted a bit more runoff than normal due to the high ec feeding previously.


Processing
Likes
12
Share
@BloodBath
Follow
I will be focusing this diary on the smoothie strain but you’ll be seeing some other plants in the tent that are not the same strain. I only have room in this tent so bare with me. There are 2 Smoothie, 1 CNC, and 1 Stardawg (dog). The smoothie are the two bigger ones in the back of the tent.
Now, the Smoothie from FastBuds is just killin it right now. Since I popped the beans they have done nothing but show signs of greatness. I don’t think this one is gonna slow down much either.
I’m going to push these plants harder than my last harvest. I had a really really amazing harvest last time. I was even able to pull sap out of all 4 plants. 2 Zkittles and 2 LSD-25. This was all done by feeding at the right times and keeping a “moist” soil. Also I want add that I ran pretty much the entire line of Nectar for the Gods at a little less then the recommended ratios. This time I plan on going a tiny bit over the recommended ratios just to see what these plants will do. Trust me, if the plants have a bad response I will go back to the recommended ratios.
The reason I want to do this is because I really think these auto strains can handle a lot more than a regular flowering cycle plant would. They can handle more stress, that’s for sure.
When do you think I should add a compost tea into my regimen? Soon or wait till the plant is a little larger?
Processing
Likes
15
Share
@eldruida_lamota
Follow
Que hay familia, yo deseando finalizar estas cookies que han fascinado me tienen, tienen un buen porte y unos buenos satélites, un ejemplar creció demasiado pero not bad.
Ph controlado y humedad / temperatura relativamente dentro de los parámetros correctos.
Nuestras crazy cookies de zambezaseeds visualmente están espléndidas, tienen un verde sano que me gusta, y principalmente no es difícil de cultivar tampoco, hay que tener algo de cuidado con la altura y pasarlas pronto a floración.
Por lo general tienen un buen comportamiento en indoor , así que veremos estas semanas el crecimiento y la formación de las flores.
Likes
6
Share
@mikheil007
Follow
Still going very very well... Vanillla Latte still drives me crazy . Very Strong genetics!


Likes
9
Share
@HashtagHerbs
Follow
Seeds were directly off the mother plant, soaked in water for 24 hours. They were pretty slow to popping and required me to use my fingertips to pop them gently. After that it was 100% successful.
Likes
11
Share
@Papastroumf
Follow
Day 51 : Watered with 2.5L each lady. I added as always 1 co2 tab per 4.5L . Also i added nutrients. The next one will be pure water. She is smelling like bubble bug. She will be very tasty and it is obvious from the terpenes she produces, but she will not be heavy yielder.
Edit (Day 56) : Watered 1.5L pure tap water of 7.5ph and 360ppm. No co2 today. Just pure water with 0.5/L Cal-Mag. Buds are fattening nothing else.

Likes
4
Share
@Be4ry20
Follow
Hello people,
its time for a small update!
My Fillmore is growing strong, the first Nodes started to develop.
The Top Leaves are getting super big and the plant is very wide already. The pot will get too small soon...
I havent used any fertilizer this week, only water. Now I noticed some light green parts in the upper part of the plant, so i will take measures next week against that. Maybe some Boom Spray and/or Fishmix (BioBizz).
Lets hope for the best!

Likes
97
Share
@OrganicNature420
Follow
JungleBoys
Gelato33 x ZkittlezCake (clone)
THC: 30+%
Terp: 45%
Nutrients • GreenBuzzNutrients
(DISCOUNT CODE • (GD42025) %25 off
I use the whole product range and this stuff is a game changer. I've not had one bad grow with this company and it hasn't let me down once. Terps and taste are through the roof. No need for run off in coco only during flush week (i use a 0ppm distilled water) Hands down the best nutrients on the market
GREEN BUZZ OUR NOW GIVING YOU GUYS A SUPER DISCOUNT OF %25 WHEN USING THE NEW CODE ABOVE. JUMP ON BOARD THE GREEN BUZZ TRAIN AND GIVE YOUR PLANTS WHAT THEY DESERVE 💚🌱
LIGHT/TENT • Mars Hydro FC-E6500 5x5 tent
This clone is massive. Hoping to hit 200gs in dense smelly nugs. Buds are rock solid. If you haven't already please give GreenBuzzNutrients a follow and have a serious think about switching. This stuff is just on another level and Organic. Not salts or silicon to ruin the taste and super easy to use 🌱💚
Bubble hash review : most probably 3oz of trim and all the sugar leaves. Easily oz if not 1half. It smells amazing and will be a great smoke 👍🏻 dry weight in a couple of days


Likes
2
Share
@CannaIGrow
Follow
Trop Cherry #8 x BeeJayz hasn’t been topped, I transplanted the girls this week from a 1 gallon pot to a 3 gallon pot. Trop Cherry was in a plastic pot but now in a fabric pot. Plants seem to be growing well.
Likes
14
Share
@Luv2Grow
Follow
Day 78 - The start of week 12 and from looking at her and the trichs, she probably won’t be getting chopped this weekend. Gave her a good flush with the sledgehammer yesterday so hopefully the depletion of nutes will push her to the end sooner rather than later.
Day 79 - Still just waiting but her leaves are starting to yellow a bit so she seems to be sucking whatever she can out of them to finish up. Can’t wait for her to be done to get a taste.
Day 80 - Leaves are starting to fade pretty good now and almost certain I’ll be chopping her this week or this coming weekend at the latest. Trying to push some more amber trichs into her.
Day 81 - No real updates, she’ll be getting the chop no later than this weekend. Most likely on Saturday.
Likes
2
Share


Likes
60
Share
@SooSan
Follow
J'ai divisée la 90x60x140 en 3 parties (et donc 3 Diaries) :
1️⃣
🏠 60x60x140
☀️ FC-E 4800 => puissance a 20%
🍁
1x Black Bomb / Philosopher Seed
2x Amnesia Lemon / PEV Seeds
1x Blueberry / PEV Seeds
1x Blueberry / 00 Seeds
1x Wappa / Paradise Seed
1x Dark Phoenix / Green House Seed
1x Quick Sherbet / Exotic Seeds
1x Mango Cream / Exotic Seeds
1x Banana Frosting / Sensi Seed
1x Hindu Kush / Sensi Seed
1x Fast Mix / Sweet Seed
📎 https://growdiaries.com/diaries/122084-grow-journal-by-soosan
2️⃣
🏠 30x60x90
☀️ TS1000 => puissance a 50%
🍁 4x Fast Mix - Sweet Seed
📎https://growdiaries.com/diaries/124052-grow-journal-by-soosan
3️⃣
🏠 30x60x50
☀️TS1000 => puissance a 50%
🍁 4x Quick Sherbet - Exotic Seed
📎 https://growdiaries.com/diaries/122080-grow-journal-by-soosan
Sponsorisé par Mars Hydro


Likes
62
Share
@Varinaut
Follow
Feeding schedule has been steady with the girls transpiring 5 liters of water and "eating" 8 g of Megacrop and 20 ml of P-K booster per day.
It's about that time when it would be wise for me to freeze my pruning shears in a gallon of ice to help with my impulse control. Geezuz these gals are getting dank. I had been running the 6-in carbon filter only during lights-on but noted a serious spike in terps during dark hours lately that I'm sure drifted to the neighbours, so the grow room air is now being scrubbed 24/7. That doesn't help with the stank that sticks to me whenever I touch the plants or even just go in the room. Candidly, I the smell is addictive to me, but the wife ain't no fan, so I have to do a body douche with alcohol, soap and water whenever I've been in the grow room.
Bo is on the home stretch -- or fattening, at this stage -- with pistils browning across the canopy and trichomes starting to cloud up. I'm starting to believe @PirateJoe and @SativaKid in their mid-December estimates, for Bo, at least. Sophia continues to plug away, getting thick, but pistils are just starting to brown and trics are crystal clear, so 2 weeks behind, at least.
The buds on both plants are developing a texture similar to the Kilimanjaro I grew outside this summer, @PirateJoe and @SativaKid have alluded to this as well: Dense, mushy buds that have an almost oily feel. I'm guessing this is characteristic of Sativas in general? Community input would be appreciated.
I've been increasing the duration of UV exposure by 30 min during each of the 2 daily exposure periods every few days. Now up to 2 hours each period, and since I'm seeing no damage, I'll probably continue to increase the UV so it's on continuously for 7 hrs straight during the middle of the "day."

Likes
12
Share
@B4niTa
Follow
Very easy to grow, this is my second Gorilla Zkittlez and both grew without problems
Likes
124
Share
@Legendaryseedthumb
Follow
Day 1 drying: Really nice strain! Easy to grow, medium dosage of nutrients.
Smells amazing, I’m really curious how they will end up after the drying. Let’s see in some days.
Drying day 7: finished and damn the terps are amazing! Smells and taste amazing. It reminds me of amnesia but in a mix with mimosa. Super special. I do really recommend trying this one out. But I would recommend using living soil over coco!

Likes
16
Share
@Paultemp
Follow
Very Good but he need more time in flower like 2-3week .. I Will do better next time i hope 😂👍
Likes
6
Share
@GREENPHOENIX6262
Follow
12/21 - Swapping lights tonight - running the QB3000 Sunraise (300w) FULL SPEC - adding 11 more plants into my 3x3 bringing the total to 17 clones - micro dosing will proceed as normal 😎😎😎😎😎😎
