The Grow Awards 2026 🏆 


Likes
Comments
Share
@Chucky324
Follow
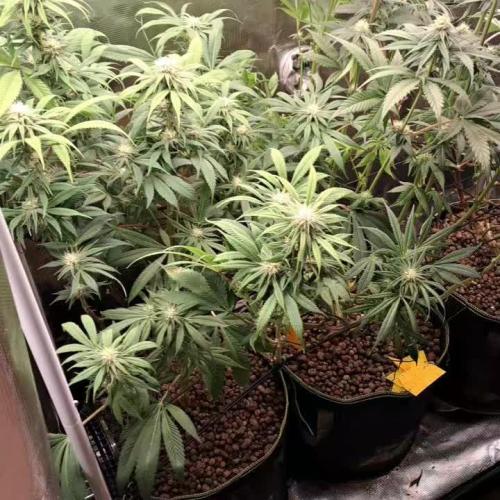
Hello All. I took a lot of pictures. Hope you don't mine, but I had fun. I think everyone likes to see large harvest pictures.
It all started back in early January when I took clones of my favorite plants. It was a cold winter here this year, for these parts. So it was mid March when I got the plants out in the greenhouse. The spring was damp and cold too. I found powdery mildew in the garden about 2 weeks before I found it in the greenhouse. I got it on the Skunkberry and the Burmberry, But not on either Amnesia Lemon or the Sister Amnesia Lemon. I was very pleased about that :) I found some spider mites in the last week and a half. I decided to turn up the fans instead of spray. Yes they still spread but very slowly when they can't spin their webs. I didn't find many when I harvested.
Everything else went well this season. I found a male Dr. Atomic Northern Lights that I liked. So I'll try to make some seeds with the Amnesia Lemon, Skunkberry and the Burmberry. I'm trying to fatten up the Burmberry. I'm interested to see if the Amnesia Lemon gets fatter buds and carries the P.M. resistance to the seeds, I'm hoping.
The tall Sister Amnesia lemon in the middle did cause a drop of production from the plants on either side of it. They were in more shade. Something to work on for next year :)
The Skunkberry had the most P.M. I used a new produce that I'm pleased with, it's White Wash frequency altered water. Knocks the P.M. right out. I found that if you put a large tray under where you are spraying you can catch the run off. I could use it a couple of times with no change in effectiveness. It must be the Scottish in me. I try to reuse or recycle as much as possible. Cuts costs, and help make me feel like I'm doing good and helping the planet.
My feeding schedule was: I had a 15 gallon half barrel and pump with hoses and nozzles. I filled the barrel with nutrient solution and watered by minuets, 15 for clod days and 25 or 30 minuets on hot days.
After 3 or4 days I added water when the solution got low. Mixed new solution once a week, and cleaned the barrel and pump. I also took the hose in the greenhouse and soaked them till run off once a week and measured the ph. I saw a few fungus gnats, but the spiders and nematodes (from my compost I added when I mixed soil) sure help to keep the numbers down.
I like to put my buds in a paper bag to dry and cure. Inside I hang the buds for 3 days before putting the buds in paper bags. But it was so hot in the green house that 2 days was more that enough before putting the buds in the paper bags. The bags sat in the greenhouse for 3 days and then went in to the basement to finish. The old hippies told me that they use to put their buds to cure in the middle of a bushel of straw. I seems that the drying buds gives off a gas, that when trapped around the buds helps to take away the bitterness and raunchiness' of the uncured buds. The bags also help in wicking away the moisture of the drying buds, just like the straw did. After a week I check to see if it is dry enough. If the buds are dense the bag might need to be rehung for a few days to finish. I prefer a dryer bud. I like to hear a light crunch when I put a bud in my pipe. I like to hear a light crunch when I put the bud in a grinder.
> Amnesia Lemon- Plant #1 North plant=343 g.
>Amnesia Lemon - Plant #2 South plant=397 g.
> Sister Amnesia Lemon - Middle Tall Plant=401 g. Winner :)
> Skunkberry - Southern Middle Plant=316 g.
> Burmberry - Plant #1 North Plant=239 g.
> Burmberry - Plant #2 South Plant=294 g.
> Total= 1990 g. or 71 oz. or 4.4 lbs.
In Conclusion: This was my best grow ever! Big thanks to Barneys farm, for great seeds. I've got LSD started and I will try that in the greenhouse next year, 5/5 for mold and pest resistance. I'm very happy with the results. I was concerned because I have 2 rental houses behind me and one of them had a big backyard party at my week 5 of flowering. You could smell the grow by then and I was hoping I wasn't going to get ripped off. I looked through the fence a few days later and saw about 12 large plant pots, growing cannabis. I'm very happy. Cheers Chuck.
> November 3 Added pictures of the seeds I made this summer.

Processing
Likes
11
Share
@BlumenBot
Follow
1/4 - fed 1gal distilled water, 6.0pH. Starting RAW nutes next feeding.
1/6 - first RAW feeding. Came out rather low ppm so I may double my feeding chart for flower. Everything else is looking good.
72.7*F
5.8pH
818 ppm
4g BLOOM
0.7g Phosphorus
0.75g Kelp
0.55g Cal/Mag
0.5g ominA
2g Microbes Bloom Stage
1.25g Amino Acids
0.25g Enzymes
1/7 - dropped the AC Infinity controller to level 2 as an experiment overnight to see how temps will rise in both compartments. Light is at about 900ppfd a few inches below the lowest tops
1/9 - no issues with fan speed at 2! RAW feeding tonight.
70.5*F
6.1pH
1390 ppm
8g BLOOM
0.96 Potassium
1.5g Kelp
0.25g Cal/Mag
4.2g Microbes Bloom Stage
1.25g Amino Acids
0.25g Enzymes
Also found a new way to mix my RAW nutrients without having them stick to the bottom...small landscaping pond pump! It gets the water moving nicely and I just drop the dry nutes in, mixes it for me and I can easily fine tune PH and test PPM without having to shake and take samples! Huge win.
1/10 - She's getting fatttttt!!! Long time to go but just sayin...my lady in veg needs at least 3 weeks so hopefully I'm not stepping on myself here soon!

Likes
2
Share
@Grow4ever
Follow
Frohes neues! 🎆
Nach einer Woche Abwesenheit, kam ich heute zu diesen ganzschönen dichten Büschen und bereits etwas entwickelten Buds zurück, die Bewässerung lief top. Allerdings ist mir ein Tripsbefall direkt ins Auge gesprungen, unübersehbar... Entsprechend habe ich dannach begonnen zu defolieren, wir haben Tag 20 der Blüte. Vorallem bei der GSC extrem, da von ihr der Befall ausging. Raubmilden habe ich mir heute bestellt und ich hoffe, mit der starken Entlaubung, die drei noch gut durch die Blüte zubekommen.

Likes
81
Share
@Mrs_Larimar
Follow
Welcome toWeek 8 for the Sherbet Queens
Sunday
Second Week i switched to 12/12
My Girls sit in 20l Airpots , filled with my own Soilmix
They drink around 1,5 L Water per Week
Once in the Week they get a"Hulkmix", That is Aloejuice, Calcium, Magnesium, Silicea, Spirulina, Azospirillium, and Molasses.
Both grow wonderful , and they seem to like it in their HAZELBOX, They are finished with Training, and I wait for Flowers.
They look healthy and green
Wednesday
Today I opened my Hazelbox and WOOOOW....
Girls looking so good, theyve stretched and developed vry nice, I think i can see Tiny preflowers.
They are nice and Green No NUTRIENTS NEEDED
Friday
Looking very good, growing very fast. Looking Healthy and Happy
They show lil Preflowers
Put the Humidifier out of the Box
GUIDE: HOW ZU MAKE YOU OWN CANDYS and
GUIDE: Waterextraction of Cannabis ( INFUSED WATER)
You need:
20 grams of Sugarleqves or/and Flower
200 ml Water
400g Sugar
Juice of a Lemon
A Sieve// Kitchenscreen
Cookingpot
Whisker
Laserpistol// Thermometer
Candymolds, Lolliposmolds
At first you need to make an Canna -Extract
Its easily said a very strong Tea
I take Sugarleaves and Small Flowers to do it
Dry your Sugarleaves and small Flowers for 35 mins at 120 degree in the Oven ( decarboxylate)
around 20 Grams ( or more) decarboxylated Stuff for 200 ml Water
just let it bubble for 20 mins
Use a sieve and get an Extract
Take the Juice of 1 Lemon and you can take in Spices if you want to
Take your Extract in a good Cookingpot ( best is with copperbottom)
and ad double Amount of Sugar
Let it bubble until the Temperature reached above145 Degree
Then all Water is away and the THC is into the Sugar
.......istn it Magic=?😍
Pouring the Sugarmass into the Molds
NOTICE! Always be near the Cookingpot and use the Whisker, dont try to taste the sugarmass.. its foogin hot 👹

Likes
34
Share
@PapaNugs
Follow
Another good week come and gone. A couple of the girls needed nutrients so I add some general hydroponics blend into those that needed them. Didn't seem to make much difference yet. But they are getting into late flower.
The purple lemonade, without a doubt, has the best smells out of the crew. Actually lemonade smelling. Plus the color makes this worth exploring more. I'm not a fan of autos but I might do her again 😂
Dimmed to 80%
Here are the lights details:
Medic Grow Mini Sun-2 150W LED
Model: MN150-022
Spectrum mode: V1
Efficacy: 2.8 umol/J
Thanks for stopping by!
You can find the light on Grow Diaries:
https://growdiaries.com/grow-lights/medic-grow/mini-sun-2-150-watts
You can find the light on Medic Grow's website:
https://medicgrow.com/


Likes
11
Share
@ElGrowLab
Follow
Not much new. Looking forward to see nice big buds in a couple of weeks
Big Lady’s are faster then the little ones

Likes
19
Share
@Weird_Jimmy
Follow
👉The final dry weight, which was 369g (13oz) is just buds, no trim or larf. Just Good big buds. Great plant overall. Had a phosphorus issue that lingered, it foxtailed at the end and in the last day hermie bitz appeared on almost every branch end cola. Sturdy branches, lots of food factories. Wonderful aroma that wasn't as stanky as most. Spend 4 hours trimming. Started at the bottom and worked my way up. I put the end cola of each branch on its own label clothes pin and hung on a rack. Each cola was weighed wet and cataloged. after 24 hrs I started putting each cola in a paper bag and the net buds in a larger bag. It took 5 days to reduce the dry weight to under 30%. When they hit this mark they went into the jars which were labeled according to their documented location. I figured the weigh reduction percentage by comparing weighs from the initial wet trimmed weight. In each jar I also added a hygrometer. Surprisingly the RH of almost ever jar was under 58%. None of the jars required any burping to remove excess humidity. At that point I added moisture 62% moisture packs and put the jars in the closet. I sampled bud J till this writing. It didn't start getting tasty till the 4 week mark.

Likes
38
Share
@LittleBigTrees
Follow
Some are swelling , one is smelling very different to the others .
I seem to have 6 phenos from small to tall and rounded buds to thin spear shaped buds.
I'm not sure which is my favourite yet but one has a very unique smell almost like pineapple and exodus cheese , it could be that one but I also like the bud formation on another,, we will see

Likes
14
Share
@NorthernChemist
Follow
Aug 6: Harvest is about a week away I think. Some very minor aphid appearance on lower undersides of leaves suggest I can't wait too much linger to chop. Colors are developing nicely and the purple tones really punched out this week. Resin is thick caked now and smells of burned rubber funk.
Likes
6
Share
@QuantumB
Follow
Mad stretch this week!
A little bit of nute burn where I overfed but other than that, things are looking good.
Once the stretch has slowed down I will do some heavy defoliation to get things under control a tad but at the moment I'm just letting them do their thing.
Peace!
QB

Likes
23
Share
@eldruida_lamota
Follow
Como estamos familia, a día de hoy, viernes, llevamos exactamente 7 días en la fase de floración y todas ellas están marcadas por su sexo.
Todo va sobre ruedas, tenemos mínimas de 20,5 y maximas de 28,5 grados. la humedad no supera nunca el 60%.
Altura mínima lemon kush 25cm.
Altura maxima northern light xl 42cm.
•las power plant xl Han pegado un estirón serio, están empezando a ensanchar bastante.
•una marea verde desde semilla, con tan solo 5 semanas de crecimiento y un solo trasplante desde que se germinó, para controlar un mal crecimiento.


Likes
4
Share
@Shiva
Follow
I've noticed about 20cm growth this week. Scrog set up and water cooler keeps it at 19°C. Will do some lollipoping at the end of this week for the last time
Likes
2
Share
@Krautis_IndoorFarm
Follow
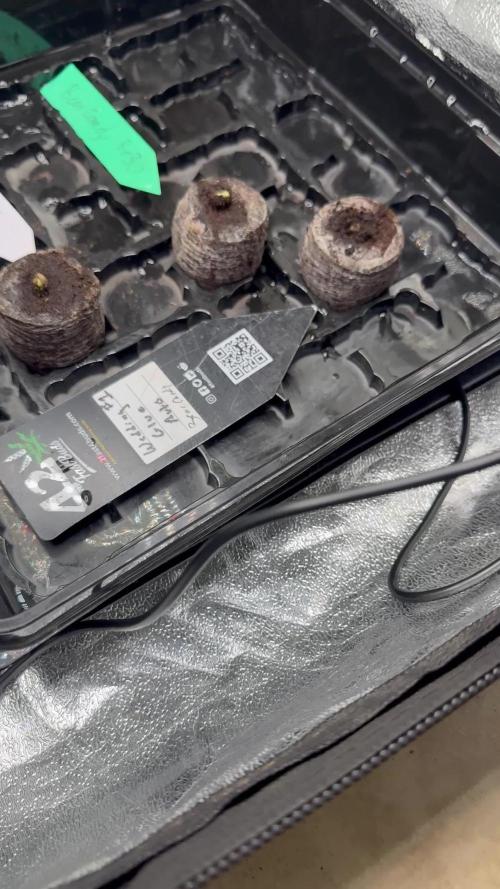
🚀 13 Tage Power Wachstum, Nächster Meilenstein erreicht! 🌱
Wahnsinn, wie schnell das geht! Unsere vier Ladies Oreoz Milkshake 🍪🥤 und Z-Valley 🌿 von @positronics_seedsarg sind mittlerweile 13 Tage alt und sie legen einen unglaublichen Turbo hin!
Der Fortschritt ist atemberaubend. Die Sämlinge haben sich in der letzten Woche prächtig entwickelt und sind bereit für das nächste große Abenteuer!
🌳 Die Vegi-Phase beginnt offiziell!
Die Wurzeln sind stark, die ersten Blattpaare wachsen rasant, und die Pflanzen saugen das Licht förmlich auf. Das behutsame Gießen und die Pflege haben sich ausgezahlt. Nun steht der entscheidende Schritt bevor:
➡️ Nächster Halt: Umzug ins neue Zuhause!
Wie angekündigt ziehen unsere Power Ladies bald in den nährstoffreichen Living Soil von @panova25.de um, um ihr volles genetisches Potenzial zu entfalten. Das wird den nächsten großen Wachstumsschub auslösen! 💥
Bleibt dran, um den Umzug und die explosive Vegetationsphase zu verfolgen! Welcher der vier Töpfe wird wohl der schnellste sein? 🤔
Folgt unserem Projekt für tägliche Einblicke in unsere Grow Journey! 👀
🤝 Partner & Support: @canna.community.germany
🌱 Seeds: @positronics_seedsarg
🏗️ Setup & Living Soil: @panova25.de
📸 Projekt: @krautis_indoorfarm
#Tag13 #Wachstumsupdate #VegPhase #IndoorGrow #CannabisCommunityDeutschland #PositronicsSeeds #LivingSoil #GrowJourney #OreozMilkshake #ZValley #CannabisAnbau #PowerLadies
@cannacommunity.deutschland
@canna.community.germany


Likes
Comments
Share
@NAG420
Follow
Wow this run has been good 1st week in she is up and out had to adjust the light for her will be transplanting into her resting place 5 gallon fabric pots.
Likes
34
Share
@MadeInGermany
Follow
Info:
Unfortunately, I had to find out that my account is used for fake pages in social media.
I am only active here on growdiaries.
I am not on facebook instagram twitter etc All accounts except this one are fake.
Have fun with the update.
Hey everyone ☺️.
This week she has developed beautifully 😍👍.
No training was done this week but next week all drives will be topped :-).
It was poured once with 1 l, which is enough at the beginning because the humidity is very high 👍.
I wish you all the best and have fun 🙏🏻
You can buy this Strain at :
https://www.exoticseed.eu/
Type:
Quick Sherbet
☝️🏼
Genetics:
75% Indica / 25% Sativa
Sunset Sherbet X Black Lemon
👍
Vega lamp:
2 x Todogrow Led
Quantum Board 100 W
💡
Bloom Lamp :
2 x Todogrow Led
Cxb 3590 COB 3500 K 205W
💡💡☝️🏼
Soil :
Canna Coco Professional +
☝️🏼
Fertilizer:
Green House Powder Feeding
☝️🏼🌱
Water:
Osmosis water mixed with normal water (24 hours stale that the chlorine evaporates) to 0.2 EC. Add Cal / Mag to 0.4 Ec Ph with Organic Ph - to 5.5 - 5.8 .

Likes
69
Share
@DogDoctorOfficial
Follow
🌸 Eternity Grow Cup — Week 17 (Flower Week 6) Update 🌸
The Final Stretch Begins… and It’s Frosty.
What a glorious week in the tent!
We’re entering Week 6 of flower, and the girls are turning into absolute crystal queens — stacking up from bottom to top with full energy, thanks to a combination of care, perfect tuning, and a whole lot of love.
We’re now 17 weeks from seed, and it shows. This grow has depth, maturity, and structure.
Genetics doing their part.
💡 Lighting tuned to perfection.
🌡️ Climate stable and strong.
🌊 Feeding locked in with fine-tuned accuracy.
⸻
Nutrient Mix & Reservoir Stats:
This week’s reservoir was an art form — mixed with intention, tuned for results, and it shows in the plants’ response. Here’s the formula:
Product.
Dosage (per L) Total for 50L
Regulator
0.15 ml
7.5 ml
System C.
0.25 ml.
12.5 ml
RO W C.
0.8 ml.
40 ml
Green S.
1 ml
50 ml
AIOL
2 ml
100 ml
Final reservoir stats after blending and fine-tuning:
• EC: 2.46
• pH: 6.22 (stabilized beautifully)
• Solution Temp: 19.4°C
Girls are drinking this blend like a fine vintage. Immediate response with increased vigor, color richness, and sparkling frost everywhere.
⸻
🌬️ Environment & VPD:
• Temp: 29°C
• Humidity: 57.1%
• VPD: 1.72 kPa
• CO₂: 600–1200 ppm depending on light cycles
• PPFD: 900–1000 µmol/m²/s — and they’re loving every photon!
We’re riding a slightly warm wave, but with perfect air movement (thanks to our vortex-style airflow), the ladies are thriving. Every leaf dances. Every cola stacks.
⸻
💡 Light Spectrum Tuning:
This week we’re pushing the Model 1s and ICL 300s to their full potential — bringing intensity up across all channels. We’re:
• Ramping up deep red & far red before and after lights-on/off (15-minute transitions)
• Boosting UV to bring that sticky trichome magic
• Still balancing whites for full spectrum saturation
• ICL 300s lighting up lower growth — no bud left behind
This garden is glowing from all directions — full canopy expression from top to soil line.
⸻
✂️ Structure, Lollipopping & Leaf Strip:
After removing the SCROG nets, we did a light but effective lollipop and leaf strip. Airflow improved, light penetration increased, and the girls bounced back with pride. No stress, only elegance.
⸻
📣 Shoutouts & Community Love:
The Eternity Grow Cup is heating up, and we want to send love and mad respect to all the other growers out there — your grows are stunning, your spirits high, and your love for the plant inspiring.
To our sponsors:
💚 Zamnesia – for the magic beans
💚 Plagron – for nutrient mastery
💚 Aptus Holland – for precision in feeding
💚 TrolMaster – for ultimate control
💚 Future of Grow & ThinkGrow – for bringing the light
💚 Grove Bags, Ziggi Papers, Cannakan, ProMix, and all who make this dream real
And to the community — lovers, haters, learners, legends — THANK YOU. You are what makes this journey unforgettable.
⸻
🎥 See More on YouTube & Instagram
📺 Full 4K episodes every week on YouTube
📸 Behind-the-scenes, details & extras on Instagram
Come check it out and ride the wave with us.
💬 Like if you like it.
📣 Comment if you vibe with it.
🌱 Follow — because this grow is just getting better and better.
As always…
Growers Love. Always.
With heart, with hope, with humility.
— DD 🌿
--------------------
Genetics - Runtz https://www.zamnesia.com/6000-zamnesia-seeds-runtz-feminized.html
Nutrients - Plagron https://plagron.com/en/hobby
- Aptus Holland https://aptus-holland.com/
Controls - Trol Master https://www.trolmaster.eu/
LED - https://www.futureofgrow.com/en
LED - https://www.thinkgrowled.com
Soil - https://www.promixgardening.com/en
Germination - Cannakan https://cannakan.com/?srsltid=AfmBOopXr-inLXajXu3QFgKXCXXos4F1oEvScjMKIB5MR5dk8-GJ-F49
DOGDOCTOR 15% off
Smoking Papers - https://ziggioriginal.com/
Terpene saver - https://grovebags.com/
As always thank you all for stopping by, for the love and for it all , this journey of mine wold just not be the same without you guys, the love and support is very much appreciloved and i fell honored with you all in my life
With true love comes happiness Always believe in your self and always do things expecting nothing and with an open heart , be a giver and the universe will give back to you in ways you could not even imagine so
As always, this is shared for educational purposes, aiming to spread understanding and appreciation for this plant. The journey with nature is one of discovery, creativity, and respect. Let’s celebrate it responsibly and continue to learn and grow together!
Growers Love To you All 💚
#EternityGrowCup #RuntzHunt #GrowersLove #CannabisCommunity #AptusHolland #ProMixSoil #TrolMaster #Zamnesia #Plagron #ZiggiPapers #Grovebags
Likes
12
Share
@Archieballs
Follow
Started LST today but as of Day 22 Mazar was 24 cm Daiquiri was 13 cm and Auto Ultimate was 22 cm. They are doing really well and growing fast!! Daiquiri is definitely shorter then the other two but I believe that is her nature.

Likes
23
Share
@HanzGrowz
Follow
They’re all hitting their stride in terms of flower. Chemdawg easily the most impressive bud development/size wise, but Bubba is massive and has a TON of bud sites.
No leaf discolouration at all so I’m guessing the ladies have switched to flower smoothly with the right amount of food in the soil. I top dressed with Gaia Bloom to give them a little extra for the next few weeks as they push forward.
Crazy to believe Bubba might only have 25 days left which means I don’t know if she’ll get fed anything other than water from here on out