
Likes
Comments
Share


@GrowGuy97
Follow
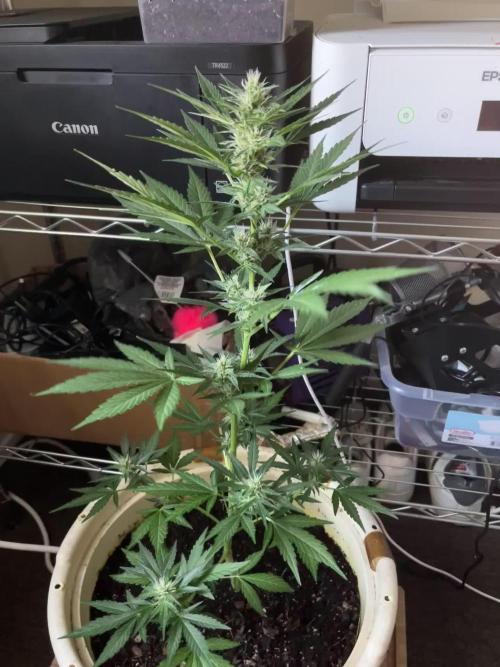
Day 28 - RH 58% Temp 81F . Ladies are growing great, they are really starting to turn into little bushes & the double mainline is going strong 💪🏻 Thanks for following friends & make sure to check back for daily updates! Happy growing✌️🏼🌱
Day 29 - RH 57% Temp 78F . Couldn’t be happier with the growth!
Day 30 - RH 60% Temp 78F . Everything is looking great!
Day 31 - RH 51% Temp 78F . Watered today with PH at 6.5, all 3 ladies are doing amazing!👍🏼
Day 32 - RH 53% Temp 81F . Considering topping the ladies tomorrow not sure yet! Still growing beautifully!
Day 33 - RH 52% Temp is 80F - Bushing out like crazy & growing strong! The double mainline seems to be bouncing back as well! So far very impressed with this strain😍👍🏼
Day 34 - RH 56% Temp is 79F - Decided to top the two bushy plants today, they also got fed today with PH about 6.3

Likes
Comments
Share

@Exr_300
Follow
wow learning a lot now u know why the first experiment grew way smaller but here is the second auto ever grown
Likes
18
Share


@Teo_bkk
Follow
Starting to see nitrogen toxicity in the Solomatic, I'm watering with only PH water since 1 week now


Processing
Likes
42
Share


@Dunk_Junk
Follow
Well she looks a bit better than last week!!
Still chugging along.
6.5cm vertical growth this week.

Likes
14
Share

@Pheno_Minds
Follow
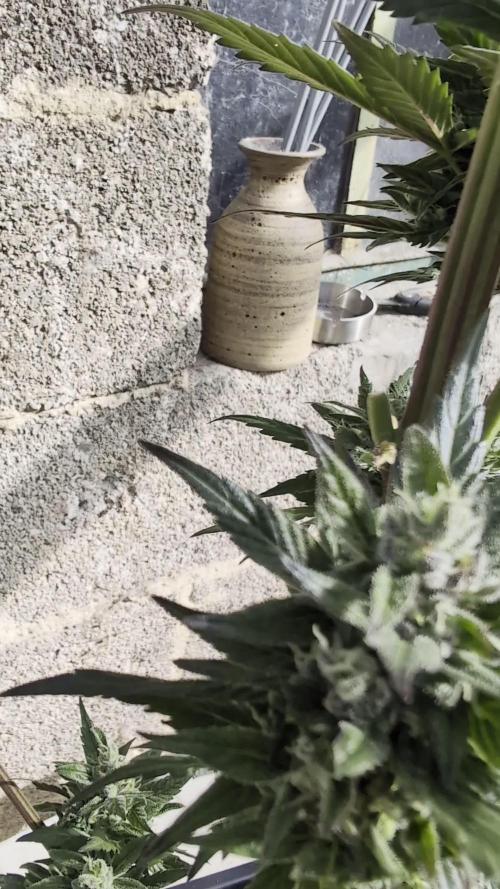
✂️ Wir sind in der Erntewoche angekommen. Eigentlich wollte ich die Wild Thai noch länger stehen lassen, aber die Natur hat mir einen Strich durch die Rechnung gemacht. Am 2026-06-15 habe ich massiven Befall mit Botrytis, also Grauschimmel, festgestellt. Bei einer Landrace-Sorte in diesem Stadium ist das ein absolutes K.O.-Kriterium, da wartet man nicht mehr ab.
📋 Die Fakten für diese Woche sind schnell zusammengefasst: Die Behandlung des Befalls bestand in der sofortigen Ernte am 2026-06-16, um den Rest der Pflanze oder andere Bestände nicht zu gefährden. Der Grow ist damit offiziell beendet.
📸 Wenn man sich die Bilder ansieht, erkennt man deutlich die typische Struktur dieser Sorte. Die Blüten sind eher locker gewachsen, was bei einer Thai-Genetik aber auch zu erwarten ist. Trotz der frühen Ernte sind die Blätter dunkelgrün bis violett gefärbt, was für eine schöne Optik sorgt. Die Trichome sind überall auf den Blüten und den kleinen Zuckerblättern gut ausgebildet und erkennbar. Der Stamm ist kräftig und zeigt die für die Sorte charakteristische Rötung.
Fazit: Schade um die letzten Tage, die ich ihr noch gegönnt hätte, aber Sicherheit geht vor. Grauschimmel ist ein gefährlicher Gegner, den man nicht unterschätzen darf. Jetzt geht es ans Trocknen und dann sehen wir mal, was die Ernte qualitativ hergibt. Man lernt eben nie aus, auch bei Landrassen nicht.

Likes
54
Share


@Fibro_Witch
Follow
I didn't have a lot of time for photos this week so you're getting a video... And you're gonna like it😅


Likes
16
Share


@ZzTooRightOGzZ
Follow
Letting her do her gave her a feeding of 10ml grow. she's in pre flowering now.

Likes
40
Share


@Ganjagrandaddy
Follow
Day 27 from seed: Wow these ladies like life it seems. Some very good growth this week and the switch to Mega Crop has started well so far. The Paler girl is starting to darken a little more now so let's see how we go. As mentioned in the video , I have been able to top them this week so the training can slowly begin . The only thing I need to sort now it the watering regime for the Los. They are doing good with the MC being used too. I am dialing them all in this week to see how green and healthy we can get them. I am looking forward to their smoke as these have been a strain I grew as a photo period a while back. Love these fast buds girls.
Processing
Likes
88
Share


@No_Clout
Follow
01/08/18 - I fed them all 1 litre each, one of them seems to be praying up but the other two Seem a little bit droopy still.
02/08/18 - #3 is praying like usual and the other two are getting better Day by day I’m going to be giving them another feeding tomorrow, I have seen roots stretching out to the sides of the pots so I might saturate the whole pot.
04/08/18 - horrible sight today looks like rusty cracks in some leaves , not got a clue what this.
05/08/18 - browning has continued since last night and it’s all on the new leafs not the older ones. i fed them without any calmag , so I think it could be a deficiency of some sort (cal/mag).the mad thing is, it’s only two of the girls, one of them is completely fine nice green leaves not yellow marks that turn orange/brown. It definitely has nothing to do with my ph or all three girls would be showing some symptoms seeing as they all get fed with the same soloution.✌️🏻
07/08/18 - everything’s cleared up their was slight nute burn in the process but everything seems a lot better so I decided to start LST. all the new leaves are the colour they should be with no nute burns or calcium deficiency 🙏🏻
Likes
23
Share


@420DeepGrow
Follow
Toda esta fantasía se hace realidad gracias a Royal Queen Seeds y @James por confiar en mí. 🚀💥
Fiel a su linaje genético, la Hyperion F1 ofrece un aroma intenso que está dominado por notas frescas de pino y hierba, junto con un trasfondo terroso y un delicioso toque especiado. Aunque todos nuestros híbridos F1 producen excelentes concentraciones de cannabinoides y terpenos, no hay duda de que la Hyperion destaca entre el resto. Sus cogollos alargados y escarchados producen una resina rica y cargada de cannabinoides (sobre todo THC), y terpenos como mirceno, ocimeno, farneseno, terpinoleno, cariofileno y humuleno. Esto no solo da lugar a un aroma muy fuerte, sino también a un efecto bien equilibrado que combina una relajación física (en gran parte gracias al mirceno y al farneseno) con la euforia, risa y efecto motivador de otros terpenos. Al igual que el dios de la luz del mismo nombre, la Hyperion F1 causa un subidón esclarecedor que se puede disfrutar a cualquier hora del día.
🌻🚀 Consigue aqui tus semillas:
https://www.royalqueenseeds.es/semillas-de-marihuana-hibridas-f1/622-hyperion-f1.html
🍣🍦🌴 Xpert Nutrients es una empresa especializada en la producción y comercialización de fertilizantes líquidos y tierras, que garantizan excelentes cosechas y un crecimiento activo para sus plantas durante todas las fases de cultivo.
Consigue aqui tus Nutrientes:
https://xpertnutrients.com/es/shop/
📆 Semana 9:
Gran semana, la planta parece que ha terminado de crecer y centra toda su energía en desarrollar los futuros cogollos, los erizos 🦔 son apreciables.
@xpertnutrients está haciendo un buen trabajo, ella consume algo de sus recursos lentamente como a mi me gusta .
Vienen lluvias 😡
Likes
64
Share


@Ju_Bps
Follow
Hello happy Growers!
This week was better than early,
I've founded few very litle banana spend the week,
I will continue to check this week,
Harvest will be in 2 or 3 weeks, I hope can take situation under control untill harvest.
If banana start to be too big, I'll remove the branch.
If no, buds start to be compact, Nice sweet smeel and sticky,
Probably my last fertilizer week, after I'll start flush
Plant start to take less water, sign harvest for soon :)
Have a good week my friends
Likes
114
Share


@Natrona
Follow
Week 20 8/11-17
For my outside ladies, Opium, Auto Opium, Fractal, and Lemon Cake not much changed. They continue lovin life outside. These ladies are maturing as many fans are yellowing and falling off.
Temps are comfortable following Storm Debby, in the 80s with low humidity. Buds are fattening up, trichomes are minimal at this time but some fragrance is starting to be noticed.
These ladies had a long vegetation phase. They germinated April 1 so I could get them hardened off before I went on vacay. They had basically 4 months of veg and the colas are already large, trichomes forming and with 2 more months to go, my expectations for these are heavy yields and sticky dense buds.
Lemon Cake had her spa day and had heavy defoliation of her voluminous fan leaves. It took most of the day for my husband to trim. Oh, and there are so many feeder and sugar leaves remaining, She will be a b!tch to trim at harvest. .
Thanks for the visits, likes and comments, I appreciate all the plant love💚.
Have fun & love what you grow 💚
Sending you good vibes of love, light, and healing 💫
💫Natrona 💫

Likes
9
Share


@Kayotic
Follow
Missed a week
Day 151 since sprouting
Week 5 of flower
2 caps full of Tiger Bloom yesterday with non ph'd water
Don't have enough time lately to get it all done , NOT happy with this one currently!

Likes
27
Share


@adam_pawloski87
Follow
First off I just want to say for some reason it’s not letting me change the right temperatures on my diaries ! Each time when I put it in they stay at 50. My day air stays 75 degrees an , night degrees is 70 !
Today is day 58 for all these ladies! This week has been really great ! Girls really progressed a lot , especially for one the Forbiddin Runtz, looks like is gonna finish up in a week or 2 ! Other then that they are coming along well! Keep those eyes peeled for next week! Cheers😶🌫️💨💨💨💨
Likes
48
Share


@DreamIT
Follow
🧙♂️🍁BUBBA HAZE BY REGULAR SEEDS 🍁🧙♂️
🧙♂️ 19.3 Father's day in my part, so a couple of photos of Bubba Haze's dad. Greetings to all dads in general 🤘
🧙♂️ 20.3 ...
🧙♂️ 21.3 ...
🧙♂️ 22.3 ...
🧙♂️ 23.3 ...
🧙♂️ 24.3 The male is blooming and has begun to open the sacs. The female, on the other hand, stopped growing in height (finally, I was afraid that she would come to pierce the box 😆)
🧙♂️ 25.3
___________________________________________________________
😮 What ???? New to Regular Seeds?
Take a look at their site, you won't regret it !!
http://bit.ly/REGULARSEEDS
________________________________________________________________
📜 A look at the details of what I'm growing 📜
🧙♂️🍁Bubba Haze 🍁🧙♂️
⚧ Gender
▪️ Regular
➰ Genes
▪️ 75% Indica / 25% Sativa
🎄 Genetics
▪️ Bubba Kush x Jack Herer x Cannalope Haze
🚜Harvest
▪️ 550 g/m²
🌷Flowering
▪️ 8 weeks
✨THC
▪️ Very High
✅CBD
▪️ 1.0%
🏡Room Type
▪️ Indoor
🌄Room Type
▪️ Outdoor
🕋Room Type
▪️ Greenhouse
__________________________________________________________________________
📷🥇 Follow the best photos on Instagram 🥇📷
https://www.instagram.com/dreamit420/
🔻🔻Leave a comment with your opinions if you pass by here🔻🔻
🤟🤗💚Thanks and Enjoy growth 💚🤗🤟
Likes
60
Share


@Professor_Chaos
Follow
Beginning of week..
So instead of feed, water, feed.. I think I'm gonna feed, feed, water this week.. PPM going in is 900 PPM and runoff is still coming out around 500 PPM.. Still seems weird to me.. But whatever lol. She is looking a little deficient in some areas (more than 1)... Not horrible.. But it's there.. Some spotting.. Little yellowing here and there.. But that is expected at the end of flower, of course.. Buds look nice tho.. Fucking gorgeous plant! Trichomes are for sure gettin cloudy.. Very few amber in there.. So yeah, this should be the last week of feeding and then beginning the 2 week flush!
Mid week..
Not too worried about the coloring and spotting.. Just thought I'd post it along with this lady.. She is looking pretty good tho.. Smells amazing.. Got a few pretty fat colas... Haven't really checked to see how dense.. Don't wanna just squeeze them lol.. But I'm almost positive that the nitrogen toxicity she hit may have contributed to keeping her a bit airy.. Well.. One more update and then the 2 week flush will begin!!!
End of week..
Tried to get more trichome shots but trichomes kept smearing all over the lens so I gave up lol.. ALOT of cloudy.. A small amount of amber.. Starting the flush tomorrow with some pics for the next week! This is gonna be some epic bud for sure! Can't wait!!! Gonna use some FloraKleen tomorrow and just pH'd water until harvest! May use FloraKleen a couple times this week depending on how the runoff reads.. But according to my screw up during transition one time with FloraKleen should be more than enough lol.. But we shall see... On to the next week!!!...
Likes
15
Share


@Fronti89
Follow
Heute am 5.12.23 wurde die Zeitschaltuhr auf 12/12 gestellt , somit leite ich ab heute die Blüte ein. Desweiteren wurden sie ein wenig Entlaubt "die untersten älteren Blätter" damit die neuen Triebe ein bisschen mehr Licht abbekommen . Den Damen geht es Recht gut .. Update folgt die Tage !

Likes
51
Share


@Chumpkilla
Follow
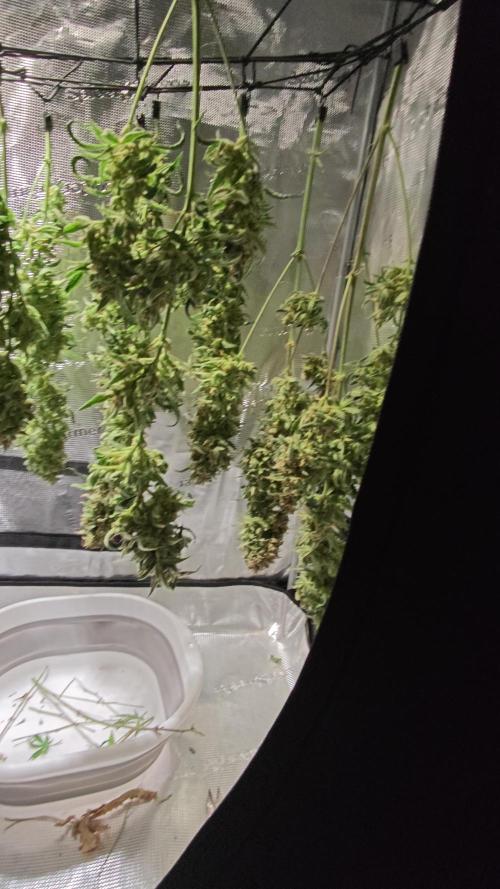
12/30/23 - Day 54 - Hello All! I started this week a day early. I wanted to update everyone on something I have been thinking about a lot. Curing. I feel if there was a hole in my growing skills it would be curing. Last grow there was more than I had anticipated. I was not set up for curing 1 lb. I threw in an audible at the last minute. It worked out but I know I can improve with some trial and error and hands-on experience. So after reading a ton, and going off of some of my prior builds for drying, I came up with this design.
I have a controller that will turn the air on and will run when the contents inside the box hit whatever RH% I want to set it at. I think the first week I will set it for 78%RH, then every couple of days go down a % until I hit 62%.
The thought is that if the bucket gets above the set RH% then the air will kick on and distribute air across the buds until the RH% is back down to where you want it. It will force the humidity out. I won't need to worry about burping. It will happen on its own.... in theory.
Ill update tomorrow with some pictures after the water change.
12/31/23 - Day 55 - Everything is looking good. The water change completed this morning while I was in the shower. Its adding nutes now and will do so over the next hour or so. She is starting to get stinky. I had to add the extra carbon filter to the room. I've got some pics up top of that.
Happy New Year! Next time I post it will be in 2024! Have a great night and be safe! Dont drink and drive, your life and anyone else involved in an accident is too important! C' YA!
1/4/24 - Day 58 - I have been thinking of trimming her for a while.... I got a comment on the bushy-ness and I got self-conscious and gave her a trim. Lol I have been going bath and forth for a while and that gave me the push to give her a little trim.
She looks great and is growing really quickly. Ill update with more pics as it goes along.