


Likes
22
Share


Likes
24
Share


@Homestickycannabis
Follow
Doing great, flushed her today with 5 gal of ph'd water and started a new feeding schedule as seen above I will alternate watering and feeding. One week water one week feed. I'll keep this gradually increasing the strength of nutes. As far as everything as a whole couldn't be better. Looking forward to her bounty.

Processing
Likes
2
Share


@Alejangrow
Follow
They've been in flower for a week now. ⏰
No sign of sex yet. ♀️
Loving how they're brushing out.
The health of the plants looks well. 😄


Likes
Comments
Share


@GreeneScene
Follow
Day#37 update: i finally made her beg for her water . The way all her leaves are hanging at a downward angle , then in the 1st video if you look you can see her “drooping” leaves begin to “pray” stand themselves back up. O watered her to run off then did a life-medium defoliation instead of a super heavy one like I planned and then I “ponytailed” each of her main tops to allow the other nodes to become strong to produce more branching .
Day#40Update: the re-growth from defoliating & pony tailing has been decent . On one or two she’s trying her hardest to break out of the tie. I’ll release her from the ponytails later today & we’ll see where we are in two days for day #42 week 6
The plan is still to top all her main tops after untying the ponytails .
Day#42 Update : end of week #6 she’s growing so evenly and well that I ru still don’t see a benefit in topping. These lateral sode branches are growing for what they know .
She’s a squat plant for sure but man is she full. She’s been in this one gallon since day #9 so it’s been 33 days she should be asking for food soon . I’m debating on top dressing her in the one gallon or up-potting during a transplant for her . Part of me wants to skip forward straight to a 6gall pot but part of me is saying to “punish” her a little more and leave her in this pot a few more weeks .

Likes
2
Share


@AZTERPHUNTER
Follow
Little closer missed couple weeks but nothing really new yet just waiting to fatten up

Likes
10
Share


@BelgianBudtender
Follow
Hey ho fellow farmers.
My little girl is two weeks old and I feel comfy entering the competition with this diary now, she's established and growing fine.
Germination could have gone better, I let her stretch a bit too long, I wanted her to stretch a bit because of my dripper ring, I had seen some very dense and compact phenos of this strain and didn't want to risk mold issues down the line.
as a result she fell over at the start of the week, I supported her and she seems to have recovered since.
She also threw some weird shaped leaves on her second nodes, likely from the stress of falling over, I tend to find ruderalis does this when stressed, more so than normal weed.
They look like lil thumbs up.
Thanks for coming by this week, hope to see you next week.
Stay safe and keep growing

Likes
2
Share

@zazazilla
Follow
Den 69. Den 42. květu. Tento týden holky ještě pěkně dorostly, ale poslední tři dny už je vidět, že se růst postupně zastavuje a rostliny se soustředí hlavně na zrání a nabírání objemu palic.
Malý a velký Critical Orange Punch vypadají jako dvě úplně odlišné kytky, a to nejen vzhledem, ale i výnosem a vůní. Menší má krásně zbarvené oranžové pestíky a příjemnou sladší vůni. U toho většího jsem musel svázat korunu dohromady, aby se pod tíhou palic nelámaly větve. Manipulace už je docela o nervy, protože ty palice jsou opravdu těžké.
Frozen Biscotti má taky velmi pěkný výnos a palice začínají přecházet do fialových odstínů. Vůně se od minulého týdne zase posunula, cítím v tom zázvor a sladký podtón, připomíná mi to jemné zázvorky. Opravdu zajímavý profil a těším se na výsledek.
Trichomy se začínají pěkně kalit, zatím bych řekl půl na půl mléčné a čiré, jantarové jsem zatím moc nezaznamenal spíš jen na listech.
Na rostlinách je vidět lehké přehnojení, hlavně na sugar leaves, ale zároveň palice krásně nabobtnaly, takže už do toho nebudu nijak zasahovat a nechám to v klidu dojet. Teď už nemá smysl dělat větší změny.
Aktuálně se soustředím hlavně na stabilní podmínky, hlídám teplotu a vlhkost, aby všechno doběhlo bez problémů až do sklizně.
Likes
87
Share


@Wastent91
Follow
Ehi ragazzi scusate il ritardo! Qua sta andando tutto più che bene! Ho spostato la ragazza gelosa insieme alla sorella che è già matura e probabilemnte farò l ultima settimana di sviluppo per questa, ma penso che sarà l ultima settimana, ormai è più he matura, cime dense come roccie e giganti come macigni! Sta prendendo un bel colore viola intenso, gli odori sono di frutti tropicali molto agrumati! Un profilo terpenico davvero spettacolare per quello che posso odorare senza averla ancora provata! Complimenti a zamnesia che sta partacmente raggiungendo come qualità le migliori case di semi! Spero vi piaccia come si è sviluppata la bimba, di sicuro non vincerò mai il contest, ma non si sa mai, sperare è sempre una bella cosa per tutti avere l oppurtunita di dimostrare le proprie qualità con prodotti professionali come quelli di plagron! Ma tutto questo vi ricordo che è stato possible solo grazie alla collaborazione con Mars hydro, che mi sta fornendo le attrezzature necessarie per avere un prodotto di qualità così eccellente, in un paese repressivo nei confronti della cannabis come quello in cui mi trovo io.. Free weed for everyone! Buon 420 a tutti voi! 💪😸💜💗🌱🌿🌲🧑🌾🤞

Likes
1
Share

@ReallySavoy
Follow
Final dry weight report (details later):
Final chop was on day 88.
First harvest was 184g of top-shelf from 5 colas. Then another 5 colas brought it up to 300g of top-shelf on sticks — all from the tent.
On the second-to-last harvest I took the rest, which added up to another ~300g including leaves.
Flushed with Terra Aquatica FlashClean (before that I was running Overdrive + honey with the base bloom nutrients).
In total: 3 days on water + FlashClean, followed by a step-by-step harvest and another 6 days just on water.

Likes
3
Share


@julian100614
Follow
Seguimos creciendo con esta dulce y maravillosa banana 🍌
Seguimos suministrando los nutrientes necesarios para la formacion de resina y engorde de cogollos 👌
La punta principal está consiguiendo muchos brotes ya que hemos estado sometiendola con la malla de scrog para que no suba demasiado y cree esa producción
Likes
49
Share


@LockDownGrow
Follow
Ok just finnished a blunt of this a out an hour ago, and I do not smoke blunts lol
But it seems only right too do a real smoked reveiw ,
So the fbt7 has been dry now for about 2 weeks and in a jar and today was the day too take the first bud too try so I rolled a fat one " fat one in photos lol ,
So for me the flavour just isn't there yet and am hoping that will come after a cure ,
So I smoked this all too my self and qiukly ,
Within a few minutes I went white as a ghost as was twitching the the corner hehehe,
This is very strong bud and I would go as far as saying it's probably the strongest bud I've had in years ,
I am what I would describe as a joker smoker , as I turn my bud into oils and do not smoke it ,
But any serious cannabis smoker will absolutely love this strain ,
Well done fast buds and thank you :)

Likes
27
Share


@MrJones
Follow
OSS Cheese XXL
╰⊰🔹Started 03.10.24🔹╰⊰
🌾 - Popped The Seeds On 03.10.24
🌞 - Environment - 80F / 65% RH
🌾 - Training - Defoliating the buds as needed, a little at a time; they should be pretty clean by the time harvest comes.
⚱️ - 2-Gallon 📊6.2 PH
💧 - Feeding - Using Horti Late Bloom 0-24-26, Cal 12-0-0
🌞 - Mars Hydro FC-4800
🕷️ - IPM - CannControl from Mammoth and Mosquito Bits
╰⊰🔹WEEKLY REPORT🔹╰⊰
📝 Notes - This ends the two weeks of using the High Fortified P&K of the Horti-Late Bloom 0-24-26; you will be watering with H20 PHed to 6.2; when growing this strain, you are going to want to pull the branches down so buds at the nodes have plenty of airflow, stay on top of the defoliation, as this cultivar appears to be a leafy one, with that said these girls are worth growing the terpenes are strong with a foul citrus, definitely a likable skunk smell!
🗓️06.08.24 Feeding 2x Dail with Horti Cal and Horti Late Bloom
🗓️06.09.24 Feeding 2x Dail with Horti Cal and Horti Late Bloom
🗓️06.10.24 Feeding 2x Dail with Horti Cal and Horti Late Bloom
🗓️06.11.24 Feeding 2x Dail with Horti Cal and Horti Late Bloom
🗓️06.12.24 Feeding 2x Dail with Horti Cal and Horti Late Bloom
🗓️06.13.24 Feeding 2x Dail with Horti Cal and Horti Late Bloom
🗓️06.14.24 Feeding 2x Dail with Horti Cal and Horti Late Bloom
📝Fertigation injects fertilizers into an irrigation system to supply dissolved nutrients and water to crops.
╰⊰🔹STRAIN INFO🔹⊱╮
Cheese XXL cannabis seeds are a unique blend of Afghan Kush x Super Skunk, producing the most pungent dank weed. Cheese XXL is the third commercially available edition released by Original Sensible using and developing these Afghan and Skunk genetics. The first release of these genetics was their Skunk Afghani. The second improved version was Stinkin' Bishop, which had an enhanced and more potent THC content and was more intense in terms of smell. The third and improved release on a similar theme is this Cheese XXL, which has a similar THC content but an enhanced heavier yield. The smoke is incredible, with an outstanding flavor of pungent skunk and spicy, extra strong mature cheese created by the dominant terpene myrcene with its earthy solid scent accompanied by caryophyllene and pinene, which combine to create a peppery acrid cheesy odor. THC levels are exceptionally high in this Cheese strain, and the effect is well-balanced, developing mental and body relaxation with a remarkable alleviation of stress and depression.
The intense solid aroma starts early in the flowering period; if you're growing Cheese XXL indoors, you'll need plenty of ventilation to disperse these babies' stinky "road kill" aroma! Cheese XXL is a cheese strain suited to indoor setups and thrives outdoors well. These feminized marijuana seeds are incredibly resistant to mold and disease and produce a substantial harvest that professional and amateur growers can quickly achieve. These Cheese weed seeds are outstanding. Break open the buds ready for use, and you'll see why the stench will make your eyes water!
Cheese XXL from Original Sensible Seeds is a great choice to break into the commercial market of growing cannabis, so if you're looking to buy something special with extreme yield, potency, and flavor, Cheese XXL cannabis seeds are simply the best choice.

Likes
6
Share


@UnorthadoxDude
Follow
Wow what a week this has been, the plants have all undergone fair dramatic changes. A real flurry of leaf yellowing, pistil darkening/curling, and bug swelling. The smell is really coming along now, I think we're really quite close to harvest. On the assumption that pre-flowering was two weeks, this strain should be ready at the end of week seven flowering, so in the case of this diary the end of week nine (i.e. one week to go!).
Pistils are about 70-80% amber, and the lower pistils on buds have started curling inward.
Trichomes look to me to be something like 10% clear 80% Milky 10% White.
I have smoke tested a small bud off the lower part of plant 3 today after quick-drying overnight in the airing cupboard, taking into consideration the obvious chlorophyll from the fast dry, the high was much closer to what I am expecting than the last smoke test. It came on at the normal pace, was quite effective, and lasted a good while. I am really hoping I can navigate my way through the next process, as I feel quite close now to having some home grown bud for the first time.
The plants are being well watered this evening with just water, and this will be the last time that I water them until harvest.
I will continue to monitor these daily, I intend to harvest at the first sign of any amber trichome.
Advice and comments welcomed.
P.S. Exciting news! My order from Green House Seeds arrived today for my next diaries! :)


Likes
11
Share


@wheedtobeus420
Follow
Beautiful lady! Idk what day she went to. She finished up right as we came home from vacation so I just had to handle her the best I could before her ripening too far. I’m so happy with her she smells Devine! So sweet like candy and straight gas! So sticky took forever to trim for trim jail. I’m so so happy with her!!!!
Likes
112
Share


@Tropicannibis_Todd
Follow
Alright Then
REMINDER I DO 2 UPDATES PER WEEK 👉WEEKLYROUNDUP👈👉MIDWEEKLY UPDATE👈
We just hit week 3 and all is well , have to admit she been a little bit of a let down ,still she keeps on going in just 21 days😃 .......
So this little sprout is tuff but I did screwed up and placed her in a bad spot and it got HEAT STRESSED last week😭 Fixed the problem and shes bounce back within a few days.......👍 Still very little vertical growth , but I'm working g on it 😏
Very little water given ,so far and rain water to be used entire growth
Lights being readjusted and chart updated .........👍
I GOT MULTIPLE DIARIES ON THE GO 😱 please check them out 😎
👉I WISH GD HAD DISCORD SERVER SO GROWMIES COULD HAVE A PLACE TO HELP AND TALK THINGS RELATED TO GROWING IN REAL TIME .....👈
👉SO I CREATED ONE ALL YOU NEED IS TO JOIN THE GROWDIARIES DISCORD SERVER !!!!!!!!!!!👈
LINK IS 👉
https://discord.gg/zQmTHkbejs
AND SEE HOW IT PLAYS OUT !!!!!!!
Likes
17
Share


@Nedyah420
Follow
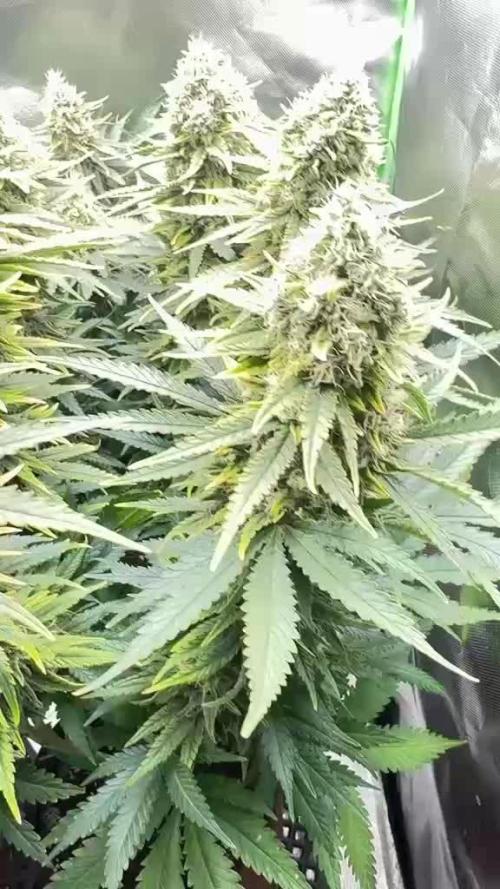
Starting to swell more each day...still very pleased with overall quality..


Likes
9
Share


@Krautbauern
Follow
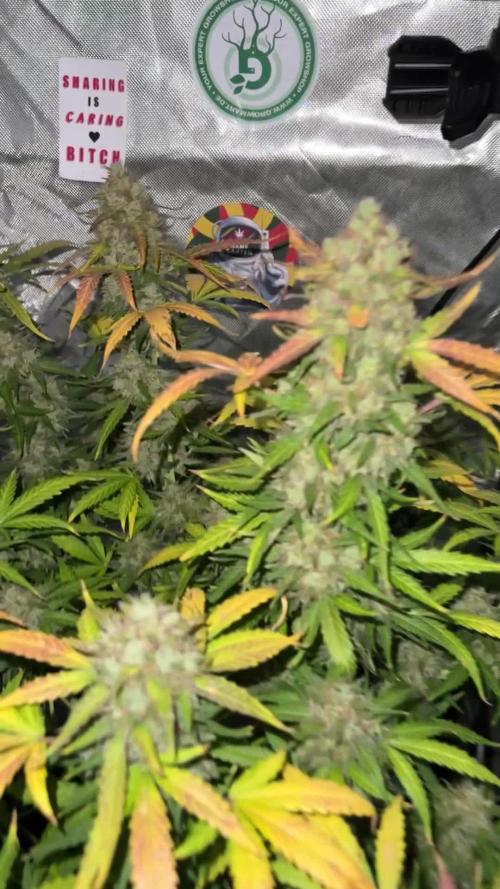
Those colours are so beautiful, the forbidden nectar is turning totally purple in the moment. Her orange smell is incredible.
Kush Pop Clone is producing insane dense buds in these days, thed are also turning a little bit purple. dehumidifier is a must have.
The Rainbow Triangle seems to be the latest plant. She also produces very nice buds
