


Likes
Comments
Share


@GrowGuy97
Follow
2 of them got cut on day 66 the last one on day 69 but overall I couldn’t be happier with these babies they all put off some amazing buds & didn’t give me much trouble at all! This is by far my favorite auto of this grow & I will be doing another run with them! If you havnt already go get you some seeds from seedsman you won’t be disappointed! Will be back with more pictures, dry weight & smoke report as soon as she is done drying! Thank you to everyone for following & happy growing friends!🙏🏼🙏🏼✌️🏼🌱


Likes
23
Share


@StantonGrowsUk
Follow
Been a nice grow and lots of knowledge gained 🙂
The 4 girls are looking frosty now.
I'm going to start flush from next feed which is tomorrow.
Hopefully they swell up nicely and get frosty.
Will tune over the next few.
Take care guys and be good 👍
Stanton
Likes
5
Share

@Nistnov
Follow
Okay so this is the last week, i already cut her down as you can see in one of the vids.
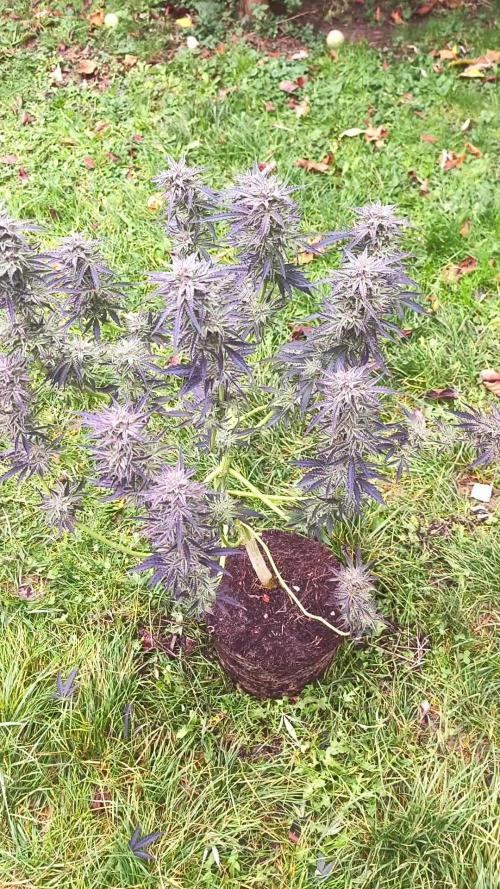
Im in love with this plant, mainly because there is not a single sign of bud rot, she survived sveral days with humidity at 90%+ and rain.
While there was almost no sun shine she fattend up quite good.
The smell is so amazing, the fresh buds smell of caramell and it has this nostalgic indica smell. The dried buds, even though not cured, smell sweet and a bit like ripe mango, truly amazing just like the crazy amount of trichomes everywhere, shes so frosty.
Im mourning that she didnt flower earlier, more sun would have helped her getting even fatter.
Im preparing her for the harvest with the "living dead" method, i used lemon juice and water which i filled in a vase in which she will now slowly finish up in the darkness, this will help to fill the last clear trichomes with all the good stuff. I will post the harvest in the coming week.

Likes
38
Share


@GERGrowDesigns
Follow
A Special Project from Germany and Welcome to Flower Week 2 of GoodTimesGenetix Blue Cream Haze
I'm excited to share my grow journey with you from my
GoodTimeGenetix Seeds .Im the First Person outside my Friends Company who got hands on this Strain .
He Managed over a long time to Cross these Strains:
-Blue Dream (Blueberry x Super Silver Haze - Female)
-Ice Cream Haze (Gelato x Wedding Cake x Crockets Haze - Male)
They Done a lot of Tests for a Nearly Perfect Stabilisation of this Genetic and Feminized them aswell .
This one is Professionell Created In Germany , Growed in Germany and presented To the World on Grow Diaries.
Here’s what I’m working with:
• 🌱 Tent: 120x60x80
• 🧑🌾 Breeder Company: GoodTimesGenetix
• 💧 Humidity Range: 60
• ⏳ Flowering Time: 8-9 Weeks
• Strain Info: 23%THC
• 🌡️ Temperature: 26
• 🍵 Pot Size: 20
• Nutrient Brand: Hy-Pro
• ⚡ Lights : 600W x 2
I would truly appreciate every bit of feedback, help, questions, or discussions – and of course, your likes and interactions mean the world to me as I try to stand out in this exciting competition!
Let’s grow together – and don’t forget to stop by again to see the latest updates!
Happy growing!
Stay lifted and stay curious!
Peace & Buds!

Likes
20
Share


@Ultraviolet
Follow
Not particularly growing for speed or any dedicated reason this time round, just adding water and a abundande of positivity, gotta admit I do like the autoseed logo. Off we go again into the magical forest.
(Arthrospira platensis) cultivated in high-alkaline, mineral-rich water in Kailua-Kona, Hawaii. It is renowned for having a higher nutrient content, including more carotenoids and essential fats, compared to other spirulina brands. It is frequently cited as a "complete food" due to its dense concentration of proteins, vitamins, minerals, and pigments.
The nutritional profile of standard dried Spirulina platensis biomass. 3kg of spirulina powder has an approximate NPK ratio of 10-2-1 (or 10% Nitrogen, 2% Phosphorus, and 1% Potassium).
Here is the breakdown of the nutrient content for 3kg of powder:
Nitrogen (N): ~300g (10% of total mass)
Phosphorus (P): ~60g (roughly 2% of total mass)
Potassium (K): ~30g (roughly 1% of total mass)
3kg of spirulina powder is more than enough nitrogen for 4 cannabis plants in a 100-gallon pot—in fact, it is likely excessive and could cause severe nutrient burn or toxicity if not properly managed. Spirulina has a very high protein content (46% to 63% dry weight), which translates to a significant nitrogen source. It is often described as a 5-1-1 NPK fertilizer.
3kg (3000g) of powder in 100 gallons means 30g per gallon. General organic recommendations for potent amendments (like frass) are often around 1–3 tablespoons per gallon. 30g of powder is roughly 2-3 tablespoons, making this a very high-strength application rate if added all at once. Balance this with calcium/magnesium, and organic nutrient delivery in soil growing can lead to deficiencies in these nutrients.
Not all of that 100 gallon is used, so figuring out precise measurements was ballpark, but there is about 10kg of engineered biochar in that pot. Mostly in the top half. Ideally, I'd have 25kg in a full active 100-gallon, but......... don't mess with something that is not broken. Roots do not utilize the entire 100 gallons. This has been a couple of years of trial and error, mostly error. The amount of cations you can add in grams depends entirely on the specific cation exchange capacity (CEC) of your biochar and the type of cation being added. Biochar CEC values vary widely, typically ranging from 4 to over 300cmolc/kg. Multiple Biochars in use, ranging upwards of 100cmolc/km.
Different cations have different atomic weights
Potassium K+ 39.1g/mol.
Calcium Ca2+ 40.1g/mol.
Magnesium Mg2+ 24.3g/mol.
Nitrogen NH4+ 18.04g/mol.
You get more nitrogen bang for your buck. It all depends on the CEC of the biochar you use, but brrrrrrrrrr roughly I'm looking at 500-600 grams worth of elemental cation exchange capacity, give or take. That's just for the biochar alone. Elemental cation exchange capacity refers to the ability of materials—such as soil, minerals, and biochar to adsorb, hold, and release positively charged ions Ca2+, Mg2+, K+, Na+, Al3+, and Zn2+. This capacity is a critical measure of nutrient availability in soil and energy density in electrochemical systems.
Added calmag 2:1 to complement spirulina.
Calcium (Ca): Approximately 150g - 300g of elemental calcium.
Magnesium (Mg): Approximately 75g - 150g of elemental magnesium.
So long as pH stays in 6.3 to 6.7 ish, the plant will unlock hydrogen. Plants will be able to cycle CEC for their own needs. Hydrogen ion pumping (proton pumping) is a fundamental mechanism used by plant roots to facilitate the cycling of nutrients within a medium's Cation Exchange Capacity (CEC), directly increasing nutrient availability. A growing medium's Cation Exchange Capacity (CEC) does not contribute directly to Electrical Conductivity (EC). CEC represents potential nutrient storage, while EC represents active nutrients in the water/soil solution. A medium with a high CEC can hold many nutrients, but if there is no water present, the EC will be low.
98% of plant nutrient uptake comes directly from the soil solution.
2% of nutrient uptake is directly from soil particles.
Nutrients held on exchange sites (CEC) are not directly measured by EC until they are released into the soil solution through exchange with other ions (e.g., hydrogen ions from roots or fertilizer).
Plants source the H+ ions (protons) used in cation exchange primarily by exuding carbon sugars into the rhizosphere, then microorganisms perform root respiration, which reacts with soil water to form carbonic acid H2CO3 that dissociates into H+ and bicarbonate. Roots also actively pump out H+ ions directly to acidify the rhizosphere, plants trade hydrogen produced through metabolism for essential nutrients held by the soil.
In plant cells, the H+ (protons) used in proton pumping across the plasma membrane come primarily from the cytoplasm (cytosol). The protons are derived from internal cellular sources, including metabolic processes that release H+, and the regulation of intracellular pH homeostasis.
Distilled water is highly useful in managing the electrical conductivity (EC) of a growing medium by allowing for precise control over nutrient concentration and assisting in the mobilization of nutrients from the cation exchange capacity (CEC) into the active, plant-available nutrient solution.
Just add water & positive energy.
Potential hydrogen. pH. + - , potential charge balance for hydrogen.
So long as there is adequate oxygen in the soil and air and water moves at a decent interval, its practically impossible for the pH to skew in a soil that is taking in oxygen and releasing CO2 and nitrogen, I say practically, but meh, even with plenty of oxygen, the process of converting ammonium NH4+ to nitrate NO3- by bacteria releases hydrogen ions H+, which directly causes acidification (lowering pH). While water movement is necessary, consistent water moving through the soil can leach away basic cations Ca2+, Mg2+, K+, Na+, leaving behind acidic hydrogen and aluminum ions, causing pH to drop, especially in humid regions. High levels of CO2 in the soil (from intense respiration) dissolve in soil water to create carbonic acid, H2CO3, which lowers the pH. (barometric pumping removes that possibility) The pH in a cannabis cultivation environment, particularly in hydroponic or soilless setups, will often naturally drift towards acidic (lower pH) over time. Understand how to know when to lime the pH back up. Complex but critical. Once I understood this it helped ease the pain of understanding pH.
Base saturation directly reflects the percentage of CEC occupied by base cations. Generally, as base saturation increases, soil pH increases because fewer acidic cations, H+ and Al3,+ are present on the soil colloid surfaces.
At a pH of 7 or higher, the soil colloids are saturated with base cations, resulting in a base saturation of 90+%.
While many sources include Sodium Na+ as a base cation, some calculations focused specifically on plant nutrients (like in some nutrient management contexts) may focus solely on the "Big 3": Ca2+, Mg2+, and K+. However, in soil science and CEC (Cation Exchange Capacity) measurements, sodium is usually included in the definition of total base cations, making it the "Big 4" base cations.
At a pH around 5.5, soils often have a 45–55% base saturation, while a soil with a pH between 6.5 and 6.8 generally has an 80–90% base saturation.
Base saturation is considered a reliable, albeit complex, indicator of soil fertility and the degree of soil weathering, acting as a crucial metric in soil classification and management.
Once you take full control of the pH, so long as there is oxygen, and one keeps tabs on base saturation levels. Its near impossible for anything to go wrong. All you are essentially doing is adding water and waiting for any sign of deficiency. Not so much growing as eliminating the possibilities of things going sideways. Can't over or under water, can't skew pH, can't go anaerobic. Everything runs in optimal cycles, watering every 2 to 3 days or as required, depending on the rate of combined ET. A little warmer, a little drier, but never short on water. All the nutrients are already there in the medium, we still focus on the water, just not adding salts, but to mobilize nutrients held in the Cation Exchange Capacity (CEC) and move them into the active soil solution for plant uptake, the best supplements to add to water are fulvic acid, humic acid, or seaweed/kelp extract. Liquid solutions with high concentrations of essential trace elements. Distilled water has no alkalinity or minerals to help buffer or release nutrients. Adding these supplements turns the "empty" water into an active agent that forces nutrients off the CEC colloids into the solution for plant uptake.
When to water? When Electrical Conductivity of soil gets low. No water, no conductivity.

Likes
19
Share


@Mzsnoop2001
Follow
Hoy fue la peor semana del cultivo y de mi experiencia cultivando, siendo el tercer día de la semana 5 se me desprendió el ventilador en el indoor y se me cae sobre una planta quebrando la punta principal (blue moby). día siguiente queriendo doblar el tallo principal lo arranque literal, ahora está en un mal estado, en comparación a la blue moby que recupero. Leo criticas y concejos! Bh


Likes
8
Share


@StonedandSteady
Follow
AutoWhiteRussian Growing into her 10th week of Bloom and She's Finishing out Great, Glorious, Gasy, Greasy as All get Out! Super Stacked and Phenomenally Packed!!!
7th Feed of #HumboldtCountysOwn
#AutoWhiteRussian *Fem* breed by Team #DivineSeeds #DivineSeedsSquad #DivineSeedsBreedingCompany Looking Magnificent and Amazingly Great in her 10th week of Flower! She's Growing under the #Growatt600w and in my #TopoLite 24×24×48 Grow Tent! I'm also using #TNBNaturals #TheEnhancer Co2 Despersal Canister and using thier Ph⬆️⬇️ for my Decolinated Tap Water!
#AutoWhiteRussian breed by Outstandingly Awesome Team #DivineSeeds #DivineSeedsSquad #DivineSeedsBreedingCompany
Yo!!! This Lil Beauty popped open in under between 16-18 hours of Germination using this Wet Papertowel Method, this New Heat Mat, Baked potato ToGo Container and Regular Tap Water Helped Tremendously! Heck Yeah Growmies and Growmets!!! Let's Grow!!!
DivineSeeds:
#AutoWhiteRussian
Origin:Afghanistan
Type:Indica/ Sativa/ Ruderalis
Flowering:65 days
THC:24 %
Harvest:400-600 g/m2
Height:100-150 cm
https://divineseeds.net/
https://instagram.com/divine.seeds?igshid=osxe2v7en33v
HumboldtCounty'sOwn:
Email: [email protected]
Phone: (707) 725-4119
Toll free: (866) 872-9434
Humboldt Bottling
Po Box 429 · Fortuna, CA 95540
HumboldtCounty'sOwn Website Link: https://humboldtcountysown.com/
HumboldtCounty'sOwn Instagram Link: https://instagram.com/humboldtcountysown?igshid=1qj809qkkwych
I love and Appreciate Everyone!!! Thanks Again Teams! Cheers Famz!!! Much Props and Much Topz!💯

Likes
6
Share


@NewMan
Follow
Chtěl bych vyjádřit dík Zamnesia a Plagron ze se můžu zúčastnit, a teď uz to snad rozjedeme a konečně legálně u nás 🖖


Likes
15
Share


@Kurow
Follow
Here’s to fruitful buds! Alrighty been feeding every two days and did some decent defoliation on them today. Last weeks please be easy. 🙏🏾

Likes
15
Share


@Klookmop420
Follow
Started flushing. Have been a bit absentee but nothing bad so far. Love the purple leaves.

Likes
4
Share


@Gram_Solo
Follow
These 2 are shooting up fast man! Literally not had to do anything to them after the main lining was complete the shape has remained and its solid lol may need to get a tomato ring to support or some yoyo strings to hold up once flowered.
Applied some cal mag and micro, grow to this feed to try and improve leaf colour.
Need to lower nitrogen now so hope it works.
Likes
15
Share


@MrJones
Follow
Mr. Jones Fast Buds Moby Dick
╰⊰´🌿 ╰⊰´🌿 ╰⊰´🌿 ╰⊰´🌿 ╰⊰´🌿 ╰⊰´🌿 ╰⊰´🌿
🏡Indoor - 3"x4"x8" Custom Built Grow Closet
🌾This strain likes to stretch, so a heavy training regiment will be needed.
🗓️Germenation - Soaking in Water Strait into Amended Soil.
⚱️3-Gallon Pots 📊6.4 / 6.8 PH
💧 Feeding - Gaia Green Grow / Bloom
🕷️ IPM - We will be using Green Cleaner" 1 OZ per Gallon, and CannControl from Mammoth alternating between products each month for Integrated Pest Management.
🌿╰⊰´🌿╰⊰´🌿 PLANT UPDATES 🌿╰⊰´🌿╰⊰´🌿
🗓️Saturday - 11.11.23 So last week I did some training 1 plant was topped, 1 plant was LST, and the last one, the smallest one, was left alone, I am happy with the recovery as we head into week 4, this week that most FB strains begin to stretch into flower, today I started a compost tea, see recipe below, will be feeding tomorrow.
Moved the plants into my stealth closet, under 2 Vipar Spectare XS 1500s.
╰⊰´🌿 ╰⊰´🌿 ╰⊰´🌿 ╰⊰´🌿 ╰⊰´🌿 ╰⊰´🌿 ╰⊰´🌿
📝 Notes - Original Moby Dick Auto is a world-renowned Sativa-dominant giant created from two of the most popular strains ever, the White Widow and Haze cannabis strains which are known for the huge delicious aroma, huge size and yields; It’s an extremely easy-to-grow variety highly recommended for growers of all levels seeking for maximum yields with minimum effort as this strain grows up to 150cm and yields up to 650 g/m2 in 10 weeks without extra maintenance. Thanks to its 23% THC, this marvelous hybrid is all about happiness as it will melt your worries away while boosting your mood, leaving you with a big fat smile on your face and ready to get things done as soon as you take the first hit, making it an excellent choice for social scenarios and busy workdays. The Sativa effect comes hand-in-hand with a mix of lemony, piney, and woody terpenes that translate into that classic aroma every stoner loves.
╰⊰´🌿 ╰⊰´🌿 ╰⊰´🌿 ╰⊰´🌿 ╰⊰´🌿 ╰⊰´🌿 ╰⊰´🌿
Compost Tea
3 Gallons Dechlorinated H20
3 Cups Malibu Compost
2T Molasses
2 T Alfalfa Meal (DTE)
2 T Kelp Meal (DTE)
1 T Bat Guano (DTE)
1 teaspoon Rootwise Bio Elixir
1)- I used a small paint strainer to hold my composts, placing an air stone right in the bag and zip-tie it nice and tight - this allows air bubbles to really agitate the micro matter off of the compost and into your tea
2)- I like to mix in the molasses (microbe food) and start my main air stone, the dry amendments and Rootwise can be just measured in the bubbles
3) - Keep the temp of the water warm to 75F/85F - too cool and the microbes reproduce too slowly and too hot will kill them.
I do not delete my teas and let the plant pots dry out slightly before feeding.
Likes
13
Share

@DogDoctorOfficial
Follow
🌿 Nectar Drip – Week 6 Report
Early–Mid Vegetative Development (12/12 from Seed)
Zamnesia Seeds x TICAL – Pack #268
Timing clarification (as always):
This is logged as Week 6 on GrowDiaries, while in real plant development we are closer to Week 5 of vegetative growth.
The offset comes from an early, photo-heavy germination phase. We’ll continue clarifying this weekly for consistency.
⸻
🌱 Growth Overview – Divergence & Character
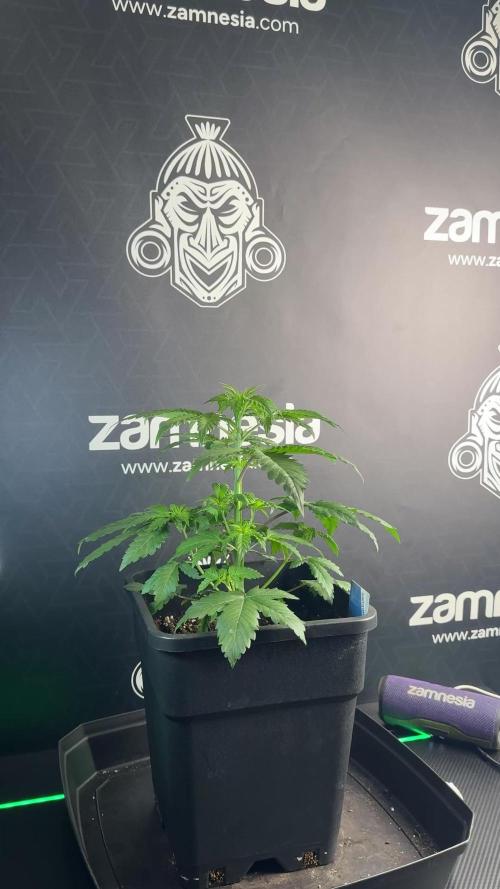
This week, the Nectar Drip really began to separate into personalities. Same genetics, same room, same feeding — but very different expressions depending on training intensity and structure guidance.
We’re now clearly working with multiple plant strategies inside the same tent.
⸻
✂️ Training Breakdown – Plant by Plant
🌿 Plant A – Leaf Work & Gentle Guidance
This plant is trained using leaf bending and leaf tucking only.
• Large fan leaves are tucked under neighboring leaves
• Growth tips are exposed naturally
• No clamps or hard bending
Response:
Absolutely thriving. She’s growing tall, wide, and fast, now reaching roughly 8–9 nodes, with beautiful branching and strong vertical momentum. This is a great example of how far simple leaf management can take a healthy plant.
⸻
🌿 Plant B – Aggressive Opening with Plastic Clamps
This plant started similarly to Plant A, but quickly outpaced the rest in size.
This week, we:
• Introduced plastic clamps
• Opened her aggressively
• Focused on redistributing energy from top dominance to lower branches
Response:
Outstanding. She accepted the harder intervention without stress, opened up beautifully, and continues to push growth across the canopy. Her size advantage is now being converted into structure, not just height.
⸻
🌿 Plant C – The Heavy LST Experiment
This is the plant we’ve been focusing on since last week — the smallest of the group, but the one receiving the most intensive training.
• Strong horizontal bending
• Continuous opening of leaves
• Structural redirection from early on
Response:
She’s thickening, branching, and responding incredibly well. While she is still behind in height (which is expected), she’s building a dense, intentional structure. This plant is also the most delayed in showing pre-flower signs, which is completely normal under 12/12 from seed when subjected to stronger training.
She may never be the tallest — but she is quickly becoming one of the most interesting.
⸻
🌸 Pre-Flower Signals
Some plants are now showing early pre-flower signs. Nothing dramatic yet, but the transition is clearly approaching.
As expected:
• The most heavily trained plant is the most delayed
• The more upright plants are moving faster
This confirms that structure and stress management play a significant role in timing under a 12/12-from-seed regimen.
⸻
🌡️ Environment – Weather-Driven Adjustments
This week brought real-world challenges.
Outside conditions:
• ~5 °C
• 92% relative humidity
Inside the tent:
• Temperature: ~21.8 °C
• Relative Humidity: ~58%
Despite cooler and more humid ambient conditions, the plants are showing no complaints whatsoever. This range is manageable, and the canopy looks relaxed and happy.
⸻
💡 Lighting – Letting Plants Decide
We are now running approximately 700–850 PPFD, depending on plant height and canopy position. Smaller plants receive less, taller ones naturally receive more.
This is intentional.
The plants are:
• growing into the light
• dictating their own intensity
• transitioning naturally toward flowering
I’m not pushing — I’m responding.
This run is about listening, especially under 12/12 from seed.
⸻
🌬️ Airflow – Vortex Method
Airflow is dialed in using a vortex-style circulation:
• Fresh air enters from below
• Warm air exits higher up
• Side fans encourage circular movement
• Central fans gently disrupt stagnation without collapsing the vortex
This creates:
• even temperature distribution
• stable humidity
• strong gas exchange
• minimal microclimates
Air is moving around the plants, not blasting them — exactly what we want at this stage.
⸻
Nutrition – Adjustment for Water Quality & LEDs
💧 Water Source
We are now using a mix of:
• rainwater
• dehumidifier-collected water
Starting EC is extremely low (~0.2), so supplementation became necessary.
CalMag Introduction
We introduced Plagron CalMag Pro at 1 ml/L as a preventive measure, especially important under high-intensity LED lighting, where calcium and magnesium demand increases.
Current Hand-Watering Parameters (Nectar Drip Plants)
• EC: ~2.29
• pH: ~6.0
• Water Temperature: ~22.8 °C
🚰 Reservoir / Autopot Clarification
The tent contains six plants total, not all Nectar Drip.
• Autopot reservoir currently runs Terra Grow + CalMag only
• Organic inputs are excluded from the reservoir (not compatible)
• Reservoir EC: ~1.43
• Reservoir pH: ~5.9
Autopot plants are occasionally top-fed by hand to receive the full recipe. For future runs, the feeding strategy will be simplified and better aligned with autopot systems.
⸻
Special Guest – Mr. Baggy Joins the Team
This week we were joined by Mr. Baggy, a fluffy inspector and proud GrowDiaries “Diary of the Month” prize winner.
He’ll be making more appearances from now on — every good grow needs an official supervisor.
⸻
🔮 What to Expect / What Not to Expect
Expect:
• more pronounced pre-flower expression
• increasing structural differences
• trained plants staying shorter and wider
• untrained plants stretching sooner
Don’t Expect:
• uniform behavior
• identical flowering times
• forced transitions
This run is about letting plants speak.
⸻
🤝 Gratitude
Huge thanks to:
• Zamnesia Seeds
• TICAL
• Plagron
• Future of Grow
• Lumiflora
And to the entire GrowDiaries community — supporters, critics, silent readers, and longtime friends.
Everything shared here reflects my personal experience, philosophy, lessons, and mistakes. The goal is learning — together.
⸻
🌟 Week 6 Summary
• Training is defining structure
• Plants are choosing their own rhythm
• Light intensity is earned, not forced
• Environment is stable despite harsh outside conditions
• The 12/12-from-seed experiment continues to teach
A lot of files.
A lot of data.
A lot of learning.
And we’re just getting started.
Growers love always 💚
Community Note
Due to YouTube community guidelines, our educational channel was taken down.
While we firmly believe the content was purely educational, we respect YouTube’s decision and are actively exploring alternative platforms to continue sharing this work.
📡 Please stay tuned.
🙏 Thank you for your patience and continued support.
FOR DISCOUNT CODES AND MORE JUST FOLLOW THE LINK https://website.beacons.ai/dogdoctorofficial
📲 Don’t forget to Subscribe and follow me on Instagram and YouTube @DogDoctorOfficial for exclusive content, real-time updates, and behind-the-scenes magic. We’ve got so much more coming, including transplanting and all the amazing techniques that go along with it. You won’t want to miss it.
GrowDiaries Journal: https://growdiaries.com/grower/dogdoctorofficial
Instagram: https://www.instagram.com/dogdoctorofficial/
YouTube: https://www.youtube.com/@dogdoctorofficial Deleted by Youtube
Vimeo : https://vimeo.com/dogdoctorofficial Under construction stay tuned ⸻
Explore the Gear that Powers My Grow
If you’re curious about the tech I’m using, check out these links:
🔆 Lighting & Environmental Control
• Future of Grow — Advanced LED lighting technology
https://www.futureofgrow.com/
DISCOUNT CODE: DOG20
• Lumiflora — Under-canopy LED lighting
https://lumiflorade.com/
• TrollMaster — Environmental controllers and automation gear (past collaboration)
⸻
Genetics
• Zamnesia Seeds — Genetics used in this project
https://www.zamnesia.com/
⸻
🌱 Soil, Substrates, Boosters & Root Support
• Plagron — Substrates, bio mixes, and supportive products
https://plagron.com/en/
⸻
🎒 Storage, Curing & Preservation
• Grove Bags — Curing and storage solutions
https://grovebags.com/
⸻
📸 Photography Equipment & Tools
(Not sponsors, but part of my creative toolkit)
• Sony A6700
• Sony full-frame macro lens + few more
• Stacking photography workflow - learning
• iPhone (for behind-the-scenes shots)
We’ve got much more coming as we move through the grow cycles. Trust me, you won’t want to miss the next steps, let’s push the boundaries of indoor horticulture together!
As always, this is shared for educational purposes, aiming to spread understanding and appreciation for this plant. Let’s celebrate it responsibly and continue to learn and grow together.
With true love comes happiness. Always believe in yourself, and always do things expecting nothing and with an open heart. Be a giver, and the universe will give back in ways you could never imagine.
💚 Growers love to all 💚
📸 P.S. – The Eye Behind the Lens
All photos in this diary (for now — except for the ones showing the camera, which I took with an iPhone) are taken with a Sony A6700 paired with a Sony full-frame macro lens and a few more.
Photography is part of the story — it’s how we share the fine textures, the glow, and the quiet details that words can’t always capture.
I’ve also started experimenting with photo stacking — a technique where multiple images, each taken at a slightly different focus point, are layered together to create one perfectly sharp image from front to back.
It’s not digital enhancement or AI; it’s pure photography — a way to reveal the plant’s beauty in microscopic depth, from trichome to petal.
You’ll even see a few shots of "ghost me" capturing the shots — camera, lens, setup — because every grow deserves not just to be cultivated, but documented like art.
FOR DISCOUNT CODES AND MORE JUST FOLLOW THE LINK https://website.beacons.ai/dogdoctorofficial
NEW DISCORD - Official Server Invite Link : https://discord.gg/ksjAkA5T74
Likes
19
Share


Likes
15
Share


@Waveform
Follow
Day 33: What an amazing height and bud gain in just 3 days! Lady #1 is 67 cm tall now, her sister a tad smaller. Both still have a great color, and I dared to cur away just the lowest branches and leaves that do not look like they could gain height in time. Really enjoying this strain so far!
At the end of their day, they are a bit dropping leaves, so clearly no hunger for more light. The impressive growth speed continued on their buds: Tallest lady at 70 cm now.
Their next morning shows growth is still at an impressive 5 cm/day as lady #1 with her leaves erected again stretches now 72, the maximum of my previous growth. Pulled the lights as close as possible to the ceiling and hope they won’t make it much more than 1 m. I activated the Sansi 30 W folded wings LED to give them somewhat of a morning and evening light and to add some more light to their overlapping center branches in the middle of "their" day. Sadly that’s causing some interference to the timelapse videos, but I can’t say they’re perfect if it wouldn’t.
Watching the timelapse video of day 34, I have the feeling the additional light rather irritates them. Maybe the interference is not only visible for electronic eyes. I’ll keep it off next day for comparisons.
Day 35 shows stretch speed has reduced indeed and they seem to be concentrating on leaf and bud growth instead. 75 cm, so we are currently at "only" 3 cm/day. Watered them with a HPE/Bud growth mix again last night, about 1 l each.
Well, forget my words about reduced growth. After they recovered during the night, we are at 77 cm for lady #1.
Which measured at 78 with hanging leaves in their day’s evening. I must have missed a day number – day 36 concludes their 5th week. I gave them another 2 l of fertilised water each and will lave them for the weekend again.
Video shows that growth concentrates now more on leaf and bud development than on gaining height. So I guess my 160 cm tent will be sufficient. For a moment I was worried, but it looks like stretch is over. Anyway, time to rearrange the camera next week. Leaves are running out of focus.
Likes
9
Share


@Scilef
Follow
Daily report:
Day 1.
Watering: NO
Stats:
Humidity: 70%
Temp: 27.2
Notes: I want to see how often should I water Heracles. I fucked up with pH and maybe with watering frequency. I want to fix that. Also set the board to 100%.
Day 2.
Watering: NO
Notes: Defoliation went a bit too aggressive, but it looks fine and I hope that it will help weaker stems to grow faster. I will let Heracles to heal tonight and feed her only tomorrow's morning.
Day 3.
Watering: 5.7 pH 1550 ppm (1.25 l + CalMag) && 5.8 pH 1320 ppm (2.3 l + CalMag) + 5.7 pH 1120 ppm (1.6 l + CalMag) Total 5.15 l => 5.9 pH 1720 ppm (1.25 l)
Notes: This morning pot was completely lightweight and dry. Heracles looks amazing.
Day 4.
Watering: Night - 5.8 pH 1190 ppm 3.5 l (+CalMag) => 6.0 pH 1890 ppm 0.7 l
Notes: New leaves still has yellow marks between veins. I don't know what should I do with that - neither MgSO4 foliar nor CalMag in the mixture helped. Currently 1.5 days is the comfy period for feeding schedule.
Day 5.
Watering: NO
Notes: I found signs of overfeeding (and not only me found that), so next mixture will be less concentrated to let Heracles relax. Also, I bounded all tallest stems to the net to place all the grow spots at the same height.
Day 6.
Watering: Morning - 5.7 pH 761 ppm 4.5 l (0.75% of Base +CalMag + 1 l of plain water) => 6.1 pH 1750 ppm 1.1 l
Notes: I am still trying to create a flat screen of greens. Very excited of flowering stage, it's almost here. But wtf is going on with ppm in drainage?!
Day 7.
Watering: Night - 5.8 pH 1040 ppm 4.0 l (0.75% of Base +CalMag) => 6.0 pH 1930 ppm 0.8 l
Notes: I am run out of a free space in my growbox. Why does not blow starts?
Likes
4
Share


@CityFarmer
Follow
Hello everyone,
Been busy this week working around the house so not much I can say. Heres a little video of there growing...
See you guys next week

Likes
116
Share


@CelticSmokey88
Follow
Are you threatened by words from an empire of money and gold?
Will you trade in your country's potential for the lies you've been sold?
Are you scared that the walls are too high to bee breeched by the bold?
Will you stand and be counted or shut up and do what you're told?
Hope over fear; don't be afraid
