


Likes
13
Share


@SgtDoofy
Follow
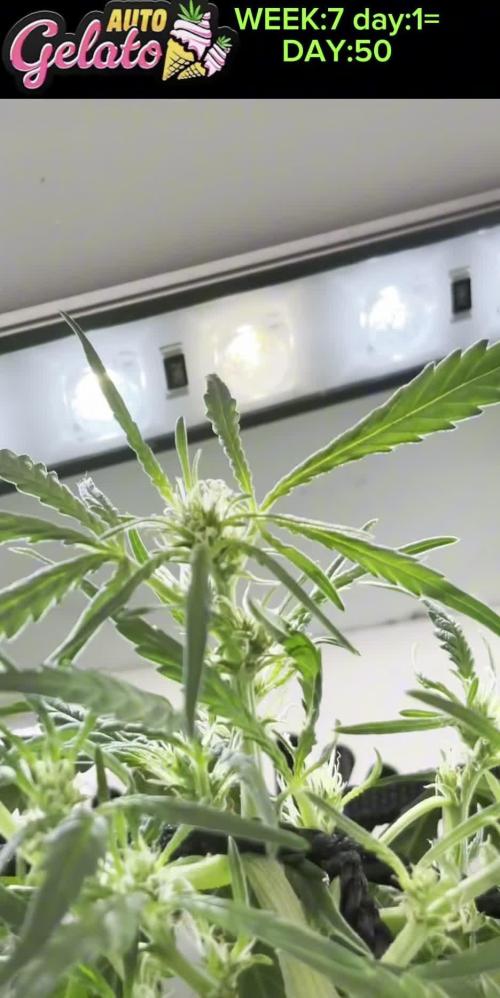
March 18
Sherbet has the tent to themselves now. I've flipped to a 12/12 flowering light schedule for Sherbet. You're supposed to imagine what the current plant looks like doubled in size, and flip to flowering according to what you think your tent could handle. The other tent is larger than this one, but it's in a much colder room, so having 12 hours without the heat from the lights could have been harsh for the plant. This room can hover around 50-60F on cold nights, so Sherbet will just stay in this tent to grow.
Temps have lowered 5+ degrees by removing the other plant and it's light.

Likes
43
Share


@MadeInGermany
Follow
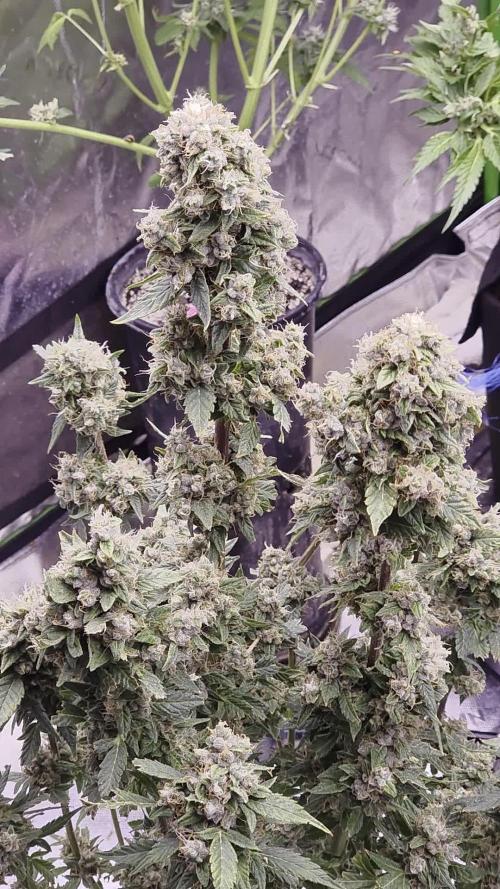
Hey everyone 😊.
Today is the last week before the harvest 😍.
I don't even know where to start 😅.
I love this phenotype .
It smells extremely tasty 😃, and this time I'm very curious to see if the pheno tastes better in the aero than the last time it was grown on earth.
I would never have thought that it could taste better on aero than on earth, I always thought it was a Mhytos, but the last run with the Blue Gelato # 41 on aeroponic tasted even more intense than the same pheno on earth 😃.
I'm really looking forward to the harvest, and of course I will bring a harvest update before the last update 😇.
At the end there is also a detailed report 👍.
I wish you all a lot of fun with the update, stay healthy 🙏🏻 and let it grow ☘️🍀
You can buy This Strain at :
www.Zamnesia.com
☝️🏼☝️🏼☝️🏼☝️🏼☝️🏼☝️🏼
Strain
Gelato clone from mother (Zamnesia )
☝️
Genetics: Wedding Cake x Gelato x Gelato 33
👍
Vega lamp: 2 x Todogrow LED CXB3590 COB 55 W
1 x Sanlight S2W 62 W
💡
Flower lamp : 2 x Todogrow LED CXB3590 COB 55 W
1 x Sanlight S2W 62 W
💡 ☝️
Grow Aero System : Growtool 0.8
☝️
Fertilizer:
Canna Aqua Vega A + B , Canna Aqua Flores A + B , Rizotonic, Cannazym, CANNA Boost, Pk 13/14, Canna Cal / Mag, Canna Ph - Grow, Canna Ph-Bloom
☝️🌱
Water:
Osmosis water mixed with normal water (24 hours stale that the chlorine evaporates) to 0.2 EG. Add Cal / Mag to 0.4 Ec Ph with ph- to 5.5 - 5.8
💦 💧

Processing
Likes
17
Share


@greennug
Follow
shortest plant is 50cm tallest being 95cm. They are all doing wonderfully, most of autos are budding nicely and all of the photoperiods are ready to flower. looking very promising. i am changing my light schedule to 14-10 to kick these girls into flower.. this will give the plants an extra 17% (or so) a day under the lights.rather than 12-12. i cant be fussy as i only have one grow space but if my research is correct these should grow beautifully! the autos are well ahead so shouldnt affect my harvest weight too much. like i say i cant be fussy! thanks for looking


Likes
26
Share


@GuerillaGorilla
Follow
Sept 10th
She was ankered to the fence with rope.
Notthing to report really. Looking great no sign of mould. Heads are yellow looking. Pretty bizarre. From a distance its is really striking...does'nt show in pictures sadly
She is next up for defoliation, together with Killer Kush. Few more days rain till sunny period..fingers crossed.
Happy growing everyone

Likes
5
Share


@MilkBagg
Follow
So happy with the autopots and how well they plants are thriving. Instead of top dressing i decided to switch nutrients to cronks bonnie and Clyde for autoflowers. Did a half does to see how well it does at first. I make water in 2 gallon batches, 2 gallons with food, when empty, 2 gallons of with calmag.
Likes
20
Share


@Steno
Follow
The first plant makes 20 gr. , the second one 55 gr. Now in curing with boveda 62%. The plants created a lot of smell during the end of flowering and the drying process.
Likes
2
Share


@Romobo16
Follow
I finally received the new 1000w Spider farmer new light, the AC infinity extractor and the humidifier, I’m loving them and also the plants.
I moved the light to 18 inches same intensity 50%, they are grown very fast, I’m really excited.
I also did water changes to all of them and I’m now using 4 ML of hydrogen instead of 3 ML.
I ordered Root drip of FF but looks like they are in back ordered, will see when it arrives.


Likes
53
Share


@Schnabeldino
Follow
The stems have become a little too long, but they grow much faster after fertilizing once. I bought a starter kit of Canna Terra fertilizer and will try it out for my grow.
In a few days I will top them for the first time, pictures will follow....
I have the little ones in the tent for 12 hours during the day because the light is much better
_______________________________________________________________________
I discovered bud rot on my Red Hot Cookies, I first looked to see how far the fungus had penetrated inside the buds.
Then I decided to cut the whole headbutt.
I checked the entire plant thoroughly and couldn't find anything else. I think it's due to insufficient air flow...I had my fan off for 2 days, my mistake...
hope the fungus hasn't spread further.

Likes
44
Share


Processing
Likes
14
Share


@Canadian
Follow
The plant is doing very well is filling up with flowers everywhere and it has a fruity skunky smell to it very nice I can't wait to see it fully developed .
For now not much to talk about her except that she's doing pretty good developing good and very fast thank you for reading I will continue to update have a happy grow

Processing
Likes
23
Share


@CaliGrown
Follow
Like I said I messed this one up. Neglected her and it shows. Super big colas but stunted. And all maybe fault. Going to do Much better next bubbley Livers bean

Likes
8
Share


Likes
161
Share


@FrontRowAG_BrianG
Follow
Entered diary of the month for the first time here on GD. It’s been a good run thanks to Ethos Genetics and Front Row AG Nutrients.
Grow diaries has been kinds shitty lately. I’ve tried my best to upload as many good photos as possible.
I know I grow a little differently than most here on grow diaries. Push the plants as hard as you can, lots of heat/humidity/co2 and high EC. My motto, if you’re gonna grow, harvest as much as you can with the space you have.
Overall this was one of my best runs in a while. Deep orange and cream/cake smells and vigorous growth made this a great strain.


Likes
6
Share


@Growzzbud
Follow
Son unas plantas muy agradecidas y fáciles de cultivar además de que van como una bala, estoy impresionada con lo que mutan semana tras semana, primera semana de floración superada, vamos a por las siguientes a ver si cosecho unos buenos cogollos...


Likes
Comments
Share


@eldruida_lamota
Follow
Vamos familia, actualizamos la segunda semana de floración de esta Amaretto Tarmac de Seedstockers.
Empezamos abonando ya con varios productos de la gama Agrobeta para la floración.
Temperatura y humedad dentro de los rangos correctos, 12 horas luz, 12 oscuridad.
Una lástima que de todas solo aguanto una, y en concreto tiene un color espectacular aún así seguiremos con el diario hasta el final.
Agrobeta:
https://www.agrobeta.com/agrobetatiendaonline/36-abonos-canamo
Hasta aquí todo, Buenos humos 💨💨💨

Likes
14
Share


@Quintall
Follow
Trocken Gewicht folgt
Geschmack 10/10
Wirkung 10/10
Evtl liegt es daran das es mein erster grow ist aber viel entspannter was man sonst so bekommt.
Ich bin jedenfalls zufrieden und freue mich auf den nächsten grow.
Da werden die Fehler dann ausgebessert.
Likes
6
Share


@Kolakk420
Follow
Auto ColoradoCookies, 62days, 100cm, 102g dry, very tasty fruity aroma, good strain, easy to grow!!! Thanx for watching!!!