The Grow Awards 2026 🏆 


Likes
Comments
Share
@StrontiumGrow420
Follow
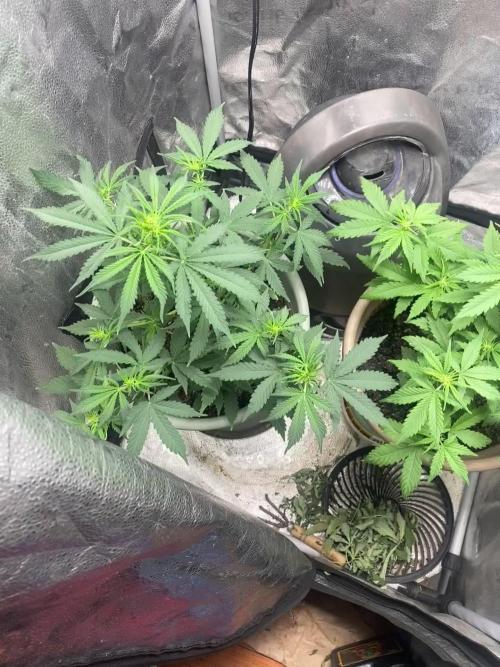
This week it's all about the 8 White Widow clones, rooted well in shallow water bath with .5ml pH perfect Grow in the water.
Long roots sprouted through the rockwool and they didn't seem to be inhibited by the 50w led.
Now transplanted into their 1L pots with fresh soil substrate, no additives.
Transplanted 2 clones into rockwool now in 1 pot, see how they (Cerberus) develops.
Harvested the clone cuttings on 24/8/2020, took approx just over 2 weeks (17 days) to develop the long roots seen in the pics above.
Kept the water feed fresh every 3/4 days to prevent algae build up.
Switched to 12/12 11/9/2020
Unfortunately, I had to pull this grow, it was painful to ditch the plants as the grow was going well but i had to move house and couldn't take them with me.

Likes
10
Share
@nonick123
Follow
Día 35 (10/06) N/A
Día 36 (11/06) Se va a quedar un pequeño gran cogollo porque ya se ha detenido el strecht
Día 37 (12/06) N/A
Día 38 (13/06) Avanza la floración para estas pequeñas
Día 39 (14/06) Riego 150 ml de H20 pH 6,5
Día 40 (15/06) N/A
Día 41 (16/06) 500 ml de Té de Floración con Healthy Harvest 8 ml/L + Insect Frass 16 ml/L + Melaza 1 ml/L
💦Nutrients by Lurpe Solutions - www.lurpenaturalsolutions.com
🌱Substrate PRO-MIX HP BACILLUS + MYCORRHIZAE - www.pthorticulture.com/en/products/pro-mix-hp-biostimulant-plus-mycorrhizae

Likes
18
Share
@ZouzouCanna
Follow
Changé de chambre, on a reçu la 4x4 du sponsors Mars Hydro avec la FC4800 (thanks ♥️) !
Changed room, we received the 4x4 from the sponsor Mars Hydro with the FC4800 (thanks to them ♥️) !


Processing
Likes
15
Share
@AK1210
Follow
The tricombe production on this strain is ridiculous! It looks amazing under my microscope. The heads are mostly milky coloured so this may be finishing sooner than expected.
The space in the tent is getting a bit tight so I'll be glad to have more room when this lady has done her thing.
Likes
18
Share
@Siriuz
Follow
Just waiting patiently for her to show up!
Happy growing everyone
Blessings and thanks for your support
Likes
13
Share
@buzbun
Follow
Its good growing plant,good cloning its all from 1 freebie seed!On flowering they stretching 2x maybe more im not expect it but all good.think need more Silica for plant like that for more strong stems

Likes
26
Share
@Hydro_Bins
Follow
Excellent quality and quantity with this harvest! Will look to to control the stretching phase of flowering next grow.
Likes
36
Share
@KrautFabrik
Follow
Pictures are taken on day 105 / flower day 49 📸
**********************************************
They getting super frosty and gaining weight, I hope the buds getting bigger in size. 🌹
The nematodes already killed all fungus gnades. 🐛
Happy growing🌱

Likes
Comments
Share
@mariocave
Follow
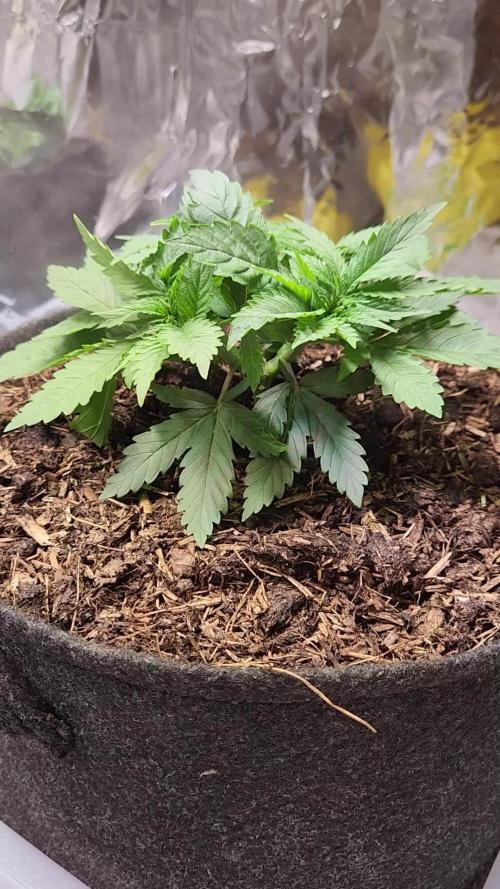
First week of flower and the plants seem to be doing alright still … remember this is my first time planting indoor


Likes
3
Share
@Oldwied
Follow
Let it grow.
Training is not necessary. She grows extremely compact.
Light Power: 60%
Day 37
Photoshooting

Likes
10
Share
@Stickygreens420
Follow
3/11/2024: Start to week 7 flower. She is getting close to being done. Most of the pistols have turned orange, and the tricomes are getting mainly cloudy. Plan to give her another week or two in hopes she will swell a bit

Likes
42
Share
@MadeInGermany
Follow
Hey everyone 😃.
Due to the lack of space in the flower tent at the moment, I decided to use a delayed LST for the 2 women 🙂.
So I can let them grow again in the next 30 days until there is room in the flower tent 😄👍.
I'm curious to see how they will recover, and I think that growth will continue in the next 48 hours 👌.
I wish you a lot of fun with the update, stay healthy 🙏🏻 and let it grow ☘️🍀
You can buy this Strain at :
https://sweetseeds.es/de/cream-caramel/
Type:
Cream Caramel
☝️🏼
Genetics:
Blue Black
x
Maple Leaf Indica
x
White Rhino
👍
Vega lamp:
2 x Todogrow Led
Quantum Board 100 W
💡
Bloom Lamp :
2 x Todogrow Led
Cxb 3590 COB 3500 K 205W
💡💡☝️🏼
Soil :
Canna Coco Professional +
☝️🏼
Fertilizer:
Green House Powder Feeding
☝️🏼🌱
Water:
Osmosis water mixed with normal water (24 hours stale that the chlorine evaporates) to 0.2 EC. Add Cal / Mag to 0.4 Ec Ph with Organic Ph - to 5.5 - 5.8 .
Likes
12
Share
@GREENPHOENIX6262
Follow
Week 3 Veg - Thus far running accordingly. No signs of stress or deficiencies. Introduced a Co2 bag (Exhale 265) to run into early flowering.
*End of week recap* (08/27)
User error during LST for both -
Gave heavy nutes to assist on the rebound - Minor chance of stunting
Besides the LST error - Running smoothly -
Light flower will begin in 2 weeks.
Likes
22
Share
@RDWCGrowing
Follow
1/11/2024 Vegetation Week 1 Day 1- I have a root almost in the water.. Yay!! Top feeding is almost done. she is looking a little sad as I work the transition Top feeding but once the roots are fully in the water she will start to take off. Ensured my PPFD is set between 250-300 it is set to: 258
1/12/2024 Vegetation Week 1 Day 2- I have a root in the water.... NO TOP FEED TODAY SIR!!! now that a root is touching the water and she looks stable, I am not going to topfeed, I will see how she looks tomorrow and as long as everything looks good I am going to go ahead and do a change and week 1 fill on Nutes.. I know it is a couple of days in but the same Nutes go through Week 2 and get changed at Week 3 So I should be good to go.. I will just ensure I fill to root touching the water when I change tomorrow.
1/13/2024 Vegetation Week 1 Day 3- Water Change Day!!
I added 36 Gallons of Water to the system:
Silica= .5mil/gal= 18mil
CalMag= .75mil/gal = 27mil
FloraMicro=3.0mil/gal = 108mil
FloraGro=2.0mil/gal = 72mil
FloraBloom= 2.0mil/gal = 72mil
PH DOWN= 30mil
Very important thing with this system is to now wait the 24 hours for the system to adjust.. Do not make any further adjustments to your PH up or Down for 24 hours to allow time for the system to balance.
1/14/2024 Vegetation Week 1 Day 4- Today I just adjusted the PH to ensure that it was right at 6.0
1/15/2024 Vegetation Week 1 Day 5- Today I Cleaned up the lower damaged leaves from the transition from top feeding to roots in the water. She looks good today.
1/16/2024 Vegetation Week 1 Day 6- Today I just took a picture of the beautiful lady for Log. Other than that just normal day to day operations, check the pH, check the Humidifiers and fill as necessary, check level of water in the Res. Everything looks great. onto Tomorrow!!
1/17/2024 Vegetation Week 1 Day 7- Today I filled the humidifers, checked the PH and just let her grow.. Grow baby Grow.....

Likes
10
Share
@The_Bearded_Grower
Follow
had to harvest a bit early as it looks like it turned hermy on me .... hope the clones dont do the same
update- Turns out I harvested a little early for nothing but it's not a huge deal seeing as it was in flush anyway.
Update- today is Sunday it's been 3 days in the drying period and I came to the conclusion at the buds had so much resin on them that if I did not remove the leaves it would be exceedingly difficult to do so in a couple days I'm not sure what the updated weight would be
update - here we have it ladies and gentlemen finish the Harvest putting them into cure now I pulled a tiny butt off and had a small hit and I must say it feels nice and a very little bit got me quite High. I'd say the high feels more in the frontal cortex of my mind

Likes
25
Share
@RakonGrow
Follow
+
Day 43 :
Pantine + Pantinchen each 2.0L
Pantine 50% 50% vega and flores
Pantinchen 100% last vega pahse
Day 44:
Day 45:
Pantine 2.0L (80% Flores + 20% Vega)
Day 46:
Pantinchen 2.0L (100% Vega) its slow , really slow in progress.
Day 47:
Pantine 2.0L (100% Flores) PH 5.9 (Canna PH+)
Pantinchen hurry up in progress , nice about 4-5cm over night !!! Finally I can remove a height box again . There are only 3x5cm to her sister that I didn't disturb with topping on day 4. Nutrien up to 80% of her sister. It is a weak little plant, my bad :/ .
Day 48:
Pantinchen 2.0L (close to night) (100% Vega) .
Day 49:
Pantine 2.0L (100% Flores) PH 6.1 (Canna PH+)
+

Likes
19
Share
@valiotoro
Follow
Hello everyone week 4 of flower has passed for this Cherry Cola auto 🍒
For the feeding schedule i stopped feeding Power Roots and Pure Zym and started feeding Green Sensation 0,5/l
Mars hydro FC-E6500 75%
have a great day and wish you all happy growing 😎👨🌾🏻
Likes
241
Share
@Tropicannibis_Todd
Follow
💩Holy Crap We Are Back At It And Loving It💩
Growmies we are at DAY 56 and she's just killing💀it👌
👉We are in full on flowering , gotta say the pink to redish hairs have gone away which is a bummer 😕 but the frost 🍦 is strong 💪
So Shit , I gave them just a tad to much nutes on the first few feeding 👈 But I have since fixed it
So I'm still doing some low stress training 🙃 and some defolation 😳
Lights being readjusted and chart updated .........👍rain water to be used entire growth👈
👉I used NutriNPK for nutrients for my grows and welcome anyone to give them a try .👈
👉 www.nutrinpk.com 👈
NutriNPK Cal MAG 14-0-14
NutriNPK Grow 28-14-14
NutriNPK Bloom 8-20-30
NutriNPK Bloom Booster 0-52-34
I GOT MULTIPLE DIARIES ON THE GO 😱 please check them out 😎
👉THANKS FOR TAKING THE TIME TO GO OVER MY DIARIES 👈


