


Likes
Comments
Share


@Popothamio
Follow
Aquí unos vídeos de la segunda semana de floración. Ya tiene los led definitivos y la malla más abierta, hace rato que pasaron a la 8 ball kush. Los riegos eran de medio litro cada dos o tres días todos ellos con fertilizantes. Se me olvidaba comentar que la red mandarin es de flor roja y de las tres solo una salió con ese tono que me está gustando bastante y otra cosa que no comenté es que la 8 ball tiene dos semanas más de crecimiento que las otras pero se le hizo lst y podas apicales a varios brazos.. las red mandarin solo fue una poda apical a cada una antes de la mallla.


Likes
3
Share

@HuskyHouse
Follow
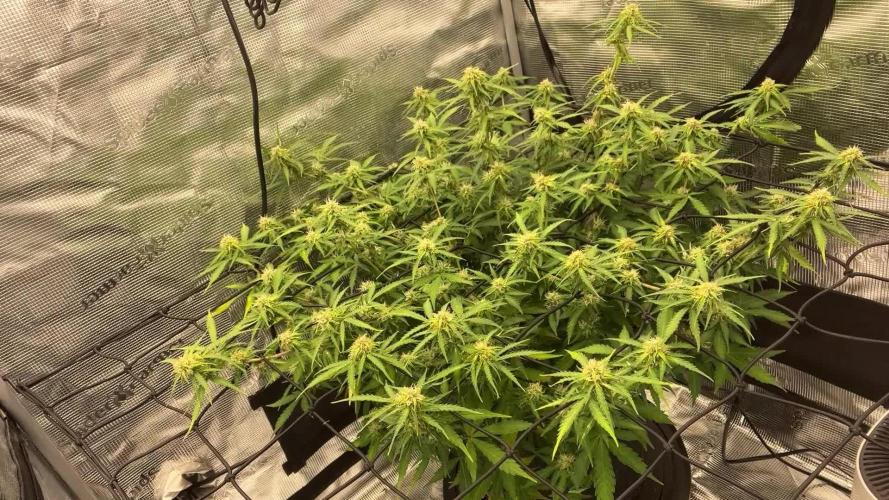
She has a lot more room now to spread out, she is doing well! Second net going up in the next few days to help speed her out more.

Likes
1
Share

@Walachiangrowdiary
Follow
Every two weeks using BioEnhancer,wormhumus and homemade compost tea

Likes
2
Share


@GhostBlvckPhant0m
Follow
Week 2 of flower and the ladies are starting to frost up! Watering every 3 days about 2 liters each. The monster in the 7 gal gets about a gallon every 3 day or 4 days and takes it all in with no problem. The light is about 19-22” from the tallest plant. Still dimmed to 80%
Likes
7
Share


@Pshycoactive
Follow
Apart from the bud rot problems towards the end of the grow, wich in this plant were actually small comparing to my other plants I had at the time, it all went really well! I even broke the main branch in half around week 5-6 but the plant recovered really fast and developed two main branches like in a topping and in a few days was back growing and stretching a lot!! From a 3L vase I got about 40g of dried weed wich I considered really good!
Likes
10
Share


@Kinghaze
Follow
The first week of flowering went well, no defects or anything.
I put up a second trellis with small compartments.
And a dehumidifier to keep the humidity between 50% and 60%
I have also started the flowering nutrition , including the New 'powerbuds' from plagron.
Does anyone happen to have any experience with that?
Now it is waiting for the plant to stop stretching.
Around day 20 I will defoliate the plants one more time


Likes
41
Share


@Coopmc
Follow
This is a new seedling I topped think I’ll keep 8 tops was considering only keeping 4 but I’m going for 8 there all staying up equal hight on there own
Tied her down she good!
8 nice tops one more week and flower time!

Likes
10
Share


@CANNASIM
Follow
A lot of rain and wind, continuously. Temps have dropped as well.
I’m reading another week or two to chop this plants.
Sativa dominant hybrids did the best, the Fastberry and the banana purple punch did not really develop as the other two.
In specifics the cbd crack developed sizable buds, and the blue dream as well, the flowers are not as developed tight and dense as in the indoor grow. A bit of fox-tailing nothing too expressive.
Minimal work, as per the setup chosen, an no extra nutes this week.

Likes
114
Share


@RockoCalenberg
Follow
Letzte Tage vor der Ernte
Auch hier in den letzten Tagen kaum noch Entwicklung.
Die Pflanze stand optisch fertig,
hat aber nicht mehr wirklich weitergereift.
Foxtailing lief weiter auf bereits entwickelten Buds,
ohne dass sich die Reife sichtbar nach vorne bewegt hat.
Der Chop erfolgte ebenfalls aus praktischen Gründen,
da ein weiteres Warten keinen klaren Mehrwert gezeigt hätte.
👉 Optisch fertig, aber ohne echten Abschluss.
Kurzfazit:
👉 Unruhiger Finish-Verlauf ohne klaren Reifepunkt.
Grow on 🌱
Last Days Before Harvest
Again, very little development in the final days.
The plant looked finished,
but did not continue ripening in a meaningful way.
Foxtailing continued on developed buds,
without real progress in maturity.
Chopped as well for practical reasons,
since waiting longer showed no clear benefit.
👉 Looks done, but never fully completed.
Quick summary:
👉 Unstable finish without a clearly defined ripening point.
Grow on 🌱

Likes
12
Share


@GarciasGarden
Follow
WEEK 2 DAY 14
Since last week the babies have taken off! They didn’t have much light until yesterday when I added another 100w led and since then I’ve seen a huge difference ! They are looking super healthy the roots said fuck the pot and grew right through it I’m actually super interested in seeing how these grow up..
The 3 clones that were separate last week are now moved into one single pot to further develop the experiment.
They are on the same feed as the mother with flora grow/micro/bloom and cal-mag .
And In the last picture you can see my ghettos man way of cloning .. going to see which 2 out of 4 are better rooted and I will move those to a pot in about a week or so.
If you guys have any questions or want to know where I got these exotic seeds message me!! Or comment below !

Processing
Likes
14
Share


@AthanasGrow
Follow
So we are in the middle of week 10 and I feel pretty comfortable feeding them now, pretty much the same until next week when I give more Top Max. I've seen much more explosive growth on other diaries but I have to say I'm pretty proud so far for my first attempt. Staring at those fresh furry little balls of life is surreal, getting to this point is great, but it's far from over.
So I kept the same feeding this week, still adding the Great White with mycorrhizae (and like 40+ other microbes) once a week as it says per directions. The BioBizz products are easy to use and hold up well, so I'm feeling better about going with them even though I had some issues at the beginning (all my fault most likely). I can dial in the feeding mixture PPM now first try to where I want it, so far 700ppm of a gallon every 2 days has been working out. I feel like at the start I was over watering because people say water everyday in coco, well that seems to be for the coco bricks. I am using FoxFarm Bush Doctor Coco Loco (long ass title just for some coco coir) with additional perlite and it has a lot more holding capacity than just normal bricked coco coir. For checking on when it needs water I still use the method of digging into the topsoil an inch and weighing the pots by hand. Also I've noticed if they are pretty tired looking after lights on then I'll water. Like everyone said, consistent fertigation has been the hardest part as a beginner.
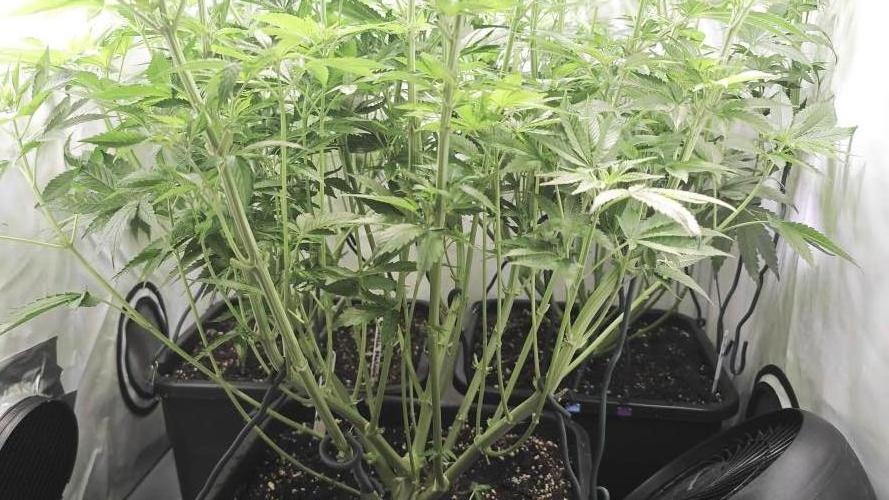
First week I'm posting a video, the fan can't oscillate so I turn it to the right, left, and keep it center as well as raise and lower it so there is decent airflow. I wouldn't say it's optimal but it works for now.
I've raised the lights about 3 inches just so the top colas don't get burnt, I've also found the sweet spot on the potentiometer (power knob) where I can get maximum power without raising the temperature above 77f, which it quickly goes above 80f if I exceed it.
I've done minor defoliation before each feeding (so like every 2 or 3 days), mostly just clearing the leaves from above while keeping the important sugar leaves and some fan leaves, even though most the large fan leaves have long died/turned. If you watch the first video I've posted you'll notice an injury on her, unfortunately I didn'
I feel like I've failed on the C99 X Blueberry Auto, in fact I took it out of the title. I definitely kept it in nutrient lock even after repeated flushings, it seems to have grown a little and even looks like it's accepted its new life as a stunted sideshow geek never thinking of being the in the spotlight under my grow tent. On the plus side, the two normal Desert Lemon photo's look great, even if one is starting to look leggy. They haven't shown their sexes but it looks like they soon will, because frankly I don't have enough room and would like the leggy one to be gone. The two other shortest plants looks nice and green, shortest being the Black Sugar photo that I did some minor LST with tent stakes - and the very beautiful Gelat.OG photo that is so symmetrical it makes me want to put her in the spotlight (aka position 1 which I give most room/light priority too).
Okay so that's it for this week folks, thanks for checking in and please comment or critique on my first grow! Any questions also welcome.
-AthanasGrow


Likes
8
Share

@Growbody
Follow
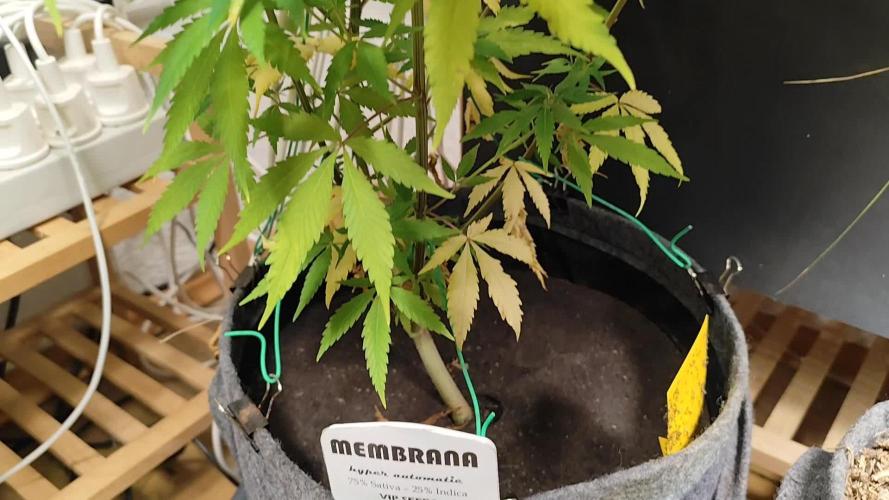
Herzlich Willkommen zu meinem Growbericht der Membrana Hyper Autofem von VIP Seeds.
Die URL für den Strain findet Ihr hier:
https://www.vip-seeds.com/membrana
Für den Grow verwende ich den großen 15 Liter WideVersion Stofftopf von ROOTIES. Bei meinem ersten Grow mit den ROOTIES kam nur die 9 Liter Version zum Einsatz, da haben die sich gut bewährt.
Auch die Smart Start Plugs von Zamnesia werden wieder verwendet, dieses Mal ohne den Samen vorher einzuweichen.
Und die Erde und der Dünger von BioBizz findet wieder Verwendung.
Tag 97: Die Membrane Hyper Autofem von VIP-Seeds bleibt filigran und streckt sich weiter.
Schön, dass du dir mein Tagebuch angesehen hast. Schöne Weihnachten 🎄✋😎

Likes
6
Share

@Growbody
Follow
Hallo und Herzlich willkommen zu meinem neuen Grow mit der Forbidden Runtz double XL Automatic von Grower's Choice. Diese schreiben: "Eine Kreuzung zwischen „Forbidden Fruit“ und „Runtz“. Eine Sorte von Growerschoice mit sehr hohem Terpengehalt. Die Aromen waren das Wichtigste bei der Auswahl und Kreuzung dieser Genetik". Sehr süss und fruchtig soll sie sein, ganz genau mein Fall.
Die URL findet ihr hier:
https://www.growerschoice.nl/de/feminisierte-selbstbluhende-hanfsamen/forbidden-runtz-xl-auto.html#additional
Tag 30: Die Forbidden Runtz double XL Automatic von Grower's Choice bekommt nochmal etwas LST und 1,0 Liter Wasser.
Tag 32: 1,5 Liter Wasser.
Tag 35: 1,0 Liter Wasser.
Schön, dass du dir den Grow angesehen hast. Bleib neugierig 👋😎



Likes
15
Share


@ElegantBuds
Follow
Bakers delight had a nice cookies smell all the way. A nice layer of trichomes and hard compact buds. A true beauty to the eyes.
Likes
38
Share


@Cariboo_OG
Follow
Utopia Haze is a rare heavily sativa dominant hybrid (90% sativa/10% indica) strain created through back crossing Brazilian Sativa strains. This tasty little bud took home 1st Place for Best Sativa in the 2008 High Times’ Cannabis Cup and for good reason – with its potent 18-22% average THC level and long lasting cerebral effects, Utopia Haze is one powerhouse smoke. The Utopia Haze high comes on soon after you finish your first toke, hitting you with a strong cerebral lift that infuses you with a sense of hazy relaxation.
Type: Feminised/Photoperiod
Cultivation: Indoor/Outdoor
Flowering Time (days): 70-75
Indoor Yield (g): Up to 650
Feminised Outdoor Harvest Month: October
Feminised Outdoor Harvest Month Week: 3rd-4th week
Aroma: Citrus, Woody, Pungent, Mint
Effect: Cerebral Lift, Hazy Relaxation, Sleepy
Welcome Everyone to the Final Entry of my Utopia Haze Grow !
There is so much to discuss ! I have been extremely busy as of late trying to get this Harvest together, but i am happy to have it here for you now !
I Seriously under estimated the amount of time, help from others, and my own necessary skills to pull this off.. and i still kind of screwed it up lol !
But its worth noting i have never actually done this before and trying to document it during....was extremely hard.
It is next to impossible to work an iPhone with rubber gloves on !
First I want to discuss everything step by step so before you jump straight into the comments on how the end product is so small in "quantity"
Rest assured i am happy with its"quality"...and thats all that matters to me because Life is a journey not a destination! and i have learned so much from this grow that I couldn't be any happy even if i messed some things up :)
But at the very least I hope you read through this entry in its entirety with an open mind and focus more on the process, rather than just the outcome!
I ran out of Ice & i was only able to wash three times..(normally I've heard you should go sometimes 5-6 washes)
Preparation is Key & things will be much better next round :)
Photos 1-22
These are pretty self explanatory but for those of you just tuning in now.. this is what happens to a very happy plant when you don't have the necessary tools to monitor key components of growing cannabis.. Ph, as well as EC levels play a very key role in the outcome of your grow lol that being said I was just able to save this plant by purchasing both tools but that doesn't mean the plant didn't suffer because of the prior events.. This was a Huge reason behind me choosing to turn this harvest into what i would consider
"Solventless Hash Rosin" from "Ice water extracted Bubble hash".
Pictures 23
The idea here is the process of using "fresh Frozen Cannabis" this has been discussed many a time online on such sites as instagram and here on grow diaries as well.. I personally have Never tried the process so i decided to try it out and make a judgement for myself..
Video 24
The Cannabis has now been in the freezer for 72 hours making it very well frozen.. as you can tell i struggled getting it all into the 25u Screen Wash Bag. One thing of note i would do differently is i will de-stem my next batch as i also believe this played a part in the amount of plant matter that escaped through the sieves.
Photo/Video's 25-28
The idea here is "ice water Seiving" & especially with the bags that I am using here that are only have screen material on the bottom portion of the bag it is very important to have spaces in-between the screens to allow the water to pass directly through the screens into the bottom bucket with the least amount of resistance.. because the hash is so extremely temperature dependant if it gets warm on the side of the bag.. it will stick there and not make it to the bottom to become use able product..
29
You do not need to use as much Ice as i used here lol... the idea is to keep everything very cold..i certainly achieved that but at the sacrifice of using so much that i ended up grinding product and producing "contaminants" but in the end they are just plant matter that i would be smoking when i rolled up my joint either way so.. I'm not super disappointed..
But it should be noted that what you want to achieve here is a Layering effect where you have the wash bag between two small layers of ice while the "water current" washes the Trichomes away allowing them to be separated by the screens setup below :)
Before Starting the machine you should allow some time (i.e.;10-12minutes pre soak to allow the product to become saturated) before the first cycle.
By video 32 I have just ran out of ice lol..
Video 33-34
Here I have a tip for you.. to separate the screens that you sieve through.. cut 5 gallon buckets to stretch them across nice and tight.. it'll make scooping your Bubble that much easier ! i learned this from the many "Frenchy" videos I have watched :)
Picture 35
Here in lays the problem for most people.. drying your hash without loosing vast amounts of "Terpenes" whilst also stay ever vigilant against mold !
Thanks to all those videos I've watched on youtube.. id like to think this was one of my most successful parts of this process..
Things to Note; Terpenes start to seriously evaporate at temperatures 68F or 20C
you need to stay as cold as possible whilst bringing the Relative Humidity in the space down into the 40-30% to stay away from that nasty mold !
I used my cold storage room in the basement.. with a dehumidifier running to keep the space at 45% RH & staying at a constant 15c.
All while spreading the hash as thin as possible across parchment paper, on top of the white screens with a fan moving air across both sides of the paper.
Pictures 36-38
These are some macros i took in the middle of my drying session I fell in love with the colour.
Yes i know the black spots are plant material but they will get caught when i bag the hash & squish the oil out.
Thing to Note; at this stage it is important to ensure you 'micro plane" the hash down as fine as you can whilst staying weary of the temperature... any "chunks" will hold pockets of moisture.. that lead to potential problems..ie; mold ...
Picture/Video 39-41
Successfully planed bubble hash ready to be bagged and Squished !
Picture 42
Ive decided to follow Pedro.. from Pedros Grow Room and double bag to be on the safe side so i don't have any blow outs.
So thats One 25u bag inside one 160u bag ! :)
Pictures 43
This is almost 3 grams of the bubble hash from above, already melting in the bag.. this is where i ran into trouble again lol things started getting to warm in the house and i was only able to get one of the three squish's i did on video :( things started getting sticky.
Picture 44
This is basically just a photo of the equipment I'm using; 3x5 LowTemp Cage in the frame I built myself, with a 20Ton bottle jack.
Something to note here is this is an older Lowtemp model with only a single heating zone which is which i have it closed here heating Both sides of the press :)
As well as the importance of having adequate pressure on your plates.. my rig is very overkill for the size of hash bags..lol
Video 45
Here is the lovely press video.. its didn't quite work the way i wanted either lol my directional folding wasn't quite tight enough for a big "drip" :)
&the Press was set to 65°c
Photo's 46-50 are pretty self explanatory :) I had a blow out.. but still managed to pull an 80% return from the hash once squished...& yes it tasted amazing :)
Was it worth it in the end... that could be debated.. for some..i understand..its not your thing, but for those of us that are interested in making our own concentrates.. free from Solvents...
I wouldn't make it any other way :)
If even ONE of you reading this diary finds it helpful to reference for ANYTHING.....even if its "what not to do" ill consider it a success !
Thanks again for tagging along on this garden adventure.. its been one heck of a journey !
Much Love from B.C. Canada,
Until Next time,
Cariboo
Likes
42
Share


@Ganjagrandaddy
Follow
hi all. Here we are finally here with some of the ladies out and hanging to dry. It had been a fun week with trimming and hanging the Girl Scout cookie ladies. They finished so perfectly with a beautiful colour and terpenes oozing off them. Everytime I go up to the room , their sweet smell hits me before I get to see the other ladies. With about 6 days for #2 and 4 for #1 , I expect a few more days before they are even close to jar ready for a cure. Thankfully as they are organic and not needing to deal with leftover sodium based nutes, the terpenes should remain fairly intact with the very low 8°c and plenty of airflow keeping them rotating slowly. Rh is around 50% but not a mould risk thanks to the draughty eaves.
The remaining Amnesia Haze ladies are like wound springs now. They are still 2 weeks from their supposed harvest time but look ready now. If I didn't know that there is a second flush about to pop them wide open and swell them even more , it would be easy to pull them before their true ending . Still very smokable at this stage now but i am confident that they will have a second flush of fresh pistils any day now. There are signs of it starting on a couple of the mains so i will be using the Dragon force to support this for about 7 days , which is designed to boost them at their finishing stages. I rate this product and use it every grow. Well worth a look. The natural fading and the temperature drops at lights off are creating some amazing colours throughout the canopy now too. Thankfully experience allows me to enjoy this kaleidoscope of autumnal colours and not panic that I have a major deficiency going down. There are some nicely cannabalising leaves in the canopy too which is also a good sign that they are performing just as nature intended and gorging on the stored goodness from the big fans left on. They are a multi purpose leaf for the whole process from veg to finish , they change their role as the grow progresses and as soon as she notices that they are taking more to keep alive and become a sink instead of a gain , she will cannabalising the stores built up and shed the leaf herself. This is why I get stuck with the whole defoliation debate. With that said , I hope your weeks has been as much fun as mine and that you will be joining me in the upcoming tester strain runs of Fast Buds new 2022 unreleased strains to see what's in the pipeline for the autoflower world. Be lucky folks.

Likes
47
Share


@terpproducer
Follow
👇 This week:
---
Watered again as usual with the standard Plagron scheme + Calmag (last feeding with Alga Grow) (PLEASE CHECK YOUR WATER BEFORE USING CALMAG)
Phosphorus foliar spray - red stems pretty much gone now
PPFD at canopy height approximately 350-400, VPD ~1
Performed a major defoliation again
Ordered more Autopots 😂
---
Happy growing and thanks for checking out my report! I really appreciate you! 😁💪🙏

Likes
22
Share


@bypado_farm
Follow
Day 49:
Watered each plant with 1L with nuts
1568 ppm, 3345 us/cm, 3.3 EC (purple punch, strawberry banana, wedding Cheesecake)
1573 ppm, 3346 us/cm, 3.3 EC
It wasn't me who did the feeding
(gorilla cookies)
2 different feedings for the 10 plants
Day 51:
Watered each plant with 1L with nuts
1562 ppm, 3325 us/cm, 3.3 EC (purple punch, strawberry banana, wedding Cheesecake)
1514 ppm, 3293 us/cm, 3.2 EC
It wasn't me who did the feeding
(gorilla cookies)
2 different feedings for the 10 plants
Day 53:
Watered each plant with 1L with nuts
1632 ppm, 3472 us/cm, 3.4 EC (purple punch, strawberry banana, wedding Cheesecake)
??? ppm, ??? us/cm, ??? EC
It wasn't me who did the feeding
(gorilla cookies)
2 different feedings for the 10 plants
Day 55:
Watered each plant with 1L with nuts
1655 ppm, 3521 us/cm, 3.5 EC (purple punch, strawberry banana, wedding Cheesecake)
2142 ppm, 4557 us/cm, 4.5 EC ?
It wasn't me who did the feeding
(gorilla cookies)
2 different feedings for the 10 plants