


Likes
Comments
Share


@GrowGuy97
Follow
This lady got cut on day 63, I am extremely impressed with how she turned out considering she got nothing but PHed water the entire grow! She is extremely sticky & frosty and has a unbelievable smell everytime you open the jar! Definitely one of my favorite strains I have grown so far can’t wait to see how she does using nutrients next grow! If you havnt already I highly recommend going to check out Doctors Choice seed bank for some fire genetics & all around great people! Thanks for following the grow & stay tuned for the Rock Machine & Doctors Choice #1 harvest coming soon! Happy growing friends!🌱✌️🏼🙏🏼

Likes
48
Share


@AsNoriu
Follow
Day 57. Statement :
Even with hard beginning - thats my best run ! Zamnesia is AMAZING !!!
With veg hiccups, they still bushout to really nice plants in less than 7 weeks. Now Blue Dream is targeting my roof, Kalini Asias are thick as f@ck. Runtz very dense plants, thought they would be a bit bigger ...
They drink every 36 hours, hard to keep up with work, but i do my best not to screw up with them ;)
This week : feed, water, water. Defoliation too !!!
Day 59. That game - "who will reach sealings" - I don't like !!!!
Moved lights two days ago ... Soon i will need axe for my roof !!! ;)) That Monster Blue Dream is insane !!!
Hope will do heavy defoliation in two days, maybe this will shock her ;))) other plants keep up with her and canopy is even without all three Blue Dreams. Huge plants.
Day 60. Video is showing how less space is left, but they just keep climbing !!! ;))
Day 61. Thinking to defoliate all girls tonight, but maybe i will do it after next watering. Had to reposition them, loads of branches need to be chopped, some didn't see light for last two weeks( Curly, looks like sh$t, will never reach light). Girls are too big for my setup and i really hope it will be enough light and HEIGHT for them...
And so Defoliation has started !!! Hope everything will go fine !!!
All done !!
With the thought " WHAT HAVE I DONE !!!!??????!!!!!" i go to try to fall asleep ;)))
Happy Growing !!!

Likes
3
Share


@Wiggsix
Follow
Jue19mayo
Hermosa por donde se la mire.
Vie20mayo
Hoy se hizo una defoliación intensa sacando hojas satélites q no suman, y poda de bajos..
Sab21mayo
Entrenando ramas con impresiones 3d, para no andar atando las ramas..
Mar24mayo
Linda y fuerte..
Vie27mayo
Se realizo una nueva defoliación de la cual no saque fotos..
Likes
62
Share


@Chucky324
Follow
Hello.
I've harvested the Mega Mouth. WOW!!! I'm very impressed with this strain. Over 1.5 k for 5 plants. and it was finished by Aug 20 with the tents help.
I'm trying some new (for me) categories to add to my report.
Plant Stretch (PS) 1 to 5- 1 is hardly any stretch.
Bud Mutation (BM) 1 to 5- 1 is a beautiful normal bud- 5 is big weird growths like foxtails.
Trim- How easy or hard it was to trim up 1- you blow on the branch and hang it up. 5- Is very hard to trim takes a long time.
About- Best guess on the THC % (I've been smoking a long time)
Resin- 1 is super slippery 5- is very sticky like Gorilla Glue.
Size of Buds (SOB) 1- is very small 5- is the biggest buds
Dense- 1- is the lightest or fluffiest 5- is the rock hard buds your bud buster has trouble busting up.
Plant #1 Wet Trim 1647 g
PS. 3.5
BM 3.5
Trim 4
About 21%
Resin 4
SoB 4
Dense 4
Finished Dry Weight 289.5 g or 10.33 oz.
Plant #2 Wet trim 1606 g
PS 3,5
BM 3.9
Trim 4
About 22%
Resin 3
SoB 4.7
Dense 4.3
Finished Dry Weight- 302 g or 10.78 oz.
Plant #3 Wet Trim 1635 g
PS 3.7
BM 3
Trim 2.8
About 20%
Resin 2.8
SoB 3.7
Dense 4.5
Finished Dry Weight- 314 g or 11.21 oz.
Plant #4 Wet Trim 1753 g
PS 2.5
BM 2.5
Trim 3
About 22%
Resin 4 Falls off easily- Clumpy
Dense 2.5
Final Dry Weight- 343.5 g or 12.26 oz.
Plant #5- Wet Trim 1787 g
PS 3.5
BM 3.7
Trim 3
About 24%
Resin 2.5
Dense 2.5
Finished Dry Weight- 355.5 g or 12.69 oz.
The taste is sweet and smooth to go down with a nice balanced buzz. There was some pests around. I found thrips damage in veg and got some Spinosad to take care of that. Saw some fungus gnats around but they didn't do much damage. Easy to grow and trim. This is a recommended strain.
Chuck.

Likes
25
Share


@Dunk_Junk
Follow
She is growing well this week. Making leaves to catch the lovely light!

Likes
Comments
Share


Likes
9
Share


@DoctorCannas
Follow
Welcome back friends of growdiaries.
have you seen?
The beautiful Canadian ladies of the expertseedbank.com grew in less than a week from 12/15 cm up to 65/70 cm.
This is incredible and magnificent.
The quality of the seeds is indisputable.
The quality of nutrient fertilizers as well.
Unfortunately last week I was very busy, and with such rapid growth,
I could not mount the net for the scrog, now they are too big for this method.
So they will grow free, with LST and HST, when needed, and defoliation. Have fun and see you next week

Likes
3
Share


@Farmerbry71
Follow
Day 87 for this AK Auto super frosty very heavy buds had to tie up all the branches loving life and haven't had any problems with bugs temperature or with the nutrients feed and its been very hot and lots of heavy rain here in Ontario Canada

Likes
10
Share


@couplethatgrows420
Follow
chopped on 11/19/2021
after wet trim got 604 grams of flower and 61 grams of trim

Likes
21
Share


@MicrowGrow420
Follow
Bushy little mama. Removed the tobacco plants as they were taking over the tent. She is on her lonesome now so she can make full use of the space available. Looking like she needs some defoliation pretty soon.
3/10 Gave her a radical defoliation. Took away about 85% of all the larger fan leaves and some lower canopy growth. I want all the plants energy to go into flowering and developing large kolas.
Don't expect the auto clone to get much bigger, so won't be potting up, but she may produce a decent kola.
Likes
11
Share


@Paradox_1ste1
Follow
Stardog room it is looking pretty good and is thriving. Hopefully get the results we asking for.
Aya room up to now is giving pretty impressive results and it looks like they like the enviroment even tho its not fully equiped.
After adding the c4 neet to celan the insides a little bit more and see how it will react.
Likes
4
Share


@cadaver420
Follow
Alga vera biobizz once more. NEXT TIME go with Bloom.
Smell sttrong.
buds hard as a rock.
Royal critical, royal gorilla, amnesia haze in the front smaller plants.
One week more for Bubble kush (in video) then harvest. More space i will have than.
Likes
11
Share


@mediterranean_pot
Follow
Mimosa cake is my favourite strain. This was the biggest I ever grew and without any issues. Also the largest ever by weight, 1430g wet including stalk which should leave me with much over 200g on this 😍Cant wait to have her cured.

Likes
7
Share


@High_And_Hydro
Follow
Ich bin zufrieden bis jetzt. Sie sieht gut genährt und gesund aus und hat den Umzug nach draußen gut verkraftet.
Likes
1
Share


@Mr_Maes
Follow
this is by far the tallest Auto i have ever had. Next time i will use a smaller pot or grow it in its own tent because she is HUGE. Im excited to see how the buds start stacking.

Likes
25
Share


@Zurban_Poison
Follow
oh my god she makes me fall in love with her every day! simply an amazing plant. the buds began to gain weight and grow in width 😍😳

Likes
Comments
Share

@NuclearPyro
Follow
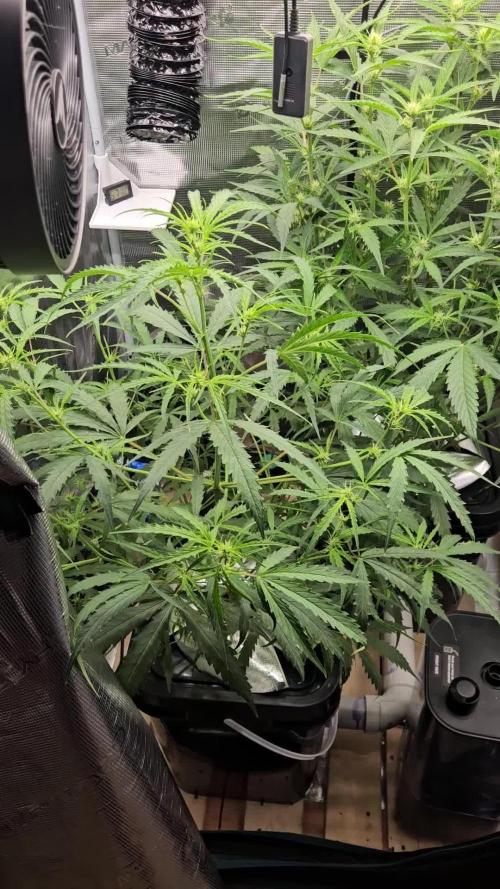
OG EVERGLADE-- Day 42
Overall status: EXCELLENT! Finished flower stretch, pom poms are increasing in size. Time to pack on weight.
PINEAPPLE RUNTZ-- Day 35
Overall status: EXCELLENT! Still in flower stretch, stems might not hold well with heavy buds. Finally caught up almost to OG in vertical height. Root system is finally established to expectations. RUNTZ are soooo finicky, any acute environmental change, they will toco, claw, and droop making you think toxicities and deficiencies. THEY DONT NOT LIKE ACUTE CHANGES IN OSMOTIC PRESSURE. ph must stay consistent with water levels and food.
Dropped ppm down to 350-375, seems like the sweet spot. Hard to determine which one is eating more bc of stress early on, age difference, and with 1 being IBL (pheno has week peripheral stems, tight internodal spacing then stretches crazy aka FINNICKY AF!) Nutes have been decreasing by 70-75ppm w/in 24hrs the last 6 days. Drinking 1-1.5 gal H2O in 24-30 hrs. Check stats today, ph stable, plants consuming at a HIGH METABOLIC RATE. I rather feed 3 times a week then 1 BIG 750ppm forcing the food. Switch to heavy bloom nutes since last week. Will feed 3rd time in a week tonight. My threshold is 200ppm. Consuming 175ppm in 48-60 hrs with 1.5 gals H20.
SORRY FOR THE BOOK I WROTE!!
HAPPY GROWS🔥🌲💨?😆

Likes
13
Share


@HeavyHead
Follow
So this is a combination of weeks 11-12 as they all went into 48 hours of darkness and cut down on different days. My got cut down on different days. Will post dry harvest pics next ;p
Likes
6
Share


@Growers313
Follow
purtroppo ho saltato la 2 settimana di fioritura perché ho merso le foto/video.

Likes
81
Share


@LockDownGrow
Follow
Ok so this week I did a defoliation and a tigh down too the netting , I really was not planning on doing such a big defoliation but the leafs became thick and dense and there was almost no light penitration down too the lower branches of the plant , so she is opened right up now and the humidity and temperature has dropped loads and the air is moving alot better around the leaves and branches , I will not take anything more off her now , I have also added Cal mag too the nutrients for this week only ,
I am very happy with them so far and being new too all this it's all very exciting ,
Thanks for looking :)
Likes
17
Share


@Zkittlezman
Follow
Incredibile ma vero...ho trovato alcuni ragnetti rossi in una zona del palco. Dopo aver rimosso la parte "infetta",ho dato una passata di piretro(essendo solo alla seconda di fioritura,non dovrebbe creare peoblemi ma,per ogni evenienza,mi sono procurato dell'olio di neem) e per ora,sembra che i ragnetti rossi siano definitivamente deceduti,speriamo tutti. Cmq il mio bellissimo veleno cresce e ci sono un sacco di cime che si stanno riempiendo di peletti bianchi