
Likes
Comments
Share


@Firepharmer
Follow
Flushed and Chopped everything in the last 7 days, very happy with both strains my best grow to date with the futur vert flora max 660watts led. Adding another futur vert Flora max 660watts for the next grow shit going to get crazy then .. the monkey berries with be trimmed Friday more pics to come them


Likes
13
Share


@MT420
Follow
Day 1: Paper towel method was used. Made sure plastic container stayed in a dark and warm place.
Day 2: Seed has cracked but no tail yet.
Day 3: Started to worry seed won’t germinate so top tissue paper was replaced with new dry one. Used warm water to wet the new paper towel. After 12 hrs crack in seed got wider little tail started to appear.
Day 4: Repeated method used in Day 3. Warm water used on new paper towel.
Day 5: Germinated seed placed in jiffy peat pellet and placed in propagator.
Day 6: no change yet. Put propagator in window for sunlight.
Day 7: no change so decided to intervene. Checked to see if seed cracked. Slowly removed the remaining shell. Covered with soil.
Day 8: Seed has sprouted. Put propagator under the sun for 9 hrs, and after it stsrted to open its first leaves.
Day 9: She’s enjoying the sun.
Day 10: Last day in the sun. Soil mix prepared and washed with water (ph 6.5). Transfer to 15L fabric pot tomorrow.

Likes
11
Share


@power88
Follow
esta semana creció muy pero muy bien mucho mejor que la otra semana se ve que el revegetamiento va mucho mejor y ahora estamos en una fase mucho mucho más productiva con corto espacio internodal muy pero muy buena cepa white widow dinafem, buena tolerancia a lo que sería estrés y buena tolerancia también a los cambios de horario maceta espectacular todo.

Likes
15
Share


@Deli_Weed
Follow
Esta es mi primer planta que cosechó con éxito, y estoy muy feliz con mi resultado final 😄 obtuve una muy buena cantidad de flores premium con alrededor de 15% de thc (desde mi punto de vista claro 😅)
Tuve algunos problemas durante el cultivo, principalmente que deje que se estirara mucho, debi hacerle LST a la punta principal para que no siguiera aumentando la altura y tener más flores del mismo tamaño, las flores más bajas quedaron chicas y les faltó madurar un poco, también tuve problemas de sobrefertilizacion aun a pesar de que seguí las instituciones de los fertilizantes y de sus indicaciones que me dieron los de servicio al cliente, incluso ya teniendo en cuenta eso siempre use la menos de la dosis de la base ya hasta que crecieron más le fui aumentando, igual creo que es muy cierto lo que dicen de que “menos es más” a la próxima empezaré usando muy pocos nutrientes, aparte creo que si hubiera usado unos leds más potentes, las plantas hubieran aprovechado más los nutrientes, pero igual me sirvió de experiencia, pienso cultivar de nuevo esta genética y sacarle más provecho. Muy recomendada 👌🏻😁
Likes
9
Share


@Xabii
Follow
The ORP probe is not calibrated and values are to be taken with a grain of salt.
Values are average of the day.
DATE - °C - RH% (Tent Temp/RH)
20240815 24.4 70.3
20240816 24.2 70.5
20240817 24.2 75.4
20240818 23.0 69.3
20240819 23.0 62.9
20240820 23.2 64.2
20240821 22.3 63.4
DATE - PH
20240815 5.63
20240816 5.69
20240817 5.58
20240818 5.85
20240819 5.90
20240820 6.23
20240821 6.21
DATE - ORP (mV)
20240815 60
20240816 48
20240817 35
20240818 18
20240819 3
20240820 -12
20240821 -15
DATE - EC(us/cm)
20240815 2141
20240816 2135
20240817 2191
20240818 2089
20240819 2107
20240820 2117
20240821 2169
DATE - CF
20240815 21.41
20240816 21.35
20240817 21.91
20240818 20.89
20240819 21.07
20240820 21.17
20240821 21.69
DATE - °C (Reservoir)
20240815 22.5
20240816 22.4
20240817 22.8
20240818 22.2
20240819 21.4
20240820 20.9
20240821 21.1

Likes
3
Share


@Diy_autoflowers
Follow
Put too much medium in the pots. Gonna have to bottom feed till flower.

Likes
3
Share


@Dungeonbeard
Follow
Dealing with humidity issues with the amount of green in the tent. I really don't want to defoliate too much more. Around 62% rh with tent closed. Added another fan to keep air moving. I have a small dehumidifier arriving tomorrow, so that should help. Smell is becoming pretty strong.
Likes
422
Share


@Crashoverite
Follow
Hi all 🧑🌾
Welcome to my 🍌💜👊 week update.
Hope everyone keeping well and having a great week😁
Thank you so much for so much support on this bananas ride 🙏💜💚💜💚
Everything still going pretty well. Girls are developing and stretching like crazy. Athena currently Dec 14 90cm and main stem of Xena is not far of this height either. Unfortunately noticed first signs of calcium deficiency(my opinion) on Athena. Thankfully started feeding both girls with calmag weeks back but the dosage wasn't not enough for Athena. Started small treatment very next day on Dec 11 (see description below) I belive got my baby back on right track.
Week 9
Dec 11-17
Dec 11
Watering was planned for Tuesday but due to calcium deficiency decided for a little treatment. Watered both girls with mixture of reduced content of growth nutes by 50% calmag at 1.2 ml per ltr. Reduced solution PH to 6.2 as apperently it's ideal for calcium consumption. Over period 4h I have watered Athena with 5ltr with couple runoffs. Xena 3ltr. Total of 7-10 leaves affected mainly at top colas close to the light.
Dec 12-13
Purely observation and all looking well. Of course all affected leaves will progres of showing signs but good news is that growth and development booming and don't see any new leaves with symptoms.
Very nice trichomes development in recent days and more and more colours.
Dec 14
Second watering for this week 6.5l Increased calmag to 1.4ml per ltr and if still things will be looking well reduce to 1 or 1.2 on next feeding.
Dec 15
Very nice respond on yesterday feeding. They definitely fatten over night and getting more and more frosty. Will need to remove some foliage soon as getting extremely bushy again.
Dec 17
Xenas main stem top cola almost touched the light today. Tied her to left side of the cabinet, applied selective defoliation on both girls, tied few branches to netting and on the end of this busy day a third watering for this week. 7 ltrs beetwen both. Runoffs Xena PH6.4 Athena 6.3.
Very nice week have to say. I belive that calcium deficiency on Athena is no longer a case here and both girls developing very nicely. Both are still stretching, buds are gaining in size and both girls started exploding with trichomes,
Thank you all again for such amazing support 🙏peace and love brothers and sisters ✌️💚💜💚💜💚
Stay tuned for new week update 😉🧑🌾✌️💚
Likes
22
Share


@bypado_farm
Follow
16 days of slow drying each plant with the environment controlled inside the tent with 2 meters.
I have two fans on, pointing at the floor to circulate the air
temps - 20 - 23 º
humid - 50- 60 %
Likes
4
Share


@Minuteman_Organics
Follow
Things are finally moving along. The greenhouse is getting pushed to next year due to rain every weekend. Still growing the plants next to the location just gonna have to scale back and put two plants in each 65 gallon. They will be trained with a trellis net heavily to compensate.
These girls are up to 16 tops each. Hoping the heavy training will pay off for this pivot

Likes
7
Share


@Lifesgarden420
Follow
She is definitely looking very potent
She did not grow very tall but she looks very dense and very frosty

Likes
10
Share


@Elguacho420
Follow
Muy buenas a tod@s... Octava semanita de la lemon cookie kush... Ya estamos en los días finales, hermosa y preta flor, rico aroma y bastante recina parece... Una limpieza y listo... Hermosa planta... Me encantó... Buen finde para tod@s y buenos humos... 😎💪🏻🇦🇷🤝🏻🇪🇦💨💨💨

Likes
29
Share


@THCeitor
Follow
Ya estamos a medio camino del proceso, las plantas se ven sanas y con una leve ventaja de la Red Strawberry Banana #2, la cual muestra una floración mas adelantada que la #1 como muestran los videos. Se nota un tono purpura mas oscuro en la R.S.Banana #2 y un tono mas claro en la R.S.Banana #1, la cual muestra un tallo de gran proporción quizás por un leve exceso de Nitrógeno.

Likes
33
Share


@Seldom_Seen
Follow
This plant was an experiment in the corner of my grow space in a 6ltr pot. I was thinking if I got an ounce off it I would be lucky. It took 15 weeks and here I am now with 3 ounces of super sweet smelling Rhino Ryder 🦏
Likes
31
Share


@Grey_Wolf
Follow
Super Skunk Kush GOG Autumn Cup
18th January 2022
She is looking good 😀
should start to see some stretch now that flowering is getting very close .
I'm hoping it fills the wire cage by the time it is in full bloom we shall see 😎
Waiting on some guano for the bloom booster as well as a few jars of molasses .
I am enjoying this grow so far and hope I can do well in this comp by getting some frosty bud at the end 👊
Thanks once again for stopping by 👍

Likes
9
Share


@Gogogorman1
Follow
Slow and steady. Used different training methods on each of the 3 plants


Likes
31
Share


@MrJones
Follow
MrJones VIPARSPECTRA XS1000 LED
📜 SUMMARY - I have been given the opportunity to run the next generation of LED lights by VIPERSPECTAR, the XS1000! I set up a Stealth Cabnient and moved 3 Cream Manderain Auto XL.s under these lights, the cabinet set up is automated with WIFI light controllers, and INKBIRD Temperature and Humidity Controllers, I am very excited about this opportunity!
Specs and Discount Codes Listed Below.
🔹🔹🔹🔹🔹🔹WEEKLY GOALS 🔹🔹🔹🔹🔹🔹
🌞Environment - 80F and 50%Humidity - using Humidfyer as needed.
💧 Feeding - Feeding with FOOP Canna Organic Nutrient Line
🍃Training / Keeping Stems Stable and Strait
🕷️ IPM - Will be using Green Cleaner" 1 OZ per Gallon, and CannControl from Mammoth alternating between product each month for Integrated Pest Management.
💡 Vegetation & Flower (new) Viparspectra XS-1000 Release on March 15th.
🔹🔹🔹🔹PLANT UPDATES🔹🔹🔹🔹🔹
🌱 Plant #1 - Week 5 Flowering is starting to happen, should see more stretch this week, she is about 15 inches wide not.
🌱 Plant #2 - Week 5 Flowering is starting to happen, should see more stretch this week, she is about 12 inches wide not.
🌱 Plant #3 - Week 5 Flowering is starting to happen, should see more stretch this week, she is about 12 inches wide not.
🔹🔹🔹🔹🔹🔹🔹🔹🔹🔹🔹🔹🔹🔹🔹
▶️Monday 03.23.21 / Plants are starting to flower, I decided to defoliate and remove many of the small sucker branches, I would prefer the hormones being spent in the larger and more productive colas, I also fear that these plants may outgrow their space, we will see,I am moving the feed up to the next level as well. I am amazed that just at a week under these VIPARSPECTRA XS1000 LEDs they have almost doubled in size, the FOOP Canna nutrients are so easy to use and the plants just love them!
▶️Tuesday 03.24.21 / These girls just keep stretching, not much room left under the lights feeding FOOP 30 ounces each day.
▶️Wednesday 03.25.21/ Feeding FOOP 30 ounces per day.
▶️Thursday 03.26.21 / Feeding FOOP 30 ounces per day.
▶️Friday 03.27.21 / Feeding FOOP 30 ounces per day.
▶️Saturday 03.28.21 / Feeding FOOP 30 ounces per day.
▶️Sunday 03.29.21 / Feeding FOOP 30 ounces per day.
🔹🔹VIPARSPECTRA XS1000 LED🔹🔹
Amazon US:
XS1000 10% off: in10MrJones http://yx-8.cn/0y-6
XS1500 5% off: in15MrJones http://yx-8.cn/0yA
XS2000 5% off: in20MrJones http://yx-8.cn/0y2Y
XS4000 5% off: in40MrJones http://yx-8.cn/0y5k
Amazon Canada
XS1000 10% off it10MrJones https://amzn.to/38udUVe
XS1500 5% off: it15MrJones https://amzn.to/3esVUyr
XS2000 5% off: it20MrJones https://amzn.to/3l5zAfg
XS4000 5% off: it40MrJones https://amzn.to/3l7k5Uj
Processing
Likes
7
Share


@Adam420
Follow
2 inches in 2 days average
Day 45 of 49: 25 inches
Day 47 of 49: 26 inches (topped tip)
Day 49: 26.5
STILL IN VEG
It’s a Sativa but my first grow. Having Indica and Sativa I can tell much differences.
Day 45. Grew 2 inches. 2nd spray down. Heavy feeding dose. Topped he tip
Likes
35
Share


@Hiroots420
Follow
25/06/2021 (F DAY 28)
Se agregó unos 5L de comida en modo top dress.
Se agregó harina de todo tipo, humus, compost, microkashi, bokashi, guano, etc.
La flora viene muy bien y los olores son muy intensos y sabrosos.
Sweet Cheese:
Posee el desarrollo de flora mas rápido, lleno de tricomas y con un aroma intenso a queso.
Black Afghalien:
Posee un característica muy particular de pistilos super finos, el olor a incienso con resinas es increíble.
El color característico negro de la black está apareciendo al mes de flora con el descenso de la temperatura.
Pomelo Haze:
Es la flora más lenta pero sin duda alguna es uno de los mejores terrenos que poseo en esta carpa.
Tiene bastante distancia internodal y muy poca ramificación.
Likes
38
Share

@Brujha77
Follow
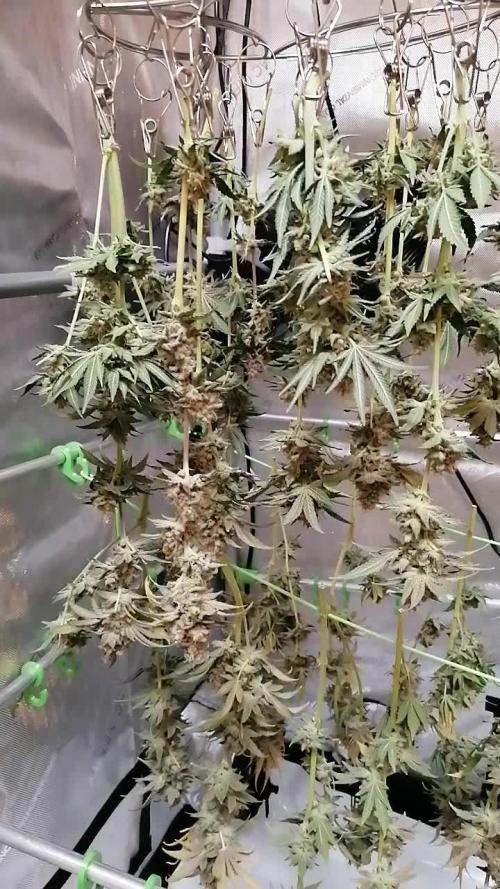
So,
Die Damen haben es geschafft. 🍾🍾
Hängen nun zum trocknen im Zelt bei ca 22° und 55-57%Rlf
War wieder ein recht entspannter Durchgang.
Riechen tun sie mal sehr interessant, gute frage wie Man's beschreiben sollte🙄🙄
Die Airpots funktionieren einfach super, und auch das Scrog Netz (Inferno Harvest) ist extrem praktisch.

Likes
2
Share


@BenjasGrasgefluester
Follow
Die Lady‘s sind jetzt 20 Tage alt und entwickeln sich weiter sehr gut!
Sie wurden vor 4 Tagen in 0,6L Töpfe umgetopft und werden die nächsten 10-14 Tage in den neuen Schuhen bleiben.
Lampe läuft auf 75%.
Die Erde wurde mit 10g Bio Grow Pulver Dünger von Greenhouse Feeding angereichert.
Zudem wurde heute gegossen und das Wasser mit Big Plant & Power Plant von Organics Nutrients versetzt.
Schönen ersten Advent und bis zum nächsten Update 🏻
