
Likes
Comments
Share


@Northerngarden85
Follow
Looking nice now taking a bit for feed now
The smell is definitely getting stronger now really looking forward the see these baby's in final stage also big shout out the @barnysfarm my seed have arrived today ready for launch. And new diaries tk come piece out growmies update few pictures when lights are off 🍋🍋

Likes
33
Share


@XG_Jack
Follow
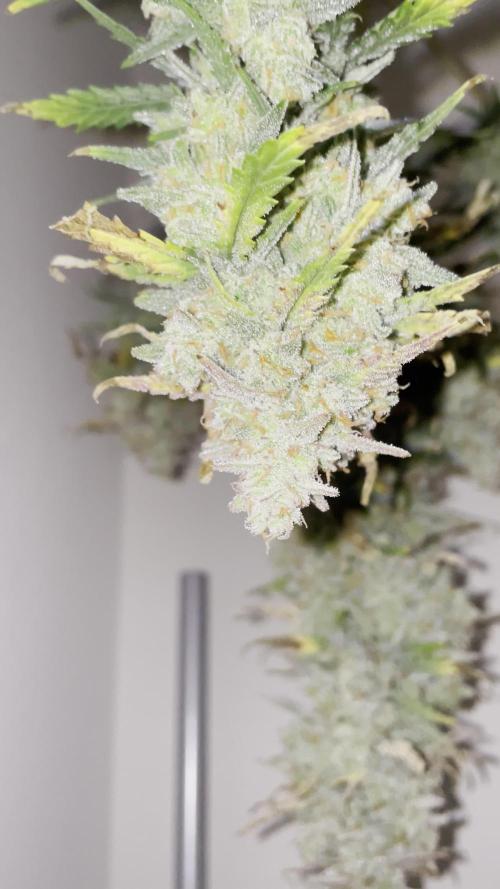
Trichs are starting to change to Amber about 10% giving it a flush for a few days then 24 hours darkness before chop. Very happy with the bud structure here. Very nice purple and red fade

Processing
Likes
3
Share


@HeavensHarvest89
Follow
Great week a lot of new growth.. looks like this will be a rather large plants and its producing a lot of bud sites thanks to the training.. still no sign of flower but not worried hoping she will stretch some more.. but overall throughly impressed with the genetics

Likes
15
Share


@Nimas
Follow
Hello everyone 🍀
The girls are in pre flowering stage!
So far so good 🙏
Cheers 🍀 ❤️

Likes
33
Share


@Roberts
Follow
Cali Crasher is doing really good under the Hortibloom Solux 350. Everything is doing really good, and fingers crossed for a great finish. Thank you Hortibloom, and Doctor's Choice. 🤜🏻🤛🏻🌱🌱🌱
Thank you grow diaries community for the 👇likes👇, follows, comments, and subscriptions on my YouTube channel👇. ❄️🌱🍻
Happy Growing 🌱🌱🌱
https://youtube.com/channel/UCAhN7yRzWLpcaRHhMIQ7X4g


Likes
8
Share


@Highclass
Follow
10-15 days to go, depending on plant. Some of them starting to show mature trichomes.
Going full dose of all nutrients this week.
After 2 aply of neem, there is no more black flys!!


Processing
Likes
10
Share


@CanadianFillmore
Follow
Start of week 3! All three plants have had great bud site development during the last 2 weeks. The Super Lemon Haze is a bit thirstier than the Blueberries, so the Slh got and extra 2 liters of feed during week 2. The Slh is also showing deficiency, hopefully with the addition of B52 to the feed cycle, she'll come around. On th blueberries, there has been some rust spots appearing on the largest leaves, I removed the worst one's and will monitor more closely this week, if that issue continues or not. These babies are very bushy, they take up 80% of my grow room space, very excited about this grow and these plants.

Likes
9
Share


@n1mbu5
Follow
Please like and follow my diary and check out my others!! Would appreciate the support🙏
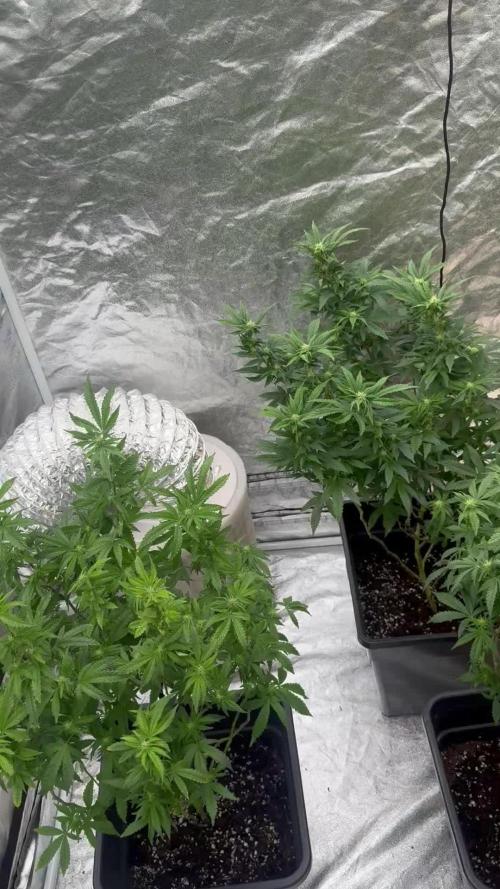
Ok guys week 4 starting now and these girls have gotten all bushy and lushy!!
I am just now setting up and starting to play around with time lapses lol here are my tester videos to start. Any pointers and tips would be greatly appreciated👏
Soo the girls are doing great done a little lst and neem oil applied last night for pest prevention
I wanted to bend down their main stems and do a little hst but unfortunately their main stemsare waaaay to thick for it, I'll add some pics later
Ok and as for feeding we are following the advanced nutrients feeding schedule
I have measured EC and PPM this time but i need to go find my notes will add it into this weeks diary
*update*
1.5l water per plant
EC 1.3
PPM 650
.............
Ok that's it for now I've got another time lapse running so I'll add that one later today too!
Likes
112
Share


@Tropicannibis_Todd
Follow
ALRIGHTY THEN
REMINDER I DO 2 UPDATES PER WEEK 👉WEEKLYROUNDUP👈👉MIDWEEKLY UPDATE👈
We just hit week 12 and all is well , have to admit shes just killing it on the resin development 😃 ......the frost is insane 👹...... Just waiting for her to ripen up👈
👉NutriNPK NUTRIENTS USED FOR FEEDING👈
Lights being readjusted and chart updated .........👍
I GOT MULTIPLE DIARIES ON THE GO 😱 please check them out 😎
👉IF ANYONE IS LOOKING FOR A PLACE TO HANGOUT VIA GROWDIARIES AND TALK GROWING AND JUST CHILL AND WHATEVER .....👈
👉I CREATED GROWDIARIES DISCORD SERVER !!!!!!!!!!!👈
LINK IS 👉
https://discord.gg/zQmTHkbejs
AND SEE HOW IT PLAYS OUT !!!!!!!
Likes
161
Share


@FrontRowAG_BrianG
Follow
WEEK 5 START OF DAY 29
I should say if you watch the video this week💰buy the cheaper single laser thermometer💰it is hard to get the dual infrared thermometer to hit a single leaf blade.
I have the nutrients selected only to get noticed in the different categories on this site. I’m trying to get Front Row AG listed as a nutrient selection on Grow Diaries.
⭐️Nutrients used this week⭐️
Front Row AG Si .5ml per gallon
Front Row AG Part A 2.9g per gallon
Front Row AG Part B 2.0g per gallon
Front Row AG Phoszyme .4g per gallon
Front Row AG Bloom 2.3g per gallon
Front Row AG CleanUp .2g per gallon
All nutrients are mixed in that order and allowed to fully dissolve in RO water before mixing into 60 gallon tank of RO water. So far so good.
At the end of this week the plants will be flushed with a 1.0EC solution of calmag and Canna pk13/14 and allowed to dry all the way out…to the point of oh shit that’s dry. Then I will boost the EC for 2 weeks to Front Row AG’s high strength chart. These are the last 2 weeks of heavy feeding. Then one week of lower nutes and 1 week to 10 days of flush.
For my first time running Front Row AG nutrients, things are going great. I defoliate leaves here and there daily. It just seems like the shit grows right back by the next day 🤣.
Mandarin Cookies has a lot less leaves than the old school strain that is in the room. I’ve got 3 keeper phenos and will show them prominently in next weeks photos. I’ve got one in particular that smells like sour oranges and gasoline…hopefully it fattens nicely over the next 3 weeks and will be my keeper for a mother plant.
Thanks for all the comments and I’ll see you next week

Likes
12
Share


@Onlysquifflehere
Follow
This week has been amazing nothing but growth and bud sites she is starting to fatten up now and within weeks it'll be stacked with those big nugs!!

Likes
35
Share


@Da420Andi
Follow
Howdy it is day 63 and in 2 days it is time to harvest. Since 2 weeks i feed clear Walter only. They get 16 hours darkness before harvest. All the plants are really🔥
My favourites are still 3G and Wedding Gelato. The smell and Look is crazy. You will see i guess Also North Thunderfuck and Hulkberry is good looking. The weight of North Thunderfuck for the dice is insane.
I wish everyone a nice Day and good time. Stay safe 💚
Likes
57
Share


@LockDownGrow
Follow
Ok so this week I did a defoliation and a tigh down too the netting , I really was not planning on doing such a big defoliation but the leafs became thick and dense and there was almost no light penitration down too the lower branches of the plant , so she is opened right up now and the humidity and temperature has dropped loads and the air is moving alot better around the leaves and branches , I will not take anything more off her now , I have also added Cal mag too the nutrients for this week only , she is well into pre flower now but the stretch has not yet started so I figured it's no or never too defoliate and tigh them down , this grill really has grown right out this week and is unrecognisable from the plant just a few days ago ,
I am very happy with them so far and being new too all this it's all very exciting ,
Thanks for looking :)

Likes
14
Share


@TickTockCroc
Follow
So, I harvested my 2 older girls around 4 weeks ago, the 2 younger ones took that extra 4 weeks, just chopped them now! Initially, I was really upset when I harvested the first two - they just looked really bad and loads of fluffy larf. So, I wrote a negative review but I deleted it because when I smoked some, it was really good! LOL. But still just had no good aesthetic. I decided to feed the younger ones way more nutes than I was giving the other ones, and increased the rate of water feeds... and WOW. They responded so well and they came out HUGE!!!! MAN!!! These nugs came out beastly. The older ones 100% were being fed way too low a dosage of nutes, and were not watered frequently enough.
I've only just chopped them all and hung up to dry. Will update with a smoke report when they're ready!
So, the pics im posting are of the two younger plants that were harvested later. I do not have pics of the earlier harvest, unfortunately, but it looked terrible (from my own doing it seems as I mentioned above). As you can see in the first pic, I had to hold her up as she was falling over on her own weight because the nugs were so heavy (actually had to use many ties to keep both the plants from falling in the final 2 weeks).
Not too many pics but just an idea of how they were looking. Dense, big, frosty - not SUPER gassy in smell but still smells good! The side branches were all looking like main colas! Didn't LST or anything, just a bit of lollipopping and let it do its thing! Each pic is of a different bud site. Will also update with more details such as weight when it's dry!
Stay safe, friends!
┏(^0^)┛
-TickTockCroc
Likes
36
Share


@Erpollic3verde
Follow
Bene amici growers come potete vedere la fioritura procede senza molti problemi. Ho innaffiato le piante per la prima volta con una soluzione adatta alla fioritura e ora staremo a vedere come pian piano cominceranno a gonfiarsi i nostri amati fiori.
Le piante iniziano ad emanare un profumo inebriante, le Durban posion stanno già assumendo un colore violaceo mentre le critical sembrano un po' più in dietro. Vi ringrazio anticipatamente nel caso lasciate un like!!


Likes
28
Share


@GodZilla_Owner
Follow
The Bruce Banner shows the first pre-flowering in Veg4. Plants are growing well but the size of the tent doesn't make it easy.
The plants have already been switched to a 12/12 light cycle.