
Likes
Comments
Share


Likes
3
Share


@Bluemels
Follow
Tag 44: Wie von Zamnesia empfohlen fange ich jetzt schon an zu Spülen. Ein bisschen später als empfohlen jedenfalls. Weil die Pflanze schon so helle Blätter hat.

Likes
16
Share


@AestheticGenetics
Follow
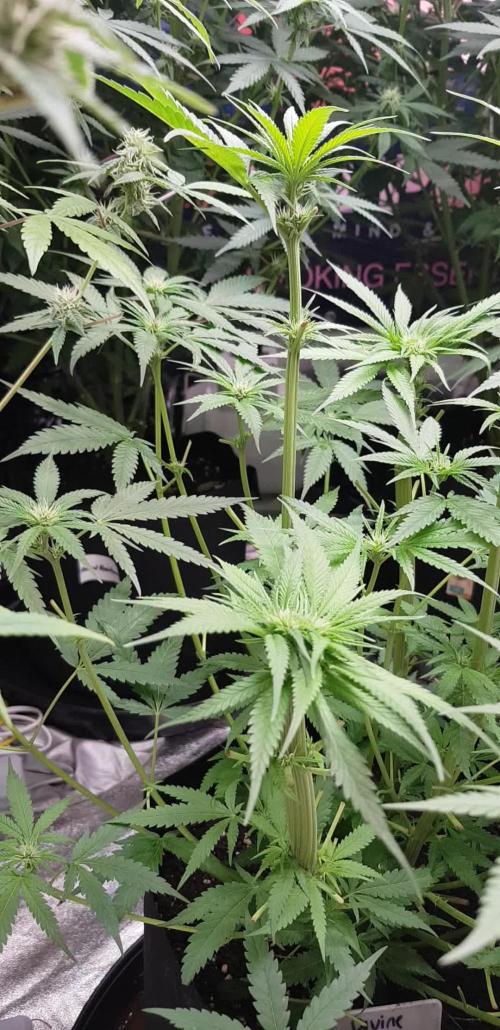
4/15/25 This plant is blowing my freaking mind. Long stacked colas. Even the lower buds are plumping up like golf balls. This is an exceptional plant so far.
Shes starting to show the classic "sherbert" purple that ive noticed shows up with anything that has sunset sherbert in the lineage. Some of the leaves are starting to fade slightly and the purple is coming in.
The rs11 that this seed came from, produced the most from a single plant out of all plants ive grown and trained and kept that small. She yielded 3.5 ounces or a 1/4lb of top nugs from a plant that was only about 18 inches tall and vegged for 6 weeks before flip.
Once i start to clear out all of the fan leaves later on in flower, its just going to be buds running the length of the stems
4/18/25
I really believe this may be a keeper. She is absolutely stunning. Just everything is perfect. She has super long stacking of buds up and down the stems.
Im actually super stoked to see how she finishes up.
One of the craziest parts is that shes in a plastic 2 or 3 gallon pot and this plant is going to yield insane.

Likes
15
Share


@Chubbs
Follow
What up grow fam. Weekly update on these three. One of them is ready for the chop this week and the other two don't look far behind. I'm excited to sample this one as the flower are mesmerizing with trichs all over.
All in all Happy Growing
Likes
7
Share


@CannabisAprendiz
Follow
Esta cosecha fue muy buena con excelentes resultados de flores muy compactas y demasiado resinosas , la genética en sí es muy resinosa con olor muy característico , con sabores terrosos muy marcados .
Likes
3
Share


@Moli77
Follow
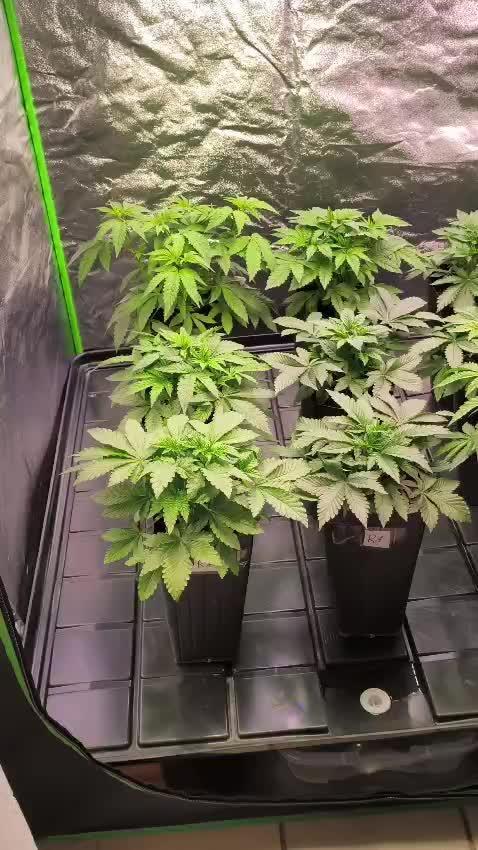
Vorab, die sind bisschen durchs Zelt gewandert. Beschriftung von links oben nach recht unten, von links nach recht.
Ich habe mich gescheut viel auf einmal abzuschneiden, hab lieber 2-3 Tage gewartet, geschaut wie sie es annehmen, bis es wieder notwendig war zuschneiden, um die Mitte der Sherbet Queen freizuhalten und Blätter die kein Licht bekommen wegzunehmen.
Bei der Sherbet Queen habe ich die ersten Seitentriebe der unteren beiden "Haupttriebe" entfernt, da diese eh lost sind und die Pflanze sich deshalkb auch mehr gestreckt hat.
Die Cherry Pie, mein eigentliches Sorgenkind, sieht mittlerweile aus wie ein richtiger Blumenstrauß, hier habe ich das LST zum richtgen Zeitpunkt angwendet.
Bei der Hulkberry ist mir einer der ersten beiden Seitentriebe, der zu einem fetten Arm hätte werden können, leider abgebrochen, außerdem zeigen zwei weitere Risse durch das biegen der Stiele. Sind schon wieder verheilt, nur jetzt angeknackst und nicht mehr allzu stabil.
Ansonsten immernoch sehr zufreiden.

Likes
13
Share

@GERGrowDesigns
Follow
Welcome to Flower Week 2 of Divine Seeds Divine Rapier
I'm excited to share my grow journey with you from my
Sensi Seeds Project . It's going to be an incredible ride, full of learning, growing, and connecting with fellow growers from all around the world!
For this Project , I’ve chosen the Feminized Photo Strain Divine Rapier:
Here’s what I’m working with:
• 🌱 Tent: 120x60x80
• 🧑🌾 Breeder Company: Divine Seeds
• 💧Strain Info : 29%
• ⏳ Flowering Time: 6-7weeks

Likes
Comments
Share


@BruWeed
Follow
18/10 - Cumple 6 semanas en etapa de floracion. Su evolución fue muy rapida y los cocos se encuentran muy bien desarrollados. El banco recomienda dejarla en floracion de 8 a 9 semanas.
Se encuentra muy resinosa con mucho olor. La parte principal parece un arbol.
No tuve ningun problema en toda su etapa. Los nutrientes los tomo de forma perfecta, las chalas se encuentran verdes y perfectas. Solo en la parte baja estan un poco amarillas pero es normal por que la luz no llega.
Podes seguirme en instagram como @bruweed_arg

Processing
Likes
8
Share


@Majormolasses
Follow
It’s crazy to think it’s only been a weeek she has put on some massive size I’m loving everything about this strain hands down the smell the size the the ease of the process of the strain like everything but the very start has been cake like I don’t have much pictures cause I forget about her that’s how easy this Auto is.

Likes
42
Share


@MadeInGermany
Follow
Hey everyone 😊.
A nice week is over, which I would like to tell you about here.
Flowering day 8
Today the tent was cleaned, the humidifier filled and the plants checked for health.
Flowering day 9
Today was watered with 1.2 L (see fertilizer table) and the plants were sprayed.
Flowering day 10
Today there was nothing to do except for a check :-).
Flowering day 11
The tent was cleaned, everything checked for health and the humidifier refilled.
Flowering day 12
The electronics have been completely checked for functionality again.
Flowering day 13
Today it was poured again, but this time with 1 l each.
Flowering day 14
Today the tent was cleaned again and the health of the plants checked.
I wish you a lot of fun with the update, stay healthy and let it grow 🙏🏻🍀
You can buy this Strain at :
https://sweetseeds.es/de/cream-caramel/
Type:
Cream Caramel
☝️🏼
Genetics:
Blue Black
x
Maple Leaf Indica
x
White Rhino
👍
Vega lamp:
2 x Todogrow Led
Quantum Board 100 W
💡
Bloom Lamp :
2 x Todogrow Led
Cxb 3590 COB 3500 K 205W
💡💡☝️🏼
Soil :
Canna Coco Professional +
☝️🏼
Fertilizer:
Green House Powder Feeding
☝️🏼🌱
Water:
Osmosis water mixed with normal water (24 hours stale that the chlorine evaporates) to 0.2 EC. Add Cal / Mag to 0.4 Ec Ph with Organic Ph - to 5.5 - 5.8 .


Likes
85
Share


@Organic_G
Follow
Meine Babys starten nun in die 4. Woche der Vegetation.
Einige Ladys haben bereits Vorblüte Stadium erreicht.
Sie werden alle 2-3 Tage gegossen, alle 7 Tage bekommen Sie die angegebenen Nährstoffe.
Bisher ein optimaler Run, keine Wachsstumsstörungen durch Stress, keine Defizite ersichtlich. Möglicherweise mein bester Run bisher.
Sie bekommen Bat Guano als Microbenquelle, Rohr Molasse als Futter Quelle für die Microben, Dann Hesi Vit, eine Enzym Konzentration ( max2. Tropen auf 5 L) & Seawead fertilazior, was das genau bringt weiß ich nicht genau aber es wirkt 😄🏽♂️

Likes
9
Share


@Cultivate
Follow
Week 3 of flower stinking dank!😂
Some heavy heavy defoliation slight lollipoping to increase that light power hoping for just nice bud development but we will see!
Thanks guys!
Likes
209
Share


@Rock_n_Roll_Randy
Follow
Day 87 for the 54 plant grow. 42 different strains of photoperiods and 12 different autoflower strains in the:
8X8 GROW TENT WITH THE NEW FC-E6500, FC4800 AND TSW2000 AND THE NEW 5X5 GROW TENT WITH A TSW2000 👍and they are being fed GREEN BUZZ LIQUIDS all organic/vegan fertilizers🤘.
I only pinched the tops on 2 or 3 plants but I defoliated every plant ALOT. it slowed the vertical growth alot but it's exactly what I wanted. I can keep track of the plant sizes, how they grew, how healthy they were, how easy they were to grow and how good the final product is👍
ALL THE AUTOFLOWERS ARE CHOPPED.
The girls are loving their MARS MANSION and WITH THE 5X5 INLAW SUITE and everything is doing good and looking nice and getting bigger👍 lots of hairs clumping up now and they are all getting nice and frosty and starting to stink ALOT. MARS HYDRO ALWAYS GETS EM FROSTY👍.I AM NEVER DISAPPOINTED With how awesome these lights are🤘. KEEP KILLING IT MARS🤘👏👏
BREEDERS AND SEEDS:
DIVINE SEEDS:
MAZAR, OPIUM, WHITE WIDOW, OG KUSH, PABLO ESCOBAR, DIVINE INDICA.
AUTO WHITE WIDOW
AUTO PABLO ESCOBAR
AUTO WHITE RUSSIAN
AUTO FRACTAL
AUTO MONTREAL
AUTO OPIUM
AUTO KABUL
AUTO MAZAR.
WEEDSEED EXPRESS:
GREEN CRACK, GHOST TRAIN HAZE, LITHIUM OG, CHEESE.
DOCTORS CHOICE:
DC KUSH, AUTO NIAGARA, AUTO ROCK MACHINE.
EXOTIC SEEDS:
HIPPIE BERRY, MALASANA GELATO, EXOTIC ANIMAL.
GENE/MEME SEEDS:
BLACK HELL.
ORIGINAL SENSIBLE SEEDS:
PURPLE PUNCH COOKIES, WEDDING CAKE, PURE KUSH, GORILLA COOKIES.
SWEET SEEDS:
BLACK JACK, GORILLA GIRL, SWEET ZKITTLES.
EMERALD TRIANGLE SEEDS:
GORILLA GLUE, MASTODON KUSH.
SEEDSMAN SEEDS:
BLACK SUGAR, PEYOTE FORUM, PEYOTE WIFI, BADAZZ COOKIES OG, PURPLE GHOST CANDY, STRAWBERRY BANANA GRAPE, L.A. PEYOTE KUSH, PEYOTE WIFI CBD, FUEL DOG, CRITICAL PURPLE KUSH.
AMSTERDAM MARIJUANA SEEDS:
GIRL SCOUT COOKIES EXTREME, GREEN CRACK.
QUEBEC CANNABIS SEEDS:
BRUCE BANNER, GREEN CRACK, QUEBEC CBD 20:1.
I 💚 GROWING MARIJUANA:
SKYWALKER OG, BANANA KUSH, BLUEBERRY CBD.
FOR EVERYTHING MARS HYDRO VISIT:
www.mars-hydro.com
www.marshydroled.ca
PROMO CODE: rocknroll
VISIT THE ALIEXPRESS STORE:
@marshydro_aliexpress
Instagram: @marshydropenny
https://youtube.com/channel/UChU5ZWwNi-DvnO3oWVU3ceA
https://greenbuzzliquids.com/
#greenbuzzliquids
@GreenBuzzLiquids
https://greenbuzzliquids.com/en/shop/
PROMO CODE: rocknroll
https://www.youtube.com/watch?v=8hEqyS1jPpI
https://growdiaries.com/diaries/112437-grow-journal-by-rock-n-roll-randy/week/593118
Thanks for taking the time to read and check out my diary🤜🤛
FC-E6500 LED GROW LIGHT:
FC-E6500 grow light with 3978pcs OSRAM BridgeLux Diodes & Moso Driver, market-leading PPF 2.7 µmol/J, Max 2.5g yield/watt with 30% higher Average PPE, more cost-effective when compared to same style type lights. Only consumes 650W, perfectly cover 5x5ft (personal), 4x4ft (commercial) grow space. Innovative Precise Uniform Lighting-Built-in removable bars interval & dimmability enable the exact & dynamic PPFD control over each of the plant growing stages, FC-E6500 detachable bars deliverSuperior Heat Dissipation: Real Aluminum heatsink together with 6 slim profile passive cooled bars (THINNER & LARGER surface) and detachable Meanwell Driver, create less heat. save 50% hydro than other old grow lights! Driver can be mounted remotely on the side of a grow tent/rack or on an adjacent wall to remove heat from grow space. Full Spectrum UV IR LED: With Yield Max spectrum (660nm Osram enhanced Deep Red,2800k-5000k,730-740nm IR,380-410nm UV LEDs), Average PPFD the FC-E6500 LED grow lamp enables cultivators to produce BIG FAT Dense Buds, perfect for full-cycle hydroponic, soil, grow tent/grow room.
Dimmable Commercial Grow Light: Cost-efficient, easy dimming & daisy chain With a max up to 20 lights, IP65 Waterproof, master light easily controls the rest. Perfect for commercial & home horticulture.
FC4800 LED GROW LIGHT:
GET THE MAX FROM MARS👍: Welcome one of the newest members of the Mars Hydro family🤜🤛🤘. The Mars Hydro FC 4800 480W LED Grow Light can accommodate up to a 4' x 4' area for flowering. It has OVER 2000 LED chips consisting of the best selling Samsung LM301B diodes which has a Luminous Efficacy of: 220 lm/W
0.2 W, 3 V mid power,
Osram 660nm Diodes, Infrared light and UV LIGHT👍. It boasts the incredible efficiency of 2.8 µmol/J, maximum 2.5gram yield per watt with 30% higher Average PPFD. This High-intensity spectrum is beneficial for plants at all stages - from veg to bloom, and creates Big dense Buds👍. achieve 50% higher yields & quality compared with the old lights! Only consumes 480W for 4x4ft personal grows, and 3x3ft for commerical grow. It comes with a dimmer and daisy chain function with a maximum of up to 15 lights, the master light controls the rest👍. Wide 6-bar design offers even & wide canopy coverage and can maximizes your grow space. slim 180° FOLDABLE DESIGN... YES I SAID FOLDABLE🤘🤣 , making it compact and easy to install, it's IP65 WATERPROOF and will give you no worries while growing in a humid environment and makes it a flexible high performance commercial grow light for enormous SUPER FROSTY yields.😛😛😛. MARS GETS EM FROSTY BOYS👍
AWESOME HEAT DISSIPATION: The Low energy consumption FC4800 growing light has 6 passive-cooled bars and an aluminum heat-sink a removable driver you can upgrade later or have it outside your tent. with zero noise you can save up to 50% in your electricity bill compared to HID's or HPS lights!
It also has a removable driver so you can upgrade it in the future or have it outside your grow space for better heat control in your growroom👍
UPGRADED FULL SPECTRUM: Yield Max Spectrum with enhanced red (Top-Bin Samsung 3000k-5000knm, Osram 660nm Deep Red), speed up blooming & fruiting, perfectly suited for full-cycle growing. The FC4800 LED grow lamp was born for Big Buds, perfect for commercial, grow tent, grow room, hydroponics, and all soil grows.👍
THE BEST SAMSUNG DIODES: THE FC4800 has Top Bin genuine Samsung Osram Diodes, combined with remarkable 2.8 µmol/J Efficacy, 30% higher Average PPFD, 50% less energy consumption, to maximize your yields. They give you a TRUSTED 3 years warranty 100% Satisfactory guaranteed!!!
X2 TSW2000 LED GROW LIGHT:
INCREASE YIELD AND CROP QUALITY WITH MARS HYDRO LED GROW LIGHTS: NEWEST SMD LED technology provides the highest PAR/LUMEN output (1122umol@18") and can make you get 30% higher yield compared to OLD blurple led lights. Max 2.5g yield per wattage and achieve maximum quality and quantity, much better than traditional HPS grow systems
LOW ENERGY CONSUMPTION LED GROW LIGHT: Consuming only 300W true output with 684 LEDS! It saves up to 50% energy than other led grow lights. Perfect for 3.5x3.5ft bloom stage, 4x4ft veg stage. Over 90% light energy can be absorbed by plants, it will have higher intensity in a MARS HYDRO grow tent with diamond design mylar, or by crossing over using multiple TSW2000
HIGH EFFICIENCY FULL SPECTRUM INDOOR GROW: 3000K 5000K and IR 660nm 760nm RED, makes it close to natural light, highly engineered to provide improved growing performance for plants at all stages of growing, rapid plant response from seed to flower; Uniform and wide-beam light distribution for your plant's optimal growth
8x8 GROW TENT:
The MARS HYDRO 8x8 Grow Tent interior is made of a unique diamond design mylar which is highly reflective. (Other companies mylar and reflective rate is as low as 50%, and it won't provide efficient light. They use thick 1680D oxford canvas, and being double stitched, it is tear proof and perfect for locking in the light. Their grow tent keeps 100% of the light inside the tent and helps your plants absorb more light. EXTRA-THICK material means No light leaks or rips at all.👍
Strong Stable metal corner adapters and poles are the trustful supporters of the tent. It's very sturdy, neither rusting or paint flaking off. quick and easy tool-free setup. They use heavy-duty metal zippers, with double layer black lining, by far the best on the market which creates a light-proof seal.
5X5 GROW TENT AND TSW2000
TSW2000 LED GROW LIGHT:
INCREASE YIELD AND CROP QUALITY WITH MARS HYDRO LED GROW LIGHTS: NEWEST SMD LED technology provides the highest PAR/LUMEN output (1122umol@18") and can make you get 30% higher yield compared to OLD blurple led lights. Max 2.5g yield per wattage and achieve maximum quality and quantity, much better than traditional HPS grow systems
LOW ENERGY CONSUMPTION LED GROW LIGHT: Consuming only 300W true output with 684 LEDS! It saves up to 50% energy than other led grow lights. Perfect for 3.5x3.5ft bloom stage, 4x4ft veg stage. Over 90% light energy can be absorbed by plants, it will have higher intensity in a MARS HYDRO grow tent with diamond design mylar, or by crossing over using multiple TSW2000
HIGH EFFICIENCY FULL SPECTRUM INDOOR GROW: 3000K 5000K and IR 660nm 760nm RED, makes it close to natural light, highly engineered to provide improved growing performance for plants at all stages of growing, rapid plant response from seed to flower; Uniform and wide-beam light distribution for your plant's optimal growth
5x5 GROW TENT
LOCK ALL LIGHT INSIDE MARS HYDRO Indoor Grow Tent interior is made of diamond mylar which is highly reflective. (Other brand's mylar and reflective rate is as low as 50%, won't provide efficient light. )MARS HYDRO 1680D canvas, being double stitched, it is tear proof and has perfect light locking. Mars Hydro's grow tent keeps 100% lighting beams inside and helps your plant absorb more lights. EXTRA-THICK --No light leaks or rips at all
DURABILITY GROW TENT Stable metal corner adapters and poles are the trustful supporters of the tent, standing sturdy, neither rusting nor paint-falling, quick easy tool-free installation. Mars Hydro's heavy-duty metal zippers, with double layer black lining, are the best on the market which create a light-proof seal
EASY OBSERVATION FOR YOUR PLANTS. Special observation windows are made by double layers of cloth. Observe the growing conditions of your plants without opening the tent and avoid disturbing plants. The observation window also serves to dissipate heat and ventilate air
FOR EVERYTHING MARS HYDRO:
www.mars-hydro.com
www.marshydroled.ca
PROMO CODE: rocknroll
Instagram: @marshydropenny
VISIT THE MARS HYDRO STORE:
@marshydro_aliexpress2
https://growdiaries.com/grower/rock-n-roll-randy
https://greenbuzzliquids.com/
#greenbuzzliquids
@GreenBuzzLiquids
https://greenbuzzliquids.com/en/shop/
PROMO CODE: rocknroll
https://growdiaries.com/diaries/112437-grow-journal-by-rock-n-roll-randy/week/593118
Likes
19
Share


@Poppetnewbie
Follow
### ANY ADVISE IS EXTREMELY APPRECIATED 1ST GROW AND AUTOS NORTHEN LIGHTS AND JACK HERER....thanks like i mentioned my 1st and im coming along ok in soil please all is welcomed thanks in advance 😀 i got little confused with adding all the journals to 1 diary but think I'm there now and have the hang of this for u guys to follow thanks and happy for any input and advice will these as autos take a growth spurt

Processing
Likes
15
Share


Likes
16
Share


@Kmikaz420
Follow
Alors la on tien quelque chose de juste magnifique !!! Fast bud à réussi à faire une plante rapide qui fait des bourgeons à faire pâlir les photoperiodique !!! Et ils ont en plus réussi à faire en sorte que y a presque aucun entretien (très peu de feuille ,branche solide ) et avec une production de trichome une dinguerie!!!
La dame termine sont flusch et je repasse terminer le journal


Likes
43
Share


@420DeepGrow
Follow
Gracias al equipo de Kannabia Seed y XpertNutrients, sin ellos esta magia no seria posible.
🍁💐 Runtz (Auto):
Si esta cepa se ha ganado su popularidad a pulso, esta versión autofloreciente es digna heredera de sus atributos. No es de extrañar que nuestros criadores hayan acertado con su programa de reproducción, al combinar dos de las cepas más fascinantes de la actualidad: Zkittlez y Gelato.
planta resistente y robusta, de cuerpo esbelto y fuerte ramificación lateral, que se puede cultivar prácticamente en cualquier entorno; pero prefiere los veranos largos y cálidos, tal y como quiere la madre naturaleza, donde bañada por el sol se eleva hasta los 120 cm. para producir unos rendimientos muy gratificantes de 100-150 gramos por planta.
En interior, y tras solo 70 días desde la semilla, también recompensará con cosechas abundantes de hasta 500 gr./m²
Inmediatamente después de encontrarte con ella, lo primero que notarás es su aroma descaradamente afrutado, con un toque tropical cortado con reminiscencias terrosas y amaderadas, que se entremezclan de forma agradable para ofrecer un combo que hace salivar las papilas gustativas.
Ofrece un sabor confitado, refrescante y similar a sumergirse en una piscina de frutas cítricas y flores de fragancia intensa. Al inhalar, obtienes la bondad de la dulzura; al exhalar, el humo se convierte en suave y cremoso, dejando suficiente profundidad en cada bocanada para satisfacer a aquellos que buscan los matices más complejos.
⛽ XpertNutrients: es una empresa especializada en la producción y comercialización de fertilizantes líquidos 🍶y sustratos🐛, que garantizan los mejores resultados y cosechas de la más alta calidad. A través de una cuidadosa selección de materias primas y un proceso de producción avanzado, sus productos son sinónimo de resultados confiables.
🛒 Consigue aqui tus fertilizantes:
https://xpertnutrients.com/es/sobre-nosotros/#:~:text=Xpert%20Nutrients%20es%20una%20empresa,de%20la%20m%C3%A1s%20alta%20calidad.
📆 Semana 13:
Gran semana aunque algo tarde, los cogollos siguen engordando y aparecen nuevas flores, ella sigue cargada de resina y su aroma citrico y dulce es celestial .
Aplico una dosis de nutrientes y agua hasta el corte

Processing
Likes
8
Share


@GrownwithLED
Follow
The plants are now growing slower in height and start to develop real flower clusters at all tops. Both Barbarian (=AK-47 x Barbara Bud) plants are bushy with lots of budding sites, but plant#2 is now 15 cm taller than plant #1, which is a little more bushy than #2. Both plants are healthy and still enjoy the normal recommended feeding schedule from Advanced Nutrients.


