The Grow Awards 2026 🏆 


Likes
Comments
Share
@Mrs_Larimar
Follow
January 1st.
HAPPY NEW YEAR!!!
New Year , new Challenges 😄
Seedlings were showing up very fast, but Iam taking today as Day 1
Its alot of fun with those cute Vessels
And iam really hoping to keep them Happy
Thy for Visiting this lil Grow.
#420 Worldwide

Likes
8
Share
@GrowingABushWithButch
Follow
It's Day 54 Week 08 0f Flower For My 02 Kombucha Cream by atlasseed . And For My Snow White and SpliffStrawberry by Spliff Seeds Amsterdam . So Today I Started My Day By Checking My Tricomes On My 2 Kombucha Cream. The 02 Where Looking Fully Milky So My 02 Kombucha Cream Got Flushed TODAY with Some Flawless Finish by Advanced Nutrients . The 2 Received 80ml of Flawless Finish mix with 1OGallons Of Water Ph at 6.0. Tomorrow they will get Rinse off with ph balance water. Yesterday I watered my Snow White and SpliffStrawberry Ppm where down to 100ppm. All 4 Plants will get a nice ice bath in a few days. My plan is to check the Tricomes on the SpliffStrawberry In a few more days she was still Milky when I check her yesterday. I will chop her down next weekend. And the rest will get the chop at 30%Amber Tricomes.
Happy Growing Growmies 🤘🏻


Likes
8
Share
@SherbGrows
Follow
Fast Buds
Wedding Glue
Day 49
Light viparspectra XS2000 dialed in at 75% light intensity
Watering every other day to every two days
Buds are taking off on this girl! wow! growing in nice and frosty! super excited how she looks this time next week!
See you all next week! Happy growing


Likes
7
Share
@Craiz
Follow
The main Stem snaped on the QO whilst doing some LST but it seems to be healing quite well after I attached it back with some tape. I can already see pistils shooting out on both of the plants especially on the Quick One.
Likes
3
Share
@Carpangler
Follow
Ahoj.Začíná nám druhý týden květu.Je to prales.Ohýbám zatím listy pod sebe.Ať to roste,přátelé. :)
Likes
4
Share
@Scandinavia
Follow
Always good seeds from RoyalQueen Seeds.. The pineapple kush was clones. Unfortunately something happened and it didnt got finished.
Other than that, some different strains i have beeen growing over the years :)0

Likes
165
Share
@DutchFarmer
Follow
🌿 GrowDiaries Harvest Review Runtz by Zamnesia Seeds 🌿
Participating in this contest has been an incredible journey! A massive shoutout to Plagron and Zamnesia for making this possible. Growing Runtz in a 1-liter pot was an experiment that exceeded all expectations yielding a whopping 2 ounces! 😱
Aroma & Flavor:
The scent is absolutely intoxicating: fruity candy haze with a gassy undertone that fills the room. Each puff delivers a smooth smoke, leaving behind a clean white ash, a testament to its quality.
Bud Structure:
The buds are dense and chunky, resembling big, oily nuggets. Their vibrant colors and resin coated appearance make them a visual delight.
Effects:
This strain hits hard with a potent and euphoric high, perfect for evening relaxation.
The balance between indica and sativa effects provides a creative uplift followed by a soothing body relaxation.
Final Thoughts:
From seed to harvest, this grow was a rewarding experience.
The combination of top-tier genetics and quality nutrients from Plagron made all the difference. I'm thrilled with the results and proud of what I've achieved in such a compact setup.
Thank you once again to the GrowDiaries community, Plagron, and Zamnesia for this opportunity.
Here's to more successful grows ahead! 🌱🔥
DIARY COMPLETE

Likes
10
Share
@NSABND
Follow
today Day 22 and Hilde still goes well 🙏
Speedrun video 21 Days 😉
Day23 was cloudy an alot of rain 😩
Day24 was cloudy and alot of rain 😳
Day25 there was sun and not too hot 🙏
Day26 in the afternoon a really sunny day but it started cloudy and rainy oh lord 😯
Day27 full of cloudy rainy weather and low temp 😕
Day28 no sun and cloudy 😒
Likes
21
Share
@Dapper_Buds
Follow
What’s going on lady’s an gentleman. we got the Moab strains going on W/1 in living soil. They where planted into the root riot cube an treated with neem oil to kill off the fungus gnats, they are thriving now. An getting bigger as the day goes. They will be trans planted into the auto pot system at end of this week. Into the 2x4. Under the double UFL3000 mounted on custom frame. Pumping 402w from the wall. Currently both the girls are in the veg/solo cup cabinet under the UF2000 100w light. Currently 60% rh and temps running 79 lights on. Thanks for viewing an happy growing!

Processing
Likes
8
Share
@hi_bengal
Follow
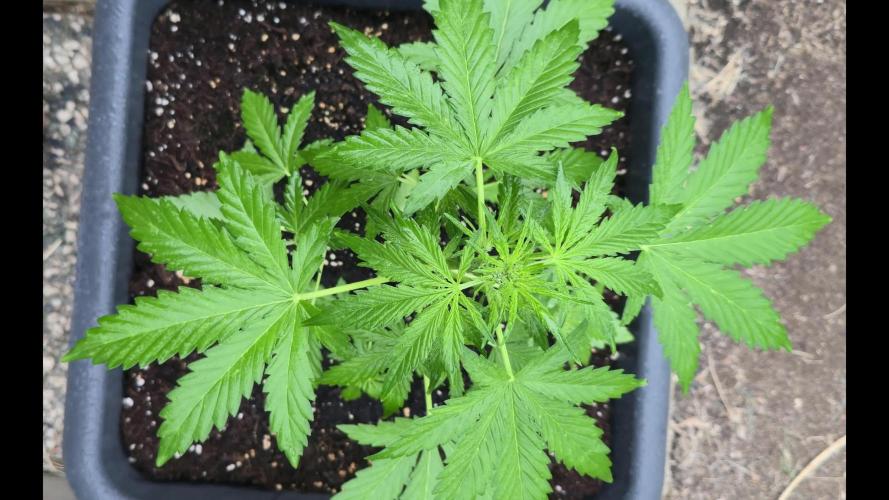
This little girl is loving life! 16 days old today! 6.4 ph water 18/6 light schedule watering when soil looks and feels dry.

Likes
4
Share
@BADINFLUENCER
Follow
Cambio liquidos a floración por ver ya sus flores, muy contento con los resultados, la poda justo a tiempo. He tenido un problema con la mesa A, una de las luces se ha fundido, la sustituyo por una de 4200k mismo voltage, hasta que la marca me lo reemplaze por defectuosa.
Likes
30
Share
@Silverback_Guerilla
Follow
10/23:
Fed today with One, sweet & sticky, signal, beastie bloomz, silica, and a little Ca/Mg
10/27:
Fed today with one, signal, sweet & sticky, silica, beastie bloomz, kangaroots, and humic acid.
Lowered the lights to no more than a foot from any cola..most are 7-9" away.
Likes
10
Share
@Deniguez
Follow
Settimana 6 di fioritura. I bud sono densi e iniziano a gonfiare. Stop con big bud e inizio con overdrive. Vediamo un po cosa ci dice questa genetica 😈
Likes
16
Share
@osmrducks
Follow
Day 29: The girls are looking great. I upped the nutes yesterday, as I have been giving them barely any at all. Will up them once again on next feeding. Looking like tomorrow. The main branch that I snapped off did not make it. Lesson learned on that one.
Day 30: Removed all other lights and added the HLG 550 V2 RSpec. Did some defoliation on the girls along with another feeding. Will do straight PH'd water next go. The girls are looking strong and healthy. 💪 Just on the small side. Still having to leave the tent wide open to subside temps and humidity.
Day 31: Nothing new to report. Looking very short and stubby and healthy!!
Day 32: Looking like they had some good stretching going on over the 3-day weekend. Will be needing fed tomorrow after work. May water a little less this time, as it is taking 2-3 days for them to dry out.
Day 33: Great stretch and bloom on the girls today! They are looking super healthy and strong! 💪 No smell yet.
Day 34: Girls are looking decent. Noticed some rusty looking splotches on the leaves. I'm thinking possibly Cal-Mag deficiency? Not sure.
Day 35: Not looking too happy today. I let them dry completely and watered with only Cal-Mag. Hoping the patchiness clears up for them!


Likes
2
Share
@GrowTF
Follow
habe an Tag 40 das Licht von 18/6 auf 12 um gestellt und dann angefangen NoVamax Grow und Novamax Bloom nach dem Düngeschema dosiert.
Wasser wechsel alle 1-2 Wochen
EC und PH wert jeden Tag gemessen und angepasst.( Düngeschema)


Likes
27
Share
@TheCannaProphet
Follow
------------------------------------
~SEEDSMAN PEYOTE ZKITTLEZ~
------------------------------------
Description
Peyote Zkittlez is an Indica-dominant hybrid strain bred by pollinating Peyote WiFi with the sweet-tasting Zkittlez. Peyote WiFi is itself a cross of Peyote Purple and the US Indica WiFi strain. Zkittlez is a 3-way cross of Grape Ape, Grapefruit and a third, top secret, strain.
Peyote WiFi is an Indica-dominant strain which is a cross of Peyote Purple, derived from a single purple pheno-type which was back-crossed for several generations to cement its qualities, and WiFi, a US Indica strain created by crossing The White with Fire OG. This plant is medium-sized with large, broad leaves and takes around 75 days of flowering before it is ready to harvest producing very generous yields of highly potent weed - up to 650 gr/m2 indoors and 1500 gr/plant when cultivated outdoors. The THC potential of this strain is very high with plants attaining 26 - 28%.
Zkittlez is a sweet-tasting Indica-dominant (80%) cannabis strain which produces high yields boasting high levels of THC. This is a very colorful strain displaying green and purple colors with bright orange pistils.
Zkittlez is a 3-way cross between Granddaddy Purple, Grapefruit and Afghani. It is suitable for growing in all environments and takes between 60 - 65 days to complete flowering indoors. Outdoors it will be ready to harvest during late September in northern latitudes. Yields are very good and vary between 450 - 600 gr/m2.
Zkittlez' scent is very sweet and entices with ripe tropical fruits and candy which also follow through in the taste as well. THC production is in excess of 20%. The effect is very uplifting, especially for an Indica strain. Therapeutically it is used to combat stress, depression and anxiety as well as for those with ADHD.
Peyote Zkittlez will make a superb, highly potent and high-yielding Indica-dominant addition to all seed collections which is certain to become a growers' favorite. Get yours from Seedsman now.
*description credit to Seedsman Seeds
__________________________________________________________________________________________________________________________________________________________________________________________________________________________________________________________________________________________________________________________________________________________________________________________________________________________________________________
BREEDER/BRAND: Seedsman
PRODUCT TYPE: Seeds THC
GENETICS: Peyote WiFi (The White x Fire OG) x Zkittlez
VARIETY: Mostly Indica
FLOWERING TYPE: Photoperiod
SEX: Feminised
THC CONTENT: 20%+
YIELD: Indoors: up to 650 gr/m2; Outdoors: up to 1500 gr/plant
GROWS: Indoors, Outdoors
FLOWERING TIME: 60 days
MEDICAL CONDITIONS: Anxiety, Depression, Stress
MEDICINAL PROPERTIES: Yes
EFFECT: Powerful, Relaxing
__________________________________________________________________________________________________________________________________________________________________________________________________________________________________________________________________________________________________________________________________________________________________________________________________________________________________________________
THE SETUP:
~Planted into Jiffy Peat Pellets that were hydrated with de-chlorinated water with SuperThrive added then ph'd to 6.0 @ 80℉
~Grown 100% organic in 10g fabric pots with Mother Earth 70/30 Coco/Perlite medium amended with 2tbs/g of Down To Earth 4-4-4 / 2 cups/g of Earthworm Castings / 1tbs/g of Dr. Earth Flower Girl 3-9-4, 1tbs/g of Dr. Earth Bat Guano, 3/4 cup of Down To Earth Azomite and 1 tsp/g Down To Earth Fish Bone Meal.
~24hr light cycle during Germination / 19/5 light cycle for Vegetation and 12/12 for Flower
~Straight water ph'd @ 6.2-6.8 when needed and weekly Compost Tea's.
__________________________________________________________________________________________________________________________________________________________________________________________________________________________________________________________________________________________________________________________________________________________________________________________________________________________________________________
WEEKLY UPDATES:
9/13- With approx. 10 weeks of growth behind her now she's going into her 5th week of flower now and let me tell you the pictures don't do her justice... This is one phenomenal cultivar! 😍
She was given Compost Tea yesterday and today was still fairly heavy so I skipped watering and just removed a few leaves to maintain light penetration, turned her pot and sat and chatted with her awhile!
9/15- Well she really must have liked that last batch of Compost Tea as she looks exceptionally vibrant today!
She's continuing on her mission of stacking her flowers, which are developing beautifully and have a delicious sweet citrus aroma to them right now.
I did not water yesterday, so today I watered with 1.5g of straight de-chlorinated water that was ph'd to 6.5 @ 72℉ and rotated her pot... Damn she is looking great! 🤩💖
9/17- Yesterday I top dressed her with 1/2 cup of Down To Earth Bio-Fish then watered it in with 1.5g of straight de-chlorinated water that was ph'd to 6.5 @ 72℉.
Her flowering is continuing beautifully and she's smelling stronger every day it seems! I'm staying on top of tucking leaves blocking light and turning her pot daily as well.
9/19- Five weeks of flower on the books! We're halfway there now, she's stacking her flowers tightly going into Week Six and she's looking phenomenal! 🤩
When I watered her today I added 1 tbsp/g each of Kelp Extract and Fish Emulsion (both liquid) to the 1.5g of straight de-chlorinated water she received, which was ph'd to 6.2 @ 74℉.
~Thanks for stopping in! Things should be getting a lot more interesting in the coming weeks...Stay lifted and be Blessed! 😎🙏~

Likes
62
Share
@ButterfliesLittleFarm
Follow
Hello Diary,
I apologize right away for the large number of photos, but it is important for me to document as best I can.
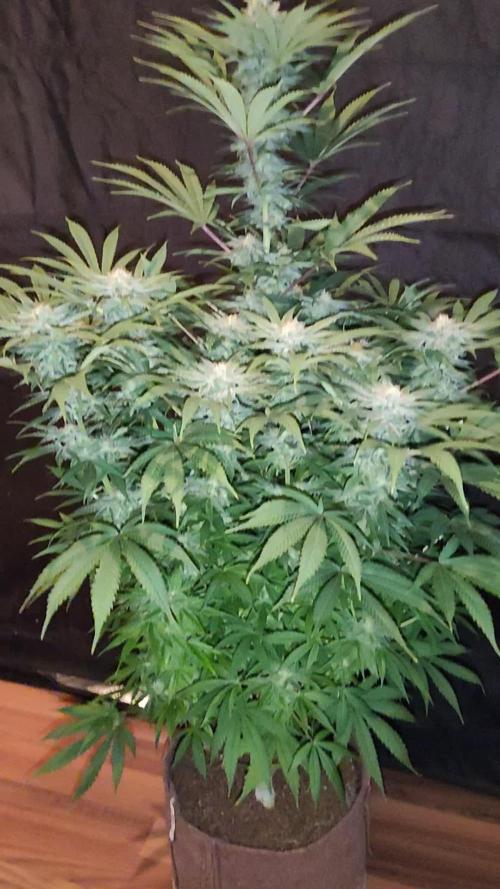
This week I also photographed on a black background because they are really beautiful plants.
So Medusa F1 is incredibly fast, after only four weeks of flowering, the first Medusa F1 is approaching harvest.
I checked the trichomes under a microscope and most of them are milky, on the lower branches the ratio is 50/50.
So I will wait a few more days, monitor the situation and harvest at the right time.
This time I photographed the second Medusa, a really beautiful plant, but it has not yet matured like the first one.
Considering the number of photos, I will not describe the appearance too much, therefore the smell, incredible.
No other strain has had such an intense and strong smell so far on my small farm, I am very much looking forward to trying this new strain.
Watering is more frequent, every three days I water them with almost 4 liters of water per plant.
The conditions are excellent, 25 degrees and less than 40% humidity in the air.
Here's how it went last week.
09/03/2023 - Day - 44.
Watering. I lowered the p.H. at 6.0 and with 7 liters of water, I watered both plants evenly.
12/03/2023 - Day - 47.
Watering and checking trichomes with a microscope.
I repeated the watering procedure as I did three days earlier.
14/03/2023 - Day - 49.
Photography and video. this time, after the grow box, I also photographed the plants on a black background. It was worth every effort.
This weekend I also visited Spannabis, a great event and I'm really grateful to have met some new people in the industry and also some great growers.
I'll definitely see you next year.
That's all for this week, thanks everyone for your support and comments and see you next week.