
Likes
Comments
Share


@MrHightimes
Follow
Well when i peeked in there I got super worried becuase they had BLOWN UP!!!! such big girls! But after learning lessons from The Defoliator I knew I could clean them up!!!
The result was very nice!! I even went in and did some minor LST. 1 plant is a bit bigger than the rest, but really I think this is definitly gonna be the most sculpted plants i have made!
Everything is going along just GREAT!!!!!
________________________________________________________________________
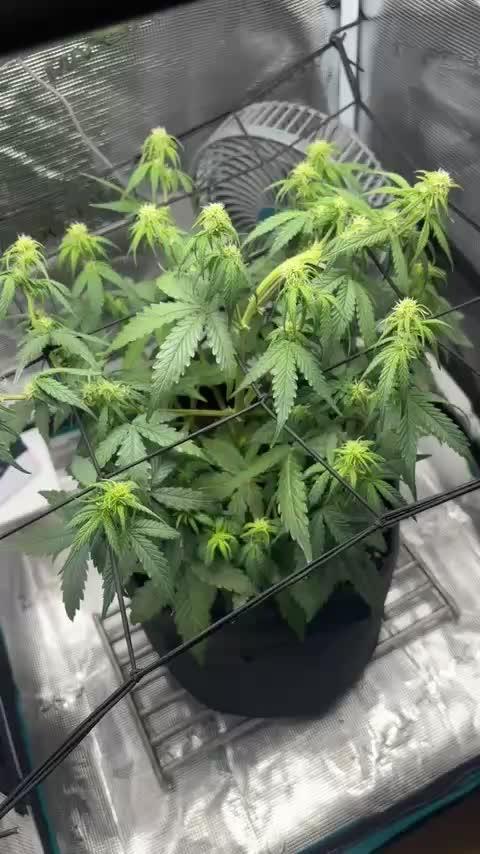
The week has gone by so fast!!! My flower tent is hogging all the glory with amazing buds, but these Night Owl seeds are EXPLODING!!!! There is a significant difference between the biggest plant and the smallest one, but I'm continuing to develop an even canopy and attempting to tame these bitches down!!! They are so ready for a bigger tent but I cant get them moved just yet... I'm really hopefull next week will be the move!
I supercropped the hell outta them! It was very nice to have a container of SCs and LST ties to pin everything down!!! Def invest in a 3D printer!!!

Likes
11
Share


@PanGrower
Follow
I think about the fact that it is no longer necessary to cut leaves. I cut it a lot, but I notice that many people cut a bunch of leaves at one time, although somewhere I read no more than 10% at a time.
When I gave fertilizers, I always diluted them with water even more to reduce ppm
Day 68: I added cal-mag to the diet because the leaves are really turning yellow from the bottom. 0.5 ml
Day 70: I added 1 ml cal-mag


Likes
9
Share


@Rastaluna
Follow
Planties are getting bushier :3
This week we focused on LST, providing as much light so smaller tops could reach the size of bigger ones.
We raised the light cause NL started showing signs it didnt like being close to the light, but also saw some other issues, tips of canna leafs started to yellow, about a week and a half ago we fed them some nutrience, home made organic and also a mix. So now im not really sure from what caused the yellowing tips. Nutriante deficiancy? Nutrient burn? Light?
Taking now a closer look, to see upcoming signs that would make this situation clearer.
Apart from yellowing leafs, the smell(rrrlll goood) becomes more noticable, its nice coming to the tent, feels like youre high from growing nature :=)
We topped speedy chille and took of yellowing leafs, she really liked it and is now growing 4 tops

Likes
2
Share


@High_Grade_Dadli
Follow
First set of cutting got a bit of overwater change the container they were in n lef them outside n rain came n soaked dem
.IYKYK fittest of the fittest will survive.. had to cut the mother's again earlier than I would want to jus to ensure we stay on track from the minor setback...also added gorilla #4 to the ship already cut her

Likes
133
Share


@PapaNugs
Follow
After topping last week,we flipped to flower! I've been training the girl down with LST wire. Want as level as I can until I reach the edge of the light. But I've been increasing the light intensity slowly this run. Normally I just blast them but went slow over the week. Getting water more often now and will install the self watering pots today.
Lights at 100% power.
Here are the lights details:
Medic Grow Mini Sun-2 150W LED
Model: MN150-022
Spectrum mode: V1
Efficacy: 2.8 umol/J
Thanks for stopping by!
You can find the light on Grow Diaries:
https://growdiaries.com/grow-lights/medic-grow/mini-sun-2-150-watts
You can find the light on Medic Grow's website:
https://medicgrow.com/

Likes
8
Share

@Firstautos
Follow
So have had to to use the trellis the top bud was making me move the light to far away from the others I hope I haven't done harm doing this but I felt it was starving the others of light :).. this is my first grow and first diary entry.. all and any help is appreciated this video is where I'm at today :) happy growing :) 31/8
Likes
35
Share


@Ganjagrandaddy
Follow
Yay! video is back up again..
Day 22 flowering: Well what a week this has been for the Amnesia Haze. She began the week intact and showed the many bud sets throughout her frame. I have been waiting until day 19 to defoliate her and get as much of the light down lownas I can
she has some perfect stacking developing now and all of her quadded limbs are top to base with flowering sites. Her speed and progress has been excellent from the off and I am now preparing to run 3 Sweet Seeds Autos of this strain with their Amnesia Haze XL alongside 3 Gorilla Girl XL and 3 Sweet Cheese XL , I cannot wait to see what these genetics can throw up.
The amnesia has got a nice fruity smell starting to be noticeable as i open the tent. She is 3ft across inn parts and has a lot of mains vying for top spot . I am hoping she will be a great yielder with the way I have trained her out.
She is feeding well and not showing signs of any issues at all so its a head for the finish line now in about 5 weeks time.
S.a.d is alive but not looking the best still , she is in flower but her initial poor start has effected her too much. power toner for keeping going though, same with the red hot cookie really. gutted to have lost so many in the heatwave issue and be left with so few to show this breeders genetics. Thankfully the Amnesia will be a star and the next Sweet Seeds run will be a roaring success.
Until next time . Be safe and well.
Thanks for the visit.
Likes
18
Share


@Mikhail19
Follow
So far everything is going great. I water every 4 days and trying to use as little nutrients as possible as these plants don't like nutrients that much. I haven't faced major problems yet. They getting bigger and bigger each week..


Likes
2
Share


@Brocolilla
Follow
Last two weeks the weather was terrible. So I kept girls warm possible as I can.

Likes
18
Share


@Hashy
Follow
Week 7
Light cycle=12/12
Light Power=196w
Extractor controller settings
High temp= 25c
Low temp= c
Temp step=0c
High Rh= 56%
Low Rh= %
Rh step=0%
Speed max=10
Speed min=2
Fri 2/2/24
#3 (Day 43)(Day 5 flower)
📋 raised camera, nearly touching the roof.
Sat 3/2/24
#3 (Day 44)(Day 6 flower)
📋 Defoliate a lot of lower leaves.
Sun 4/2/24
💧💧💧💧💧💧💧💧💧💧💧💧💧💧💧💧
Method= automatic
Feed=bloom nutes.
Neutralise=0.1ml/L
Silicon=1.0ml/L
Calmag=1.0ml/L
Terra Bloom=4.0ml/L
Sumo Boost=1.0ml/L
Roots=0.2ml/L
Easy Ph down=0.115ml/L
Ec=1.9 PH=6.1/6.5
Time start=12.00pm
Finish time=13.45pm
(11×5 minute runs with 5 minute gaps)
Total flow rate=190ml/min
Flow rate per plant=47ml/min.
Total volume made=13L
Total volume left=2.5L
Total volume used=10.5L
Volume per plant=2.62L (Est)
Runoff.
Total runoff=1.75L
Ec=2.4PH=5.9/6.2
💧💧💧💧💧💧💧💧💧💧💧💧💧💧💧💧
#3 (Day 45)(Day 7 flower)
📋
Mon 5/2/24
#3 (Day 46)(Day 8 flower)
📋 H=49cm D=50cm DLI=33.0
Raised the pot a little.
H=49cm D=43cm DLI=35.5
Tue 6/2/24
#3 (Day 47)(Day 9 flower)
📋 Looks like the weather is turning cold again over the next few days.
Wed 7/2/24
💧💧💧💧💧💧💧💧💧💧💧💧💧💧💧💧
Method= automatic
Feed=water
Neutralise=0.1ml/L
Roots=0.2ml/L
Easy Ph down=0.ml/L
Ec=0.2 PH=6.6/6.5
Time start=12.00pm
Finish time=13.45pm
(11×5 minute runs with 5 minute gaps)
Total flow rate=190ml/min
Flow rate per plant=47ml/min.
Total volume made=13L
Total volume left=2.5L
Total volume used=10.5L
Volume per plant=2.6L (Est)
Runoff.
Total runoff=1.5L
Ec=1.74 PH=6.6/
💧💧💧💧💧💧💧💧💧💧💧💧💧💧💧💧
#3 (Day 48)(Day 10 flower)
📋 H=53cm D=39cm DLI=42.0
Thur 8/2/24
#3 (Day 49)(Day 11 flower)
📋 H=55cm D=37cm DLI=45.0
Raised light 5cm.
Lowered power from 200w to 180w
H=55cm D=42cm DLI=37.0
This one is progressing OK. A little bit smaller then the others in the tent by about 20cm. She has lost the battle for space and is the runt of the grow at this moment in time.
Back soon.
Take it easy.

Likes
45
Share


@masterofsmeagol
Follow
I Messed Up A DAY Here. So one of the days is dated wrong. I tried to correct it the best that I could.
7/24 I decided to label this week as flower. It's more like preflower though. GMOs are stretching like crazy. Due to the rain we weren't supposed to get some of my plants are a little over watered. That's why I love the fabric pots. With the winds we get the bags dry out fast. The GMO's would've needed water anyway if we didn't get this storm. Event Horizon seems to be the furthest in flower amd the most over watered. WE'LL get a LITTLE more rain today and tomorrow but then hopfully my bags will dry out. They are heavy as hell right now. Had we not got rain for what seems like forever. Several plants would've needed to be watered if we didn't get this rain. Still the plants are currently overwatered. All the pics and video so far are from this morning after the horrible pounding rain of yesterday. Like I said before, I need to; defoliate for better air flow, add secondary supports or a vertical trellis, considering using a preventative pest application (e.g. BT), LST and spread branches apart and start using nutes.
7/25 Wasn't supposed to rain today. Like .001. It poured this morning and is still raining VERY LIGHTLY at 2:30. We got an inch yesterday. The total for these 3 days was suppised to be under half an inch. Anyway I went over around two and everything looks great! Things are clearly overwatered and heavy but the plants look happy! Most have their leaves out and everything! I love growing in bags because they dry out so quickly! I don't mind watering more. I defoliated one event horizon and the few yellow leaves I coukd see on other plants after shaking them off. The seedling in the 50 is far behind the others in flower and just showed its sex. I'm fairly certain that one is red runtz. Whatever it is is going to flower much later than the rest. It's going to be good if I have couple early finishers. I did a video but I'll have to upload tomorrow. I have a lot of work to do And not just in the garden so I'm hoping I can balance things out and get this stuff done. Caught three TINY inch worms. I'm wondering if me manually hunting has cut the adult population down and I'm just getting fresh born ones? If that's the case I wouldn't need to spray.
7/26 Plants looked pretty great today. I think me manually removing pillars has made a big difference. It's windy out too so it won't take long for those bags to dry out. Which is good because what wad supposed to be a half inch of rain turned into 3 straight days of rain. I'll be back over to work on the garden today and I'll update then.
7/27 Plants are looking pretty good. Good weather ahead and the bags are starting to lose weight. Found a pillar wrapped in a dead interior leaf all wrapped up. Found a couple more early this morning amd killed them. I did some slight leafing on some plants. I don't like doing that outdoors but since these are monster cropped they have far to many leaves. Airflow is improved. I'm not seeing any nutrient deficiencies yet. Plants are a vibrant healthy dark green. Soon I'll add a base nute like big bloom or ancient amber (I think that's the one, it's applicable to big bloom). I cam see some plants trying to start flowering and I've got one (in the 50) that has just shown sex. Hopfully this will give me some time between harvests. I'll update as I go along.
DAD CALLED IN THE AFTERNOON AND SAID HE THOUGHT A PLANT MIGHT BE STARTING TO DROOP. IT WAS MY GMO CANARY THAT GETS HIT ON ALMOST THREE FULL SIDES BY WIND (ONLY ONE PLANT). I CHECKED THE WEIGHT AND IT WAS LIGHT. IT WAS DROOPING TOO. I WATERED THAT ONE PLANT WITH A GALLON AND WATCHED IT PERK BACK UP. I CHECKED THE WEIGHT ON THE OTHER PLANTS AND LIKE I THOUGHT THEY WERE STILL HEAVY. I PUT MY FINGER IN THE SOIL AND IT CAME AWWY COVERED IN DIRT. MY SEEDLING IN THE 10 WAS KINDA LIGHT SO I GAVE THAT HALF A GALLON. I USED THE OTHER HALF AS "A CUP OF KINDNESS" ON THE PLANTS THAT SEEMED LIGHTEST TO CARRY THEM OVER. I PROBABLY SHOULDVE WAITED BUT I DOUBT IT MATTERS. ILL CHECK IN THE MORNING. I ASSUME ILL HAVE TO WATER THEN OR AT NIGHT. ILL GO BY THE WEIGHT. THE CANARY WILL NEED TO BE ON A SEPERATE SCHEDULE. THATS FOR SURE. Went back over at 6:30 and plants looked better than they have in a long time bags still have some weight. With the sunny weather we are going to have these plants will keep exploding in growth. Found one pillar but I wasn't there long. Seriously considering a spray of BT in the near future.
EDIT: UNFORTUNATELY MY SPIDEY SENSE STARTING TINGLING AROUND NOON. MY ANXIETY WONT LET ME IGNORE IT (IM NOW EMBRACING IT) AND I HAD TO CUT OFF A CONVERSATION WITH MY WIFE TO GO TO THE GARDEN. I IMMEDIATELY SAW THAT ONE OF MY GMOS WAS STARTING TO DROOP. NOT LIKE BEFORE BUT IF I HAD BRUSHED IT OFF AND LEFT IT FOR FOUR MORE HOURS IN THE 90° SUN IT WOULD'VE BEEN. I GAVE THE GMO'S (BESIDES THE ONE I GOT YESTERDAY EACH A GALLON. I DIDNT WANT TO WATER DURING THE DAY BUT THIS WAS MY BEST OPTION. I GAVE THE TOASTED TOFFY A GALLON AND THE 2 EVENT HORIZONS EACH GOT HALF A GALLON, AS WELL AS THE SHERB PIE WHICH GOT HALF A GALLON. I DECIDED TO DO THIS BECAUSE SOME PLANTS USE MORE WATER THAN OTHERS. BEFORE ACTUALLY GOING OVER I CONSULTED MY PREVIOS DIARIES. I HAD THIS SANE PROBLEM LAST YEAR ON THE SAME WEEK OF THE MONTH! THATS WHAT MADE ME TRUST MY INTUITION FULLY. I LEARNED FROM THE MISTAKE OF LAST YEAR. THINGS ARE GOING GOOD. IM STARTING NUTES SOON AND I NEED TO SPEAY FOR BT BUT DONT KNOW IF IT WILL BE TONIGHT.
7/29 Apparently my intuition worked out well. Plants looked great this morning. I may feed today. I defoliated a bit and watered the 10g with a half gallon and gave another half gallon to the gmo on the end that dries out fastest and that I didn't water yesterday. I think I've got the watering down. Now I need to start nutes and spray bt. Need to wait for the rain first though. Suppised to get minor showers the next couple days. I'm gonna try to get the trellis up too.
WENT BACK A LITTPE AFTER FOUR. HUMiDITY WAS 100% AND IT WAS RAINING VERY LIGHTLY. I MEAN AS LITTLE AS IT CAN POSSIBLY RAIN. ALMOST LIKE WHAT IT FEELS LIKE WITH THOSE MISTING FANS IF YOU STAND BACK A WAYS. I DIDN'T WATER. PLANTS WERE LOOKING GREAT! I DID SOME DEFOLIATION AND CAN TELL I NEED TO START NUTES. I CAN SEE SOME SLIGHT DEFICIENCIES IN BIG OLDER LEAVES. SOME SMALL INTERIOR LEAVES YELLOWED. NOT MANY. GRANTED THEY ARE STARTING TO FLOWER. I'LL PLAN ON FEEDING TOMORROW. THE NEXT FEW DAYS IS SUPPISED TO BE SHOWERS. I DOUBT IT WILL GIVE MY BIG GIRLS ALL THEY NEED BUT IT WILL BE A GOOD START. I DID A VIDEO BUT ITS RATHER LONG SO I CANT UPLOAD IT HERE. ITS COOL WATCHING HOW DIFFERENT THE DIFFERENT STRAINS GROW. STILL HAVE A BUNCH OF SHIT TO DO. IT WILL GET DONE THIS WEEK.
7/30 I held off watering today due to a supposed storm and rain we were supposed to be getting. I had early doctors appointments. I got back around 11 and the bags seemed light. After consulting last years diary I saw that I am underwatering. The root system weighs a lot! We haven't got the hundredths of an inch of rain but we got some sun. It's over cast now. I was there working for a few hours. I watered most a gallon. All the gmo's got a gallon. I gave the two event horizons about two thirds a gallon. About the same with the toasted toffy and the sherb pie. About 3/4 of a gallon as they seemed to have a little weight left. Looking at last years diary there were plants I was giving two gallons at a time in a 20 gal bag so I've been u Der watering a bit. I've caught it now and adjusted. I'm not losing leaves at the pace I have in the past. Even though some are in flower. I think I'm getting better. I fed for the first time today. Each plant got 1.75 pints. Except the 10gallon which got half the powerade bottle and the 5gal which got a qtr. By the time I left the plants were standing up nice and tall and looking amazing. Now I just need to apply bt and secondary supports.
7/31 Another eight day week. I'll have to do six days next week. Everything looked amazing this morning. I'm seeing less pest damage. Watering and feeding was the right move. Now I just have a little rearranging to do, add supports and spray if I decide to.

Likes
23
Share


@Chi_K24
Follow
Hey guys, Into week 8 and the ladies have bushed out considerably even after last week's defoliation! I will have to plan to defoiliate again this upcoming week!
The plants are doing well, I have not watered these plants since Monday of this week and we had 2 large t-storms roll through the past 2 days. I will be holding off watering since they got allot of rain water.
This comming week I will be planning to possibly top but mainly to start our 2nd round of amendments. Sticking to same formula of 2tsb per gal of 70/30 ratio 444 to 284.
I also found the holy grail of prevent maint for fungus gnats. This stuff I found at my ls call aquabac mosquito larvacide. Works great on gnat larvae. All you need is to use 1-2 tbs in a tea bag and let it soak in water for 24-48hr before watering. Hopfully it will prevent any fg infestation.
Have a good one guys and see you on the next update.
Likes
28
Share


@MadeInGermany
Follow
Flowering day 18
since time change
to 12 / 12 h
Hey guys :-)
The ladies have recovered well from the cold thanks to the heating mat and have developed beautifully 👍.
During the check today I saw that despite spraying neem oil 3 times, there are still a few trips :-( .
Now I've ordered nematodes again specifically against trips for leaf and substrate.
I will use that immediately 👍.
Watering was done twice this week, each time with 1.3 l (nutrients see table above)
Next week I will remove the lowermost shoots so that the energy goes into the upper buds.
Fresh osmosis water was mixed with tap water and put into the 100 liter tank so that the water can stand and I'll have enough next week :-)
Otherwise everything was cleaned.
Have fun and stay healthy 💚🙏🏻
👇🏼👇🏼👇🏼👇🏼👇🏼👇🏼👇🏼👇🏼👇🏼👇🏼👇🏼👇🏼
You can buy this Nutrients at :
https://greenbuzzliquids.com/en/shop/
With the discount code: Made_in_Germany you get a discount of 15% on all products from an order value of 100 euros.
👇🏼👇🏼👇🏼👇🏼👇🏼👇🏼👇🏼👇🏼👇🏼👇🏼👇🏼👇🏼
Water 💧 💧💧
Osmosis water mixed with normal water (24 hours stale that the chlorine evaporates) to 0.2 EC. Add Cal / Mag to 0.4 Ec Ph with Organic Ph - to 5.8 - 6.4
MadeInGermany


Likes
20
Share


@Bakeryguy420
Follow
Never afraid to show people the truth and bounce back on these autos. I was absent 5 days. You can the coco went bone dry as dick. Within 7 hours the girl back to her healthy glow. Unfazed I'm so keen for this one. So much purple like my c4. Tall as fuck and nugs are slowly filling in her gapes. All the little ones are so happy. I'm one happy grower :) will update with more photos later today.
A nice beautiful update on 3/13 holy fuck just realized today friday the 13th haha. Night queen starting to fill in nicely as the weeks go by. About to hit her with another strong feed. ^_^
Another update on 3/16 before the end of the week bud sites are really starting to fill in now 3 more weeks to go ^_^. Strong feeds all week then going be regular water for about 2 weeks. Give it a nice fade :). Thank you to everyone who watched this beautiful plant grow.

Likes
9
Share

@Gorillanonymous
Follow
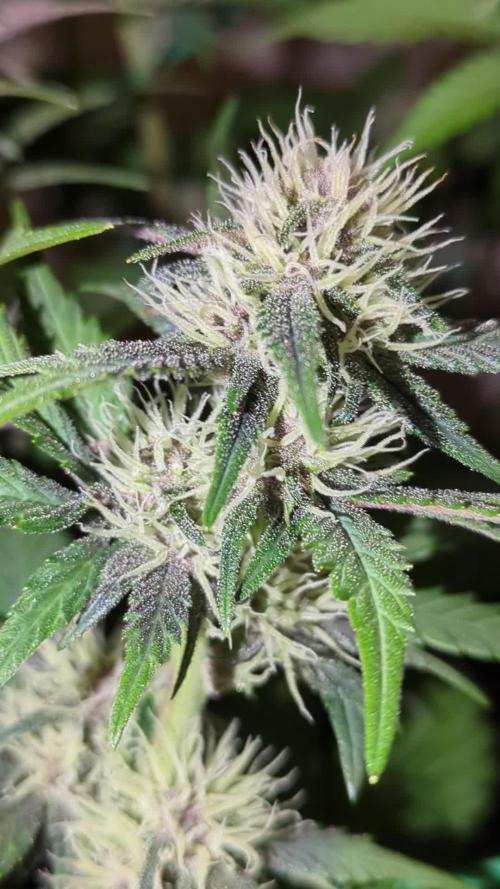
Day 45 - She's continuing to grow like a monster. The resin production is already insane, and she smells amazing - cream & gas right now with a touch of fruit 🤤
I used a few bits of garden wire to separate all the colas evenly and give them space to develop fully, but no other training was necessary today.
I gave her another 5L of treated water, the same concentrations as the last feeding. I squirted 1L directly into the base of the plant, and the rest spread around. She barely spilt a drop, which means she's drinking nearly 1L per day 😱
What a great strain, I can't wait to see how these buds swell up 🌱🌱
Likes
4
Share

@XanHalen
Follow
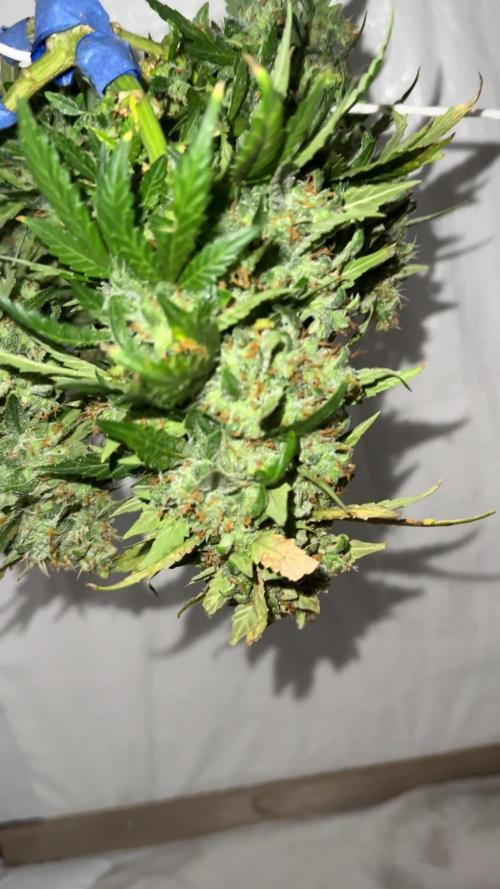
Chopped, saturated plants with diluted H2O2/water (1tbsp/500ml) with a spray bottle, and then Bud-washed the plants whole like normal in plain dechlorinated tap water at 75F for 20-25 seconds, then hung whole in the drying tent, conditions are 63-67f, 50-60% RH, intake and exhaust @ 50% with circulation fan inside the ⛺️
Until next time growmies! ✌️
Likes
2
Share


@420Senpai
Follow
👻Hello!💀
another week passed by. A week with low-near to 0 stress to get some growing.
LSD-25 is in stretch mode 👽but still is compact.
Mimosa Cake coming into flower is really! iam stoked to see how she matures 👏
Pink Mist is growing leafs and leafs. I defoliated all plants at the end of this week.
Feeding time was in middle of this week. every plant got enough till there was anough drain ~1.5 l with 3ml/l of nutrients.
I watered with tap water the days later.
happy growing