
Likes
Comments
Share


Likes
8
Share


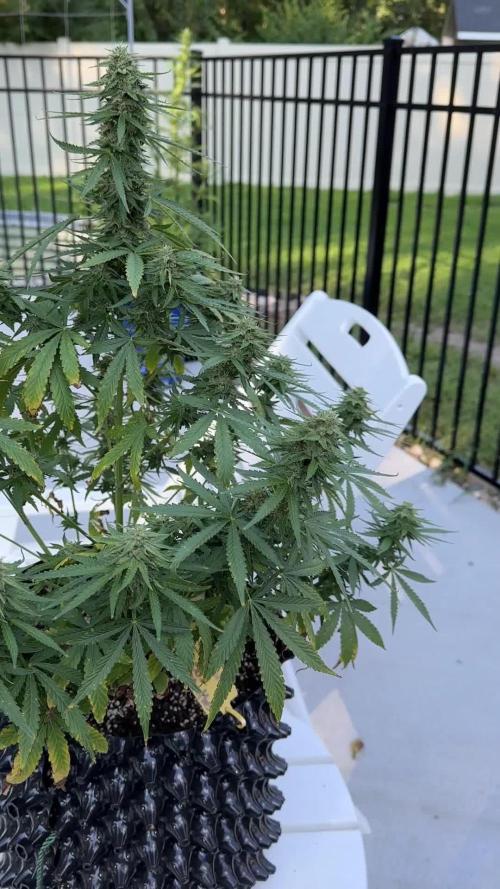
@Genussmittel420
Follow
she is fadeing into red/purple at the buds and sugar leafs while also completeley yellowing out because of nitrogen and a light bit of green is also here and there. love to look at her and the jucy buds. i think she might be done in about a week

Likes
5
Share


@Tacofever88
Follow
A quick check up and they're doing well. Some growth so that's a good sign.
Some little bastard animal (mole I assume) made a few holes around my girls. I made sure to put some fluid in them as I was peeing. Then stuffed them with rocks, dirt and a thick branch. Hopefully they're not too interested and I don't have an animal having a root party
Likes
25
Share


@DrGanj
Follow
Last week of flush now. Still feeding the active sugar boost from Natures Delight and seems to be working wonders. I've enquired about this and it's fine to feed in flush.
Flush is showing signs of deficiency which is good as means those fan leaves are being sucked dry :D


Likes
233
Share


@Tropicannibis_Todd
Follow
🐶🐶🐶🐶🐶 👉Alrighty Then👈🐶🐶🐶🐶🐶🐶
We're 35 days in and we be moving along great 👍 really surprised at the bud development thus far 👈
👉The SweetDream Rose is the tallest and biggest mover growing another 6 inches in just one week 😲 gotta love that purple hues coming in 👈
We've also got some double tops on some branches as well as some triple internode branching 👈
All plants are blooming like crazy 🤪 🙀
We got some great growth right across the board on all plants 👈 All plants receiving at least a min of 850 PPFD
🐶 🐕 🐶 🐕 🐶 🐕 🐶
So we are back for another round 😛 But this grow is special because my big boy needs some love too , he's been getting on the old side of things and his hips have been giving him trouble so I've been buying CBD treats for him and it works great so 😉 👍
I've decided to grow this for my little buddy 🐶 so I can make him some Doggy 🐕 Treats and plus I've never tryed it myself and I really wanna give it a go👈 😊 so let's see what it's all about 👈
I will post the recipes at the end of harvest 👏
So Let's Do This👈
👉Soil Provided by ProMix.ca
👉Nutrients Provided by Agrogardens
👉Lighting Provided by MarsHydro.ca
👉Seeds Provided by Kannabia Seeds

Likes
22
Share


Likes
11
Share


@Mo_Powers
Follow
the 7th week. i decided to do the first topping. she took it well. and the new branches are thriving. i have also started LST training. she has got used to the environment and is finally showing the power i expected from her. the first weeks were just too changeable and sometimes too cold.
Likes
3
Share


@0JuJu0
Follow
Hey there,
I will say goodbye, fastbuds dont appreciate my work and this reports cost a lot of time maybe i come back. But i get 6 seeds for my 58 diaries waited 6 month to get the next seeds only to get no answer and no seed. My plan was big but i had to stop in the middle of the beginning so see ya and happy growing!
Likes
2
Share


@Vincentsta7
Follow
Nearly 2 weeks from 12/12. Some of the plants are having a good Stretcheing
Likes
13
Share


@DansHampf
Follow
I went on business trip for 5 days. Neighbor watered the plants. Must dehumidify better as I had 85% max. at 24°C.
NYC Sour D
#1: Has developed quite well. Many small branches. A few stunted leaves. But she is growing ok.
#2: Still one of the problem child. Small growth, some slightly deformed and discolored leaves. Wait and see how it develops.
Royal Cookies Auto
#1: Best development in the last 5 days. Many small new branches. Largest plant, no signs of light stress. Let's see if I will water more yet.
#2: I am also very satisfied with the development. Slightly smaller than #1, but completely ok.
Royal Haze Auto
#1: Also a problem child. The main stem has not developed any new leaves. Thus, I topped her, so that the secondary stems would develop accordingly. The leaves don't look too good. I'll let her grow and decide before flowering whether to remove her.
#2: Actually quite good so far. Growing a bit stunted, but so far okay.
Light settings
45% dimmer at 45 cm distance
Between 450 and 615 ppfd. Seems to work well as they are not growing too fast and have no signs of light stress.
Likes
5
Share

@Susquihanna
Follow
Fall weather is here this week. It has cooled down tremendously which means my grow tent isn't getting too hot for my girls.
This is week 5 of flowering. The website says it could flower up to 10 weeks.
I took Sexy Moma outside so I could get some good pictures of her. Take a look at her packed, frosty buds! I also used my max-see to take some close up pictures as well. She needs a few more weeks before she is ready to harvest. She smells wonderful!
Likes
31
Share


@JeyGanesha
Follow
Questa gorilla cookie cresce ben forte..spero arrivi al termine senza nessun intoppo....
Siamo arrivati alla fine della3 settimana. Tt procedere alla grande
Likes
14
Share


@Silvadragon
Follow
Hello hope this find you well! As for now this Zkittle is growing buds. And shows some sign of lack potassium nutritions. So today give her some 1.2.4 ratios with some extra cask and molasses.
Processing
Likes
27
Share


@Dunk_Junk
Follow
Not long now!!!
More pistils changing colour! Flowers swelling up!


Likes
27
Share


@w33dhawk
Follow
Spülung 🍍🍍🍍🍍🍍🍾🍾🍾🍾
Bilder sprechen mehr als 1000 Worte 63 Tage sind rum und die Ladys haben sich wirklich easy entwickelt der Geruch ist mittlerweile so extrem das meine filter Anlage nicht mehr nach kommt die halbe Wohnung duftet nach cremigem Ananas caramel bonbong mit einem extrem funky Gras Geruch der so stechend Intensiv ist das meine Frau durchs Haus rennt und sagt es stinkt 😂😂😂😂😂 alles richtig gemacht meine Nase ist Mega zu Frieden, und meine frau stirbt halb 😂😂😂😂👌👍. Eine Woche lass ich sie jetzt noch laufen dann sind die Damen 70 Tage in der blüte und bekommen danach ca. 36 Stunden Dunkelheit vor dem chop! Euch allen schon jetzt ein fettes danke fürs fleißige liken und kommentieren bis nächste Woche ihr growmies......


Likes
60
Share


@BudBoutique
Follow
Welcome to Bud Boutique Grow Diary - really appreciate all your love and support :)
Dont forget to check out my other current grows!
🗓️ This Week:
- Day 52: the end is near - fading out colors really yellowing
- Day 53: Trichomes check - looking super good almost all cloudy, a few amber and clear. perfect point to chop
- Day 54: this one is finished, let's chop them !! ✂️✂️✂️
- now its time to dry inside the tent at about 60%rh and less than 20°C/68°F trying to get it even lower for the next 10-14 days - in complete darkness
Thank you for still staying with me 💚
___________________________________________
--- 🌱 Strain (Sponsor) 🌱 ---
🏷️ Cookie Haze by Kannabia Seed Company
https://www.kannabia.com/en/feminized-cannabis-seeds/cookies-haze
--- 🥗 Nutrients and Feeding (sponsored by APTUS: APTUS Ambassador) ---
🍸 APTUS: full nutrient schedule extreme
-- Regulator, N-Boost, P-Boost, CaMg-Boost, K-Boost, Allin1 Liquid, Startbooster, Topbooster, Enzym+ every feeding
-- Fulvic-Blast, NutriSpray as Foliar each once a week
🔗 https://aptus-holland.com/
--- ♻️ Grow Control (Sponsor) ---
TROLMASTER: TENT-X + LM14 Light Adapter to dim/sunrise/sunset lights + Temp & rH Sensor all remote on App
🔗 https://www.trolmaster.eu/
--- 🚿 PetraGrow (Sponsor) ---
CannaFogger Foliar Spray
🔗 https://www.petratools.com/product/petragrow-cannafogger-atomizer-new-mini-fogger
--- 🏭 Grow Setup ---
💡LUMATEK Zeus Pro 600
* 🏠🌿 Indoor: Homebox 120x120x200cm (4x4)
* 📐🌀 PrimaKlima exhausting Fan 1180m3/h (running on 60-80%)
* 🌀 Can Light Filter 800m3/h & 1x Fanbox 1x Dyson fan for Air circulation
🔗 https://lumatek-lighting.com/zeus-600w-pro-29/
🔗 https://primaklima.com/de/shop/ventilatoren-de/ec-ventilatoren/pk160ec-tc/
🔗 https://canfilters.com/products/filters/
All Likes and comments are highly appreciated!!!
👨🌾 don't forget to check out my Instagram for daily educational content: budboutiquee
- Bud Boutique
Likes
7
Share


@hash_thetics710
Follow
The moisture in the soil after the first 3 days of transplant was wetter than I anticipated.
I've been using a '3 gallon' flowering pot - separated evenly for all 10 of my clones -
Gnats and flies have been coming so this I believed to be an indication that my soil is too wet I believe.
The next following three weeks I am going to be doing about '1 1/2 gallons' per ALL 10 plants - seperated evenly.
These last couple days i've been letting the plants soak up all the available moisture... Hoping maybe my overwatering will be affected in a positive way in regards to the new root formations.
My PH coming out of my tap hose is around 7.8 - this is something i'd like to keep constant for this season if I can.
I'm not seeing any sign of stress, discoloration, or anything yet.
I understand ideally it would be smarter to lower it a couple numbers, however it makes it easier to not have to get a PH down and mix into my watering solution -
DO YOU THINK THIS HIGH PH WILL AFFECT MY YIELD AND PLANTS LIFE EVENTUALLY ?!?!
The plants are all looking healthy so far I think, let me know what you think cannabis fam!!
Air quality very poor and smokey in California this week-
7/6/21

Likes
6
Share


@Lickey
Follow
Transplanted to 5gal to see what happens! Flipping within the week for sure !
Mixed 50/50 444 and 284 Gaia green dry amendments.
Will cut a bunch of clones, trim the fan leaves and flip 🔜 soon!