
Processing
Likes
Comments
Share


@Master_weeda
Follow
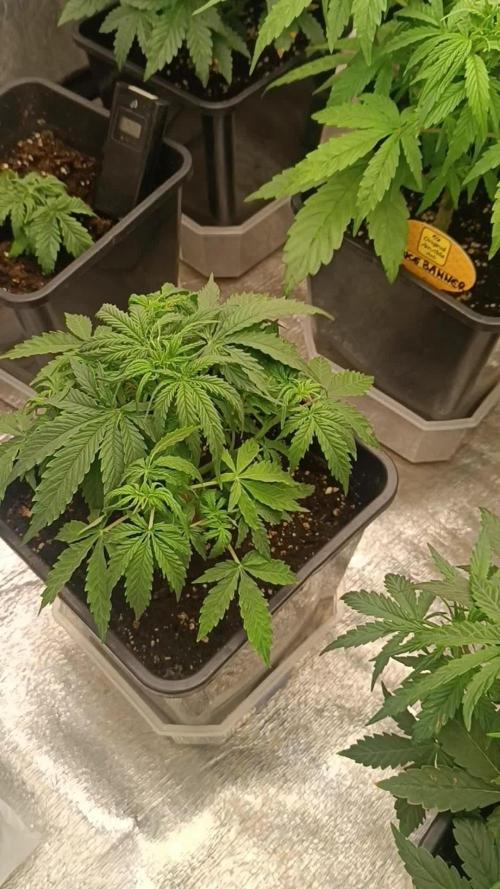
Bonjour à tous les padawans et maîtres jedis
Pour cette semaine je commence le rinçage car les trichomes sont bien laiteux
Arrosage avec 2 litres d'eau ph6.3 à chaque fois que le pot est léger


Processing
Likes
4
Share


@Skillgrower
Follow
Estamos a meio da 2° semana a crescer bem ja cm boa ramificação mas a dar indicios de falta de magnezio, mais uma semana começa o lst
Afinal vai começou mais cedo q o esperado.. a crescer muito rápido, mais uns dias estamos no inicio da 3°semana


Processing
Likes
37
Share


@MG2009
Follow
GTH SEED #1 in training, just super cropped on one side to even conopy.
The first site im recording will be a clone,it is on back side of plant and will not produce. #2,#3,#4 pics,#2 is stripped of leaves at about 12 inches.
06/16/18
#4 is showing
pre-flowers,#2,#3, no sign yet. #1 check in the morning.
06/19/2018
Still no pre -flowers on #1,#2,#3, #4 however is female so I Fimmed her to encourage side shoots to grow biggest of wider canopy. #1 reacting well to supercropping 20 tops as of today. Praying she is female🙏🙏. She is a stretchy girl in flower 2 to 3 x her vegged height so trying to be low profile as possible.👍
Likes
Comments
Share

@Trichoma
Follow
@1.2 kPa
Started to get a bit of Cal deficiency as I couldn't report earlier.

Likes
6
Share


@Krautbauern
Follow
dosidos auto is the plant with the most leaves, but it still has the biggest headbud. We are curious to see how firm her buds will be and are looking forward to a prompt harvest.

Likes
1
Share


Likes
23
Share


@gottagrowsometime
Follow
Welcome to my Animsl Mints Diary sponsored by MSNL and Spider-Farmer with their 2023 Seed release and Spider-Farmers new upgraded 2023 SE5000.
Veg Days 16-25 Days 22-35 Weeks 4&5
Growth was good. Really happy and healthy. Everything was flying along. Then, sadly. All my plants were hit with 2 low Ezyme & Terpinator 4.5ph feeds that screwed up a lot of my girls. These had a rough time of it but she pulls through. For the most part it's over here. Sprayed entire crop with Vita Race. It'll help with any ill affects from the growth aspect as some grows progress. I could of hard flushed. But, that would of solved the issue, only to start a whole new one that would have suppressed growth. Have been on the slow fix approach with adjusted ph of anything given into the 6.4-6.7 range. Foliar spray as given as they are. I only applied Vita Race twice as the problem has only been an issue the plant 10 days or so. From now on, everything will be PH'ed growing in co2, there really is no room for mistakes. Imbalances or any crucial nutrient like mag if that's thrown off, the whole plant(s) seedlings have suffered. There is rapid growth. I've had flips after 4 days into veg. But, things need to be FLAWLESS.
Pult Alga Grow as Recommended by the maker. Will be kept on stuff listed above.
Thanks to my sponsors from MSNL & SPIDER-FARMER for the chance to try these new lights and strains. I highly appreciate it. And also to all who stop by to view, like &/r comment. Thanks. Look forward to seen your work.

Likes
3
Share


@OrganicPower
Follow
W10F and the end is near. The bud sites are small and internodes are spaced far apart. I neglected them and let the light intensity get too high during stretch. They are pretty frosty though. Fade has started and they are displaying nice colours


Likes
6
Share


@TrapnTrade
Follow
Week 4 these babies went straight into 12/12 lighting, then a longer veg period hence the smaller size as im running an experiment on different lighting techniques with 12/12 start to now 16/8 veg/flower back then ill go down to 12/12 flower/flush just to see how the plants react and grow in size with a much smaller growing time frame of 8-10 weeks start to finish autoz


Likes
10
Share


@valiotoro
Follow
Photoperiod buds 🤩
The smell is absolutely divine very fruity,sweet & tropical🍋🍊🍉🍌
Solid like a diamond 💎
Bay harbor butcher’s trim to show the density
Likes
111
Share


@DreamIT
Follow
There is little to say yet. I recommend everyone to try this technique at least once. Maximize your harvest and increase your personal experience. If you want more serious proof of how mainlining works, take a look at the diaries of @Canamatoes, my teacher and mentor. More updates later, stay high🤘😁🦄
Likes
24
Share


@Cariboo_OG
Follow
My choice to use soft touch stainless steel picture hanging wire as my LST ties is seeming to be a poor choice. the wire is not rigid enough making it make difficult to achieve the results I was looking for. Overall.. not super disappointed but I am working harder than I should be :p

Likes
2
Share


@Solocultivo
Follow
29 macetas de 20-18 litros aproximadamente
Dia 32 de Floracion Super Suelo
Sin fertilizantes
Apoyado con biortilizantes @bioinsumoschakrana
Melaza
Te de Bokashi
Humato Postasico
Potenciado
@Knactive
Knactive el mejor bioestimulante 100% orgánico para todo tipo de plantas , el cual activa la autodefensa contra el estrés oxidativo y potencia la síntesis interna de todas las fitohormonas.
https://instagram.com/knactive_?igshid=MzRlODBiNWFlZA==
Vital Juice
Es un producto Chileno hecho en base a algas: durvillaea antarctica y ascophyllum nodosum.
Likes
116
Share


@Kitties_and_Colas
Follow
~_~_~_~_~_~_~_~_~_~_~_~_~_~_~_~_~_~_~_~_~_~_~_~_~_~_~_~_~_~_~_~_~_~_~_~_~_~_~_~_~_~_~_~_~_~_~_~_~_~_~_~_~_~_~_~_~_~_~_~_~_~_~_~_~_~_~_~_~_~_~_~_~_~_~_~_~_~_~_~_~_~_~_
10/07/21
👋😺Hi grow family!! We're beyond excited to try out this new MarsHydro LED for our latest grow, the SP-3000 is INCREDIBLY bright!! ..I have never seen a light more appropriate for a 4x2 tent in my life, we (happily) replaced 3 "600 watt" blurple LEDs with this single rig ( something we've wanted for a very long time). There should be no issue achieving perfect coverage, corner to corner with this light. Its been years since we've flowered under LED ( and never one of this quality), we're a little bias towards HID/CMH, especially my hubby but I think this might just be the LED that changes our mind! We'll be growing Gelat OG Auto by Seedsman (we've heard amazing things) for our first grow under the SP-3000, all plants in 5gl fabric pots, Promix-B (25% perlite) on a 20/4hr cycle. We're starting with 4 plants but if they become unmanageable, we'll move one or 2 of the plants to another tent. We use a glass of water and a paper towel as our germination method. We soak seeds roughly 24hrs and then in a wet paper towel for another 12-24hrs, we average roughly a 90% success rate doing it this way... Thank you for reading if you made it this far and happy harvests everyone! ❤️💡🌱😽💨
⚡Mars Hydro/SP-3000⚡ Specifications ⚙️:
Diodes: Samsung LM301B / Osram 660nm (960 total)
Driver: Meanwell 300watt 🔌 (300W±5% @AC120V-277V)
PPF: 824umol/S ☢️
PPE: 2.8 µmol/j 〰️〰️
Lifespan: >50k hrs ⌛
Veg Coverage: 3 x 5 ft 🌱
Flowering Coverage: 2 x 4 ft 🌼
Weight: 10.1 lbs (4.6kg)
-No-fan design: the SP-3000 uses an aluminum heatsink, and the driver can be removed then placed outside the tent🌡️⬇️
-IP65 waterproof ratings, tolerant to high humidity grow environments 💦 ..
-Up to 30 of these lights can be daisy-chained together and controlled from a single light!
💡~💡~💡~💡~💡
~_~_~_~_~_~_~_~_~_~_~_~_~_~_~_~_~_~_~_~_~_~_~_~_~_~_~_~_~_~_~_~_~_~_~_~_~_~_~_~_~_~_~_~_~_~_~_~_~_~_~_~_~_~_~_~_~_~_~_~_~_~_~_~_~_~_~_~_~_~_~_~_~_~_~_~_~_~_~_~_~_~_~_
10/10/21
🤘😺 100% germination!! All seedlings have broken the soil today.. I'm so in love with this light!! ❤️💡🌱
~_~_~_~_~_~_~_~_~_~_~_~_~_~_~_~_~_~_~_~_~_~_~_~_~_~_~_~_~_~_~_~_~_~_~_~_~_~_~_~_~_~_~_~_~_~_~_~_~_~_~_~_~_~_~_~_~_~_~_~_~_~_~_~_~_~_~_~_~_~_~_~_~_~_~_~_~_~_~_~_~_~_~


Likes
75
Share


@GODSGIFT_2005_JM
Follow
🍼Greenhouse Feeding BioGrow, Bio Enhancer & BioBloom
⛺️MARSHYDRO
The ⛺️ has a small door 🚪 on the sides which is useful for mid section groom room work. 🤩
☀️ MARSHYDRO FC 3000 LED 300W
☀️Also special thanks to VIPERSPECTRA P2000 (200W) & XS2000(240w) LED growlights
🌱GANJA FARMERS

Likes
45
Share


@SherbGrows
Follow
Happy Easter Everyone! Time for an update
During week 10
NEW LIGHT installed!! ViparSpectra XS2000. So excited! I think the plants are a little shocked from the change in light but hopefully they recover just fine.
This week 3 of the plants definitely started showing some issues I have never had before. I started noticing rust spots on the upper top leaves of the plants which I believe was the consequence of the following... A.Nutrient lockout B. Soil PH too low from over fertilization C. Soil PH being too low due to the peat moss in the growing medium. I have purchased dolomite lime as an organic alternative to properly balance soil PH for my next grow. I did do a light flush with PHd water at 6.5.
Plan for week 11
Going to be adding some Calcium to the soil during next watering to see if that helps new growth on the plants (Tuesday)
At this point I will be just keeping an eye on more rust spots forming on the leaves. I have backed off on adding more P & PK at this time because I think I over fertilized last time.
I am learning a lot still with every week of this grow. I know now how to dial in the nutrients and better amending soil first. Since my soil has peat moss I think that had a lot to do with the acidity as it breaks down. Really hoping these girls continue to finish out okay! Thinking that they will take the full 14/15 weeks at this point.
