
Likes
Comments
Share


@Naturalist
Follow
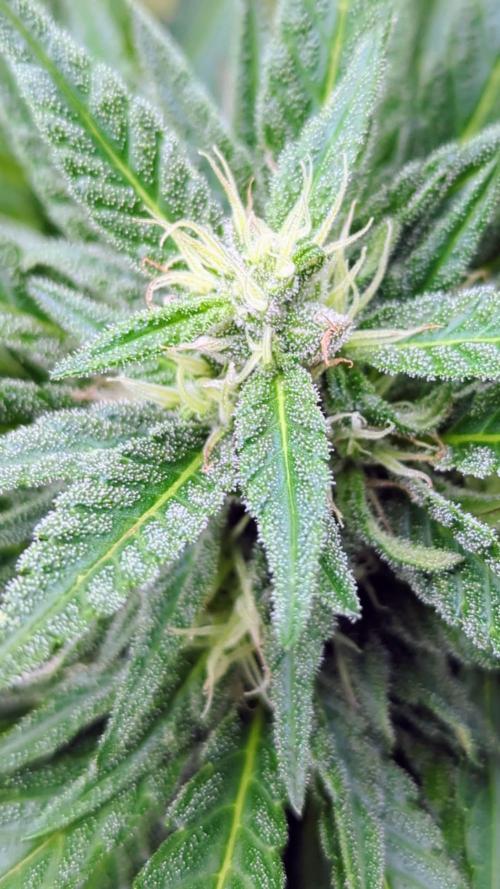
The final week, I trimmed a lot to give the bottom growth a final chance to brown up.


Likes
1
Share


@Randomjcb
Follow
Did a 15 week veg while brought 3autos to end then fliped 12/12 about a week ago lovely plant easy to grow so far and loves the feed

Likes
38
Share


@GODSGIFT_2005_JM
Follow
For LIQUIDS & NUTES ******GREEN BUZZ NUTRIENTS***** organic.
Also i’m using their LIVING SOIL CULTURE in powder form!
MARSHYDRO ⛺️ has large openings on the sides which is useful for mid section groom room work. 🤩
☀️ MARSHYDRO FC 3000 LED 300W
💨MARSHYDRO 6” in-line EXTRACTOR with speed-variation knob, comes complete with ducting and carbon filter.

Likes
4
Share

@FlowerForYou
Follow
17/07/25: Weather is super shitty for the middle of July, so not so much growth for the past couple of days! I hope it will get better soon and from now on it's just a matter of patience and slowly watching the buds thicken up! 🌿 Curious to see how long they need until harvest! Planning to the end of August at the moment, so up to six more weeks to go 👍🏼
Likes
2
Share


@Dsant
Follow
D43 - 01/03
Not much to update this week. Girls are growing super well and bud sites are fattening nicely, no toxicity or deficiency that I have noticed.
Mixed a 20L reservoir @ 70% strength on the 26th.
--
D45
Mixed a new reservoir on the 3rd. Should've done it yesterday or at least earlier today, but as far as I can tell the girls aren't showing any signs of being dehydrated so we should be alright.
Mixed new 20L reservoir @ 70% strength, I'll probably follow with this strength until chop day.
Started with B-52 this week as well, a bit of calmag and roots excelurator.
I'll do a defoliation session this week too as they're quite packed in the space.
Note to self: next time go humbler and run a max of 2 or 3 plants in that setup. Lesson learned!
Likes
5
Share


@RastaRick
Follow
Starting to see some real good growth. Everyone is looking real gree. I think next week calls for a session of LST. Still only using water with BioTabs. Not issues. Tenet is pretty hot at 27C and dry at 27%rh... Ruff but it's what I got

Likes
7
Share


@Cultivatorcarlos
Follow
No bug or disease problems. I even took her off veg nutes way too soon and she recovered like a fucking champ. I’m popping two more this week. Unfortunately i didn’t weigh it because Of some very unfortunate circumstances that I was dealing with at the time. I essentially had to vacate my premise within 24 hours. A few days after harvest. Anyways. I ended up smoking the whole thing with my friends and it was straight fire. The terps were crazy also. Super sweet. After curing she had a very sweet smell like bubblegum / grape. This was only my second harvest ever.

Likes
15
Share


@Venabr96
Follow
Estamos aqui começando mais uma semana, algumas folhas apareceram manchadinhas e com uns buraquinhos.
Pode ter sido por causa da queda da lampada ensima delas...
Folhas muitos grandes e desenvolvimento muito bom
A piquena esta crescendo bem,muito forte e linda com belas folhas. Ira crescer para cima reta sem nenhuma tecnica.

Processing
Likes
11
Share


@stickygrowz
Follow
was originally going to do scrog, I realised I'm not going to have quite enough room for a full scrog so I'm thinking about some sort of mix between scrog and sog. If anyone has any suggestions and ideas please let me know. Thanks.


Likes
46
Share


@Miss_Greenthumbs_Garden
Follow
Strain. Purple punch 💜
Breeder. Seedstockers🐿️
light. Mars hydro ts1000💡
soil . biobizz lightmix 👊
nutrients. biobizz grow 🌱 biobizz heaven
Growing really well she's been topped and I shall veg her for at least another 2 weeks !!
📢📢 UPGRADED to the MarsHydro ts1000
EFFICIENCY WHITE LED GROW LIGHT: Newest SMD LED technology provides highest PAR/LUMEN output(743umol@18"), designed to replace a single-ended 250watt HPS/MH; MARS HYDRO TS 1000 growing light makes you get 30% higher yield compared OLD blurple led lights, Max 2.0g yield per wattage (power draw).
LOWER RUNNING COSTS & HIGHER YIELDS: Actual Power 150W with 342 LEDS! It saves up to 50% energy than other led grow lights. Perfect for 80x80CM, Max Coverage 100x100CM. Over 90% light energy can be absorbed by plants; higher intensity and more even coverage in a MARS HYDRO reflective grow tent, or by crossing over using multiple TS1000.
SUNLIGHT FULL SPECTRUM LED GROW LIGHT FOR WHOLE GROWING STAGES: 760nm IR/660nm Red/5000k blue/3000k warm white light. Infinite close to natural sun light, TS1000 suits for all plants whole stages indoor growing, rapid plant response from seed to flower, achieving maximum quantity and high-quality yields
.
CUSTOMIZED GROWING NEEDS WITH UPGRADED DIMMING DAISY CHAIN: Newest TS series growing lights support multi-lights connection up to 15 lights for your various growing needs and stages; TS1000 light auto sensing power supply works on both 120VAC, 230VAC and 277VAC, suits for Large Rooms and Commercial Setups.
HIGH REFLECTIVE & NOISE FREE DESIGN: High reflective hood, noise fanless free TS series grow light. Quickly aluminum heat dispersing material increases light intensity up to 20%, reducing light lost to aisles and walls, allowing your plants receiving more energy without burning your plants in maximum headroom
Shes up and running 💚🙏😊 Thanks @marshydroled
Processing
Likes
28
Share


@GanjaFarmar
Follow
The green crack has hit week 5 from germination. About 35 days old. And it already started pre flowering! I wouldve expected it to get bigger during veg but lets see what it gives us! Ive add Topmax and BioBloom by biobizz. The room temperature is around 28 which is abit high but not too bad. If i can get it around 26C it will be perfect.
Likes
1
Share

@DogDoctorOfficial
Follow
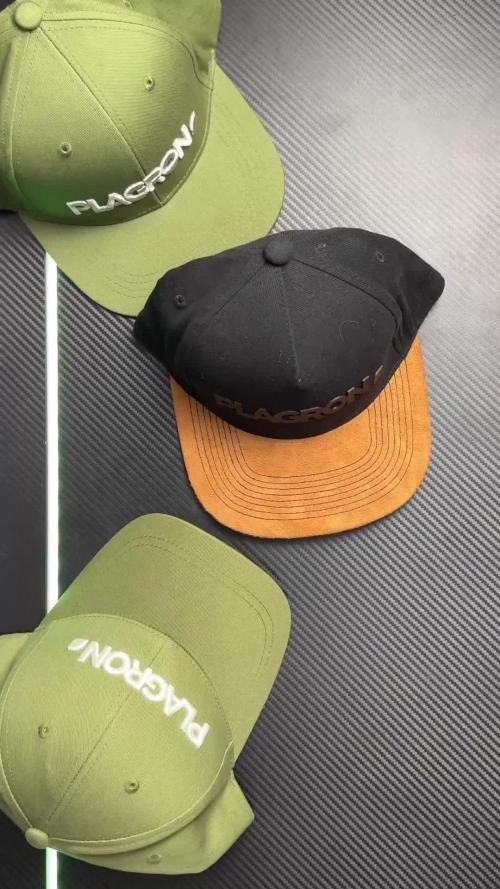
🍋 Project Blue Tent – Folder 14B
Pickled Lemon Haze F1 – Pheno B | Week 2 – Finding Her Rhythm
Every phenotype tells its own story.
Although both plants share the same genetics and are growing under identical conditions, nature always leaves its own signature. That is exactly why Project Blue Tent was created—to document each phenotype individually and discover the subtle differences that make every plant unique.
This project is built around consistency. Both phenotypes are grown inside the complete Zamnesia ecosystem, rooted in Plagron Premium Coco Grow Bags and fed exclusively with the Plagron Hydro line. Every environmental parameter, every feeding adjustment, and every observation is recorded so this diary becomes more than just a grow log—it becomes a learning experience.
This week marked one of the most important moments of early vegetative growth: transplant day. Thanks to the outstanding root development inside the starter pot, Pheno B was ready to move into her permanent home, where she can now fully explore the coco substrate and begin building the foundation for the weeks ahead.
⸻
🌱 Environment & Ecosystem
Everything inside the Blue Tent is designed to remain as stable and repeatable as possible.
• Light Schedule: 18 hours ON with 280PPFD / 6 hours OFF
• Growing Medium: Plagron Premium Coco Grow Bags
• Nutrient Line: Plagron Hydro A & B + Hydro Roots
• Water pH: 5.83
• EC: 1.26 mS/cm
• Reservoir Temperature: 23.1°C
Environmental Conditions:
• Temperature: 29°C
• Relative Humidity: 68%
These conditions provide excellent transpiration while encouraging vigorous vegetative growth and rapid root expansion throughout the coco.
⸻
🥥 Why the Starter Pot Is Buried Inside the Coco Bag
One detail that often surprises people in this project is that I don’t remove the starter pot area from the final grow bag.
Instead, I bury the entire root ball directly into the centre of the hydrated coco.
There are several reasons for this approach.
First, it completely eliminates transplant shock. The roots never need to recover from disturbance—they simply continue growing exactly as they were.
Second, the original root zone remains perfectly intact, allowing moisture levels to transition gradually into the fresh coco rather than forcing the plant to adapt overnight.
Finally, positioning the starter pot in the centre naturally creates a perfectly symmetrical root expansion. Instead of favoring one direction, the roots are encouraged to colonize the entire grow bag evenly, producing a balanced foundation for the remainder of the grow.
Sometimes the simplest techniques deliver the biggest long-term advantages.
⸻
🌿 Root Development
When removing the starter pot, the first thing that stood out was the incredible density of healthy white roots wrapping around the entire root ball.
Every side of the cube showed active growth.
The roots were bright white, thick, and evenly distributed, exactly what I hope to see before transplanting into the final container.
Healthy roots create healthy plants.
Strong roots improve nutrient uptake, increase resistance to environmental stress, and provide the engine that will support explosive vegetative growth over the coming weeks.
Looking at this root system, it’s clear Pheno B made excellent use of every cubic centimetre of her starter pot before graduating into her final home.
⸻
🌿 Meet Pheno B
While her sister impressed me with compact structure and balanced symmetry, Pheno B immediately revealed a different personality.
She has a little more stretch through the stem, creating slightly wider internodal spacing while still maintaining excellent structural strength.
Her leaves are broad, richly coloured, and beautifully layered around the main stem, giving her a vigorous, energetic appearance. The newest growth is bursting from the centre with exceptional colour and excellent leaf formation, showing that she has settled comfortably after transplant.
One detail that really caught my attention is her natural openness. Instead of stacking tightly, her branching already hints at a phenotype that may naturally create better airflow and light penetration as she matures.
Every day she seems to move with confidence, reaching upward while expanding outward at the same time.
It’s still far too early to know how she’ll express herself during flowering, but she’s already demonstrating a personality of her own—and that’s exactly why I love documenting individual phenotypes.
⸻
💧 Feeding Strategy
After transplant, I continued feeding with the Plagron Hydro line, allowing the young roots to immediately colonise the fresh coco surrounding the original root ball.
Current feed:
• Plagron Hydro A & B
• Plagron Hydro Roots
Maintaining a stable EC together with a properly adjusted pH ensures nutrients remain immediately available while encouraging continuous root expansion into the surrounding substrate.
Rather than pushing rapid top growth, the goal right now is to build an exceptionally healthy root system that will support vigorous development throughout the vegetative stage.
⸻
🔍 Looking Ahead
The transplant has gone exactly as planned, and Pheno B has already resumed active growth without showing any signs of stress.
Over the next week I’ll be watching closely as the roots continue to colonise the coco bag and the canopy begins to expand.
As her structure develops, I’ll also start evaluating her branching pattern and natural growth habits to see how this phenotype differs from her sister. Those small differences are often what make phenotype hunting so rewarding.
For now, she looks healthy, confident, and ready to show what she’s capable of.
⸻
💙 Final Thoughts
Watching two sisters grow side by side under identical conditions is one of the most fascinating parts of this journey.
Same genetics.
Same environment.
Same feeding.
Yet each plant begins writing her own story.
Pheno B is already showing a unique character—slightly more open in structure, full of energy, and growing with quiet confidence. It’s exciting to watch her develop, and I can’t wait to see how those early traits translate once flowering begins.
The adventure is only getting started.
⸻
🙏 Thank You
A huge thank you to everyone following Project Blue Tent and sharing this journey with me.
Special thanks to Zamnesia for providing the incredible genetics and building an outstanding ecosystem around home growing, and to Plagron for supplying the Hydro nutrient line and Premium Coco Grow Bags that make this project possible.
Thank you as well to the GrowDiaries community for the constant encouragement, feedback, and inspiration. Sharing these weekly updates is one of my favourite parts of every grow, and I hope they continue to educate, inspire, and encourage growers of every experience level.
Growers love and see you all in the next update. 🌱💙
Likes
6
Share


@Barcelona_Farmers710
Follow
Aquí empezó los problemas por el regulador...no podíamos bajar la potencia de 320w y los pelos se quemaron un poco, apesar de todo los colores empezaron a florecer! Buenos humos compañeros 🍁

Likes
8
Share


@Wishar_Garden
Follow
Week 13 (04/07 - 10/07)
06/04
Chopped her today, planned to keep her going until end of this week but needed space in flowering tent
She is smelling real good
Couple branches found some leaves with spider mites
She foxtailed quite a bit on the top due to her being too close too LED, couldn't get it higher


Processing
Likes
6
Share


@Jack_Greenstalk
Follow
5 out of 6 ended up female, pretty happy with that ratio, last week of 12 hour light 12 hour dark week 3 I change to 11/13 to mimic season ending sooner or island (hawaiin) sun cycle that is supposedly known to help express phenos more and make plant finish quicker. a tip i heard from dj short