
Likes
Comments
Share

@CrackinBeans
Follow
Mephisto and bighead going into darkness for 48-72 hrs. Then the chop. Big bomb is the last one standing in the 5x4 will begin flushing soon


Likes
6
Share


@TGriner420
Follow
This week went by fast! They're growing really fast and always hungry! They're getting ready for the flower stage and entering Bloom. They're getting 2L of H20 per day that's pH at 6.8. I water 2x a day! I turn them on at 6am and give them 1L of H20 at 9am that way they're awake and 1L of H2O at 9pm that way they're split. I feed my nutrients at the 9am watering. I pH my nutrient mix somewhere between 5.8 and 6.2. I also have amended the soil with Soil Recharge and that's once a week as well as the Fish Shit and The Stash Blend. Then, I always flush with only pH H20 the day after any nutrient mix. Overall, the plants are healthy and I'm waiting to see how they turn out!
Likes
1
Share

@Northern_Ent
Follow
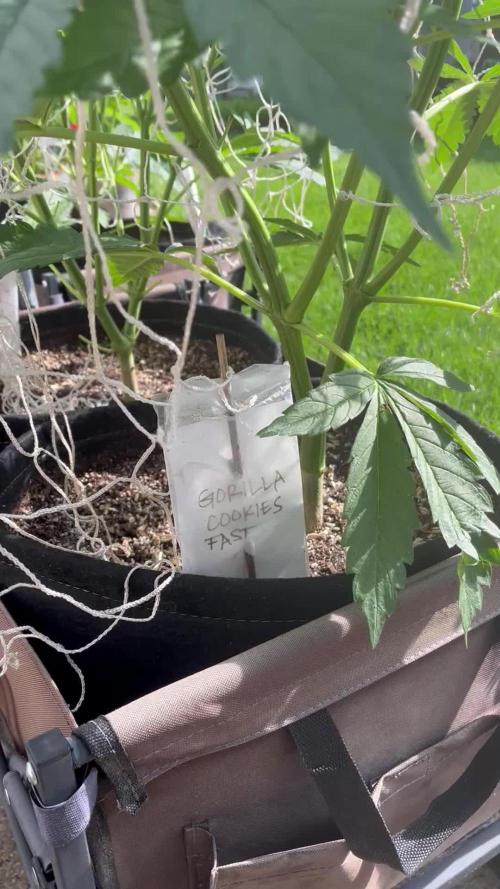
July 4: Gorilla Cookies is looking great and I did the final round of topping to get 16 growth tips.
July 10: looking really good and growing fast. Did a foliar spray of Epsom salts (for the Mg) and potassium silicate.
Likes
13
Share


@Ieiogrow94
Follow
Eccoci qui...
Per problemi di lavoro ho tardato un pò la pubblicazione delle foto, la piccola è molto vigora ed emana un forte odore.. Già si può vedere la resina che si inizia a formare sulle cime in alto...
Sono estremamente soddisfatto della sua crescita finora e sono sicuro che mi riserva sorprese, odore veramente intenso.
Grazie a tutti per il supporto, NON VEDO L'ORA DI RACCOGLIERLA 🔥🌲❤️

Likes
7
Share


@GrowmieDeLaStreet
Follow
Day 50:
Feeding day. As planned, I raised the dosage to 4ml per liter for the 3 base compound and gave each plant 1L. They drank it all.
Call me weathercock but I removed the ScrOG netting since it was more of a handicap than anything that helps. I'll continue flattening everything with LST.
Everything is looking good.
Day 51:
Another defoliation today, removing new leaves and smaller budsites. Nothing else to read.
Day 52:
Video update to show the flat canopy, budsites and how I LST the highest stems and redirected them to the center of the plant to expose the most budsites to the light.
Day 53:
Feeding Day, still 1L each. No burned tips or anything since last time so the dosage is alright.
Day 54:
I woke up to 2 of my girls praying to the light god. 50cm is the sweet spot.
Day 55:
Nothing to read. I don't have a microscope but I'm pretty sure to see the first trichomes :)
Day 56:
Nothing to read.

Likes
48
Share

@Northern_Ent
Follow
Aug 24: cool and rainy lately but will warm up again in a couple days. Gorilla Cookies looks really good and is flowering nicely. Very nice strain. Added some soluble seaweed to the water mostly for the K.
Don’t take flash pics of photoperiods unless you’re immediately using a 730 nm light to put them into dark mode.
Using the far red light like this is known as phyto-forcing and it’s like getting an extra two hours of darkness making a 26 h day. This far north I think it moves flowering up by 3-4 weeks so obviously a huge trick. Easy and cheap if you have daily access at dusk.
Aug 26: it’s been a couple of weeks but I figured it was time for a lazy compost tea. I watered with it slightly diluted and the plants look almost immediately greener and more vigorous…amazing actually. 👍👍
Aug 27: this is definitely the fastest flowering of the four. Hopefully it stays sunny for a few more weeks. Thinned out the understory a bit as there were some small branches and bud sites that were not going to do anything.
Check out the birds sounds on the first video. The magpies thought I was too close to their nest in the tree or something…they’re usually not quite that annoying.
Aug 29: this is a great strain, and the manifold is working its magic.
Likes
17
Share


@Le_Duc_Du_Bud
Follow
Salut les amis 🍁
Aujourd'hui je viens vous poser la troisième semaine de floraison.
La gouria cookies est toujours aussi énervé on voit bien sa forme sa dominance apicale.
La strawberry est différente plus petit buissons mais avec beaucoup plus de sites de bourgeons en deux semaines la strawberry a énormément gonflé en volume et en créations.
Je suis pressé des semaines à venir ❤️🍁


Likes
2
Share


@KannaGrowing
Follow
Esta semana seleccionamos las plantas más adelantadas de nuestro cultivo, para colocarlas bajo la nueva luminaria Led LazerLite Pro 720 de The Pure Factory, con la potencia ajustada al 50%.
Miramos de que las cuatro variedades estén representadas bajo el led y bajo las lamparas HID, de esta forma podremos ver las diferencias entre los dos sistemas.
Seguimos con nuestra rutina de fertilización para la fase vegetativa Grow Soldier + Green Mystic by JUJU Royal y CALMAG de BioBizz.
Al final de la semana, cambiamos el ciclo lumínico para pasar a 12/12 Floración.

Processing
Likes
Comments
Share


@DIYbucketgrows
Follow
Released the shackles of LST for now — going to allow some vertical and unobstructed growth of all branches for a few days, then perhaps resume. I hope to have another week or so of vegging!

Likes
79
Share


@Salokin
Follow
Hello Growmies,
As we conclude week 8 with our Epic Buzz trio, the grow space is a vibrant testament to the diligent care and attention we've poured into our cultivation practices. Each plant, with its individual shape and form, reflects the precise techniques that have been employed. The internodal spacing is particularly impressive, indicative of a successful vegetative period and setting the stage for a robust flowering phase.
Nutrition and lighting remain meticulously managed, with PPFD values sustaining an optimal range to support the plants' increased energy needs. Alga Bloom, part of our carefully balanced nutrient mix, continues to fortify the plants as they begin to focus their efforts on bud development. We've also stayed vigilant on pest control; the appearance of "a" fly led to an immediate and effective trapping response, confirming our proactive measures are keeping potential issues at bay.
The environmental data from the past week shows some manual adjustments to the fan speeds—a reminder of the hands-on nature of grow room management. The weekly VPD chart reflects these tweaks, though they're quickly rectified, maintaining a conducive atmosphere for plant growth. The 24-hour chart echoes this stability, with only minor deviations, demonstrating our commitment to providing a consistent environment.
The uniformity of growth among the Epic Buzz variants is striking, as observed in the latest images. Their lush foliage and the efficient use of space under the SCROG net indicate a well-executed strategy, enhancing our optimism for the flowering stage.
As we forge ahead, we await with bated breath the flowering phase's full display. The consistent growth patterns, along with the strategic interventions such as fly trapping, ensure that our Epic Buzz plants are primed for a productive season. The unity and health of the canopy are not merely a sign of what's to come but a testament to our dedication to this cultivation journey.
Stay lifted,
Salokin

Likes
5
Share


@killerjoint
Follow
15th day into flowering- Trim some Fan leaves /anything cover canopy.
18TH DAY FLOWER- LOLI POPPING.
JUST WATER EVERY 3 DAYS PH 6.5


Likes
36
Share


@Costosito
Follow
Todo sigue bien excepto que siguen apareciendo esos bichitos enanos blancos como puntos o bolitas enanas en las hojas mas bajas y suelen estar en las mas amarillas pero intento limpiarla y fumigarla pa mantenerlo a raya
Likes
11
Share

@MaxWax
Follow
I started flushing my plants three days ago, except for the Captain Future, which needs a little longer. I’ve been checking the trichomes under the microscope; most are milky now, so it won’t be long until there’s enough amber—which is exactly what I’m looking for🙃

Likes
49
Share


@AsNoriu
Follow
Day 50. Girls had 30 hours of darkness and now its first day of flower !!!
Nothing to add, they look ok, found couple pests under leaves, applied neem oil.
Never had any bugs inside, but its always first time ...
Would be nice to know, how quick or how long does it takes for big problem to happen ...
But that kind of curiosity i won't satisfy ;))))
On old leaves found like 5 bugs on first plant, thought its enough to start worry ...
Day 51. Girls are flying, photos shows it all....
Even after watering they still look more than ok, always pray...
Hope neem oil helped to sort bugs, will check it in 3 days.
Day 52. Bugs are still here, more soap and neem oil , all done in bath, each girls took at least 2 liters of spray, most leaves washed gently with spray and fingers, lowest old or damaged leaves removed.
Sticky traps installed.
Should sort this out.
Worst case i still can spray them twice before first flowers starts to form... better to do all shit in veg, but i am old and blind, sometimes i see just huge things ...
Day 56. Sticky traps out, Army of LadyBugs in !!! ;)))
Some leaves looks bad, now i see what a big pain in @$$ are pest, how fortunate was i to avoid it for so long ...
Girls drink quick, so i should be still ok, in couple days 200 larvae of LadyBugs should arrive as well ...
Fingers crossed !
Happy Growing !!!

Likes
27
Share


@Fibro_Witch
Follow
Well, its been a very hot, hum8d and dry week. Well, over a week since we got rain, weeks since we've had a good downpour. The streambed is too low, and if this keeps up I'll have to truck water from the house.
Despite the lack of rain everyone is doing well. The ladies are really stretching now that they're in flower and I'm happy with how everyone looks.
I found another liquid fish fertilizer that's a 3-2-2 vs the Alaska brand 4-1-1 I was using before so I think this will work out even better for flower. And it's local!
Likes
11
Share


@Original_Growers
Follow
Day 1.
The cuttings after being rooted in the special tray were transplanted into small jars and allowed to acclimatize in the appropriate boxes. After a few days we transplanted them into 18 L pots filled with plagron growmix, a prefertilized substrate, and then they were placed inside our cultivation box, the one in the photos. Being a prefertilized substrate we watered with only water with a pH of 6.5 until the water ran out into the saucers. As the 18 L pots are very large, no more water was needed for the first 5 days.
DAY4.
The plants were topped.


Likes
23
Share


@Ferenc
Follow
Day 58, 11th of November 2020:
I set the lamp 15 minutes shorter to switch off earlier so she receives 11:45 of darkness. I would like to imitate the nature when longer nights come with time till the 4th week (when she will receive 13 hours darkness a day 15 minutes minus 4 times = 1hour) so every week 15 min longer darkness for 4 weeks and then back to 12/12 to have bigger buds from the 4th week....
I think whe will flower longer I have got that feeling. Nice strain growing properly.
Good job Zamnesia....
Strech should end soon, however she did not strech that much due to training...
Fertilization happens every 2nd day with the mix and ratio above.
Let's go ;)
Likes
19
Share


@eldruida_lamota
Follow
Que pasa familia, puesto que la compañera y yo estamos bajo mínimos, hemos decidido proceder a un lavado de raíces temprano, y un estrés hídrico para limpiar raíces y estresarla un poco.
Todo va sobre ruedas , puesto que el Covid afecta al confinamiento, decidimos cortar las gorillas estos días siguientes para secar y en nada tener algún bote para subsistir 😂🤣.
-El estrés hídrico es reducir cada riego la cantidad de agua, para que la planta se estrese y escupa tricomas sus últimos días.
Esta variedad de sweet seeds es INCREÍBLE, aun cortándola pronto me parece que los resultados son inmejorables, su olor a melón me encanta y se ve repleta de thc.
Nos vemos en la cosecha fumetillas, y mucho ánimo para todos.