
Likes
Comments
Share


@CzAlmighty
Follow
Hello growers,💚
beautiful strong plant .No problematic flower.🍰🍰🍰
naprosto úžasná vůně květů 💨💨💚

Processing
Likes
9
Share


@Kushizlez
Follow
Day 69 (March 6th)
Just gave everyone their last watering. I’m going to harvest and wash everything tomorrow night on day 70. I‘m not going to do that whole 48 hours of darkness thing because I didn’t see a difference last time I did it. In fact, it made my plant under watered before drying which caused it to dry too fast. Slurricane and cheese will be washed with h2o2 and the rest will just be rinsed off in warm RO water and hung up. Before and after washing I’m going to go over each branch with a flashlight and make sure there is no dog hair or debris in or on the buds. I will be drying in my spare bathroom (that no one uses!) from hangers. Aiming to keep it around 60-62F and 50-60 RH. Hoping for that 10-12 day dry. I wanted to do a full plant hang but the tent got pretty dirty and I would feel more comfortable just cutting and rinsing everything off branch by branch. I’m going to try my best to keep the full plant intact. Got my humidifier hooked up and running RO water because with tap water it deposits calcium and lime all over the buds and walls. For air flow I’m just indirectly running a small usb fan. I’m not worried about air flow in the bathroom honestly. It stays nice and breezy down there anyway.
Got the food grade peroxide and RO water to wash up the slurricane and cheese. Everything except for the cheese and garlic#1 is looking more than done. Trichomes all look pretty well done. Some of them have even burst open. Smells are all super ripe and mature too. Can’t wait to smell each individually in jars.
Next week I will recap what went wrong and what I will do differently next time to keep it from happening again.
(Day 70F) Just got everything chopped, washed and hanging. The vast majority of the PM was washed out but I can still see very small amounts. When they dry out I can shake the branches a bit to get the rest off. At very least it’s sterile now. There is no question I lost some potency while washing but the amount is negligible for a much cleaner product.
I could see lots of dirt and other debris float to the surface of the water after being washed. And no those are not trichomes, those sink to the bottom. I could put that nasty water through a bubble bag and wouldn’t get all that much. Although it probably does remove a lot of the actual trichomes heads. I’ll have to check with the microscope.
Everything is rigged up for a nice slow dry. Temp is sitting at 64 and RH is at a nice 60%.

Likes
35
Share


@Bud_Koenig
Follow
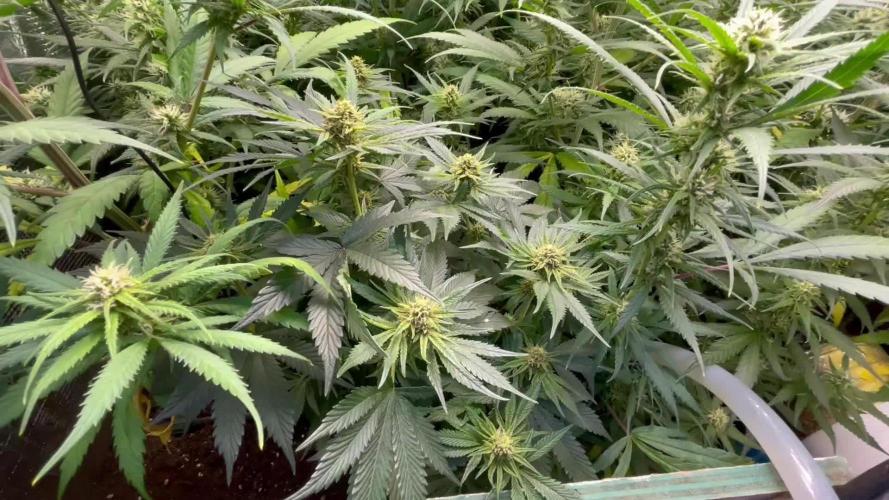
Hey fellow growers! Week 3 of Bloom is completed, and everything has gone smoothly so far. The plants are well taken care of and haven’t shown any signs of deficiency. To be safe, I did another top dressing with worm compost, microbes, and fungi. I’ll keep you updated. If you have any questions, feel free to reach out!


Likes
16
Share


@GreeneScene
Follow
What to say about this week? For starters LST was started this week. Initially I used garden ties but soon after replaced them with 6” garden staples .
2 of the 6 girls began throwing pistals resulting from the LST starting around day 15 YIKES 😬.
The Zkittlez & the Runtz both from (Expert Seeds ) began giving the 5x5 its first smells .
The LST so far has been a pleasure no ooosy daisies so far & the girls are showing what they are made of . The secondary shoots have great potential to form a nice round bush that I can train out into an even-as-possible canopy .
Today is day 21 & day 20 for this bunch . They are only using Gaia Green dry amendments for feedings but I decided to take some advice given to another grower & supplement my girls with some compost tea . NO I DONT THINK THEY NEED ANYTHING ADDITIONALLY IM REALLY HAPPY SO FAR WITH MY NUTES bbbbuuuuuttttttt in the short chance that my ladies may take a liking to an occasional tea & reward my pampering with large , long , frosty, stacked cola’s . . Thennnn I’m supplementing , I consider this all “4-play” for my ladies Ik a giver 🤷♀️😭
My only concerns are racing against this clock to get as much size & solid structure before flowering sets in I’ve really got my heart set on a certain outcome & I’m one for a good challenge.
Finally , atleast as much as I can remember, I increased the dimmer knob on the light from 65% to about 78%. I won’t increase the watts any higher until bloom sets in fully & at that point I’ll be turning it to 100% raising it a maybe 6 inches & watching patiently for my girls to start praying 🙏 to it .
Week 3 in the books !


Likes
19
Share


@JeyGanesha
Follow
Alla prima strawberry banana gli ho fatto il lavaggio radici, ancora una settimane più o meno e ci siamo gente😀👍💪💚💛
Non vedo l'ora di raccogliere perché sto rimanendo anche senza terapia🎺

Likes
2
Share

@Snugens
Follow
This week the girls all got hair cuts. Pineapple actually had to get 2 cause she’s such a grower. Put a little ogk in a pot for the wife so she can have a window plant if you see that in the video. Little burn on ogk but they’re all loving life right now.


Likes
8
Share


@Mr_nugs_lover_David
Follow
Very good smell so far, exact fragrance that the other 2 phenos plants Ak420, hoping the best for a good sativa happy energetic high with that sweetness in flavor and aroma, let's see how she perfoms! 👨🌾💚🧡

Likes
9
Share


@Krautbauern
Follow
Those colours are so beautiful, the forbidden nectar is turning totally purple in the moment. Her orange smell is incredible.
Kush Pop Clone is producing insane dense buds in these days, thed are also turning a little bit purple. dehumidifier is a must have.
The Rainbow Triangle seems to be the latest plant. She also produces very nice buds

Likes
69
Share


@Natrona
Follow
The Divine ladies Afghan Bullet and Pablo Escobar are getting close to harvest. I'm going to water only for the remainder.
Tps1 30 ml
Ph 7.01
Ppm 505
each received 3 ltrs
Thank you @DivineSeeds
Thanks for the visits, likes and comments, I appreciate all the plant love💚.
Have fun & love what you grow 💚
Sending you good vibes of love, light, and healing 💫
💫Natrona 💫

Likes
8
Share


@Uzi420
Follow
111g de buds secs et d'une qualité vraiment supérieure, un goût très fruité et sucré sur fond terreux 😋😍
De petits buds mais en grosse quantité, incontournable, je conseille vraiment cette strain même aux débutants !

Likes
8
Share


@R1pp3r
Follow
Realicé la que yo creo será la última poda, quedó un tercio de la parte inferior completamente sin brotes ni hojas.
Próximamente aplicaré guano de ave y hummus para luego regar de forma alterna con agua y melaza

Likes
17
Share


@420DeepGrow
Follow
Gracias al equipo de Seedsman Marshydro XpertNutrients y Trolmaster sin ellos esto no sería posible.
💐🍁 Tangerine Snow F1 Fast:
Esta gran cepa es un cruce de cuatro vías 75% sativa de (Boost x Tangelo) con (Lavender x Power Plant). Este híbrido Fast F1 proviene de la genética Cali y cuenta con excelentes terpenos cítricos, alta producción de resina para extractos, altos niveles de THC, muy buenos rendimientos y excelente resistencia al moho. Tangerine Snow F1 Fast se puede cultivar tanto en interior como en exterior. Los tiempos de floración en interiores son de entre 8 y 10 semanas, mientras que el tiempo de cosecha en las latitudes del norte es en septiembre, mientras que en el hemisferio sur los productores cosecharán durante marzo. Las regiones climáticas recomendadas son cálidas, secas, húmedas y cálidas. Se trata de plantas altas, semiramificadas, que superan los 200cm y que presentan un alto vigor con muy buena uniformidad. Al igual que muchas otras variedades con fuerte dominancia sativa, Tangerine Snow F1 Fast ofrece una excelente resistencia al moho, así como a las plagas y enfermedades de las plantas. La combinación de terpenos cítricos y mucha resina la convierten en una cepa de muy buen extracto, cuyo método de "lavado" produce muy buenos rendimientos de hachís. El perfil de terpenos cítricos recuerda a las mandarinas y mandarinas y también tiene notas dulces. La producción de THC ha sido verificada en laboratorio en un fuerte 24%, mientras que el CBD es bajo. El efecto es edificante y energizante, perfecto para usar durante el día y las primeras horas de la noche.
🌻🚀 Consigue aqui tus semillas:
💡TS-3000 + TS-1000: se usaran dos de las lámparas de la serie TS de Marshydro, para cubrir todas las necesidades de las plantas durante el ciclo de cultivo, uso las dos lámparas en floracion para llegar a toda la carpa de 1.50 x 1.50 x 1.80.
https://marshydro.eu/products/mars-hydro-ts-3000-led-grow-light/
🏠 : Marshydro 1.50 x 1.50 x 1.80, carpa 100% estanca con ventanas laterales para llegar a todos los lugares durante el grow
https://marshydro.eu/products/diy-150x150x200cm-grow-tent-kit
🌬️💨 Marshydro 6inch + filtro carbon para evitar olores indeseables.
https://marshydro.eu/products/ifresh-smart-6inch-filter-kits/
💻 Trolmaster Tent-X TCS-1 como controlador de luz, optimiza tu cultivo con la última tecnología del mercado, desde donde puedes controlar todos los parametros.
https://www.trolmaster.com/Products/Details/TCS-1
🍣🍦🌴 Xpert Nutrients es una empresa especializada en la producción y comercialización de fertilizantes líquidos y tierras, que garantizan excelentes cosechas y un crecimiento activo para sus plantas durante todas las fases de cultivo.
Consigue aqui tus Nutrientes:
https://xpertnutrients.com/es/shop/
📆 Semana 4:
Continuamos la etapa de vegetación, ella se desarrolla muy bien 😎, comienza el buen tiempo, temperaturas agradables para todos.
Esta semana se aplica una solución de trichodermas para una mejor adaptación aunque realmente va genial.
Se mantiene 1/3 de nutrientes Master Root y Master Grow

Likes
9
Share


@DoctorCannas
Follow
Una ceppa meravigliosa, expert seeds fa un lavoro incredibile e magnifico.
Dalla germinazione fino al raccolto le piante sono cresciute sane e forti.
Purtroppo non potrò assaggiare il risultato, perché non potrò risultare positivo al thc per molto tempo.
Infatti mi butterò sulla cbd.
sono davvero molto soddisfatto.

Likes
5
Share


@CelticSmokey88
Follow
Promoting Mars hydro fc3000 honeslty everyone whouses this light will tell you how deadly it is I germinate my seeds in the soil u this ligjt and have 100% success rate
Likes
4
Share


@ChitownCannaChica
Follow
Pictures would be better if I took her out, but I’ll wait another week for some glamour shots. Just chugging along. 1-2 more weeks!
Stacked colas
Likes
2
Share


@GhostBlvckPhant0m
Follow
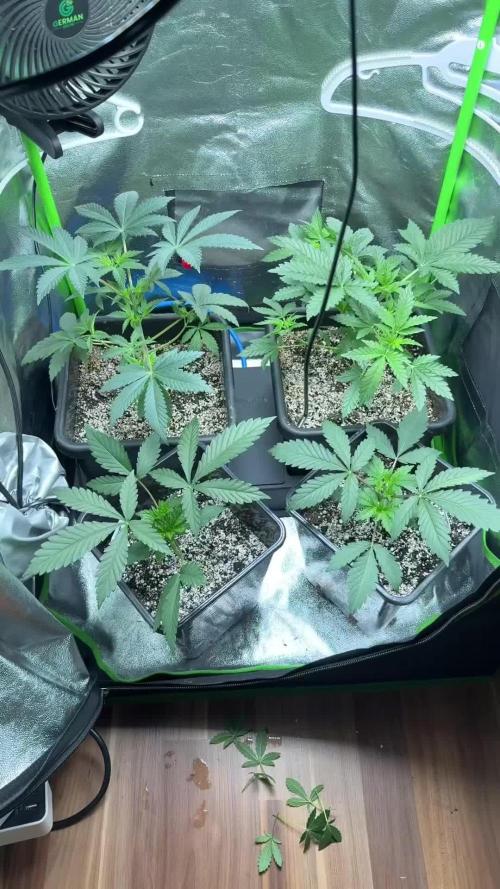
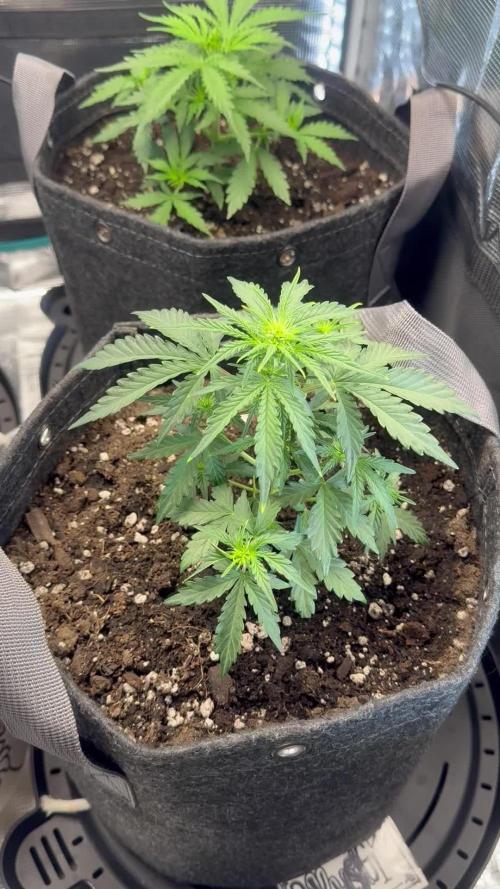
Week 5 Veg and things are cruising along. The lanky girl in the 2 gal pot is starting to look better structure wise than the other 5. Thinking about transferring her to a 7 gallon pot for clones! The Tri leaf mutation is really taking off, throwing tops for days with out training or topping. 3 of the ladies have been topped to make bushes and the other are growing natural with some defoliation.
Likes
14
Share


@Snickelfritters
Follow
10/15
This week saw a few snags. Both gorilla zkittlez girls are showing what looks like a Mg def i.e yellowing between veins and green veins themselves. This isn't the first time they've exhibited these symptoms. Currently the heaviest affected leaves are the lowest fan leaves farthest from the light. Aiming to keep it that way. I think it's pH swinging too low. I need to pay more attention to my feeds but sometimes I don't have the time to pH my water as properly as I should.
The reason I say it's that and not a deficiency is because they are also showing signs of over feed (yellow leaf tips) only a one half-strength feed did this. There must be plenty of food left in the pot.
I'm thinking the flip is gonna come at the end of the week. I'll clean up some lower foliage tomorrow or Sunday and let them grow the rest of the week. 10 weeks seems like a nice round number to me.
More pics coming when I do my defoll.
10/16 added some pics and vids


Likes
6
Share

@carlitospiratahaze
Follow
Se quedó en stop!
Al menos es lo que se aprecia ya veremos durante estas semanas..
