
Likes
Comments
Share


@BeanCrop
Follow
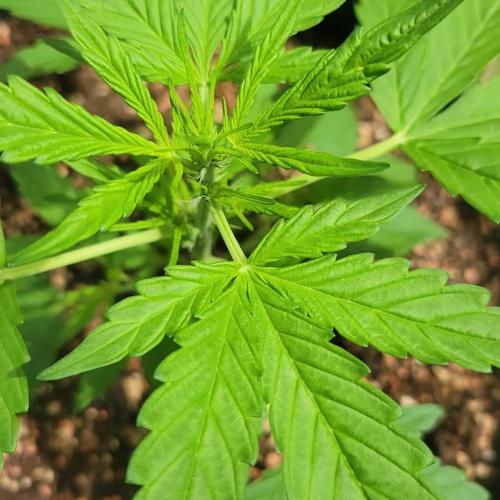
This is my first ever grow I have decided to go for Cash Crop from Cream Of The Crop Seeds and have made myself a DIY Aero/Hydroponic system from a few bits I picked up from site, B&Q and a pet shop so it will be interesting to see how it turns out!
Happy growing 🌱

Likes
3
Share


@CreoWeed
Follow
Hey guys,
We are getting very close to the harvest, I would say one more week and I'll be ready to cut her down.
Smell start to pungent and I love it! Buds are pretty compact but relatively small.
I can see by the end of the week most of leaves are turning yellow, sign that the plant its releasing the last energies.
Trichomes are mostly cloudy and for now there's no sign of ambers one.
I'll keep you guys posted with the harvest week.
Stay tuned, stay high!

Likes
147
Share


@JamMAKEcan
Follow
So much in the garden .. Not enough sun for quality cannabis but great for veggies..they dont do too good in direct sun so there im good 😁🏆
Likes
70
Share


@Mosquito_Haarlem
Follow
Het is zover.
Vandaag 27 december is de laatste dag met de lampen aan.
Ze staat nu in het donker en morgenavond 28 december zal ze worden omgehakt en opgehangen.
28 december: de koningin is omgehakt en opgehangen aan de drooglijn.
Oogst rapport komt als de toppen droog zijn
To be continued..... stay tuned........🧐

Processing
Likes
20
Share


@Sugarnugolia
Follow
Started doing some light defoliation a bit each day on the very low level offshoots and any big leafs blocking main bud sights.
Looking back I should have done a bit more earlier on as these are very heavy and leafy plants.
At the start of the week my light was at 55%, on 13 Nov I put it to 100% to see how they react. I will monitor to see if they are ready for it but they really took off this last week.
My one plant in the back left always appears droopy compared to the others because the leafs on it are so big it weighs down the whole plant.
The plant in the back right was always janky and I considered not even growing it. The seed came through a few days later than the rest and I almost wrote it off. Figured I would use it as an experiment and try and learn from it instead.

Likes
7
Share


@Naujas
Follow
I'm happy :) I couldn't do it as it should have been, my ph meters broke and ruined everything :( well, but I'm very, very satisfied with the result :) a big thank you to my teacher :)@AsNoriu you are super :) without you it wouldn't have been possible :) I learned a lot of useful information from you :) the house is full of lemon aroma :)


Likes
3
Share


@Jaschkoo0
Follow
On Day 30 i gave each 200ml of water with some melasse. One Day later i gave them some sf nemathodes.
On Day 32 i gave them 500ml water each with a cup of brennesseljauche mixed in the 1.5l of water .
On Day 33 i transplantet them into their living soil beed placed some Mykoryzha. I mixed 1l with 2ml calmag 1ml alfa boost 2ml powerzyme 1ml bio grow and some supervite.

Likes
13
Share


@Alpha_Green
Follow
Some of you may have wondered:
Why do I use CO2 at average 950 ppfd μmol/m2/s (moral flow)?
The answer is quite simple. Because of lack of space in some regions of my cultivation area, I simply cannot keep the ideal distance to my Sanlight high-performance lamp, due to some height growth of various strains. And so some of the main colas have ppfd values of 1250 μmol/m2/s and even more...
So this is how I manage to achieve and compensate for such high radiation levels even with a CO 2 balance. And I have to say, my strategy to avoid various light stress symptoms works just fabulously. In combination with CO 2 implementation, my babies are simply unbeatably insensitive to light. Thats it!
Beginning of 3rd week flowering:
Again feeding my babies by 36 hours fermented potions of Bio Tabs Kompost Tea PK-Booster (15 g pro Liter) and added:
5ml Orgatrex/Liter
1 Spoon of Bactrex
1 Spoon of Mycotrex
1 Spoon of Mycco-Vital
1 Spoon of Dynomyco
A little tip for those who are interested in small modifications that have a big difference or influence - on the result - effect - beauty - health - taste! Before adding microorganisms or beneficial bacteria or Mycorrizae and Trichodermas, please use oxygen-saturated water. On the one hand, unwanted chlorine gases evaporate and the small world of the microbiome becomes even faster and more rewarding in compost tea to sprout.
Last but not least for this week, I would like to introduce my reasons, why I prefer growing biologically and sustainably.
First of all, it’s something which suits very well in these times/days we are living now. Sustainability is a big need and task for our planet. 🌎 Nature means life. Our home, the air we breathe and everything that surrounds us. Not just today. Hopefully tomorrow as well.
Maybe I'm starting to protect our environment on a small scale, but maybe I can also make a big difference at all.
If you change the way you look at things, the things you look at change...
I thought about what’s the difference, between Mineral Feeding and Super Soil Feeding.
It’s very easy. Biologically Growing is a similar process than the natural soil activities out there in the lap of nature’s. So plants has to work and interact with the microorganisms and microbiomic communities in the soil. So the plants will never get lazy like the lazy ones of mineral feeding growers.
If you grow biologically, you will feed the soil first and the microorganisms will support every parameter next to your plant conditions. And that will generate an unbelievable spectrum of Terpenes and Trichomes you will never forget.
It’s the same comparison, when you daily visit McDonalds and you eat only fast food. How does your body and mind react on this shit for money?!?!
May I invite you to think about it…
See you next week dear Growmies! Have a nice Weekend and take care…
Peace out!
Addendum for Day 53:
At the moment we unfortunately have another winter onset here in Germany. This means that I am forced to take additional heating measures due to structural facts in order to be able to keep the temperatures constant. After all, just tonight the thermometer climbs again to -1 degree Celsius.
In addition, my exhaust air system runs out of my bedroom terrace and I therefore grow winter and summer with the patio door open. Well, sometimes I experience real weather-related challenges. But all in all, no problem...
"Where there's a will, there's a way."
Addendum to pouring out the fermented PK tea: I always administer half a liter of lukewarm aerated water with 3.5 ml of cannazyme per liter to each plant. This means that the "root machine" is not supplied with supplies unprepared and the nutrient solution can thus also be better distributed in the soil. Since I also work with cloth shoes, I spray them evenly moistened everywhere with water that is also warm before pouring them out from the outside. This has the advantage that the moisture stays where it should: in the pot!
... I did the math today ;-) We are still in week 7 until this Friday. And week 8 starts on Friday! OMG... still so much time yeahh!
Today my Fast Buds Sour Jealousy and Sweet Seeds Big Devil and Dark Devil Automatics arrived. I'm looking forward to it.
This time Fast Buds next Time Sweet Seeds. Love them too. Very beautiful genetics.
Today a review video of the beginning of week 3.
At the time of the pictures, I had minor signs of nitrogen excess. (Light peaks first at the crown of the roof and then slightly continuing to the middle section.) I then painstakingly racked my brains as to why this could be. I found that very slight dry spots had formed and therefore the root found small accumulations of nitrogen that caused its problems. But then, when I carefully homogeneously checked the moisture content in the substrate, the problem evaporated again. However, they had not shown any loss of growth rate during this time. Nevertheless, they developed as expected.
They Strawnanas had no problem with that.
In the end, I always have a hard time killing them. But I guess that's the way things go.
We live and die.
We come and go.
But it's not there yet. ;-)
Tomorrow is day 56.
Tomorrow’s updating day!
Can't wait to see their progress.
Have a good time and see you tomorrow… 🏽🕊️
🏽 ☮️🕊️


Likes
17
Share


@Fat_Olsh_Farms
Follow
Day 14. Beautiful trileaf plant. Not quite ready for LST. Maybe tomorrow.
Day 15. Bent over nicely for me. This plant is gonna be a beast.
Processing
Likes
2
Share


@Cocosium
Follow
Started overdrive this week. Should definitely see an increase in bud size now. Some trichromes are already cloudy. I’m planning to give these another 2 weeks and more if need to get the balance of 50/50 amber/cloudy


Likes
6
Share


Likes
52
Share


@DogDoctorOfficial
Follow
Let's realign our cosmic compass and embark on a harvest report for our magnificent Cosmos F1, a pure CBD strain that has taken us on an extraordinary journey. Brace yourself for cosmic revelations and interstellar delights!
After an impressive 11 weeks from seed and 7 weeks of flowering, the time has come to witness the cosmic culmination of our efforts. I carefully hung the entire Cosmos F1 plant to dry, allowing the cosmic energy to infuse every inch of this botanical marvel. It's a sight to behold, with majestic branches reaching for the cosmos, reminiscent of a cosmic dancer frozen in time.
As our cosmic queen gracefully dries, her vibrant hues continue to amaze. The shades of green, intertwined with delicate hints of purple and gold, are a testament to her genetic splendor. It's as if she has absorbed the cosmic essence of the universe, transforming it into a visually stunning spectacle.
Now, let's talk about the cosmic power of CBD. Our pure CBD strain holds the key to a transformative experience. With minimal psychoactive effects, this cosmic treasure offers a realm of therapeutic benefits. It's like a cosmic massage for the mind and body, soothing and relaxing, allowing us to explore the depths of cosmic tranquility.
The decision to hang the entire plant for drying is a testament to our dedication to preserving the cosmic integrity of our harvest. By allowing the branches to hang freely, we encourage a slow and controlled drying process, ensuring that the cosmic essence remains intact. It's a ritual that honors the plant's journey, preserving its cosmic magic for us to enjoy.
As we eagerly await the cosmic transformation, let us express our gratitude to the celestial forces that have guided us on this cosmic odyssey. The cosmos has aligned to bring us the extraordinary Cosmos F1, a gift from the cosmic garden gods themselves. We extend our heartfelt appreciation to the cosmic harmony orchestrated by @James and Royal Queen Seeds.
In the coming days, our dried cosmic buds will be ready for the next stage of our journey. From cosmic concoctions to cosmic culinary delights, the possibilities are infinite. Imagine infusing the cosmic power of CBD into soothing teas, cosmic creams, or cosmic confections. The universe is our canvas, and with our cosmic harvest, we can create cosmic masterpieces.
As we bid farewell to our Cosmos F1, let us cherish the cosmic memories we've shared. The vibrant colors, the pure CBD power, and the cosmic connection we've established with the universe. May our future endeavors be as cosmic and awe-inspiring as this one.
Until we meet again, my cosmic friends, lets keep exploring the cosmic wonders, nurturing our cosmic gardens, and let the cosmic energy guide our cosmic creations. May our harvest be abundant, our cosmic experiences be enlightening, and our cosmic journey be filled with celestial blessings.
As always thank you all for stopping by and for supporting me on this journey, i am super passion about growing and fell blessed to have you all with me on

Likes
18
Share


@ganjameister
Follow
Harvest was done on a lovely summer day.
Since summer was approaching, half of the harvest was hung upside down with the classic 60/60 and rest is stored in a wine cooler for drying. There’s also an oscillating fan below for airflow!

Likes
3
Share


@Cannabis_Sativa
Follow
Def def and defolation... it started flowering already with quick growing steps

Likes
165
Share


@SlowpokeFuegobud
Follow
🐟 🐠 🐙 🐡 🐟 🐠 🐙 🐡 🐟 🐠 🐙 🐡 🐟 🐠 🐙 🐡
A very warm welcome to my mystical winter solstice- new moon- mercury retrograde - accompanied by the Wounded Healer grow!! ✨
It's a very special time, December being capricorn season, analyzing what we've accomplished over the year and meeting our devils. Then it's a super new moon TODAY as always good for letting go and for endings, but also it's a time for new beginnings, as Chiron goes out of retrograde. It's the wounded Healer or Warrior, and he is dealing with karma. Oh you gotta love the Masters of Karma! 😎 So who are you, and who do you want to be? Look into the mirror, give your Higher Self a 😯 face!! What have we accomplished in the last 10 years??!! Amazing, right? 😜
It's only possible with magic. 😜
I planted the sprouted seed into my fish pot, using coco and fertilizing it with Mills nutes. 🙏 🌑 ✨
Thanks to advices of my growmie @Tropicannabis_Todd, I added strawers with holes 💚
Thanks as always go out to my fantastic growmunity!! 💚 💚 💚 😘 Love you!!
Million thankyouuus go out to my sponsors @GreenBuzzNutrients, thanks so much for your support!! 💚 💚 💚
If anyone would like to try their amazing organic products, you can find a generous discount code of 25% in my weekly comments from next week on! 😜 🙏
If you want a recommendation which product to get first.. BIGFRUITS!! 😍 I love the tasty terps with this one!!
https://greenbuzznutrients.com/
Thanks a lot, @Fast_buds!! 😘 Get their immensely fast growing genetics here: https://2fast4buds.com/
Shouts out to the amazing website & community www.cocoforcannabis.com!! Really helpful!! 💚 🥥
Likes
27
Share


@ButterfliesLittleFarm
Follow
Hello Diary.
Here we are at the end of the last, seventh week of flowering for the Haze Berries. Their roommate Fat Banana is now drying in a box between them. 😎
Although there are two Haze Berries on the “farm,” I only photographed one for the diary. I do too many photos with one anyway, with two it would be really too much. But before the harvest I will take a few photos and another Haze Berry. 😉
Basically, the Haze Berrys exceeded my expectations, they grew big beautiful plants full of flowers. This will be perhaps the biggest yield for me so far. 💪
As can be seen in the first photo where all the plants are, it can be seen that the Haze Berrys did not grow even remotely similar. The second Haze Berry has grown twice as short as the first. The structure of the plant itself is different, but will be seen in the final photos.
Watering is every three days, the last two weeks I water with clean water which I regulate p.H at 6.3.
Conditions on the "farm" are almost ideal, the temperature in the Box is about 25, 26 degrees, the humidity is about 40%, sometimes even lower.
Now everything is ready, here and there I see some brown trichomes so I will still have to wait a day or two until harvest. 😀
Here’s what the last week of flowering looked like.
28/11/2020 - Day 65.
Watering. I regulated the p.H of water to 6.3.
Temp / Humidity on the farm - 25.5 degrees and 40% humidity.
1/12/2020 - Day 68.
Watering. Like three days ago. It was the last watering for Haze Barry before the harvest.
Temp / Humidity on the farm - 26.3 degrees and 37% humidity.
3/12/2020 - Day 70.
Usual photography for the end of the current week.
Temp / Humidity on the farm - 25.6 degrees and 40% humidity.
In the end I can say that I am very excited about the harvest, it will be interesting to see the outcome in the end. Stay connect, and thank you for supporting all this past weeks. And sorry for so much delay with the posts but I have a bunch of photos to edit. So when other obligations come together, then this is what it looks like. 🙏
Likes
31
Share


@CrazyHorse
Follow
Last week :) within 7 days, 4 times only tap water + pH down, so pH 6.26 / 6.30 :) don't ask how many 10l buckets of solution I poured into the toilet during these 12 weeks, but now there is full control of the hydrogen potential :) Today 04-07-20 my baby has been cut and she is already drying, of course, in full darkness, the exhausted air is filtered through a carbon filter, it works good at this point 0% smell outside.. Inside, the tent has a beautiful sweet smell, and the lemon note shows up when I touch buds. Max temperature 25 * C, humidity worries me 57%, I have to invest in a good air dehumidifier. As soon as I collect my flowers, I will give my result. This is my first plant so I'm waiting impatiently, I can't even assess whether it will be two ounces or maybe more :D It is certain that I have not even approached half the potential of this genetics. Auto Lemon Kix is easy going seed for beginners, but using its potential is a completely different gravity. A person without experience like me, having a small tent 1.60 m high, will certainly have problems with kix dimensions a specially her high . Fortunately, my 1x1x2 tent gave me the opportunity to adjust the equipment inside without bending my treasure, which would be a drastic solution. Next I think about indica, of course Dutch Passion, and later Auto Lemon Kix once again : D I hope I didn't bore to death anyone and see you in the next diary FOLKS :D
Likes
13
Share

@El-Ecko
Follow
5 Week Flowering
Little Pearl ⚪️ is now slowly entering the flowering phase and is doing very well.
She certainly won’t be the biggest, but she looks absolutely healthy🤤😋.
Unfortunately, the weather has been rather dreary and wet at times, but it’s supposed to get sunnier and warmer again next week. ☀️

Likes
9
Share

@BlaKX
Follow
Guten Tag Growmies,
Habe den Zyklus auf 18/6 runter gesetzt und die Pflanze nochmal entlaubt für gute Luft zirkulieren.
Die Pflanze hat sich prächtig entwickelt und fängt an ordentlich Blüten zu produzieren!

Likes
13
Share


@TrueNorth
Follow
Okay growmies here we are at the end of our cream cookies by fast buds. It was such a pleasure to grow, i learned so so so much this run that will help me through the rest of my adventures. The beginning was tough as i am new i over watered and did not ph the water and what i mistake. But its okay i learned. She bounced back like nothing and produced these awesome buds and beautiful smoke for me. Watching her change colour and grow was amazing. It was topped and lst, she reacted amazing to it and grew more and more. Fast buds has not let me down. I cant wait to grow her again and see what happens next time!
I washed the trim and made bubble hash with it!
Pressed some of the flower to make some rosen!!!