


Likes
2
Share

@TTerpz
Follow
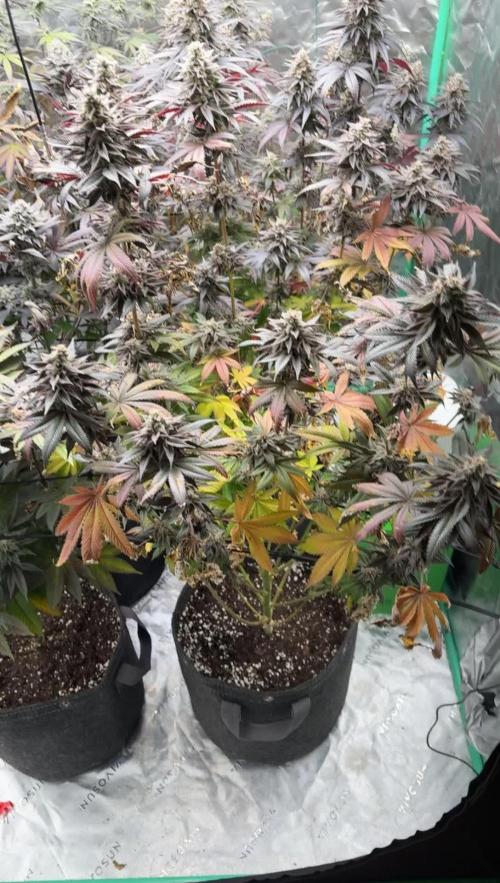
Start of week 13
(Day 49 of flower)
9/20/25
Fed with 1/4 strength of nutrients: 9/24/25
Flushed with water 9/26
Likes
12
Share


@KalooNie
Follow
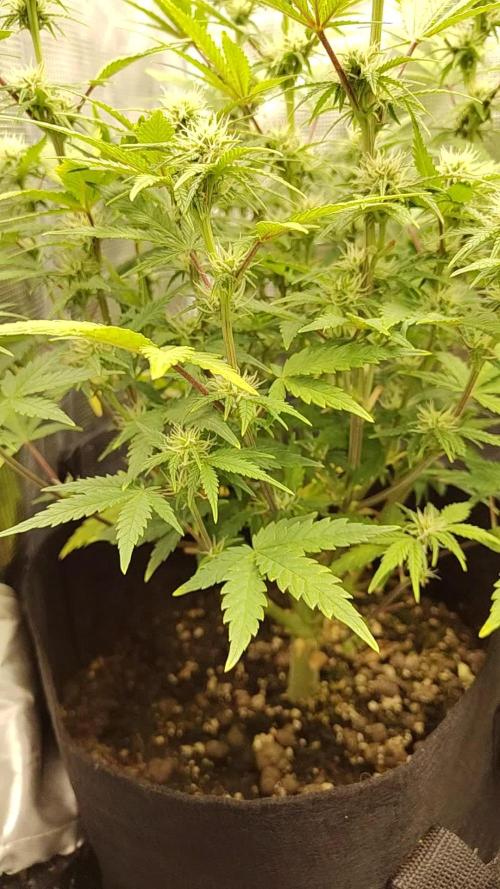
These gals are doing fantastic! Smell is really starting to come out now, smells like a very strong citrus pine 👌🙌 Switched them to full strength flowering nutes and they're doing pretty well. I probably should have transitioned them a little earlier but a little stress doesn't hurt, they're growing just fine! Heat is also an issue but they'll manage 😅
8-4-18 :: Largest plant's bucket got empty on accident; Filled a 15gallon reservoir of full strength nutes and pumped the solution into the bucket as always. Next day my largest plant is dying and the other two are fine, looks like lockout. Flushed for a day and then added nutes, no improvement.. Orange pistils are appearing pretty fast on it too as if it's trying to ripen but not grow. My heart is broken😰
UPDATE: Realized I was an idiot and didn't plug up the holes I drilled into the top of the buckets (I stick a hose in there to fill them up) and the roots were exposed to light.


Likes
62
Share


@Reyden
Follow
Purtroppo le 4 gorilla 🦍 hanno delle carenze importanti e anche dei moscerini che girano nella terra e nelle radici, penso siano i moscerini dei funghi e se tengo le piante senza annaffiare più tempo loro soffrono perché gli piace l umidità e materiale organico di cui nutrirsi, ho sbagliato due settimane fa a preparare quella soluzione forse un ambiente troppo dolce gli ha richiamati…spero di non avere ancora più danni ormai le piante


Likes
1
Share


@PhinolaGreen
Follow
11. Woche
Sie ist diesmal nicht ganz so schön geworden aber schon okay.
Likes
7
Share


@MountainFlowers
Follow
Final Report:
Grow:
The plant has grown very beautiful and healty without pests and diseases. She stretched a lot when started to bloom and for this reason the internode distance increase unlike the vegetative phase.
This happened becasue I increased the height of the lights when the other plants in the grow box started reaching them.
In this grow i only defoliated only when then fan leaves turn yellow. In the flowering stage the buds grew a lot every day and forming a big mass.
I used LST tecnique on low brenches to allow them to get more ligth. I applied Biobizz fertilizers without using the offical schedule because I gave my plant an adequate quantity for its needs and growth (I have given a little more nutrients for flowering than indicated).
I contiued to use root juice most of the vegetative stage for let grow huge root system so when she started too bloom she had enough roots to get the nutrients fast.
Equipment and grow box:
The enviorment of grow box has been optimized every stage with the right temperature, umidity and air flow.
Vegetative temp/umidity --> 23-29 °C/45-55%
Flowering temp/umidity --> 20-26 °C/40-50%
The air flow was created by two pc fans and one big fan.
Harvest:
I harvested a beautiful big and dense buds and i increase al lot my haverst for plant compared to my old diaries and I got fewer soft flowers.
I washed my crop before drying process and this time i did a dry trimmg. After washing, i let them dried in a room, with 20 °C and less then 50% of umidity, for seven deys.
I got better with the result of dry trimmig (I alweys did a wet trimmg) and i wasted less time. After the curing proccess i stored all in a glass jar.
Time and patience reward me this time.😊
I'm very happy with this grow, I improve my skills but the next diary I will do better. 😁💪👍

Processing
Likes
41
Share


@MadeInGermany
Follow
Hi everyone 🤗.
It was rinsed slightly 3 days ago and now only gets water with 0.4 EC.
From tomorrow on she won't get any Canna Boost anymore, because I'm not the fan of giving it to the end :-)
It always looks more beautiful and more beautiful 😍. You can see how she removes the last nutrients from the leaves and slowly comes to an end 😇.
From next week the trichome pictures will also be added 👍. I can't wait to try them 🤣
I wish you all a nice week, stay healthy 🙏🏻 and let it grow 🌱
You can buy this Strain at :
https://sweetseeds.es/
Sweet Seeds Cup 🏆
Type:
San Fernando Lemon Kush
☝️🏼
Genetics:
OG Kush x Kosher Kush
👍
Vega lamp: 2 x Todogrow Led
Quantum Board 100 W
💡
Bloom Lamp : 2 x Todogrow Led
Cxb 3590 COB 3500 K 205W
💡💡☝️🏼
Earth: Canna Bio
☝️🏼
Fertilizer: Canna Bio
☝️🏼🌱
Water: Osmosis water mixed with normal water (24 hours stale that the chlorine evaporates) to 0.2 EC. Add Cal / Mag to 0.4 Ec Ph with Organic Ph - to 6.0 - 6.3
💦💧


Processing
Likes
14
Share


@Silverback_Guerilla
Follow
THURSDAY 11/29:
Impressive plants..both of them. Cruella is waaay more sensitive to heat and needs soil with VERY good drainage. She wilts for a few hours every time I water her, no matter how little I give her. I continue to poke and prod it with my moisture probes regularly to keep it from compacting too much for her. Carlotta hasn't given me any problems at all. She's just a little slower, but almost Cruella's equal in size now.
I foliar fed a few times and did a photo session.
FRIDAY:
Foliar fed a few times and tweaked a few things..
They are both spending most of their energy making flowers now...only grew a half inch last night.
SATURDAY:
Both Cruella and Carlotta continue to stretch. I fed therm with about 1/3 gallon of full-strength bloom nutes today and foliar fed them a few times and re-positioned them.
SUNDAY:
Cruella's buds are swelling up a bit now. I plucked off most of her burnt-up leaves and she's looking quite sexy now.😋 Carlotta's main stalk and branches have really thickened up. She's gonna be able to support some super-sized colas like her older sister now.👍
I tweaked my ventilation on Saturday and the temps were staying at or below 84, so... I quickly added my other 60w 3500k COB light to the tent..it's and positioned it on the Cookie-twin's backside.. 😎
MONDAY:
I foliar fed them today and will again for a few more days, but will probably start rinsing them off with ph'd spring water after that. Their buds are starting to thicken now.
TUESDAY:
Cruella and Carlotta both appear to have root problems. They look overwatered even when i just feed them a little and even when they are almost dry. I probed their soil very well and they were actually almost dry. I just fed them a tiny dose (12 oz each) of ph'd water with boomerang, kangaroots, calimagic, and some bat guano powder. If I don't see improvement in the next couple of days, I'll assume they are rootbound and transplant them into 5 gallon fabric pots.

Likes
22
Share


@Greenwolvesfarmer
Follow
Buenísimo , aunque tuve un problema de riego y me entristeció a mi plantita linda , pero ahí pude notar su alta resistencia a altas temperaturas y climas adversos .. muy buena cepa , ideal para iniciados o quienes no pueden estar todo el día con el cultivo . Tiene buena producción ! La recomiendo para scrog desde su inicio ...
Hasta el momento tengo pensado en que me dió unos 52grs en seco . Esperemossss ! Agradezco por nuevamente aprender de mis errores ... Gracias madre tierra por mostrarme el camino de la verdad y poder disfrutar de tus delicias y cuidados , padre Sol siempre apoyándome cada uno de mis movimientos, gracias por su esencia que corre por mis venas y ADN , Los amo .
Likes
3
Share


@curious_jules
Follow
Buds formed this week, on around 10 main stems, each with main bud and half a dozen secondary buds.
Once per week: Ionic Liquid Silicon 13ml; Ionic PK Boost 13ml; PH Down, ~20 drops.
This is in addition to what she receives daily: Ionic Liquid Oxygen 10ml; Ionic Hydro Bloom 10ml; occasional few drops of Ionic PH Down.
EC=2000 uS/cm, PH=5.5 (will rise to 6.3 through week).
This is close to the EC level that caused nutrient lockout/burn earlier, during veg; fingers crossed we don't see a repeat.
Raised light twice this week, but still a bit of leaf bleaching; plant grew a further 25cm.

Likes
2
Share


@jardinprimitivo
Follow
El sabado 7 arranca una nueva semana de vegetativo, las plantas crecen con vigor, la Ztrawberry esta mas bajita que las Full Gas.
Se esta regando solo con 2 litros de agua con ph 6.3 dia por medio solamente para mantener la humedad.
10/9 Se aplica poda apical a todas las puntas y se retiran hojas que tapen la luz.


Likes
1
Share


@Pestitel
Follow
Amazing experience with the Mix Pack, I will try it again next summer for sure. Love the variety.
Likes
2
Share

@undermink
Follow
I grew this strain multiple times and still love it. So strong and so yummy. Can't wait to try her. She looks great 😻
Likes
42
Share


@Maggie_de_Block
Follow
Didn't change anything to the feed because she seems happy
Did remove quite a bit of fan leaves, as I'm planning to send her into flower soon
Not exactly mainlining, but it definitely is a very beautiful canopy
Likes
12
Share


@ELPIRATA
Follow
DIA 50; Comienza una nueva semana, durante estos dias habia tenido problemas con la humedad; dia 25 se instala Deshumidificador
El día 25/06/2020 se han regado 3 plantas en macetas de 11 litros:
X2 Semillas Auto Lemon Kix= 1,5L [1MlBLOMBASTIC+1mlKnactive+3ml/L ATAGrowth-C+5mL ATAFlower-C+] PH 6.4/ EC=1.84Tº=23
X1 Semilla Auto Tutankhamon= 1L [1MlBLOMBASTIC+1.5mlKnactive+5ml/L ATAGrowth-C+5mL ATAFlower-C+1mLAutoTop] PH 6.2(?) / EC= 1.84Tº=23
*El día de hoy se han regado 1 planta en macetas de 7 litros:
X1 Semillas Auto Lemon Kix#3 = 800 ml [1MlBLOMBASTIC+1mlKnactive+3ml/L ATAGrowth-C+5mL ATAFlower-C+] PH 6.4/ EC=1.84Tº=23
*Se comienza a usar Bloombastic en semana 6, dia 42 (0.5 ml/Lt)
Me gustaria realizar foliacion en esta etapa, sera recomendable ?

Likes
12
Share


@StonedandSteady
Follow
AutoBlueberry 6th w/ 1st W/ Flower breed by #DivineSeeds #DivineSeedsSquad #DivineSeedsBreedingCompany
Starting to Flower and her Smells are already getting Stronger of Gasy Blueberries!
Origin:Afghani/Thai
Type:50% Indica/ 40% Sativa/ 10% Ruderalis
Flowering:56 days
THC:22%
Harvest:400-550 g/m2
Height:110-150 cm
They were Growing under the #Growatt600w and in my #TopoLite 24×24×48 Grow Tent but I've Upgraded and Updated it to my #OsreeQB100W I'm also using #TNBNaturals #TheEnhancer Co2 Despersal Canister and using thier Ph⬆️⬇️ for my Decolinated Tap Water!
Green and Growing Up Great! She's Growing into her 7th week of Flower! She's Growing in my special blend of ProMix potting mix, a 1/2 bag of Earthworm castings and 2 light handfuls of Diatomaceous Earth mixed Up well for before transplanted! Diatomaceous Earth: Diatomaceous earth is made from the fossilized remains of tiny, aquatic organisms called diatoms. Their skeletons are made of a natural substance called silica. WHAT IS DIATOMACEOUS EARTH?
In a nutshell, DE comes from the fossilised remains of small marine organisms called diatoms. Over a 30 million year period, these hard-shelled algae collected on the bottom of bodies of water, eventually forming into a type of sedimentary rock. Fast forwarding, it wasn’t until around 1836 that a German peasant Peter Kasten discovered the ivory-coloured, powdery substance while drilling a well in northern Germany. Ever since, the usefulness of DE for multiple purposes, including industrial and horticultural applications, has been well-reported. Just sprinkle some diatomaceous earth on top of your soil and watch mother nature's secret weapon work its magic.CONDITIONS THE SOIL
When it comes to growing cannabis, everyone strives to provide the best soil to grow the best plants—but there’s always a way to make it even better. Making the soil a better medium is called soil conditioning, which is exactly what diatomaceous earth does. It works by improving the retention of moisture in your potting soil, holding a large amount of fluid and drying at a rate that’s much slower. This natural soil additive also helps to retain nutrients and allows for better oxygenation of the substrate. NATURALLY CONTROLS PESTS
DE is an all-natural, safe-to-use substance that doesn’t harm the cannabis plant with toxic chemicals. The nature of diatomaceous earth makes it useful against most types of insect infestation you might be experiencing; and unlike chemical insecticides, insects can’t develop a resistance to the effects of DE. So once they’re gone, they’re gone for good. DE is an abrasive. and when used as an insecticide, it gradually scrapes away an insect’s exoskeleton, absorbs the fluids, and dehydrates insects and other critters to eventual death. IMPROVES PLANT STABILITY
When using DE in your soil, it can be especially beneficial as it frees up nutrients so that they are made available to the plants as needed. This works via the silica content of DE being absorbed into the plant tissue, which helps improve the plant’s ability to respond and receive more nutrients as DE activates. This in turn results in greater yields and better stability under small pH fluctuations!
https://divineseeds.net/
https://instagram.com/divine.seeds?igshid=osxe2v7en33v https://divineseeds.net/
Thanks Again to All my Friends, Family's, Teams, Sponsors, Followers and Subscribers!!! Your Genetics are Merry Magnificent, Mega Marvelous and Mighty Medical! Love um!!! I really Can't stress enough how Thankful and Grateful I am of All of you and what you've Shared with Us! Means the World!!! It's definitely a Pleasure being able to Grow with these Phenomenal Grow Lights! Please Enjoy! BudBrothers4-Life! Cheers Famz!!! Much Props and Much Topz!💯🔥 #Osree #GrowStarStore #Growatt #TNBNaturals #TNBTeam #GrowYourOwn #Bliss
https://instagram.com/as420.ca?igshid=1f116alw054wp
The Grow Bags: https://www.as420

Likes
10
Share


@Gabriel_OD
Follow
On Day 01, I germinated 5 Fat Banana (Auto) in a Rockwool tube and put it in a propagation tray with a dome on it. With room temperature above 80'F and humidity above 90%.
From Day 01 to Day 03, the temperature is around 85'F with humidity above 95%. The room temperature kept rising so I gave cool air in the room and removed the dome on Day 04.
On Day 04, the temperature dropped sharply from 85'F to 70'F. Humidity also dropped from 95% to 50%. To avoid the being too cold, I increased the temperature of cool air.
I gave cool air from 6 A.M to 12 P.M.
The temperature has been steady around 75'F and humidity 55% on Day 05, Day 06, Day 07.
On day 07, 4 seeds produced 4 leaves each and showed promising. So, I transferred into air pot. I used the growing soil from Superbud - Super Living Soil. I used 1 soil bag per 2 air pots.
Throughout the whole germination process, I used no nutrients and only used water to soak the rockwools.
As for light, I gave
>1500 lumen on Day 04
>7000 lumen on Day 05
>10000 lumen on Day 06
>12000 lumen on Day 03
This is my very first time growing cannabis so let me know your thoughts about how I should improved my germination methods.
Likes
29
Share


@DreamIT
Follow
I have little to add that I haven't already said. These plants in particular grew from start to finish in 0.50l pots, produced nearly a pound of wet grass and about 30 dry grass overall. Not much, but it was as I expected, the smaller the pot, the lower the yield.

Likes
4
Share


@jtgrow
Follow
Friday, September 25, 2020
Chopped to dry in closet. No trimming needed
Wednesday, September 30, 2020
Trimmed and jarred. Very little trimmings were thrown away.
My first indoor grow was a success! I don't have the largest tent so it was nice to keep it short. Not the biggest yield in the world but it was a fun experience. My only regret is not watering or feeding it enough. I'm main-lining my other auto grows so we'll see how those do.
Thanks!
-JTGROW
