The Grow Awards 2026 🏆
Likes
Comments
Share
@NoLimitQ
Follow
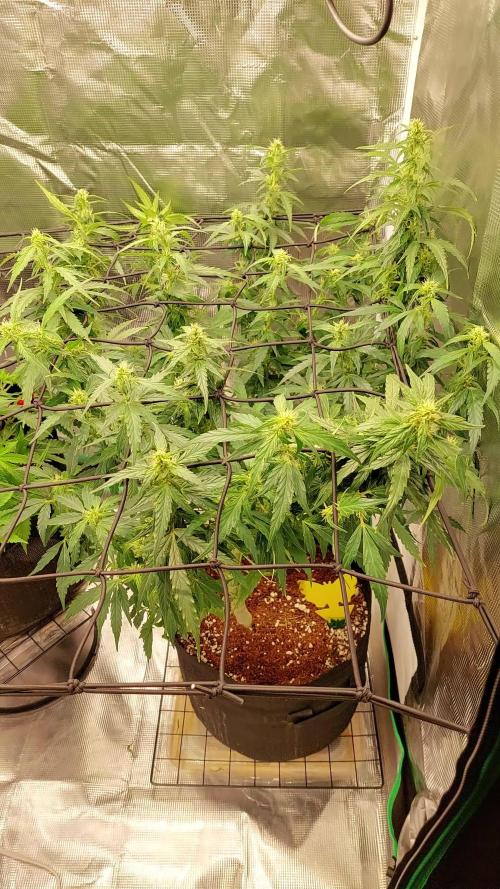
Растение подходит к завершению своего цикла. Осталось примерно 7-10 дней. Буду проливать раствором рипена через день по 1 литру. 2 последних раза пролью отстоянной водой кранухой, и дальше будет сушка и пролечка. 18/03/21 Полив расвором рипена: 1 литр воды отстоянной кранухи + 5 мл Ripen 20/03/21 Полив расвором рипена: 1 литр воды отстоянной кранухи + 5 мл Ripen. Следующие поливы водой, вымываем вкус удобрений. 23/03/21 Полив водой 2.5 л. За последние 3-4 дня я снял с растения крупные шишки, подсушил и покурил их) - для роста нижних веток на последние дни перед харвестом. Стафф вышел годным, на тверую 5ку. Через 4-5 дней будет харв, срежу, отправлю на сушку и далее на пролечку в морозилку.
Likes
2
Share
31/07/2025 - Rega A com Ph a 6.7 02/08/2025 - Rega com água mineral livre de cloro com Ph a 6.2
Likes
27
Share
Hola cultivadores! Esta chica está seduciendo mi mente cada día, no dejo de verla y darle cuidados, algunas hojas viejas cuentan la historia de una vida de excesos y mucha luz de cerca, pero hoy es una planta fuerte y segura. Se alimenta con ansias ya que el agua de riego desaparece de su maceta en cuestión de horas (además que hay mucha exposición del sustrato). Su etapa de Bloom ya es más que visible y he decidido no hacer defoliación hasta dentro de 2 semanas si fuera necesario. Sus ramas son muy fuertes y creo que no necesita nada más de lo que le doy. Si alguien tiene un sabio consejo se lo agradezco 💐🚵‍♂️🏄‍♂️🌹💚 Saludos a todos y gracias por visitar el diario 😌 Irie!
Likes
3
Share
In the ninth week i keep applying 4ml of Sensi Bloom A and Sensi Bloom B and 2ml of Bud Candy, Overdrive and B-52 from Andvanced Nutrients per 1l of water. I keep the LST training. I also did a little defoliation in the middle again. I am watering 2L or 3L of water every 2 days. I'm struggling to reduce the humidity inside the grow, I turned on a dehumidifier to help control the environment.
Likes
66
Share
34 Days have passed. The colors are fading for some reason but i dont really care, theres obviously room for improvement on this grow. Im just gonna let it go as far as i can and hopefuly the plants will mature before they die off. It may have been because of over watering, thats my best bet so i will not water until they show small signs of underwatering, just so i can make sure. Other than that, the buds are looking good and the smell is incredible. ---1st time growing with FLO - Florian Living Organics.--- They claim that there is no need to pH when watering and that their living fertilizer is the only thing that i will need throughout the whole grow so i only need to mix with soil and just water with plain water. If this stuff works then it can simplify my future grows ALOT! Happy growing. 😎
Likes
6
Share
@Averynate
Follow
Marijuana cultivation, like any agricultural endeavor, involves various techniques to optimize growth, yield, and potency of the plant. This is the week to make it happen! One such advanced technique is High-Stress Training (HST). HST is employed to control the growth pattern of the marijuana plant, making it more bushy rather than tall. This is beneficial for indoor growers with limited vertical space. Moreover, HST exposes more of the plant's foliage to light, which can lead to enhanced photosynthesis. This results in a plant that can produce more buds, which are denser and more potent. Given that light is a primary energy source for plants, maximizing light exposure can drastically improve the overall quality and quantity of the harvest. Topping is a specific form of HST that involves cutting off the main stem's topmost growth. This method forces the plant to divert its energy and nutrients to the lower branches, promoting the development of multiple main colas instead of a single dominant one. By encouraging a more even canopy, topping ensures that light is distributed more uniformly across the plant. This reduces the chances of having underdeveloped buds at the lower sections of the plant due to light deprivation. Topping also curtails the plant's height, making it more manageable, especially for indoor growers with limited space. HST and topping are integral for modern marijuana growers seeking to enhance their yields. These techniques address the spatial constraints faced by many growers and ensure that the marijuana plant receives optimal light exposure. The end goal of these methodologies is to increase yield and potency, and when done correctly, they can transform a mediocre harvest into a bountiful one. Cultivators who invest time in understanding and implementing these techniques stand to benefit significantly from their marijuana crops.
Likes
169
Share
🍊 🐶 💜 🐘 🍊 🐶 💜 🐘 🍊 🐶 💜 🐘 🍊 🐶 💜 🐘 🍊 🐶 💜 🐘 🍊 🐶 💜 🐘 🍊 🐶 💜 🐘 🍊 🐶 💜 🐘 🍊 🐶 💜 🐘 Welcome to week 11, my fellow growmies!! 💚 💚 💚 DAY 72 Watered with 4ml bloom + 2ml pk + 4ml growzyme, humics, bigfruits + 2ml calmag + epsom 💧 DAY 73 Watered with tester bottles, because I will be gone for 5 days 💧💧💧 All went ok, the dawg girl was really dry and light-weight when I got back, but now looking stressed at all. 🙏 💚 Good girl!! Thanks for stopping by, it's a true pleasure to have you as visitors!! 💚 💚 💚 😘 💜 🐘 ______________________________________________________________ About Sour Tangie Dawg cannabis seeds Sour Tangie Dawg is a sativa dominant cross between the famous Tangie and Chemdawg. Expect a combination of sweet & fruity mixed with a gassy, jet-fuel flavour. The amazing mix of citrus, tangerine, pine and gasoline produces uniquely rich, dank buds. The powerful sativa high is strong, uplifting and long lasting, great for creativity and socialising. Chemdawg is the parent of OG Kush, all Diesel strain originate from Chemdawg. The Tangie is originally a Skunk hybrid strain but extremely fruity with the trademark Tangerine flavour. This strain is potent with THC-levels over 20% alongside very generous yields of top quality weed, very suited for hash and rosin producers. If you’re looking for a strain to produce the best tasting concentrates this Sour Tangie Dawg is a proven winner! She easy to grow and the perfect choice for SCROG growing due to her growth speed and stretch. We advise switching to 12/12 light when 75% of the net is filled. For outdoor growers the harvest period is early October. Indoors she’s finished after 9 weeks of flower - fast for a sativa dominant strain. We recommend growing in soil with organic nutrients for the best tasting weed. Get some fantastic genetics here: https://supersativaseedclub.com/ 💜 🐘 ___________________________________________________________________________ SETUP: 80x80x180 cm Zelsius 240W Full Spectrum LED IR UV dimmable DW240H-A6-HS Heatsink color red LED Chips: 512pcs SAMSUNG LM301H + 24pcs Osram 660nm + 8pcs Osram IR 730nm + 8pcs UV 385nm Color mix: 2700K + 4000K 2,8umol/J Driver HLG-240H-C2100B Coverage: veg 5x3ft / flower 4x2ft Product size: 628x205x68mm Green Buzz Nutrients Shouts go out to my sponsors @GreenBuzzNutrients, thanks so much for your support! ❤️ If anyone would like to try their amazing organic products, use code GD42025 for generous 25% discount (for orders of minimum 75€) ✨ https://greenbuzznutrients.com/ Biobizz Lightmix custom exhaust fan 320/270cm³/h Carbon Active Granulate 240cm³/h tab water pH 8 - EC 0,25 with Calmag to 0,5 Advanced Hydroponics pH minus Grow + Bloom to pH 6.2 🍊 🐶 💜 🐘 🍊 🐶 💜 🐘 🍊 🐶 💜 🐘 🍊 🐶 💜 🐘 🍊 🐶 💜 🐘 🍊 🐶 💜 🐘 🍊 🐶 💜 🐘 🍊 🐶 💜 🐘 🍊 🐶 💜 🐘
Likes
6
Share
Vamos familia, actualizamos la octava semana de floración de estas Lemon Mandarin de Fastbuds. La temperatura que estuvo entre los 24-26 grados y humedad dentro de los rangos correctos. En cuanto a las plantas pues estas últimas semanas cogimos un poco de trips y pues ahí ando combatiendo con planchas pegajosas de color azul, estiraron bien y ensancharon bastante también. Las flores se están llenando de tricomas y van hinchando, aún con la plaga, por el momento todo correcto, ya aportamos solo agua, queda nada, buenos humos. - os dejo por aquí un CÓDIGO: Eldruida Descuento para la tienda de MARS HYDRO. https://www.mars-hydro.com Hasta aquí todo, Buenos humos 💨💨💨
Likes
7
Share
Nov.5 -we placed these girls in a paper towel and paper towel in ziplock Nov.6 - Once girls seeds showed tap root we placed the tap root down into the rockwool Nov.9 - Started DWC, put a small layer of pellets at the bottom then placed in rockwool then covered rockwool with pellets Nov.10 - Took a light away and put it in our small tent, these guys only have the one light now
Likes
1
Share
Sorry had my ratios off last week on my nutes. Anyway she's turning into a bush I found some balls on the lower half been plucking them off. So I guess technically it's a Hermie not a her. Top half looks amazing. Since it's only one plant I'm going to grow it out I've got nothing to lose. Had to do some lst because it grew up into the light. EC is at 2
Likes
27
Share
1/20/2023- So much to do pre grow and over the next 16 days, absolute first order of business is that I have to take down my current Grow---TIMBER-- Then I have a list of things I have to get done in order to be ready to start this grow 1 Feb. With that said T - 2 days until start 48 hour Flush T - 2 days until Start 48 hours of Light T - 4 days until TIMBER!!! Items that need to be done before 1 Feb 2023 1. I need to clean the tent out 2. I need to clean the equipment- Proper Sanitization between grows in Hydro is a must!!! 3. I need to get the hole in the ceiling above my tent repaired- For my last grow I had a deep sink installed in my grow room, to make Hydroponics a little bit easier and have a water source in the same room. The seals on the pipes they were installing broke and leaked through the ceiling causing some damage all the way across my grow room, I was already weeks into my grow and couldn't risk them working above my tent and it would have been very awkward positon for them to be working in as well, so have to get this done quickly between chop and germination. 4. I have to install my new light- I was using a Vivosun 4000 and for this grow I am switching up to a Spider-farmer SF 7000. 1/20/23- For this upcoming grow I am working with M/F photo seeds so I ordered 4 Sex determination kits. I recieved my my 4 Sex determination testing kits from Rimrock Analytics today. I will be using these to test my plants at week 2 of Veg so that when/if I take clones I know I am taking them off females. As well as I don't want to accidently pollinate my tent during this grow I am looking for big beautiful buds not seeded buds. :-) 1/24/2023- Harvest of current grow- Started at 2:00pm and finshed wet trim and firt batch into the freeze dryer. 1/25/2023- Next batch into the freeze dryer and cleaning all my equipment for this Grow. T-1 Day until the workers are supposed to be here to fix the hole in the Grow Room. T-3 days until I instll my new Gorilla Grow Tent and my New Light Spider Farmer SE-7000 for this grow. T-7 Days until Start of Germination 1/26/2023- Harvest is done ran through the Freeze dryer and dry tim completed. 1/27/2023- Grow Room repairs completed. Hole is gone Letting the paint dry before I install the new tent. T-2 days until Install the New Gorilla Grow tent and the new Light T-3 days until I put the hydro equipment in the new tent T-5 days until Germination 1/29/2023- Day 0- Final Pre Germination activities Germination Start T-3 days The paint on the ceiling was dry and it was time to finish prepping for Germination. I got the following items knocked off my list. New 4X4 Gorilla Grow Tent is up and ready New Spider Farmer SE-7000 Light is installed- Thanks Moony Grows for the suggestion and for the Code that got me some money off and free shipping (Moonygrows)!! I turned the lights all the way up to max and set the timer to 18/6 0600-0000. I will keep an eye on the temperature and humidity without my plants and see how hot it gets with the new light. I put my Hydro system back together and put in 40 gallons of water into it, time to monitor for leaks the next few days. I Setup my cloning machine for Germination Days 3-11 1/30/2023 let me break down the situation, ROOM in the TENT.. Enough said.. No really I tried putting my exhaust system up in the new tent with my new light, The light is so big corner to corner that it really didn't give me enough room for the lights be be raised, with the exahust hanging the buckets my plants are Starting in are 2 and 1/2 feet off the ground, great for plenty of room for roots but not so great for upwards space for the plant to grow. In a 6' 11 tent with the exauhst in side and hanging that only gave me a little over 4 feet of grow room to play with. My last grow if you saw my diary, anyone could tell I was struggling to keep the buds off the lights. No good, Since space was such an issue I was running my carbon filter inside on the ground but It really needed to be up sucking the heat out not shooting the cool out. With that setup I was sucking air through the filter and pushing it out the tent at a bottom exhaust hole cold out. Wasn't doing me any good for my heat. I was hitting temps of up to 85 degrees. I bought a portable AC unit and have been running it in the grow room to try and keep temps below 85 and I have had to lower the power on my lights during grow also not ideal.. With that said a friend of mine MoonyGrows (Check out his diary) took the time to look at my issue send me a picture of my grow tent setup with detailed instructions on how to suck the air out from the top but putting my filter and fan on top of my tent so no room issue and I am sucking the air out from the top where the heat is instead of pushing the air out from the bottom where the cool is... THANK YOU MoonyGrows For taking the time to help me get this straightened out.. Now I have room and I have the exhausts working right and now my temps with everything at 100% are topping out at 80 this dropped the temp by 5 + degrees at 100% max. T-2 days until Start of Germination Prepped my seed tray with humidity dome Prepped my Rapid Rooter plugs. I Used RO water, and I added a few drops of Hydrogen peroxide to Oxygenate the water. I then PH balanced between 5.7-6.0 the same that they will be getting in the Cloning Machine and when they get to thier final grow pod. I perfere the 5.8x range and I hit 5.84 for these rapid rooters. If you want to see a complete video on the process HowWeedGrow has an amzing video that shows step by step how to do it and explains it better than I ever could including how to plant the seeds. Which I will cover when I get to that step on Wed. https://www.howweedgrow.com/how-germinate-weed-seeds-cannabis-rapid-rooters/ 1/31/2023 T-1 day until Germination Start All set and ready have my Rapid Rooter plugs ready to go have my seeds out.. Have my seed tray warming up tonight. Tomorrow morning right into the Rapid Rooter then strait into the tray. I will spray the dome to start the humidity in there. 2/1/2023 Germination Day!! Let the games begin! 0600am Put the seeds into the Root Riots. And then put the seeded Root Riots into their first home the Seed tray. I have them under the light 24/7. Sprayed the dome 7:30pm Sprayed the Dome to keep humidity going on the dome. 2/2/2023 Day 1 of Germination Sprayed the Dome in the morning Sprayed the Dome in the evening 2/3/2023 Day 2 of Germination Roots are starting to come out the bottom of the root riot plugs and the heads are slowly popping out of Number 4 just below the surface. Afternoon- Number 4 has popped up Evening- Number 3 has popped up as well. Happy Dance!! 2/4/2023 Day 3 - Germination Surprise Surprise Surprise- all 4 have now poked their heads up.. Happy day!! 100% Germination succeeded. Now major milestone to track is how many are female and how many are male. I will take look at the roots this afternoon/evening and see if they have enough root to go into the cloning machine for the next 7 days before they go into their Hydro Pods. Day 3 - Germination - Evening.. Roots looked good and they were tall enough to make it into the cloning machine. Now that they are all in the cloning machine I have switched the lighting to veg state 18 on 6 off. 2/5/2023 Day 4 - Germination - Morning All the Ladies (fingers crossed) looking great stretching nicely and look nice and green, Photo synthesis underway.... UPDATE!! After a very interesting POD cast on FSTS by Dr. Bruce Bugsbee from Utah University, I have shifted my lighting to 24 hours on through seedling and then I am going to shift to 20 hours on the rest of Veg. 2/6/2023 Day 5 - Germination While Checking on my conditions inside the new tent last night, I found that the Humidity was down to 39 Percent. I added an AquaOasis Cool Mist Humidifier, the reason I selected this humidifier is that I needed one that could be turned on and off utilizing my Inkbird Humidity Controller IHC200 that I have my Pro Breeze Dehumidifier currently running with. Root structures are starting to get there about 1/4 of an inch. 2/7/2023 Day 6 - Germination Everything seems on track more roots poking out of each today. They are each getting a little taller as well. Checked in the evening and number 3 was drooping the Root riot plug on the bottome was dry and the roots were not in the water yet. I raised the water just enough that the longest root that was sticking out is now hitting the water. 2/8/2023 Day 7 - Germination Everything looked good while checking in on them this morning number 3 is now full up and no droop again. 2/9/2023 Day 8 - Germination T-2 days until Plant into Forever Pods and we start week 1 of Veg .. :-) Surprising thing to me is that number 1 and 2 were later in popping then 3 and 4 but the roots are growing longer in 1 and 2. 2/10/2023 Day 9 - Germination Number 1 and Number 2 are definitely ready for transplant today.. Based on how they were yesterday and where they are today I am hoping by tomorrow 3 and 4 are ready. Today they look to me where 1 and 2 did yesterday.. I really hope 3 and 4 catch up by tomorrow since.. T-1 day until transplant to new/ final home for grow. Need the roots long enough to have some clay down in the basket to keep the root riot out of the water and only roots in the water.. 2/11/2023 Day 10 - Germination Today they got placed in thier forever Home, 7 days from Sprout and 7 days until Week 1 Start. PPM- 180 this is water out of the Tap Temp Water: 70.7 Temp Tent: 77 Humidity: 40% I have a humidifier going 24/7 to try and bring this up.. I also have Humidity Domes on each plant. 2/12/2023 Day 11 - Germination Sprayed the domes, all are looking good.. Nothing much to do at this phase but Keep monitoring the PH level in the system and making sure they have a comfortable home. T-6 days until Week 1 start 2/13/2023 Day 12 - Germination Sprayed the domes, They were looking a little yellow today so I moved the light down to assist. Nothing much to do at this phase but Keep monitoring the PH level in the system and making sure they have a comfortable home. T-5 days until Week 1 start 2/14/2023 Day 13 - Germination Sprayed the domes, They were looking a little Florissant yellow today, with what looks like slight burn on the tips, I talked with a fellow grower and we agreed that It was probably that I was drowning them, Yes you can drown you plants even in Hydro, but only early on.. :-) It usually happens with the water being too high, which soaks not only the roots but the medium (root Riot plug in this case). I lowered the water from touching the bottom of the pot to about 1" away. This will probably take 3-4 days to resolve. I will continue my daily monitoring. T-4 days until Week 1 start 2/15/2023 Day 14 - Germination Sprayed the domes, continue my daily monitoring they look a little darker green instead of lime green now that I lowered the water levels in the system, so I think that I might have resolved the issue but it will take a few days for recovery to happen. T-3 days until Week 1 start 2/16/2023 Day 15 - Germination I looked in on them this morning, 3 and 4 look like they are doing well and recovering nicely. Number 1 not so much it has brown spots on the leaves, this very well can still be a side effect of the overwatering but I decide to go ahead and add Nutes earlier than I was planning just incase. I was going to wait until Saturday but I think intervention is necessary now especially after drowning them early on. I added 1/2 what I am planning on adding for week 1 start. I also think I am going to adjust my chart to add 1/2 2 days after plant from now on. I don't think it would hurt it to have some Nutes to pull from. .25ml/Gal Calmag = 12.5ml 1ml/gal GH FloraMicro= 50ml 1ml/gal GH FloraGro = 50ml 1ml/gal GH FloraBloom = 50ml T-2 days until Week 1 start = I will drain the system and start it over on Saturday with Week 1 Nutes. 2/17/2023 Day 16- Germination I didn't even want to post today after looking in on them this morning, 3 of the 4 are now showing signs of dronwing.. Brown spots on the leaves, the water levels were still too high.. I drained about another inch out of the tanks.. Will see how quick they recover.. I start week 1 tomorrow and will have to ensure my water levels are at least 1" away from the basket on this round.
Likes
13
Share
Likes
11
Share
@Sauce_XL
Follow
3.23.2024: Start of week 10, day 60 from sprout. Plant is moving along nicely. Heavy trichome production. No large buds but whats there is great. Dense too. Lots of purpling on the top leaves. She's probably going to finish sooner than her tent mate. 3.24.2024: Day 61. Fed 1/4 strength nutes. 96oz at 6.5ph. 3.25.2024: Day 62. ZZZzzzZZzzz 3.26.2024: Day 63. 96oz at 6.5ph. 3.27.2024: Day 64. ZZzzzZZz 3.28.2024: Day 65. just the tiger bloom and cal mag today at 1/4 strength. 96oz at 6.49ph. 3.29.2024: Day 66. ZzzzzZZzz. End of Week 9 from seed. Trichomes are starting to get milky...maybe 70/30.
Likes
6
Share
Legend Timestamp: 📅 EC - pH: ⚗️ Temp - Hum: 🌡️ Water: 🌊 Food: 🍗 pH Correction: 💧 Actions: 💼 Thoughts: 🧠 Events: 🚀 Media: 🎬 D: DAY, G: GERMINATION, V: VEGETATIVE, B: BLOOMING, R: RIPENING, D: DRYING, C: CURING ______________ 📅 D15/V11 - 30/04/24 ⚗️ EC: 0.7 pH: 6.0 🌡️ T: 21 °C H: 50% 🌊 🍗 💧 💼 🧠 🚀 🎬 1 TL video ______________ 📅 D16/V12 - 01/05/24 ⚗️ EC: 0.7 pH: 6.0 🌡️ T: 21 °C H: 50% 🌊 🍗 💧 💼 🧠 🚀 🎬 1 TL video ______________ 📅 D17/V13 - 02/05/24 ⚗️ EC: 0.6 pH: 5.8 🌡️ T: 20 °C H: 50% 🌊 🍗 💧 💼 🧠 🚀 🎬 1 TL video ______________ 📅 D18/V14 - 03/05/24 ⚗️ EC: 0.8 pH: 5.6 🌡️ T: 22 °C H: 60% 🌊 🍗 💧 💼 🧠 🚀 🎬 1 TL video ______________ 📅 D19/V15 - 04/05/24 ⚗️ EC: 0.8 pH: 5.5 🌡️ T: 22 °C H: 60% 🌊 🍗 💧 💼 🧠 🚀 🎬 1 TL video ______________ 📅 D20/V16 - 05/05/24 ⚗️ EC: 0.7 pH: 5.5 🌡️ T: 22 °C H: 60% 🌊 🍗 💧 💼 🧠 🚀 🎬 1 TL video ______________ 📅 D21/V17 - 06/05/24 ⚗️ EC: 0.7 pH: 5.3 🌡️ T: 22 °C H: 50% 🌊 🍗 Calmag, Grow A-B 💧5L 💼 🧠 🚀 🎬 1 TL video
Likes
89
Share
Ya la he cultivado varias veces y siempre ofrece tremendos resultados en todos los aspectos del cultivo. Más que contento nuevamente!!! Saludos!!
Likes
82
Share
Hey guys! 👏 Hope everyone is doing well! This week was interesting. I made a small flush because I wanted to know how much salt my plants had in the soil (considering I've fed my plants with a lot of nutrients the past few weeks) aaaaand the results were quite interesting! They obviously had tons of salts! Here are the results of the runoff water: Falco 5.94 pH 1139 ppm (2278 us/m) Max 5.85 pH 2352 ppm (4704 us/m) Roko 5.64 pH 2453 ppm (4906 us/m) Boomer 5.72 pH 1765 ppm (3530 us/m) Surprisingly enough the plants that had the "worst" runoff values were the plants who had the most foliage and their leaves were the greenest. The pH "loss" of all the plants was also within the expected margin so that's good! 👌 The buds look beautiful and I also noticed some of the plant leaves are starting to turn purple 😍 the smell is also getting stronger and it's quite citric, I love it! Anyway, that's all for now. Thanks for reading! 🙌
Likes
20
Share
@usere
Follow
Harvest time, the flowers seem ready. The seeds were given as gifts and this was my first scrog. Given the high summer temperatures I thought I wouldn't even finish, I'm satisfied in the end. a couple of weeks to dry everything and then the fun begins.
Likes
17
Share
@Fitzwell
Follow
The start was easy as it gets just add water the first 20 days and LST every day. When i saw some of the lower leaves start to change color that's when i started to add nuits. after that it was just following the instructions foxfarm already had laid out for me. I cut back by half in the start of my feeds but by the end of my grow I was at full strength. Testing your run off is key. Cropking send me great seeds and genetics is a great foundation and starting point. --------------------------------------------------------------------------------------------------------------------------------------------------------------------- I was very happy I got almost 5 ounces off one plant.