
Processing
Likes
Comments
Share


@Andres
Follow
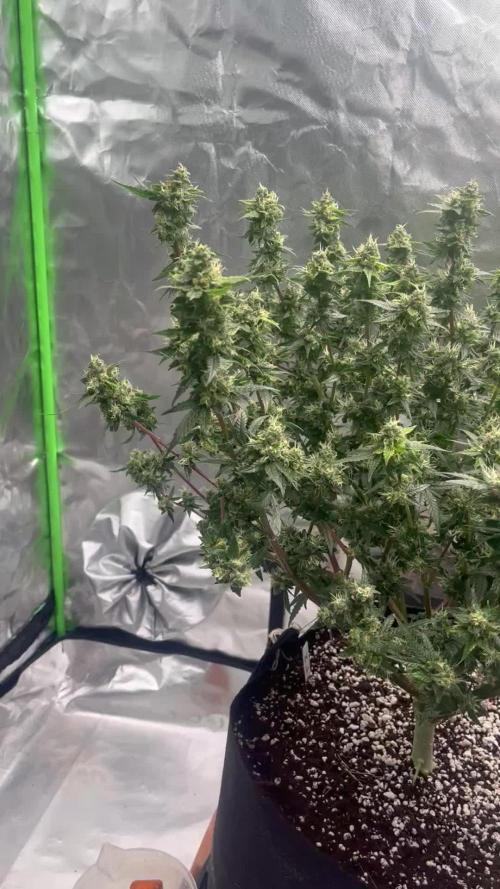
she grows healthy ... she is in her last weeks outdoor ... the days are cloudy most of the day ... with the substrate made by me .. she feeds every 10 days with red guano and earthworm humus


Likes
48
Share


@TheCannaProphet
Follow
~ WEDDING CHEESECAKE FAST FLOWER by FastBuds ~
Well fam, here we go again with another epic strain from FastBuds Fast Flowering stable. After having such tremendous success growing their Gorilla Cookies Fast Flower outdoors last year, I've decided to run another of their fast flowering strains outdoors this year... Wedding Cheesecake Fast Flower!
The best description of this awesome cultivar comes directly from my friends at FastBuds which is as follows:
"A delight for the mind and body: Wedding Cheesecake FF (Fast-Flowering) is a delicious strain that offers XXL yields in a 7-8 weeks flowering cycle. This terpene powerhouse produces loads and loads of mouth-watering vanilla-creamy-cookie-scented terps with hints of citrus and cinnamon. In addition to its delicious aromas, this variety grows very well in both indoor and outdoor setups, yielding up to 650 g/m2 without extra maintenance, making it the ideal strain for beginners as it allows you to maximize yields while minimizing work. This super-fast feminized photoperiod version offers upbeat and energetic yet deeply relaxing effects that are perfect for consumers looking for a heavily focused, motivating, and creative high. It’s the ideal strain for those needing that extra energy boost to start a busy day on the right foot.
Wedding Cheesecake FF boasts chunky, large-sized buds with a thick layer of silvery-white resin and bright orange hairs scattered all over: that just screams ‘quality’. The lime-green flowers sparkle with an array of hues ranging from dark to light green, to magenta and purple, and reek of a delicious aroma that’ll remind you of fresh store-bought cheesecake.
This is an XXL hybrid that grows extremely tall in height, reaching up to 3m with one huge main cola and multiple long side branches that can withstand enormous yields of up to 650 g/m2 with ease. Wedding Cheesecake FF is extremely resilient to the elements and can be grown in almost every climate as long as you’ve got the space and basics covered, making her an excellent choice for those looking for large-scale harvests with a quick turnaround time without much effort."
________________________________________________________________________________________________________________________________________________________________________________________________________________________________________________________________________________________________________________________
The Setup:
This is going to be an outdoor grow, but I have started the Wedding Cheesecake FF indoors as our weather is still too cold to put her outside (nighttime temp's dipping regularly into the 30's℉).
The plan is simple... let her grow inside under a 19/5 light schedule until the nighttime temperatures stay above the mid 40's℉, at which point she'll be moved outside and transplanted into the soil which I have already setup and inoculated with beneficial microbes, and then let the fun begin!🤪💚
________________________________________________________________________________________________________________________________________________________________________________________________________________________________________________________________________________________________________________________
Weekly Updates:
6/18- Week 12 and the Wedding Cheesecake Fast Flower from FastBuds is on a mission! The amount of growth happening right now can only be described as explosive, with new shoots appearing and existing branches going crazy with growth!
6/20- Our summer is here and we're under an early heat wave this week with daytime temp's hitting the mid to upper 90's ℉ with heat indexes in the low 100's ℉... in short, IT'S FNG HOT!🔥🔥🔥
I'm watering the Wedding Cheesecake FF daily now with 5-7g of straight well water from the garden hose. I'm watering at sundown so that the water will have some time to soak down into the soil before the heat evaporates it. The coating of straw that I previously spread over the soil has helped a lot as well.
6/22- The weather continues to relentlessly bake everything outside... many thanks for a good A/C!❄️
The daily watering continues and I also went ahead and removed a bunch of foliage that was below the trellis net.
6/24- Today I top dressed the FastBuds Wedding Cheesecake FF with 2 cups each of Gaia Green 4-4-4 and 2-8-4 along with 1 cup of Down To Earth Bio-Fish 7-7-2 and 1/2g of Wiggle Worm castings. After top dressing and working the amendments in by hand I replaced the straw coating over the soil and watered them in with 5g of straight well water via garden hose as usual.
There goes another week for the Wedding Cheesecake FF and it won't be long before she begins to show signs of pre-flowering!
Thank you for checking out my diary, your positive comments and support make it all worthwhile! 💚Growers Love!💚😎🙏
Likes
13
Share

@Greybeardbud
Follow
Gave them a corrective flush tonight to drop salts from 1200ppm to 700ppm then fed 5L to each of 620ppm. End result salts have been flushed out to push the final 2 weeks of stacking and finishing. Broke 3 more buds off moving them around for which I’m cranky about but the mrs gets a bit more of an early “test” first bud I broke off went from 10.3g to 2.6g smokes smooth with almost no cough and hits fairly well. Trichomes are roughly 80% milky on the taller one with some ambers appearing on the shorter one.
Likes
2
Share


@Strangelet
Follow
Day 43. Plant isn't growing much, cut all nutrients for the week, just water, seems better right now but hope she gets taller.

Likes
12
Share


@Kayanesta
Follow
Smells amazing, buds are greesy to the touch…serious genetics from fast buds!
Likes
38
Share


@GardenSchool
Follow
March 9, 2021 (Day 64, Flower 15): Pots were already light today. A day earlier than usual. Watered with 4l per plant with 3ml/l pH Perfect Bloom + 1ml/l pH Perfect Grow + 2ml/l Sweet Raw + 2ml/l Big Bud + 1ml/l Cal-Mag Plus at 6.2 pH. Runoff at 6.4 pH - barely got any this time. May have to look into more water per application. Plants are looking fantastic. Buds are starting to form all over each plant now. Smell is getting stronger. Moved humidifier outside tent because the plants are creating enough of their own humidity I've had to turn on the carbon filter and inline fan. This knocked the average humidity down just a bit which is just fine with me at this point considering my lower temperatures. The stretch already seems to be slowing down a bit. Averaging 45% rH and 70℉.
March 10, 2021 (Day 65, Flower 16): Unknown 1 is starting to slow down the stretch a bit, but the other plants keep gaining height. They're becoming a bit more even now at least. Everything is looking great. Averaging 45% rH and 70℉.
March 11, 2021 (Day 66, Flower 17): Stretch has definitely slowed now. Pistils are shooting everywhere and buds are forming strong. A few more days and I'll take some fan leaves. Smell is getting really strong and filled my entire house - had to turn up the carbon filter a bit to control the scent. Really liking what I'm seeing so far. Averaging 45% rH and 70℉.
March 12, 2021 (Day 67, Flower 18): Pots were light today. Watered with 4l per plant with 3ml/l pH Perfect Bloom + 1ml/l pH Perfect Grow + 2ml/l Sweet Raw + 2ml/l Big Bud + 1ml/l Cal-Mag Plus at 5.8 pH. Plants were really starting to bush out and some of the fan leaf stems were pushing 6"+, so I decided to pull the trigger on my first round of defoliation today. I was going to wait until day 21, but too many bud sites were being covered. The plants look fantastic. Buds are starting to smell amazing. Averaging 45% rH and 70℉.
March 13, 2021 (Day 68, Flower 19): Plants are looking great. Tilled top half-inch of soil. Definitely seeing some trichome growth, especially on Unknown 2. Had to turn up my carbon filter as the smell is starting to get out of control. The smell's a mix of gym socks, gasoline, and cream with a hint of sweetness. The smell punches you in the face when you open the tent. I hadn't measured the plants in a few days; Unknown 1 is all the way up to 27" tall. The other plants are lagging behind a bit but the light and air penetration looks great. Averaging 45% rH and 70℉.
March 14, 2021 (Day 69, Flower 20): This hobby is great. So much fun opening my tent each day to check on the plants. They're getting more and more smelly. Buds are chunking up a bit and trichomes are starting to form. Everything is looking great. Tilled the top soil again. Tucked a few auxiliary fan leaves away from developing bud sites on Gelato 1 and Unknown 2. Averaging 45% rH and 70℉.
March 15, 2021 (Day 70, Flower 21): Pots were light today. Watered with 4l per plant with 4ml/l pH Perfect Bloom + 1ml/l pH Perfect Grow + 2ml/l Sweet Raw + 2ml/l Big Bud + 1ml/l Cal-Mag Plus at 6.5 pH. The buds are starting to frost up and pistils are shooting out everywhere. Turning down humidity another 5-10% the next few weeks. Averaging 45% rH and 70℉. Really excited to see what the next several weeks have in store!

Likes
21
Share


@Hempy_The_Kid
Follow
11/10/22 another week down. Suprised she's still going. Still battling WPM. She'll probably be done this week.

Likes
7
Share


@Tio_Shuni
Follow
Un hobby que demanda mucho tiempo, hago lo que puedo con los horarios, espero disfruten este crecimiento de las hermosas presentes.
Primera semana de Floración, espero las raíces dejen de crecer, no tengo contemplado hacer un cambio de macetas 😬
Riego cada 2 días, para ser invierno toman mucha agua 2L. por maceta 6.3 ph.


Likes
19
Share


@GoldenWeedGrower
Follow
Legend
Timestamp: 📅
EC - pH: ⚗️
Temp - Hum: 🌡️
Water: 🌊
Food: 🍗
pH Correction: 💧
Actions: 💼
Thoughts: 🧠
Events: 🚀
Media: 🎬
D: DAY, G: GERMINATION, V: VEGETATIVE, B: BLOOMING, R: RIPENING, D: DRYING, C: CURING
________________________________
📅 D77/B15 - 31/01/24
⚗️ EC: 1.2 pH: 6
🌡️ T: 19-22 °C H: 40-60% (Min-Max values taken from the app.)
🌊 2L
🍗 CalMag - Bloom A-B - Bud Candy - Big Bud - B52
💧
💼 Thanks to the TM+ Pro app and the use of the Humidifier now the T-H of the enviroment is correct and i got quite good VPD (Vapor Pressure Deficit) rate
🧠
🚀
🎬 Added Timelapse video
________________________________
📅 D78/B16 - 01/02/24
⚗️ EC: 1 pH: 5.9
🌡️ T: 19-25 °C H: 45-70 %
🌊 2L
🍗
💧
💼
🧠 Quite time to change res
🚀
🎬 Added Timelapse video, 3 pics and "TM+ Pro" App screenshots of T-H values daily graph, and quite perfect VPD daily rate
________________________________
📅 D79/B17 - 02/02/24
⚗️ EC: 1 pH: 6.2
🌡️ T: 19-25 °C H: 40-60%
🌊
🍗
💧 Added few drops of pH-
💼
🧠 The res was for many time on the upper side of pH range, so now I would like it to goes down to a more acidic solution. I'll do it on the next res change, maybe tomorrow
🚀
🎬 Added Timelapse video but today it was trunked because of a problem on the camera, but I posted it anyway
________________________________
📅 D80/B18 - 03/02/24
⚗️ EC: 0.15 pH: 6.6
🌡️ T: 19-25 °C H: 40-60%
🌊 RES Changed 💦💦💦. Flushing until tomorrow
🍗
💧
💼
🧠
🚀
🎬 Added Timelapse video and VPD, T-H graphs screenshots
________________________________
📅 D81/B19 - 04/02/24
⚗️ EC: 1 pH: 5.7
🌡️ T: 19-25 °C H: 45-65 %
🌊 15L
🍗 CalMag - Grow A-B - Bud candy - B52 - Big Bud
💧
💼 Some defolation and sistemation of buds
🧠
🚀
🎬 Added Timelapse video and VPD, T-H graphs screenshots
________________________________
📅 D82/B20 - 05/02/24
⚗️ EC: 1 pH: 5.4
🌡️ T: 20-25 °C H: 52-84 %
🌊
🍗
💧
💼 Little defolation and raised up the lamp
🧠
🚀 I forgot the humidifier on manual mode, so H increased until 80%and VPD went out of control
🎬 Added 4 pics, one is from timelapse set. Added Timelapse video and screenshots
________________________________
📅 D83/B21 - 06/02/24
⚗️ EC: 1 pH: 5.0
🌡️ T: 19-25 °C H: 45-70%
🌊
🍗
💧
💼
🧠 pH decreased a lot and it's a good thing it stay on the acidic side for a while
🚀
🎬 Added Tmelapse video and screenshots of VPD and T-H


Likes
15
Share

@ChrisNbran
Follow
These two chicks have blown up the buds are starting to get frosty and on one the dark purple is starting to show I’ve up”d my watering and feeding to every day and a half or two days I feed every watering and they love it no burns or deficiencies so far until next time happy growing
Likes
3
Share


@CordersGreen
Follow
Día 23/5:
Estamos por su 2º semana de floración💪
pues nuestro jardín va cogiendo forma, después de su poda magistral tenemos un manto verde incleible!😱 a la espera de unas flores abundantes😍
Vemos que van creciendo sin ningún tipo de problema y están sanísimas con un color y aspectos saludables, hemos aumentado el porcentaje de nuestro foco lumatek al máximo a su 100%.
abonamos como siempre con nuestra tabla de advanceds nutrients y con agua opmotizada 30L.
🙌 ¡¡ YA NOS FALTA MENOS !! 🙌
Día 26/5:
Abonamos de nuevo con su 2º semana de Floración!!
Agua opmotizada 25L y nuestro abonos de advanced nutrients.
Processing
Likes
21
Share


@LittleBigTrees
Follow
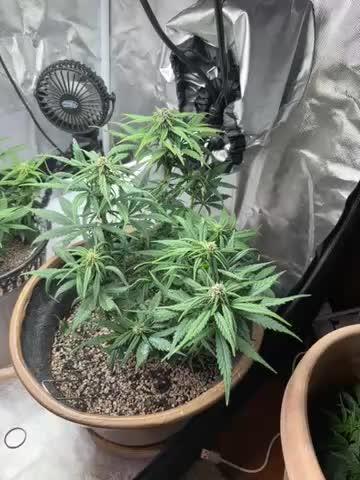
The plants were so crowded I decided to put them into a Larger tent to allow some light to the lower bud sites and to help lower the humidity amongst the plants. I'm sure they will love the extra space.
The light has now been raised 20cm (20cm taller tent)
Allowing me to turn out right up which is 45000 lux in the centre right below it.
I will up the bloom to 2ml/l this coming week.
Likes
6
Share

@D33jW
Follow
📅 Week 9 – Day 63 / FLO 35
BOX: 80x80 – 250W lamp
🌞 Temp: 26°C
💦 RH: 55%
💥 PPFD: 800+ µmol
🌬️ VPD: 1.5 1.6
⚡ EC: 1.4
The battle continues – never again big plants in small pots 😅
It’s really hard to keep them in perfect condition, there’s almost no room for mistakes.
I’m keeping VPD high to push metabolism and speed up bud development.
Watering is split into two cycles per day, EC around 1.4–1.5.
Fans are set just right – enough to make the leaves slightly move, but not enough to stress the pistils.
Stay tuned – and keep growing 🌱
Likes
15
Share


@GanjaFarmerGrow
Follow
Finishing up...
she is amazing...
HUGE buds...
amazing haze fruity smell...
She is in flushing so only water for the last days...
hope she goes good till the end ...
fingers crossed..
🙏

Likes
6
Share

@Chubbs
Follow
These girls are growing amazing. I did some defoliation and lollipopped them this week. Hopefully with more air flow at the canopy level and lollipopping, the tops and main colas can focus all the energy on growing some beautiful flowers. All in all Happy Growing.
Processing
Likes
5
Share


@Drtomb
Follow
I'm 4 days into flower.
Topped all the plants nice and even. Then removed all bud sites below the top 4 on each branch. Leaving fan leaves intact. I allowed them to recover for 2 days. Then flipped the lights.
Saskatoon Berry is stacking nodes very closely. I'm thinking these will be nice big colas.