
Likes
Comments
Share


@DrewbieDoobieNoobie
Follow
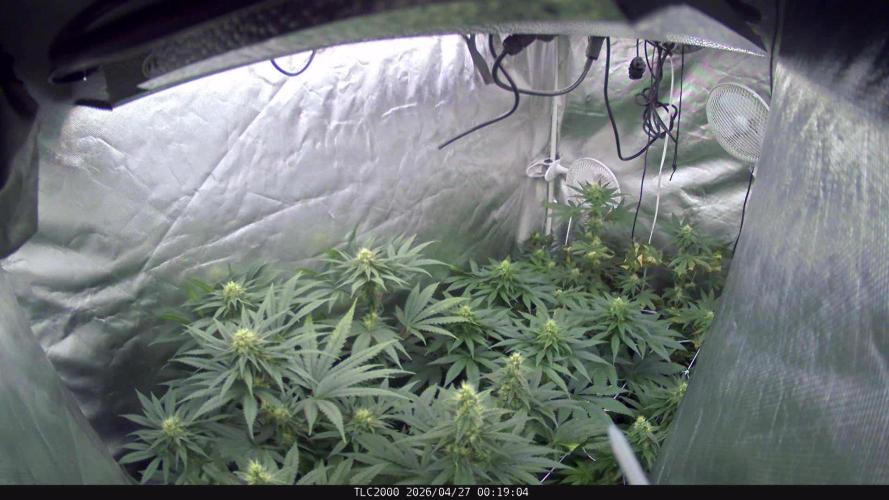
These were all pretty Uniform in height and weight even with #3 being replanted 2 weeks in, lots of Haze smell diesel and pungent on the front end and some sweet at the tail, I should of let these go a few more weeks I think it would be better. I have read and have heard that the flowering time the breeders recommend is based on a 1000w set up. and light plays an important roll in yield as far as flowering goes Its all about time. and maybe next time I will grow these to a more perfect pant. but this round as a grower I give myself a 6 out of 10 got some buds to some and turned the trim and larf to hash, not a huge return and the Trichomes were mainly in the 25 micron range with a minimal amount in the 76 micron bag. so My thinking is that these were all small and under developed trichomes, this leans into my theory that they could have gone another 3 or for weeks, Failure has been my greatest teacher and I really enjoy this hobby. Next grow will be an Organic Dry Amendment Auto Flower with new lights no more Blurple import lights. I got my 1st vaccine shot. hope you all are staying safe and lifted.
BDH#1 13 oz wet
42gm buds
30gm larffy trim
BDH#2 13 oz wet
26gm buds
42gm larffy trim
BDH#3 13oz wet
20gm buds
42gm larffy trim
TOTAL 39oz wet
TOTAL 94 gm buds 97gm larffy buds


Likes
7
Share


@Big_Rade_SCLA
Follow
No changes on my end. Watering about 2 gallons every other day for each plant...about 1 gallon a day for each. Most of it gets sucked up by the substrate and some grass+clover that's also starting to grow. It's early in the year an neither P1 or P2 have sexed. I also have a side project that I show on the videos, but am not keeping a diary for that one. Will be adding worm castings and some more soil topper next week. Possibly will add some kelp meal if I remember. Weather has been cooperating nicely. At one point in the past two weeks it was raining every other day. It's cleared up in the last few days.
Processing
Likes
12
Share


@Dancegirl
Follow
Mixed week it's growing a bit and I am giving it food now . I was told call mag is a must so I've grabbed some of that . Yesterday I took it out to water and it fell over, it got bent and I could see roots pulled up ,I pushed back the soil and straighten the trunk been reading up on it hopefully it'll be ok I kinda think it looks uneven now ? Fingers crossed . .

Likes
44
Share


@XperencdGmanXG
Follow
fully recovered and growing well. Starting to get her pine smell. Going to do some LST next week and get this girls canopy ready for a flop to flower. I also want to keep this pheno to do some breeding at a later date.
Likes
5
Share


@GODAXE
Follow
01.08.2024 D63
everything grow well, we got a mixed temp, mostly sunny with some rain.
BlackBerry steal the show, the bud stack and take mass, with a nice black purpish tone, it started to smell sweet and fruity.
FastBerry building three massive top cola, some slowly start to show nice color, it smell more fresh and sour Berry..

Likes
5
Share


@DariaFarms
Follow
06/09: increased light from 50 to 55%
07/09: Gave her a litre of water with biogrow, rootjuice & bio-heaven
08/09: Measured her at 41cm tall today!
09/09: increased light from 60% tot 65%
10/09: Watered 1L with no added nutrients & increased her light to 75%. She has little pistol hairs so I assume its preflowering!!? I am so excited, its beautiful.
12/09: watered with 1L with rootjuice, bioheaven, biogrow, activera and calmag

Likes
4
Share


@GanjaFarmer101
Follow
Harvested the Papayas - Smooth harvest, very sticky bud.
Really happy with plant 1 :)
Long trim sessions this week - hoping for some better yields from the Sweet Seeds F1 strains.

Likes
11
Share


@BudBeezy
Follow
Welcome to week 9 of my grow diary. The weather has been very changeable this week. But it doesn't seem to have had a negative effect on the plant. Due to the rain showers I didn't have to water often. I defoliated again this week. From now on I think I'll let it grow as nature intended. I have tied the longest shoots further down. The growth height hasn't changed as a result.
See you next week ✌️
Likes
9
Share


@Krissci
Follow
Day 1 reported to 3gal pots....same soil so it's repotting not transplanting
Day 3-4 topped once - 2*nodes
Day 6 topped twice - 4*nodes
Likes
5
Share


@Bluemels
Follow
Tag 40: Ich gebe zusätzlich Alg a mic in das Gießwasser zur Stressbehandlung.
Tag 46: Ich habe mich entschlossen diesen Grow abzubrechen. Seit kurzem werden die Blätter hell und fühlen sich trocken an. Ich vermute es liegt daran das ich einmal ein großen Schluck zu hartes Wasser genommen habe. Ich hatte einmal zuwenig Gießwasser vorbereitet (PH wert eingestellt 6,3) und es lief unten nicht raus so nahm unvorbereitetes (PH wert 7 etwa) Wasser zum Schluss, zunächst wuchs die Pflanze normal weiter, doch nach 1-2 Wochen stagniert das Wachstum die Blätter sind hell und trocken, auch die neuen Triebe sehen nicht gut aus.

Likes
13
Share


@NanoLeaf
Follow
Follow my grow to see full grow cycle. Happy with what I learned during this run. Only going to get better and better!


Likes
8
Share
@DrewbieDoobieNoobie
Follow
Huston, we have a problem! week 7 of flower and it looks like I have a Nutrient lock out. Potassium (K) is not getting the uptake it should. too much CAL MAG I believe is locking out the (K) looking at the symptoms and keeping track of the nutrients watering and environment, I ruled out Sephora. I will be excluding the CAL MAG in this week 8's feeding and check my double check my PH as well i am seeing a little burn on some of the leaf's but not bad. the runt of the litter is taking it the hardest. the bucket is still heavy so waiting on dry back on that one as it is smaller and had a late start. 3 different phenotypes in the tent one for the NSB it is its own and 2 from the BBFC the one in the rear with golf ball size nugs is the one i have grown before for the seeds the other I have not seen. It is stacking nicely and the BBFC smell like berries sweet and fruity the NSB has a gassy skunky smell.
that's all for now let's see if my Prognosis was correct on the (K) lock out.


Likes
8
Share


@Mtmtc
Follow
It harvest time for this lady, my second Jack Herer from Fastbuds. Grown under just 100w from seed to week 10, & On Her final week I’ve managed to put her in my other tent under a 300w led & instead of 48hrs of darkness I left her in 48hrs of light before I harvested. Seed to harvest in 81 days.
Likes
8
Share


@valiotoro
Follow
A wonderful genetic thank you Fast Buds ❤️🔥🤩
The trim was super easy the buds are FAT & FROSTY full of resin 🤤
I’m very happy with the harvest 96g !!
For the light i’ve used the Spider Farmer SE-7000💡
Likes
18
Share


@Jays_Not_Here_Man
Follow
More to come once I think this over, and finish up the dry and cure 🌱💨
Likes
14
Share

@Chucky324
Follow
Hello. This is the end of week 13 and the beginning of week 14 of veg.
Did some light SCRoG training last week, but mostly worked on my second vegie garden
I've run in to a snag putting up my top net... I forgot about the middle pole in the 10x10 foot tent.
So I guess I've got to cut the net, and tie back up, the cut part. I'll work on that for next week.
Plant's # 5 and #6 are less yellow now. I gave them some food with a lower ph -5.5 -to see if that would help with the yellowing.
They aren't so quite so yellow today, so I think it helped.
I'll do a stronger SCRoG training this week. Getting ready for flowering in a few weeks.
OK. Be Great.
Chuck.
Likes
4
Share


@The_Projexx
Follow
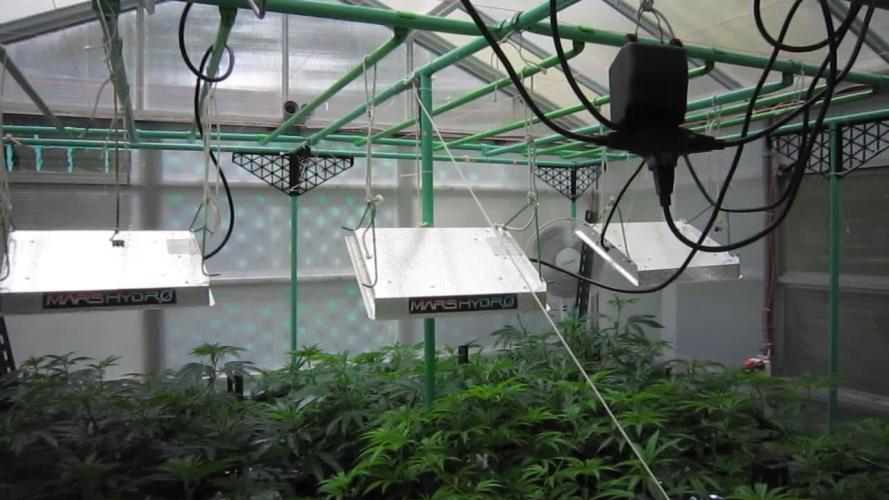
Welcome to week 4 of flower!!! I expect the ladies to slow right down in the stretch and start to focus on fattening up those flower sites. The plants have been going hard since day 1 of flower and I expect they will continue to go hard until the very end!
Huge shout outs to @MarsHydroLED and Hidden Vault Genetics for their outstanding work on gear and genetics that make growing a blast!
HUGE shout outs go to all my followers and people who stop into the diary alike! Keep on giving out those positive vibes!
Follow along and stay tuned wont be long now till we got monster flowers!
-The Projexx
Day#22F Ladies continue to stretch along , MacMelonz still has some stretch time on her.
Day#23F Pictures N/A. Some of the plants are beginning to focus on thickening up their flower sites!
Day#24F Ladies are still stretching it out , some are almost 4 feet tall now!
Day#25F Banana Smoothie is throwing off the wildest Banana Cream terpenes, the other plants are starting to throw smell too but not as hard as Banana Smoothie.
Day#26F Lots of the flower tops are starting to put on mass now.
Day#27F Pictures N/A. Creamy Cereal is deff pumping milk and fruit terpenes now.
Day#28F Ladies are just cruising along and mostly starting to focus on flowers now. MacMelonz will still stretch for a week or so.
Recap: Things went really well this week , the ladies are absolutely exploding and starting to put on mass. With 6-7 weeks left it will be quite exciting to see the end results and the terpene profiles of each plant! Overall really happy and cant wait to see what next week brings!
Likes
77
Share


@cheetah844
Follow
I'm so excited I have a purple phenotype!
I've wanted one for the past year 💜
The flowers are coming along - putting that carbon filter to use 😁
*I hope I'm not infringing on any rules about the music video.
I'm very excited about a purple phenotype - I put some music on while updating my GD & this song started playing on YouTube autoplay. 🤣 I had to edit it & add it.*

Processing
Likes
11
Share


@Andres
Follow
just wait ... its growth. it's ok ... it's in a small greenhouse in a bottle ... now see how it behaves in the last remaining summer ... in the open air ... it has good color ... and I see her happy...